I Transformed My Kitchen with TrafficMaster Vinyl Floor Tiles!
I still remember the day I decided to redo my kitchen floor. It was old, scratched, and dull, but I found TrafficMaster vinyl floor tiles at Home Depot, and they changed everything! These tiles are affordable, easy to install, and look amazing. In this guide, I’ll share what these tiles are, how to use them, and my best tips to make your flooring project a success. Whether you’re new to DIY or a pro, you’ll find simple steps and ideas to create a beautiful floor.
What Are TrafficMaster Vinyl Floor Tiles?
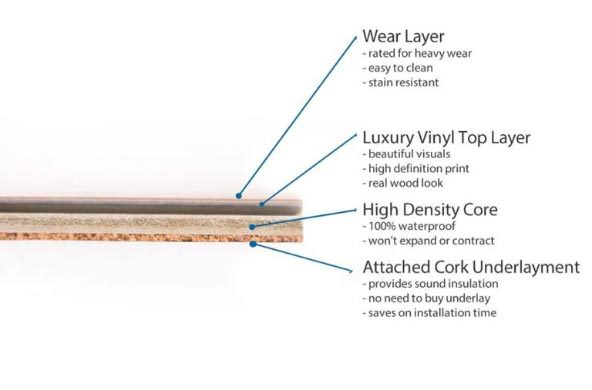
TrafficMaster vinyl floor tiles are thin, durable squares made of vinyl, a tough plastic. They mimic the look of stone, wood, or ceramic but cost less and are easier to install. I love them because they’re waterproof, perfect for kitchens or bathrooms. You can find them at stores like Home Depot or Wayfair, and they come in styles like peel-and-stick or click-lock.
Why Choose TrafficMaster Vinyl Floor Tiles?
These tiles are popular because they’re budget-friendly and tough. They handle spills, pets, and heavy foot traffic. My kitchen floor still looks great after two years! They’re also DIY-friendly, so you don’t need fancy tools. But, they may not last as long as real tile, and some types need extra glue for uneven floors.
Types of TrafficMaster Vinyl Floor Tiles
TrafficMaster offers several types to fit your needs:
- Peel-and-Stick Tiles: These have sticky backs for easy installation. Great for small projects like a bathroom.
- Click-Lock Tiles: These snap together like puzzle pieces. I used them in my kitchen for a seamless look.
- Groutable Tiles: These let you add grout for a real tile effect. Perfect for a fancy vibe on a budget.
Table 1: Comparing TrafficMaster Vinyl Tile Types
| Tile Type | Best For | Installation | Cost per Sq. Ft. |
|---|---|---|---|
| Peel-and-Stick | Small rooms, rentals | Easy, no tools | $0.99–$1.50 |
| Click-Lock | Large rooms, durability | Moderate, snaps together | $1.50–$3.00 |
| Groutable | Fancy look, bathrooms | Moderate, needs grout | $1.50–$2.50 |
| Caption: This table compares tile types to help you choose the best for your project. |
Benefits of TrafficMaster Vinyl Floor Tiles
Here’s why I love these tiles:
- Waterproof: Great for kitchens or basements. My spills wipe up easily!
- Affordable: Costs less than ceramic or hardwood. I saved hundreds on my kitchen.
- Easy to Install: No pro needed. I did my floor in a weekend.
- Durable: Resists scratches and stains. My dog’s claws haven’t damaged it.
But, there are drawbacks. The adhesive on peel-and-stick tiles can fail on uneven floors, and some tiles may fade over time in direct sunlight.
Step-by-Step Guide to Installing TrafficMaster Vinyl Floor Tiles
Ready to try it? Here’s how I installed peel-and-stick tiles in my kitchen. You’ll need a clean floor, a utility knife, a ruler, and a roller (optional).
- Clean the Floor: Sweep and mop your floor. Dirt can mess up the adhesive.
- Plan Your Layout: Lay tiles without sticking to see the pattern. Start from the center.
- Cut Tiles: Use a utility knife to score and snap tiles for edges or corners.
- Peel and Stick: Remove the backing and press tiles down firmly.
- Roll It: Use a roller or press hard to secure tiles.
Visual Idea: A diagram showing how to measure and cut tiles for a corner would help beginners visualize this step.
Tools and Materials You’ll Need
You don’t need much to start:
- Utility Knife: For cutting tiles. A $5 one works fine.
- Ruler or Measuring Tape: To measure spaces. I used a $3 ruler.
- Cleaner: To prep the floor. Simple dish soap works.
- Roller (Optional): To press tiles down. Borrow one if you can.
Table 2: Tools and Costs for Installation
| Tool | Purpose | Cost |
|---|---|---|
| Utility Knife | Cutting tiles | $5–$10 |
| Ruler | Measuring spaces | $3–$5 |
| Cleaner | Prepping floor | $2–$5 |
| Roller (Optional) | Securing tiles | $10–$20 (or rent) |
| Caption: This table lists tools and costs for a budget-friendly project. |
Common Mistakes to Avoid
I made a few errors when I started. Here’s what to watch out for:
- Skipping Floor Prep: Dirt or bumps can ruin adhesion. Clean thoroughly!
- Wrong Layout: Plan your tile pattern first to avoid weird cuts.
- Not Pressing Hard: Press tiles firmly or use a roller to avoid lifting.
Visual Idea: A simple sketch of a room layout with tile placement tips would make planning easier.
My Top Tips for Success
From my projects, here are my best tips:
- Test a Small Area: Try a few tiles in a corner to practice.
- Buy Extra Tiles: Get 10% more for mistakes or future repairs.
- Check Subfloor: Make sure it’s flat. I used a leveling compound once, and it saved my project.
Alternatives to TrafficMaster Vinyl Floor Tiles
Not sure if TrafficMaster is right for you? Here are other options:
- Ceramic Tiles: More durable but harder to install and pricier.
- Laminate Flooring: Looks like wood but isn’t waterproof.
- Luxury Vinyl Planks: Thicker and more durable but cost more.
Table 3: TrafficMaster vs. Alternatives
| Flooring Type | Pros | Cons | Cost per Sq. Ft. |
|---|---|---|---|
| TrafficMaster Vinyl | Affordable, easy install | May fade in sunlight | $0.99–$3.00 |
| Ceramic Tiles | Very durable, stylish | Hard to install | $3.00–$10.00 |
| Laminate Flooring | Wood look, affordable | Not waterproof | $1.50–$4.00 |
| Caption: This table compares flooring options to help you decide. |
Where to Buy TrafficMaster Vinyl Floor Tiles
You can find these tiles at:
- Home Depot: Wide selection, often on sale. I got mine for $0.99/sq. ft.
- Wayfair: Good for unique styles and free shipping.
- Amazon: Convenient but check reviews for quality.
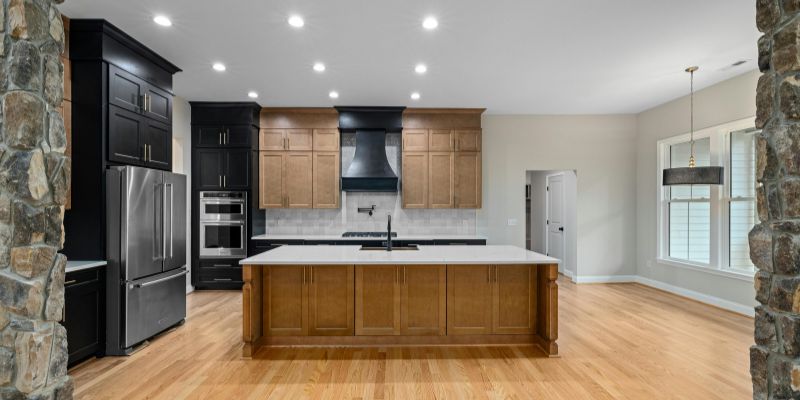
Visual Idea: A photo of a tiled kitchen with a caption explaining style choices would inspire readers.

My Experience with TrafficMaster Tiles
When I redid my basement, I chose TrafficMaster groutable tiles for a stone look. The grout made it look real, and my friends were shocked it was vinyl! Installation took two days, and I spent $200 for 100 sq. ft. The tiles are still perfect, even with my kids running around. Check trusted sites like Home Depot or Shaw Industries for more details.
Conclusion
TrafficMaster vinyl floor tiles are a game-changer for easy, affordable flooring. They’re waterproof, durable, and simple to install, making them perfect for any home. I transformed my kitchen and basement with them, and you can too! Try a small project, like a bathroom floor, and see how easy it is. Share your project ideas in the comments or ask me for tips. Let’s make your floors shine!
Frequently Asked Questions
Are TrafficMaster Vinyl Floor Tiles Really Waterproof?
Yes, most TrafficMaster tiles are 100% waterproof, perfect for kitchens or bathrooms. I spilled juice in my kitchen, and it wiped up without damage. Just clean spills quickly to protect seams, as water can seep through over time.
How Do I Clean TrafficMaster Vinyl Tiles?
Use a damp mop with mild soap. I use dish soap and water weekly, and my floor looks new. Avoid harsh chemicals like bleach, which can damage the finish. A quick sweep keeps dirt away.
Can I Install TrafficMaster Tiles Over Old Floors?
Yes, you can install over tile, wood, or concrete if it’s flat and clean. I put mine over linoleum, but I had to clean it well. Uneven floors need leveling first to avoid peeling.
How Long Do TrafficMaster Tiles Last?
They last 20–25 years with proper care. My kitchen tiles still look great after two years. The wear layer protects against scratches, but heavy furniture can dent them if you’re not careful.
Do I Need Glue for Peel-and-Stick Tiles?
Usually, no, as they have adhesive backs. But for uneven floors, extra glue helps. I used Roberts adhesive once, and it made my tiles stick better. Check Home Depot for glue options.
Can I Use TrafficMaster Tiles in a Basement?
Yes, they’re great for basements because they’re waterproof. I used groutable tiles in my basement, and they’ve held up perfectly. Just ensure the subfloor is dry and flat.
Are TrafficMaster Tiles Safe for Kids and Pets?
Absolutely! They’re scratch-resistant and easy to clean. My dog runs on them daily, and there’s no damage. They’re also low-VOC, so they’re safe for indoor air.