Best Wood Burning Kit For Adults (Beginner Guide)
Getting started with wood burning can feel tricky, especially when you’re looking for the Best Wood Burning Kit for Adults (Beginner Guide). There are so many options, it’s easy to get lost! But don’t worry, finding the right tools doesn’t have to be hard.
We’ll break it down step-by-step to make sure you have a smooth start. Let’s explore what makes a good beginner kit and how to pick yours.
Choosing Your First Wood Burning Kit
Picking the right tools is the first big step for anyone wanting to try wood burning art. It’s like choosing the right paintbrush for painting; the tools really matter for how your art turns out. For beginners, the goal is to find a kit that is easy to use, safe, and gives you good results without being too expensive.
A good kit should have the basic tools you need to start making beautiful designs on wood.
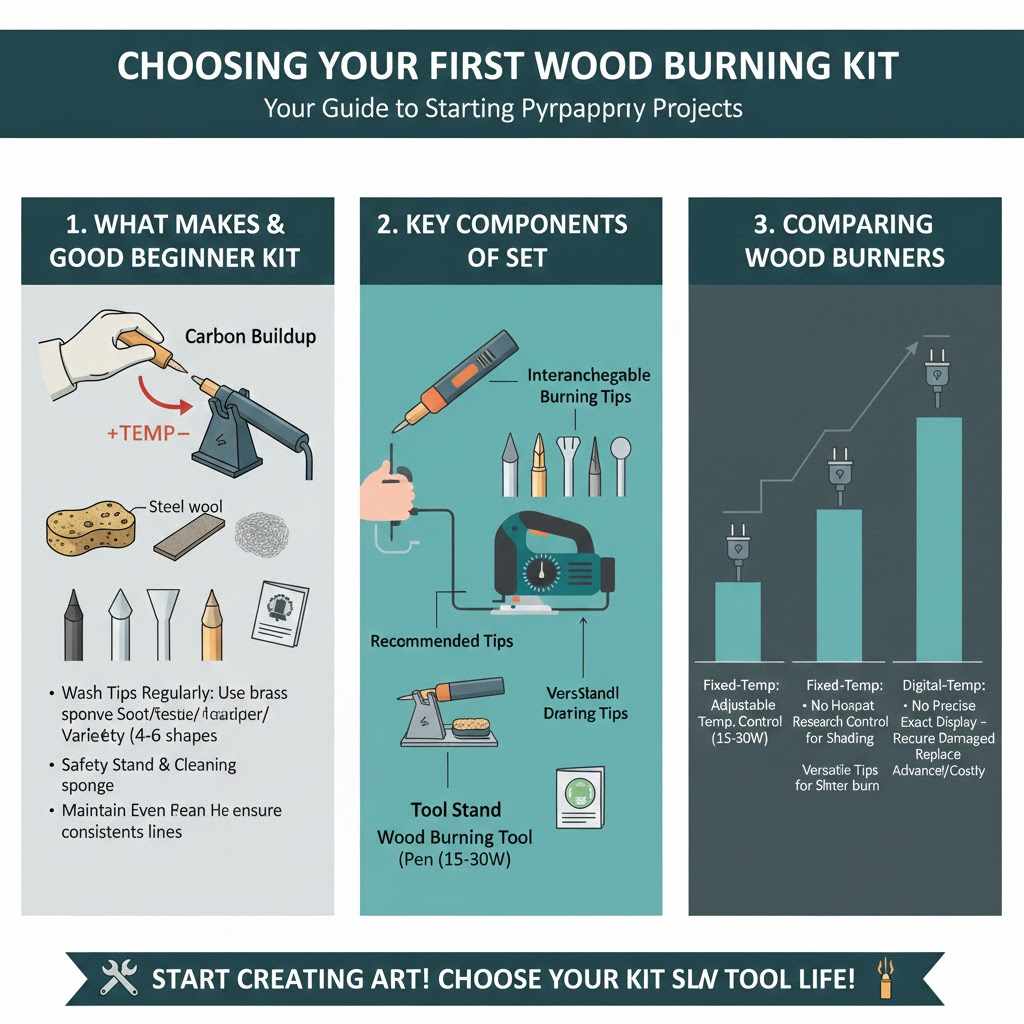
What Makes a Good Beginner Wood Burning Kit
A beginner-friendly wood burning kit should be simple to operate and include a few essential pieces of equipment. The most important item is the wood burning tool itself, often called a wood burner or pyrography pen. This tool heats up and has different tips that you use to create lines, shades, and textures on the wood.
For beginners, look for a tool that has adjustable temperature control. This feature is very helpful because it allows you to control how hot the tip gets, which affects the kind of marks you can make. If the tool gets too hot, you might burn the wood too quickly or deeply.
If it’s not hot enough, it will be hard to make clear marks. Having the ability to change the temperature means you can learn how different heat levels work on various types of wood. This flexibility is key to practicing and improving your skills.
Besides the burning tool, a good beginner kit will include a variety of tips. These tips come in many shapes and sizes, each good for different effects. For instance, some tips are small and pointed, perfect for drawing fine lines or details.
Others are broader, like a small flat head, which is great for shading larger areas or creating smooth gradients. A kit with at least 4-6 different tips will give you a good range to experiment with. You’ll be able to see how each tip creates a unique mark and learn which ones work best for the designs you have in mind.
Having a selection lets you play around and discover your favorite tools for different tasks.
Safety is also a big deal for wood burning. Your kit should come with a stand for the hot tool to rest on when you’re not using it. This stand is usually made of metal and helps keep the hot tip from touching your work surface, preventing burns or fires.
Some stands even have a sponge that you can wet to clean the burning tips. Cleaning the tips is important because wood can leave residue on them, which can affect how they burn. Also, make sure the tool has a comfortable, heat-resistant handle so you can hold it for a while without getting burned.
Good instructions are also a plus for any beginner kit. They can guide you through setting up, using the tool safely, and even offer some basic techniques.
Key Components of a Wood Burning Set
When you’re looking for the Best Wood Burning Kit for Adults (Beginner Guide), certain parts are really important. Let’s break down what you’ll typically find and why each piece matters.
- The Wood Burning Tool (Pen)
This is the heart of the kit. It’s usually a lightweight pen with a heating element inside. For beginners, look for one that heats up quickly and has a comfortable grip.
Adjustable temperature is a big plus, allowing you to control the intensity of the burn. Different tools have different wattage; higher wattage means it heats up faster and can maintain temperature better, but for beginners, 15-30 watts is usually plenty to start with.
- Interchangeable Burning Tips
These are the metal attachments that connect to the end of the burning tool. They come in all sorts of shapes: fine points for detail work, flat tips for shading, ball tips for dots, and even specialized tips for branding or calligraphy. A starter kit usually includes a few basic tips to get you going.
Having a variety lets you experiment with different textures and effects, from thin lines to smooth, shaded areas.
- Tool Stand
Safety first! A stand is crucial for resting the hot burning tool when you need to take a break or switch tips. It keeps the hot tip away from your work surface, preventing accidents and damage.
Most stands are made of metal and some have a damp sponge for cleaning the tips as you work.
- User Manual and Tips
A good kit will include instructions on how to use the tool safely and effectively. Some may also offer basic tips and techniques for beginners. Reading these guides can save you a lot of frustration and help you learn faster.
Comparing Different Types of Wood Burners
Wood burning tools can be quite different, and understanding these differences helps you pick the best one. The most common type for beginners is the fixed-temperature pen. These pens heat up to a set temperature and stay there.
They are usually the cheapest option and are great for learning the very basics. However, they offer no control over heat. If you press harder or longer, you’ll burn the wood more, but you can’t change the tool’s heat itself.
Then there are variable-temperature wood burners. These are a bit more advanced but highly recommended for anyone serious about improving. They have a dial or buttons that let you adjust the heat from low to high.
This control is incredibly useful. For example, you might need a lower temperature for soft woods like pine to avoid burning through them too fast. For harder woods, you might need a higher temperature.
Variable temperature also helps with shading. You can use lower heat for soft, light shading and increase it for darker, more intense shading. This feature makes a big difference in the variety of effects you can create.
A more advanced type is the digital wood burner. These also offer variable temperature control, but they display the exact temperature on a small screen. This precision is excellent for artists who want to replicate specific results consistently.
You can record the exact temperature you used for a certain effect and use it again later. While these are fantastic, they are usually more expensive and might be overkill for someone just starting out. For the Best Wood Burning Kit for Adults (Beginner Guide), a good quality variable-temperature pen is often the sweet spot between cost, features, and usability.
Getting Started with Your Wood Burning Project
Once you have your wood burning kit, the next step is to actually start creating. This involves preparing your workspace and your wood, then learning some fundamental techniques. It’s important to feel comfortable and safe while you’re working.
Taking a little time to set things up properly will make the whole experience much more enjoyable and productive.
Setting Up Your Safe Workspace
Creating a safe workspace is very important when you’re doing wood burning. The tool gets very hot, and you’ll be working with wood. First, find a stable, flat surface like a sturdy table or workbench.
Make sure there’s nothing flammable nearby, such as curtains, paper, or loose fabrics. It’s also a good idea to have a non-flammable mat or a piece of tile to place under your work area, just in case.
Ventilation is another key factor. When you burn wood, it creates smoke and fumes. While modern wood burners are much cleaner than older models, it’s still best to work in a well-ventilated area.
Open a window or use a fan to circulate the air. If you have a hobby room, that’s ideal. If not, just making sure there’s good airflow makes a big difference.
You don’t want to breathe in too much smoke.
Always keep your tool stand close by and make sure it’s stable. You’ll be putting the hot pen down often, so you want it to be secure. Have a small container of water nearby if your kit comes with a sponge for cleaning tips.
Also, keep your set of tips organized. It’s easy to mix them up, so putting them in a small tray or container helps. You’ll also want to have your wood pieces ready and any pencils or transfer paper you might use for drawing your design.
Think about having a fire extinguisher or a bucket of water handy, just for extra safety, though accidents are rare with proper precautions.
Preparing Your Wood Surface
The type and condition of your wood surface can greatly affect your wood burning results. For beginners, it’s best to start with smooth, dry wood. Woods like basswood, birch, or pine are excellent choices.
They are readily available and don’t have too much grain, which makes them easier to work with. Avoid woods that are very oily or have a lot of natural resins, as these can make burning uneven.
Before you start burning, ensure your wood surface is clean and smooth. If there are any rough spots or splinters, you’ll want to sand them down. Use fine-grit sandpaper, like 120 or 220 grit, to get a nice, smooth finish.
This will give you a clean canvas for your art. Wipe away any sawdust with a dry cloth so it doesn’t get burned into the wood later.
If you’re transferring a design from paper to wood, make sure the wood surface is ready for it. Some people use carbon transfer paper. You place the design on top of the wood, then put the carbon paper in between, tracing the design.
This leaves a faint line on the wood. Others prefer to draw directly onto the wood with a pencil. Whichever method you choose, keep your lines light and clear.
Dark pencil lines can sometimes show through the burn marks, and you don’t want that interfering with your art.
Basic Wood Burning Techniques for Beginners
When you first start, it’s good to practice some basic strokes and learn how they work. Don’t try to create a masterpiece right away. Instead, grab a scrap piece of wood and just play around with your tools.
Try using different tips and varying the pressure and speed at which you move the tool.
One of the most fundamental techniques is creating lines. Use a fine-point tip to draw straight lines, curves, and dots. See how much pressure you need to apply to get a light mark versus a dark mark.
Also, experiment with how fast or slow you move the tip across the wood. Moving slowly tends to create darker, deeper burns, while moving quickly results in lighter marks. This is a key skill for creating different effects.
Shading is another important technique. For this, you’ll often use a flat or ball tip. To shade, you can use a technique called stippling, where you make many small dots close together.
The closer the dots, the darker the shade. You can also use a flat tip to create smooth gradients by moving it back and forth in overlapping strokes. Try to keep your strokes consistent.
You’ll learn how to blend areas together to give your art depth and dimension. Practicing these simple methods will build your confidence and skill.
Here are some simple exercises to practice:
Line Practice
Take a few minutes to draw a series of parallel lines with your fine-point tip. Make some lines dark and some light. Then, try drawing circles, squares, and wavy lines.
Focus on keeping your lines steady and controlled.
Shading Practice
Use a shading tip to create a gradient from light to dark. Start with very light pressure and slow movement at one end, gradually increasing pressure and slowing down as you move to the other end. Try filling a small square area with a smooth shade.
Dot Practice
Using a ball tip or a fine tip, create areas of dots. Practice making dots that are far apart for a light texture and dots that are very close together for a dark, solid look. This is called stippling.
Choosing the Best Wood Burning Kit for Adults (Beginner Guide)
When you’re looking for the Best Wood Burning Kit for Adults (Beginner Guide), it’s easy to get overwhelmed by all the choices. This section will help you focus on what truly matters for someone starting out. We will look at key features, popular brands, and what to expect for your money.
Making an informed choice now will save you time and frustration later.
Features to Look For in Beginner Kits
For those new to pyrography, the ideal kit balances ease of use with enough features to learn and grow. One of the most critical features is temperature control. As mentioned before, a variable temperature setting allows you to adjust the heat.
This is like having a dimmer switch for your burning tool. Lower temperatures are great for soft woods or for creating light shading, while higher temperatures are needed for harder woods or for creating deep, dark lines.
A comfortable grip is also essential. You might be holding the tool for a while, so it should feel good in your hand. Look for tools with ergonomic handles that are designed to reduce fatigue.
The weight of the tool matters too. A lighter tool is generally easier to control for long periods. Kits that come with a variety of tips offer more creative freedom.
Having tips for detailed work, shading, and even some basic patterns will let you explore different styles right from the start.
Safety features are non-negotiable. A sturdy metal stand to hold the hot tool is a must. Also, consider the cord length.
A longer cord provides more flexibility in your workspace. Some kits come with a carrying case, which is handy for storing all your tools and keeping them organized. Finally, look for kits from reputable brands that offer good customer support.
If you have questions or run into an issue, knowing you can get help is very valuable.
Popular Brands and What They Offer
Several brands offer excellent wood burning kits that are well-suited for beginners. One popular choice is the Walnut Hollow brand. They offer a range of wood burning tools, including beginner-friendly models that are affordable and easy to use.
Their kits often come with a decent selection of tips and a basic stand. They are a great entry point into the hobby.
Another well-regarded brand is Tekchic. They produce more advanced, often digital, wood burning tools, but they also have simpler models that are suitable for beginners. Their tools are known for being durable and reliable.
Some of their kits might include a larger variety of tips, which can be appealing if you want more options from the get-go. They also tend to offer good temperature control, even on their slightly more basic models.
Speedball is a brand known for its art supplies, and they also offer wood burning kits. Their beginner kits are usually straightforward and include the essentials. They focus on providing tools that are easy to understand and operate, making them a solid choice for those who want a simple, no-fuss experience.
Price is often a factor when choosing, and these brands generally offer kits at various price points, from very budget-friendly to mid-range, all suitable for someone just starting their pyrography adventure.
Understanding the Price Range
The cost of a beginner wood burning kit can vary widely, but you can find good options at different price points. Very basic kits, often with fixed temperatures and only a few tips, might cost anywhere from $20 to $40. These are great if you want to try out the hobby without a big investment.
They will allow you to learn the fundamental skills of holding the tool and making marks on wood.
Mid-range kits, which often include variable temperature control and a better selection of tips, typically range from $40 to $70. These are highly recommended for beginners because the temperature control makes a significant difference in learning and achieving better results. You get more versatility and a better overall experience with these kits.
The tool is usually more robust and comfortable to use for longer periods.
More advanced kits, sometimes with digital displays or higher wattages, can cost $70 and up, sometimes well over $100. While these offer more precision and features, they are generally not necessary for someone just starting out. It’s usually best to start with a solid mid-range kit and then upgrade later if you find you love the hobby and want more advanced tools.
Investing in a mid-range, variable-temperature kit is often the most cost-effective way to get started with the Best Wood Burning Kit for Adults (Beginner Guide).
Creative Projects for Your New Wood Burning Kit
Now that you have your wood burning kit and have practiced some basic techniques, it’s time to have fun with some creative projects. These projects are designed to be manageable for beginners and offer a chance to apply what you’ve learned. They can result in beautiful, handmade items that you can keep or give as gifts.
Personalized Wooden Coasters
Wooden coasters are a fantastic beginner project. They are small, so you don’t need a lot of wood, and they are quick to complete. You can buy pre-made wooden coaster blanks from craft stores, or even cut your own from a larger piece of wood.
Basswood or birch rounds are excellent choices because they are smooth and easy to burn.
For personalization, you can draw simple geometric patterns, initials, or small nature-inspired designs like leaves or flowers. Use your fine-point tip for outlines and a shading tip for filling in areas. If you’re drawing letters, practice them on scrap wood first to get a feel for how they will look.
You can create a set of four or six coasters with a consistent theme or individual designs for each one.
After you finish burning your designs, you can apply a food-safe sealant like mineral oil or a beeswax finish. This protects the wood and makes the coasters more durable. They make wonderful gifts for friends and family, and they are a great way to practice your detailing and shading skills without committing to a large project.
Decorative Wooden Signs
Creating small decorative signs is another rewarding project. These can be made from a flat piece of wood, perhaps a small plaque or a cut-out shape like a heart or a star. You can write words, phrases, or even simple pictures on them.
Think about sayings like “Home Sweet Home,” “Welcome,” or seasonal greetings.
To get your text onto the wood, you can use a stencil or carefully draw it yourself. Again, practicing your lettering on scrap wood is highly recommended. For larger areas of lettering, you might find it easier to use a wider tip to fill in the letters after outlining them with a fine tip.
This can create a bold, impactful look.
For a rustic feel, you can add some simple border designs around the edges of the sign. A series of dots or a simple wavy line can add a nice touch. Once completed, these signs can be hung on a wall, displayed on a shelf, or even given as personalized gifts.
They allow you to combine your lettering skills with basic design elements.
Customized Cutting Boards
A customized cutting board can be a beautiful and functional piece of art. Choose a good quality hardwood cutting board, such as maple or cherry. These woods are durable and have a nice grain that looks great when burned.
Make sure the board is sanded smooth before you start.
You can personalize cutting boards with names, monograms, or simple kitchen-themed designs like a chef’s hat or a sprig of herbs. For names, using a slightly bolder font can look very attractive. If you’re adding a monogram, ensure the letters are evenly spaced and sized.
Be mindful of where you place your design; avoid burning directly in the main chopping area, as the burn marks could make cleaning more difficult.
When you finish burning, it’s important to seal the cutting board with a food-safe mineral oil or a cutting board conditioner. This will protect the wood and the artwork, and it will help keep the board hygienic. Customized cutting boards are very popular as wedding gifts, housewarming presents, or just for someone who loves to cook.
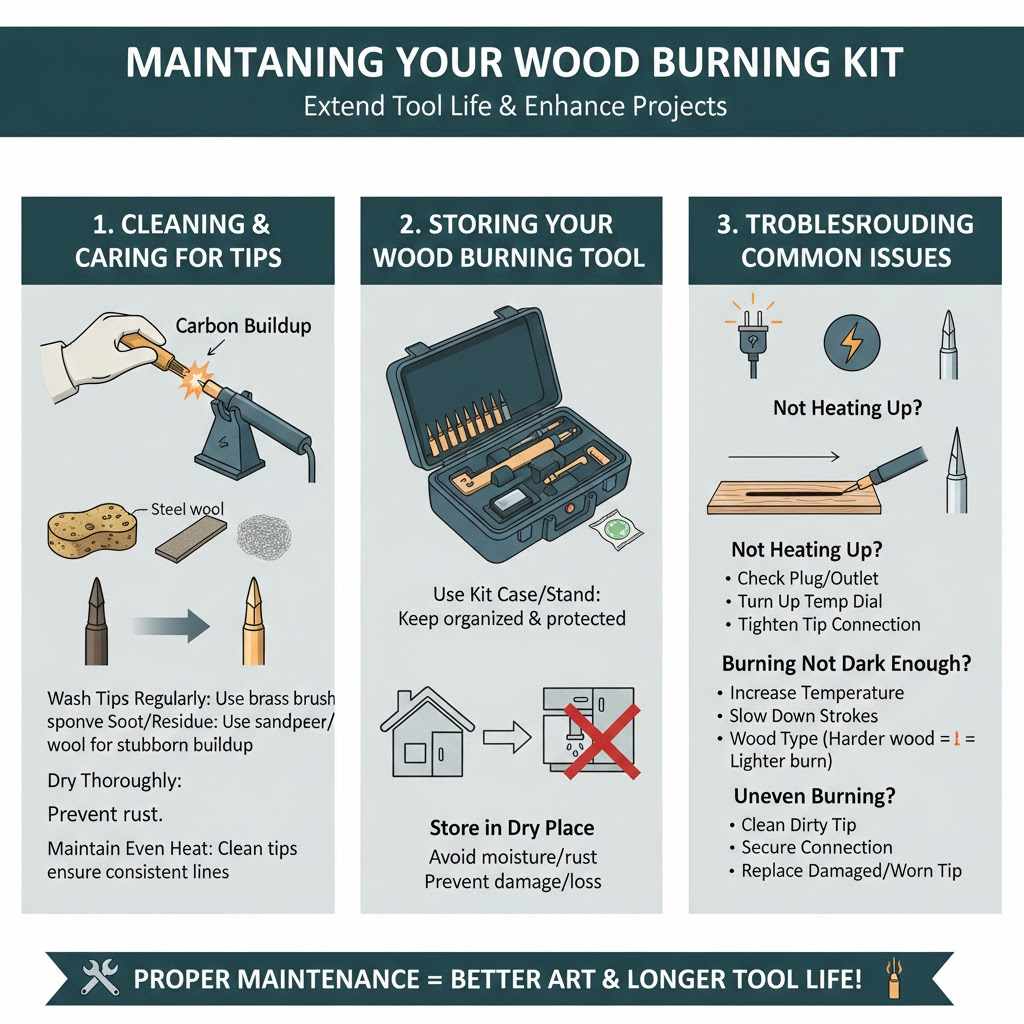
Maintaining Your Wood Burning Kit
To get the most out of your wood burning kit and ensure it lasts a long time, proper maintenance is key. This includes cleaning the tool and tips regularly, storing it correctly, and handling it with care. Simple steps can make a big difference in performance and longevity.
Cleaning and Caring for Burning Tips
The burning tips are the parts that come into direct contact with the wood, and they can get dirty quickly. After each use, and sometimes even during long sessions, it’s important to clean them. When the tip is cool, use a brass brush or a damp sponge (if your kit includes one) to gently remove any residue from the wood.
This residue can be carbon buildup or bits of wood that stick to the tip.
If a tip is particularly dirty or has buildup that’s hard to remove, you can try using fine-grit sandpaper or steel wool. Gently rub the tip to remove any stubborn material. However, be careful not to be too abrasive, as this can wear down the tips over time.
Always ensure the tip is completely cool before attempting any deep cleaning.
Some tips may also rust if they get wet and aren’t dried properly. After cleaning, especially if you used a damp sponge, make sure the tips are completely dry before storing them. A quick wipe with a dry cloth should do the trick.
For tips that have started to rust, you can try cleaning them with steel wool. Regular cleaning will help your tips transfer heat evenly and prevent them from getting damaged, ensuring you get clean, crisp lines for your projects.
Storing Your Wood Burning Tool
Proper storage is essential for keeping your wood burning tool in good condition. When you’re finished using it, make sure the tool is completely cool before you store it. Never put away a hot tool, as this can damage the handle or cause a fire hazard.
Most wood burning kits come with a stand. Use this stand to store the tool when it’s not in use, and especially when it’s cooling down. If your kit has a case, this is the ideal place to store everything.
Keep all the tips organized within the case or in a separate small container. This prevents them from getting lost or damaged.
Keep your wood burning tool and its accessories in a dry place. Moisture can lead to rust on metal parts, especially the tips. Avoid storing it in humid areas like a basement or a bathroom.
A dry cupboard or shelf in your craft room or workshop is a good spot. If you travel with your kit, ensure the case protects the tool and tips from bumps and drops.
Troubleshooting Common Issues
Sometimes, you might run into a few common issues when wood burning. If your tool isn’t heating up, first check if it’s properly plugged in and that the power outlet is working. If it’s a variable temperature tool, make sure the temperature dial is turned up.
Sometimes the connection between the tool and the tip can become loose, preventing it from heating effectively, so try tightening the tip connection.
If the burning isn’t dark enough, it could be that the temperature is too low, you’re moving too quickly, or the wood is too hard. Try increasing the temperature or slowing down your strokes. For very light marks, even on a higher setting, it might be that the wood itself is very dense or has a lot of natural oils that resist burning.
Experimenting with different pressures can also help. Remember, practice on scrap wood to find the right settings for your specific wood and design.
Another issue can be uneven burning, where some parts of your line are darker than others. This is often caused by a dirty tip or an unevenly heated tip. Make sure your tips are clean and that the connection is secure.
If you notice a tip is damaged or unevenly worn, it might be time to replace it. A consistent heat flow from the tip is crucial for creating smooth, even burns.
Frequently Asked Questions
Question: What is the easiest type of wood to start with for wood burning?
Answer: Basswood is often recommended for beginners because it is soft, has a fine and even grain, and burns smoothly without much resistance. Birch and pine are also good choices.
Question: Do I need a variable temperature wood burner to start?
Answer: While you can start with a fixed temperature burner, a variable temperature burner is highly recommended. It gives you much more control, allowing you to create a wider range of effects and work with different types of wood more easily.
Question: How long does it take to get good at wood burning?
Answer: Like any skill, proficiency comes with practice. Some beginners can create simple designs within a few sessions, while mastering detailed work and shading can take months or even years of consistent practice.
Question: What safety precautions should I take when wood burning?
Answer: Always work in a well-ventilated area, keep flammable materials away from your workspace, use the provided tool stand, and never leave a hot tool unattended. A fire extinguisher or water nearby is also a good idea.
Question: Can I wood burn on painted or treated wood?
Answer: It is generally not recommended to wood burn on painted or treated wood. The heat can release toxic fumes from the paint or chemicals. Always use natural, untreated wood.
Conclusion
Finding the Best Wood Burning Kit for Adults (Beginner Guide) involves selecting tools that are safe, user-friendly, and offer room to grow. A variable temperature tool with a good selection of tips is a smart starting point. Practicing basic techniques on smooth, untreated wood in a well-ventilated space will build your skills.
With the right kit and a little patience, you’ll soon be creating beautiful wood-burned art.