Can You Use Drydex on Wood? Discover the Ultimate Solution!
Yes, Drydex can be used on wood surfaces for filling gaps and cracks. Drydex is a versatile spackling compound that can effectively fill imperfections on wood surfaces, providing a smooth finish for painting or staining.
It dries quickly and is easy to sand, making it a convenient option for wood repair projects. Wood surfaces often require minor repairs and touch-ups to maintain their appearance and structural integrity. Drydex offers a simple and reliable solution for addressing these issues, allowing you to seamlessly repair wood before finishing it with paint or stain.
Whether you are working on furniture, trim, or other wooden items, Drydex can help you achieve professional-looking results with minimal effort. With its user-friendly application and fast-drying formula, Drydex is a valuable tool for any DIY enthusiast or professional woodworker.
What Is Drydex?
Drydex is a lightweight spackling compound known for its quick drying properties. It can be used on wood surfaces to fill in cracks and holes, providing a smooth finish before painting or staining. Drydex is easy to apply and sand, making it a versatile choice for wood repair projects.
Features Of Drydex
- Drydex dries quickly.
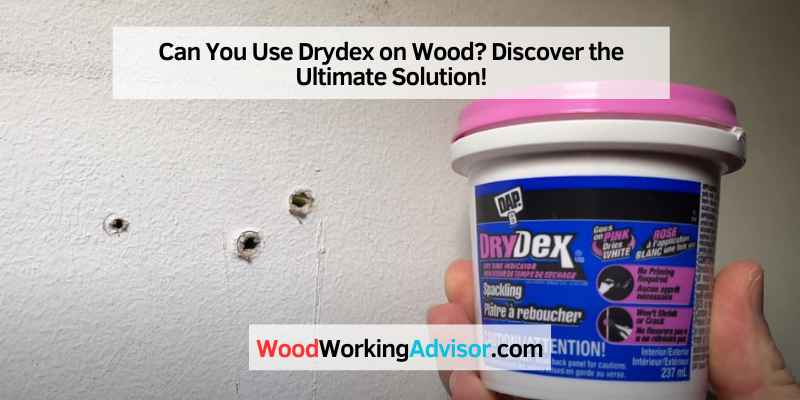
- It turns from pink to white when dry.
- Easy to sand for a smooth finish.
Benefits Of Using Drydex On Wood
- Drydex fills in cracks and holes effectively.
- Provides a strong bond to the wood surface.
- Improves the appearance of the wood with a seamless finish.
Drydex is a spackling compound commonly used in household repairs. It is ideal for filling in cracks, holes, and imperfections in various surfaces, ultimately providing a smooth finish.
When it comes to wood surfaces, Drydex can be a suitable option due to its unique qualities.
Drydex is a high-quality spackling compound that is pink in color when wet and turns white upon drying. It is known for its quick drying time and ease of sanding for a seamless appearance on surfaces.
Applying Drydex On Wood
Applying Drydex on wood can be a quick and efficient way to repair and fill cracks, holes, and imperfections. Whether you are working on a small woodworking project or dealing with larger repairs, Drydex can provide a reliable solution. To make the most out of this product, however, it is essential to follow the correct surface preparation and application techniques. In this article, we will explore the key steps you need to take to successfully apply Drydex on wood.
Surface Preparation
Before applying Drydex on wood, it is crucial to ensure that the surface is properly prepared. Here are some surface preparation steps to follow:
- Clean the surface: Begin by removing any dirt, dust, or debris from the wood surface. Use a soft cloth or a brush to clean the area thoroughly.
- Sand the area: If there are any rough patches or raised edges, gently sand the wood to create a smooth and even surface. This step is essential for the Drydex to adhere properly.
- Remove old finishes: If there are any existing finishes or coatings on the wood, such as paint or varnish, remove them completely. This can be done using a paint stripper or sanding down the surface.
- Wipe clean: Once the surface is sanded and any old finishes are removed, use a clean cloth or tack cloth to wipe away any remaining dust and ensure a clean working area.
Application Techniques
Now that the wood surface is properly prepared, it’s time to apply the Drydex. Follow these application techniques for best results:
- Apply in thin layers: Start by applying the Drydex in thin layers rather than trying to fill the entire hole or crack in one go. This will ensure better control and allow for adequate drying time in between layers.
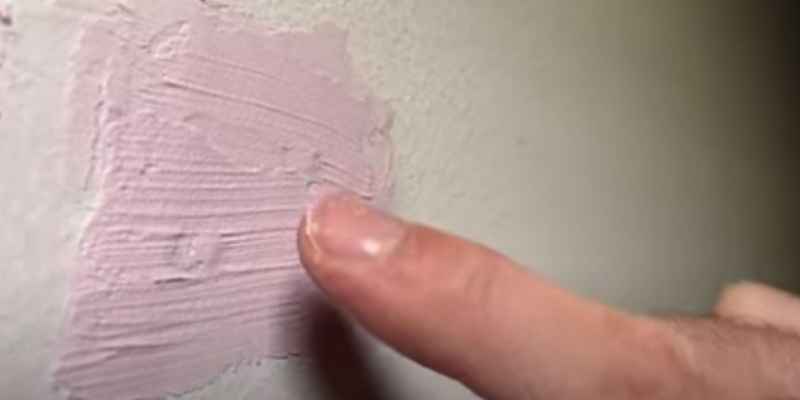
- Use a putty knife: To apply the Drydex precisely and evenly, use a putty knife or a similar tool. Gently press the product into the damaged area and smooth it out with the knife.
- Level the surface: Once the Drydex is applied, use the putty knife to level the surface and remove any excess product. This will create a seamless finish when the repair is complete.
- Allow drying time: Give the Drydex sufficient time to dry between layers and before sanding or painting. This will ensure a durable and long-lasting repair.
By following these surface preparation and application techniques, you can confidently use Drydex on wood for repairs and achieve professional-looking results. Remember to always read and follow the manufacturer’s instructions for the specific product you are using. Whether you are a seasoned woodworker or a DIY enthusiast, Drydex can be a valuable addition to your toolbox for wood repairs. Start using it today and see the difference it makes!
Drying And Sanding
About Can You Use Drydex on Wood, there are two important aspects to consider: drying time and sanding process. Properly drying and sanding wood surfaces is essential for achieving a smooth, flawless finish with Drydex, a popular spackling compound used for filling cracks and holes. Understanding the recommended drying time and the correct sanding process will help you achieve the best results for your woodworking project.
Drying Time
The drying time for Drydex on wood depends on various factors such as temperature, humidity levels, and the thickness of the application. As a general guideline, Drydex typically dries within 2-6 hours. However, specific drying times may vary, so it’s important to check the manufacturer’s instructions to ensure you allow enough time for the compound to fully dry.
Sanding Process
The sanding process plays a crucial role in achieving a smooth and even surface after using Drydex on wood. Here are some steps to follow:
- Once the Drydex compound has completely dried, use a fine-grit sandpaper to begin sanding the surface. This will help remove any excess compound and rough edges.
- Start sanding with light pressure and gradually increase as needed. Be careful not to apply too much pressure, as it may damage the wood or create uneven surfaces.
- Work in smooth, circular motions or in the direction of the wood grain to achieve a consistent finish.
- Periodically check the surface with your hand to ensure it feels smooth and free of any imperfections. If necessary, continue sanding until you achieve the desired result.
- After sanding, wipe away any dust or debris using a clean cloth or tack cloth to prepare the wood for further finishing or painting.
By following these steps, you can confidently use Drydex on wood surfaces, ensuring optimal drying time and a smooth finish through proper sanding techniques. Remember to always read and follow the manufacturer’s instructions for the best results.
Finishing Touches
To finish off wood projects, consider using Drydex as a lightweight spackling for minor repairs and filling imperfections. It dries quickly, and once sanded, it creates a smooth surface suitable for painting or staining, making it a versatile option for wood finishing.
Priming The Surface
Before applying Drydex on wood, it’s crucial to prime the surface.
By using a wood primer, you ensure proper adhesion and a smooth finish.
Painting Or Staining
Once the surface is primed, you can proceed with painting or staining.
- For a fresh new look, consider painting with a suitable wood paint.
- If you prefer accentuating the natural wood grain, opt for staining instead.
Comparing Drydex With Other Wood Fillers
When it comes to restoring damaged wood surfaces, using the right wood filler can make a significant difference. One popular wood filler on the market is Drydex, known for its ease of use and effectiveness. But how does it compare to other wood fillers? Let’s take a closer look at Drydex’s strength and durability as well as its appearance and finish.
Strength And Durability
One of the essential factors to consider when selecting a wood filler is its strength and durability. In this regard, Drydex holds its ground against other options available. It possesses excellent bonding properties, allowing it to adhere tightly to the wood surface and providing a strong, long-lasting repair. Whether you’re dealing with minor dings or more significant deep cracks, Drydex can handle the job, ensuring your wood surface remains sturdy and stable. Additionally, its resistance to shrinkage and cracking over time adds to its durability.
Appearance And Finish
The appearance of the repaired surface is also crucial when working with wood fillers. After all, you want your repairs to seamlessly blend with the rest of the wood. Thankfully, Drydex delivers in this department as well. Its smooth consistency and ability to dry to a natural wood color make it an ideal choice for achieving a seamless finish.
Unlike other wood fillers that may leave an obvious patch or require excessive sanding and painting, Drydex minimizes the need for additional touch-ups and ensures a professional result. This wood filler’s ability to accept stains and finishes further enhances its versatility in matching various wood tones and textures.
Tips And Tricks
When it comes to using Drydex on wood, following some tips and tricks can ensure you achieve a smooth finish and deal with any excess product. These handy techniques will help you get the most out of your Drydex experience. Let’s dive right in!
Dealing With Excess Product
One common challenge when using Drydex on wood is dealing with excess product. Here are some practical tips to help you overcome this issue and achieve professional-looking results:
- Start by applying a thin layer of Drydex to the wood surface. Using too much product can lead to excessive drying time and potential issues with your finish.
- If you accidentally apply too much Drydex, don’t worry! Use a putty knife or a scraper to carefully remove the excess. This will ensure an even and consistent finish.
- Once you’ve removed the excess product, give the surface some time to dry. This will allow the Drydex to settle and ensure proper adhesion to the wood.
- If you notice any imperfections or uneven areas after the drying process, lightly sand the surface with fine-grit sandpaper. This will help create a smooth and flawless finish.
Ensuring Smooth Finish
Getting a smooth finish with Drydex on wood is essential to achieve the desired results. Follow these tricks to ensure your wood project looks professional and flawless:
- Before applying Drydex, make sure the wood surface is clean and free from dust or debris. Wiping it down with a damp cloth can help remove any particles that could affect the finish.
- Use a high-quality paintbrush or a foam roller to apply the Drydex evenly. This will help you achieve a smooth and consistent coverage, minimizing the need for additional touch-ups.
- Work in small sections, applying the Drydex in long, even strokes. This technique will prevent visible brush or roller marks and create a uniform finish.
- Allow each coat of Drydex to dry completely before applying additional layers. This will ensure optimal adhesion and prevent any issues with the final result.
- If you want to achieve an extra-smooth finish, you can lightly sand the wood surface between coats. This will help remove any imperfections and result in a flawless appearance.
With these tips and tricks, you can confidently use Drydex on wood and achieve a smooth, professional-looking finish. Whether you’re working on a small DIY project or tackling a larger woodworking task, following these techniques will help you achieve the best results possible.
Common Mistakes To Avoid
Drydex should not be used on wood as it is not suitable for this type of material. It is essential to avoid this mistake to prevent damage to the wood surface. Always ensure to use the correct type of filler or sealant designed specifically for wood to achieve the best results.
Overfilling Gaps
Applying Drydex on wood can be tricky; avoid overfilling gaps to prevent noticable texture differences.
Skipping Surface Preparation
Prior to using Drydex, surface preparation is key; avoid skipping or rushing this crucial step.
Frequently Asked Questions Of Can You Use Drydex On Wood
What Surfaces Can You Use Drydex On?
DryDex can be used on drywall, wood, concrete, masonry, and plaster surfaces for filling holes and cracks.
Can I Use Spackle On Wood?
Yes, you can use spackle on wood. It is a versatile filler that can be used to repair holes, cracks, and imperfections in wood surfaces. Spackle is easy to apply and dries quickly, making it a convenient choice for wood repairs.
Can You Use Drydex On Furniture?
Yes, you can use DryDex on furniture. It is a versatile product that can be applied on various surfaces, including wood, to fill cracks and imperfections. Ensure proper preparation and follow the instructions for optimal results.
Can Dap Lightweight Spackling Be Used On Wood?
Yes, DAP lightweight spackling can be used on wood surfaces for filling small holes and cracks.
Conclusion
Drydex can be used on wood for small repairs with its advanced formula. Ensure proper application and sanding for best results. Remember to follow manufacturer instructions for optimal performance. With Drydex, you can easily fix minor wood imperfections and achieve a smooth finish.
Try it today!