My First Vinyl Flooring Adventure with a Home Depot Vinyl Flooring Cutter
I’ll never forget my first DIY flooring project. I bought vinyl planks from Home Depot, ready to transform my tiny bathroom, but I panicked when I realized I needed to cut them! That’s when I discovered the Home Depot vinyl flooring cutter—a game-changer for beginners like me. This tool made cutting planks easy, clean, and fun. In this article, I’ll share what this cutter is, how to use it, and tips to make your flooring project a breeze. Whether you’re new to DIY or a pro, you’ll find simple steps, cost-saving ideas, and fun examples to get started. Let’s dive in!
What Is a Home Depot Vinyl Flooring Cutter?
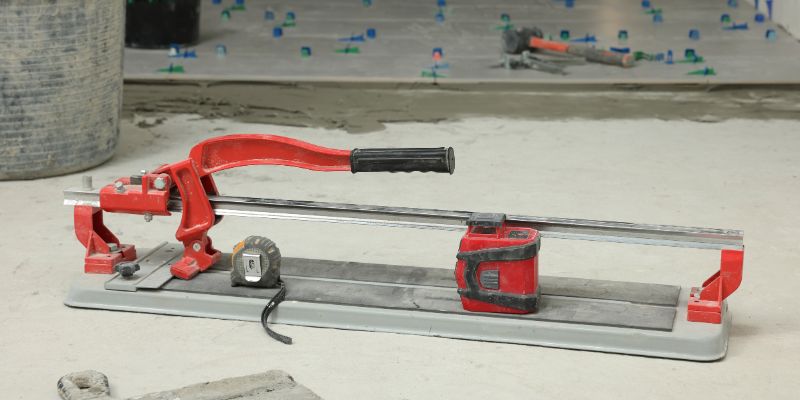
A Home Depot vinyl flooring cutter is a manual tool designed to slice vinyl planks or tiles with ease. It’s like a big paper cutter but for flooring!
Why It Matters
This cutter saves time and makes clean cuts without power tools. It’s perfect for DIYers who want a pro look without the hassle. I used one for my bathroom, and it was a total win!
Types Available
Home Depot offers several models, like the Anvil 12-inch LVT Cutter or the Roberts 13-inch Multi-Floor Cutter. Each works for vinyl planks, tiles, or even laminate.
Why Choose a Home Depot Vinyl Flooring Cutter?
Using a vinyl flooring cutter from Home Depot is a smart move. Here’s why it rocks for your project.
Benefits
- Easy to Use: No cords or batteries—just push down to cut.
- Clean Cuts: It slices vinyl smoothly, no jagged edges.
- Affordable: Most cost $30–$150, cheaper than power saws.
- Portable: Lightweight and easy to carry around your home.
Drawbacks
- Limited Width: Most cut up to 12–13 inches wide.
- No Curved Cuts: You’ll need a utility knife for corners or curves.
- Manual Effort: It takes a bit of muscle for thicker planks.
Alternatives
You can use a utility knife or a jigsaw for vinyl. I tried a knife once, and it worked, but it was slow and messy compared to a cutter.
Tools and Materials You’ll Need
Before you start, grab these items. They’re all at Home Depot, and I’ve picked beginner-friendly options.
Must-Have Tools
- Vinyl Flooring Cutter: Try the Anvil 12-inch LVT Cutter ($50).
- Measuring Tape: A 25-foot tape is perfect ($10).
- Straight Edge: A metal ruler or speed square ($8).
- Utility Knife: For small or curved cuts ($5).
- Pencil: To mark your measurements.
Materials
- Vinyl Planks or Tiles: I love LifeProof vinyl planks ($2–$4 per square foot).
- Safety Gear: Gloves and safety glasses ($10).
Optional
- Tapping Block: Helps click planks together ($15).
- Rubber Mallet: For gentle tapping ($10).
Table 1: Basic Tools for Vinyl Flooring Projects
| Tool | Price at Home Depot | Why You Need It |
|---|---|---|
| Anvil LVT Cutter | $50 | Cuts vinyl planks cleanly |
| Measuring Tape | $10 | Ensures accurate cuts |
| Utility Knife | $5 | Handles curves or trims |
| Caption: These tools make cutting vinyl planks a snap for beginners. |
Step-by-Step Guide to Using a Home Depot Vinyl Flooring Cutter
Ready to cut your vinyl planks? Follow these easy steps. I used this method for my bathroom, and it was a piece of cake!
Step 1: Measure Your Space
Measure the area where the plank goes. Use a tape measure and mark the plank with a pencil. Always measure twice to avoid mistakes!
Step 2: Set Up the Cutter
Place the cutter on a flat surface. Adjust the guide to match your marked measurement. My Anvil cutter had a clear guide, so it was no sweat.
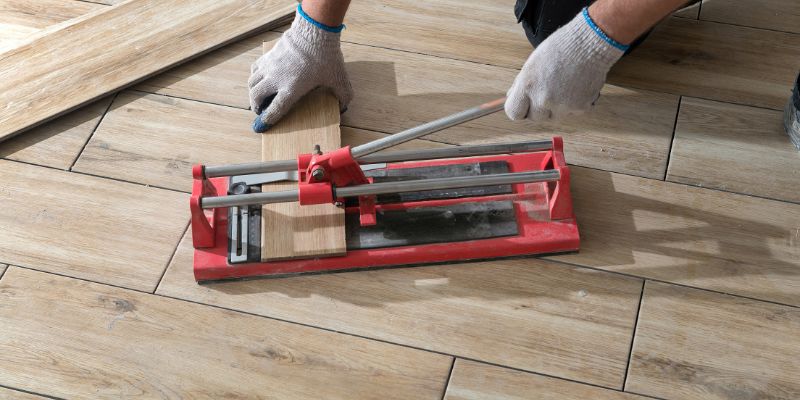
Step 3: Position the Plank
Slide the vinyl plank under the blade, aligning your pencil mark with the cutter’s guide. Make sure it’s snug and straight.
Step 4: Cut the Plank
Push the handle down firmly. The blade will slice through the vinyl cleanly. It feels like cutting thick paper—super satisfying!
Step 5: Check the Fit
Test the cut plank in your space. If it’s too big, trim a tiny bit more. If it’s perfect, move to the next plank.
Visual Idea: A diagram showing a vinyl plank sliding under the cutter’s blade with arrows for alignment would help here. (Not included.)
Tips for Success
- Keep Blades Sharp: A dull blade makes messy cuts. Replace it if needed ($5 at Home Depot).
- Cut Face-Up: Place the plank’s good side up for cleaner edges.
- Practice First: Try cutting scrap pieces to get the hang of it.
Fun Project: Transform a Small Room with Vinyl Planks
Want to try a real project? I redid my 5×7-foot bathroom with vinyl planks using a Home Depot vinyl flooring cutter. Here’s how you can do it too.
Step 1: Plan Your Layout
Sketch your room on paper. Decide if planks go lengthwise or widthwise. I went lengthwise—it looked awesome!
Step 2: Buy Supplies
Get enough vinyl planks (add 10% extra for mistakes). Grab a cutter, measuring tape, and safety gear from Home Depot.
Step 3: Prep the Floor
Clean the floor well. Remove old flooring if needed. A flat surface is key for vinyl planks.
Step 4: Cut and Install
Measure and cut planks as you go. Use the cutter for straight cuts and a utility knife for corners. Click planks together with a tapping block.
Step 5: Enjoy Your New Floor
Stand back and admire your work! My bathroom went from drab to fab in a weekend.
Visual Idea: A simple floor plan sketch showing plank direction options would be great. (Not included.)
Table 2: Cost Breakdown for a 5×7-Foot Room
| Item | Cost | Quantity Needed |
|---|---|---|
| LifeProof Vinyl | $3/sq.ft | 40 sq.ft ($120) |
| Anvil LVT Cutter | $50 | 1 |
| Measuring Tape | $10 | 1 |
| Total | ~$180 | |
| Caption: Budget-friendly supplies for a small vinyl flooring project. |
Common Mistakes to Avoid
I made plenty of blunders when I started. Here’s how to skip my flops!
- Skipping Measurements: Always measure twice. I cut a plank too short once—oops!
- Forcing the Cutter: Don’t slam the handle; a steady push works best.
- Ignoring Safety: Wear gloves to avoid nicks. I learned this the hard way.
- Wrong Blade: Use the right blade for your cutter model. Check Home Depot’s site for replacements.
Personal Tips from My DIY Journey
After a few projects, I’ve got some tricks up my sleeve. These made my flooring jobs easier and cheaper.
- Rent If You’re Unsure: Home Depot rents cutters for ~$20/day. Try before you buy
- Use Scraps for Practice: Save extra planks to test cuts. It builds confidence.
- Shop Sales: Home Depot often discounts tools during holidays. I snagged my cutter for 20% off!
- Clean As You Go: Dust from cutting can mess up your floor. Sweep often.
List: 3 Cost-Saving Ideas
- Buy vinyl in bulk to save per square foot.
- Rent a cutter for one-time projects.
- Use a utility knife for small jobs to skip buying a cutter.
Comparing Home Depot Vinyl Flooring Cutters
Not sure which cutter to pick? Here’s a quick comparison of two popular models at Home Depot.
Table 3: Home Depot Vinyl Flooring Cutter Comparison
| Model | Price | Max Cut Width | Best For |
|---|---|---|---|
| Anvil 12-inch LVT Cutter | $50 | 12 inches | Beginners, small projects |
| Roberts 13-inch Cutter | $130 | 13 inches | Pros, larger rooms |
| Caption: Choose the right cutter for your project size and budget. |
Visual Idea: A side-by-side photo of the Anvil and Roberts cutters with labels for key features would be helpful. (Not included.)
Safety First: Using Your Cutter Wisely
Cutting vinyl is safe if you’re careful. These tips keep you injury-free.
- Wear Gloves: Protect your hands from sharp edges.
- Use a Stable Surface: Place the cutter on a flat table or floor.
- Keep Kids Away: Store the cutter out of reach when not in use.
- Check the Blade: A loose blade can slip. Tighten it before cutting.
For more safety tips, check Home Depot’s flooring guide: Home Depot Flooring Safety.
Frequently Asked Questions
What Is a Home Depot Vinyl Flooring Cutter?
It’s a manual tool that cuts vinyl planks or tiles cleanly. It looks like a guillotine and works with a simple push. Perfect for DIY flooring projects.
Can I Cut Vinyl Planks with a Utility Knife?
Yes, but it’s slower and less precise. Score the plank with a knife, then snap it. A cutter is faster for straight cuts.
Which Home Depot Cutter Is Best for Beginners?
The Anvil 12-inch LVT Cutter is great. It’s affordable ($50), easy to use, and perfect for small rooms like bathrooms.
Do I Need a Cutter for Vinyl Flooring?
Not always, but it makes life easier. A cutter gives clean, fast cuts. For small jobs, a utility knife might do the trick.
How Do I Maintain My Vinyl Flooring Cutter?
Keep the blade sharp and clean. Wipe dust off after use. Replace the blade ($5) if it gets dull for smoother cuts.
Can a Home Depot Cutter Cut Other Materials?
Some can cut laminate or rubber tiles. Check the model’s specs. The Roberts 13-inch cutter handles multiple flooring types.
Where Can I Rent a Vinyl Flooring Cutter?
Home Depot rents cutters for ~$20/day. Visit your local store or check online for availability. It’s a budget-friendly option
Conclusion
A Home Depot vinyl flooring cutter is your ticket to easy, pro-looking floors. From my bathroom redo to bigger projects, this tool saved time and stress. It’s affordable, simple, and fun to use. Grab one, try a small project, and watch your space transform! Share your flooring wins in the comments—I’d love to hear them. Ready to cut? Head to Home Depot and get started!