How to Build a Strong Wooden Box Frame: Joints & Bracing
A strong wooden box frame relies on rabbet, dado, or box joints reinforced with glued corner blocks and 3/4-inch plywood on the base — plain butt joints held together with only screws work loose within months of regular use. Skipping corner reinforcement is the single biggest reason a DIY box frame starts to rack once it’s loaded past 30–40 lbs. This guide covers choosing the right wood, cutting accurate joints, reinforcing corners and the base, and finishing the frame so it holds up for years.
What You’ll Need
Before you start, gather your wood, fasteners, and cutting tools. If this is your first woodworking project, a box frame is one of the more forgiving builds to practice joinery on.
- Straight, kiln-dried lumber (pine, oak, maple, or birch — see below)
- 3/4-inch plywood for the base panel
- Wood glue (PVA or Titebond III for moisture resistance)
- Corner brackets or L-brackets, 2–3 inches
- Wood screws, 1 1/4–1 5/8 inch
- Measuring tape, miter saw, circular saw, and a jigsaw for curved cuts
- Safety glasses and gloves

Choosing the Right Wood
The wood you choose determines how much abuse your finished wooden box frame can take before a joint fails. Softwoods like pine are easy to cut and inexpensive but dent and split more easily under load; hardwoods like oak and maple cost more but hold screws and glue joints far longer.
| Wood Type | Characteristics | Best Use |
|---|---|---|
| Pine | Lightweight, affordable, easy to cut | Indoor boxes, low-stress applications |
| Oak | Dense, strong, resists decay | Heavy-duty frames, outdoor boxes |
| Maple | Hard, smooth-finishing | Furniture-grade and decorative frames |
| Birch | Strong, fine, even grain | Frames where appearance matters |
Evaluating Wood Quality
Beyond species, check every board before you cut it:
- Appearance: avoid visible knots, cracks, or warping — they weaken joints cut near them.
- Moisture content: aim for 6–8% before cutting (see the callout below).
- Grade: Select or FAS grades give straighter, more predictable stock.
- Weight: a board that feels dense for its size is usually the stronger piece.
- Sustainability: FSC-certified lumber if it matters for your project.
📊 Furniture-grade wood should sit at 6–8% moisture content before you cut it — wood acclimated above that range will keep shrinking indoors and loosen every glued joint as it dries. Source: Wagner Meters, Acceptable Moisture Levels in Wood
Measuring and Cutting the Wood Pieces
Accurate cuts are what make a box frame square instead of racked from the first assembly. Sloppy cuts here cannot be fixed later with more glue or screws — they just get hidden until the frame is loaded.
Taking Accurate Measurements
- Measure the length and width of the space where the box frame will sit.
- Add a few inches to each measurement for wood thickness and clearance.
- Write the measurements down and label each piece as you go.
- Calculate the final length and width for every individual piece from those numbers.
- Account for the thickness of the wood itself in every final measurement.
Tools for Cutting
- Measuring tape: a durable, accurate tape is the single most important tool here.
- Miter saw: best for the angled corner cuts a box frame needs.
- Circular saw: best for long, straight rip cuts.
- Jigsaw: for curves or notches if your design calls for them.
- Safety gear: glasses and gloves every time you cut.
Assembling the Frame
How you join the corners matters more than any other single decision in this build. A plain butt joint (two square-cut boards glued and screwed face to edge) is the fastest to cut but relies entirely on the fasteners — there is no mechanical lock holding the pieces together if the glue joint ever fails.
| Joint Type | Strength | Tools Needed | Best For |
|---|---|---|---|
| Butt joint | Basic — needs brackets to hold under load | Saw, drill | Quick or temporary boxes |
| Rabbet joint | Good — mechanical lock plus glue surface | Table saw or router | General-purpose frames |
| Locking rabbet-and-dado | Very good — resists front-to-back racking | Table saw with dado blade | Boxes opened or moved often |
| Box (finger) joint | Best glue surface, most durable | Table saw jig or router | Heavy-use chests and load-bearing boxes |
Securing the Corners
Whichever joint you cut, back it up with hardware. Sturdy corner brackets or metal braces screwed into each inside corner keep the joint from opening up under racking stress, and they’re the fastest fix if you’re working with plain butt joints.
Using Reinforcement Techniques
Apply wood glue to every joint before driving screws — the glue bond carries most of the long-term load, while the screws just hold the joint tight while it cures. Drive screws at a slight angle into the joint rather than straight in, which reduces the risk of splitting the end grain.

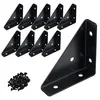
Best Corner Bracket Pick
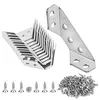
12-Pack Stainless Steel Corner Brackets for Wood Frame
Stainless steel L-brackets sized for standard box-frame corners, pre-drilled for wood screws.
- Best for: reinforcing butt-joint or rabbet-joint corners on a storage box frame
- Why we picked it: 12-pack covers a full box frame with spares left for a second project
- Main drawback: stainless finish shows screw-head scratches more than a painted bracket
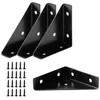
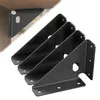
Compare more corner bracket options
 Option 1 2-9/16in Corner Brace L Brackets, 10-Pack
|
 Option 2 66mm Corner Brace Brackets for Wood, 4-Pack
|
 Option 3 SecureLatch Heavy Duty Corner Bracket, 350lb Rated
|
As an Amazon Associate we earn from qualifying purchases.
How to Reinforce a Wooden Box Frame for Extra Strength
Corner brackets alone only resist the joint pulling apart in one direction. If you want a frame that doesn’t rack (lean into a parallelogram shape when pushed sideways), add reinforcement that works across the whole frame, not just at each corner.
Corner Blocks
A corner block is a triangular or square block of wood glued into the inside corner of a frame, spanning both adjoining pieces at once. Unlike a flat metal bracket, a glued wood corner block adds real gluing surface area on both sides of the joint, which resists racking far better than screws alone.
Diagonal Cross Bracing
For taller or larger frames, run a diagonal brace — a thin strip of wood, usually 1×2 or 1×4 — from one corner to the opposite corner on the inside face. This single piece converts the frame’s rectangle into two triangles, and triangles do not rack the way rectangles do, regardless of how strong the corner joints are.
Bracing the Base
A frame with a weak base will flex even if every corner joint is perfect. Screw the bottom plywood panel directly into the frame’s bottom edge every 4–6 inches, not just at the corners — this turns the base panel itself into a structural brace instead of a loose lid resting on the frame.
“Corner blocks glued into each inside corner do more for rack resistance than brackets alone — we’ve seen box frames held together with only screw-in brackets loosen at the screw holes within a season of daily use, while a glue-blocked corner on the same style of frame stayed tight for years.”
Adding Bottom and Top Panels
The base and lid panels turn a bare frame into a functional box. Panel thickness matters more here than anywhere else in the build — a base panel that’s too thin will sag under load no matter how strong the frame around it is.
For most storage boxes, 3/4-inch plywood is the standard base thickness: it holds screws at the edge without splitting and resists flexing under weight. Lighter boxes that won’t carry much can get away with 1/2-inch on the base; anything carrying tools or heavy stock should stay at 3/4-inch or step up further.
- Measure the frame’s dimensions and cut the plywood to fit the bottom opening.
- Set the plywood in place and align its corners with the frame’s edges.
- Screw the panel to the frame every 4–6 inches along every edge, not just at the corners.
- Repeat the same process for the top panel, checking that it sits flat before driving any screws.
- Check for gaps or unevenness and adjust before the glue on the corner joints fully cures.
If you’re building the whole box from sheet stock rather than a solid-wood frame, our plywood box guide walks through that version of the build in more detail.
Finishing Touches
Once the frame, corners, and panels are assembled and the glue has cured, sand and finish the box to protect it from moisture and wear.
Sanding and Smoothing
Start with 80-grit sandpaper to knock down rough edges and splinters, sanding with the grain. Move to 120-grit, then finish with 220-grit for a smooth surface, wiping away dust between each grit.
Applying a Protective Finish
For a natural look, apply a thin coat of clear varnish or polyurethane with the grain, let it dry per the can’s instructions, then lightly sand with fine-grit paper between coats. For a painted finish, make sure the frame is clean and dust-free first, then apply thin, even coats and let each one dry fully before the next.
Work in a well-ventilated space and follow the manufacturer’s instructions on dry time and recoat windows, whichever finish you choose.

Quick-Build Steps at a Glance
- Choose your wood: Pick a species and grade rated for your load — oak or maple for heavy-duty frames, pine for lighter indoor boxes.
- Measure and cut: Measure the frame opening, add clearance for wood thickness, and cut every piece to size with a miter or circular saw.
- Cut the corner joints: Cut butt, rabbet, locking rabbet-and-dado, or box joints depending on how much load the frame needs to carry.
- Glue and clamp the corners: Apply wood glue to every joint before screwing, then clamp until the glue sets per the label’s instructions.
- Add corner brackets or blocks: Screw in metal corner brackets or glue in wood corner blocks at every inside corner for rack resistance.
- Attach the base and top panels: Cut 3/4-inch plywood to fit, then screw it to the frame every 4–6 inches along each edge.
- Sand and finish: Sand through 80, 120, and 220-grit, then apply varnish, polyurethane, or paint in thin, even coats.
Frequently Asked Questions
How Do You Make a Wooden Box Sturdy?
Use strong, durable wood like oak or birch, and cut a mechanical joint (rabbet, dado, or box joint) rather than a plain butt joint. Reinforce every corner with wood glue plus screws or metal brackets, screw the base panel down every 4–6 inches, and sand and finish the surface to protect it from moisture.
How Do You Strengthen a Wood Frame?
Add diagonal cross bracing across the inside of the frame, install metal brackets or corner blocks at each joint, glue every joint before screwing it, and use a full plywood or OSB panel on the base and top rather than leaving either side open.
How Thick Should the Walls of a Wooden Box Be?
Wall thickness depends on size and load: 1/4 to 1/2 inch is enough for smaller, lighter boxes, while larger boxes or anything carrying real weight should use 3/4 to 1 inch stock for the walls and frame members.
Is Wood Framing Strong?
Yes — wood framing is strong and durable for most construction and box-building needs when the joints are cut and glued correctly. It offers good structural stability and, with proper finishing and maintenance, holds up for years of regular use.
What Strengthens the Corners of a Wooden Box Frame?
Corner blocks, diagonal cross bracing, and metal corner brackets are the three components that actually strengthen a box frame’s corners. Glue-in corner blocks add the most gluing surface, cross bracing stops the frame from racking into a parallelogram shape, and metal brackets are the fastest to add after the fact.
How Thick Should Plywood Be for a Box Bottom?
3/4-inch plywood is the standard base thickness for most storage boxes — thick enough to hold screws at the edge without splitting and to resist sagging under load. Light-duty boxes can use 1/2-inch on the base; anything carrying tools or heavy stock should stay at 3/4-inch.
What Is the Strongest Corner Joint for a Wood Box Frame?
A box (finger) joint or a locking rabbet-and-dado joint is the strongest option, since both create mechanical interlock plus a large glue surface. For most home builds, a rabbet joint backed with glue and a corner bracket gets you most of that strength with far simpler tools.
Conclusion
A strong wooden box frame comes down to three decisions: a mechanical joint at the corners, real reinforcement (blocks, brackets, or cross bracing) rather than fasteners alone, and a base panel thick enough to carry the load. Get those three right and the wood species and finish are mostly a matter of preference.
Happy building!