How to Curve Balsa Wood: Master the Art Skills
To curve balsa wood, you can use steam or water to make it pliable, then bend it to the desired shape and hold it in place until it dries. Curving balsa wood is a common technique used in various craft and hobby projects.
Whether you want to create intricate model airplanes, architectural models, or even artistic sculptures, learning how to curve balsa wood is essential. By making the wood pliable using steam or water, you can easily bend it to achieve the desired shape.
This article will guide you through the step-by-step process of curving balsa wood, providing practical tips and techniques to ensure successful results. So, let’s delve into the fascinating world of balsa wood and discover how you can effortlessly transform it into elegant curves.
Preparing Balsa Wood For Curving
When it comes to working with balsa wood, one important step is to prepare it for curving. This involves selecting the right type of balsa wood, taking measures to prevent splitting and cracking, as well as sanding and smoothing the surfaces. In this article, we will discuss each of these steps in detail, ensuring you have a solid foundation before embarking on your balsa wood curving project.
Choosing The Right Balsa Wood
Before you begin curving balsa wood, it is essential to choose the right type of wood. Balsa wood is available in different densities, ranging from soft to hard. The denser the wood, the more difficult it is to curve. Hence, it is recommended to opt for softer balsa wood for better results. Additionally, look for straight-grained pieces, as they are less likely to split or crack during the curving process.
Preventing Splitting And Cracking
To ensure a successful curving experience, it is crucial to take precautions to prevent splitting and cracking of balsa wood. One effective method is to moisten the wood before bending. Simply dampen a cloth or sponge and apply it to the areas that need to be curved. This slight moisture helps to improve the wood’s flexibility, reducing the chances of any damage.
Another important technique is to make relief cuts along the grain lines of the wood. These cuts will act as stress relievers, allowing the wood to bend without forcefully splitting. Ensure that the cuts are shallow and evenly spaced, taking care not to cut all the way through the wood.
Sanding And Smoothing The Surfaces
After selecting the appropriate balsa wood and safeguarding it from splitting and cracking, the next step is to sand and smooth the surfaces. This enhances the curving process and results in a more refined finished product.
Start by using a fine-grit sandpaper, such as 220 or 320, to gently sand the entire surface of the wood. This helps to even out any rough areas and remove any imperfections. Pay close attention to the edges, as these require special care to ensure a smooth and uniform curve.
Once the sanding is complete, it is essential to remove any dust that may have accumulated. You can use a clean, dry cloth or compressed air to blow away the particles. This step is crucial to ensure that the curves you create are clean and free from debris.
In conclusion, preparing balsa wood for curving is a critical step in achieving excellent results. By choosing the right wood, preventing splitting and cracking, and sanding and smoothing the surfaces, you can set yourself up for success in your balsa wood curving project.
Methods And Techniques For Curving Balsa Wood
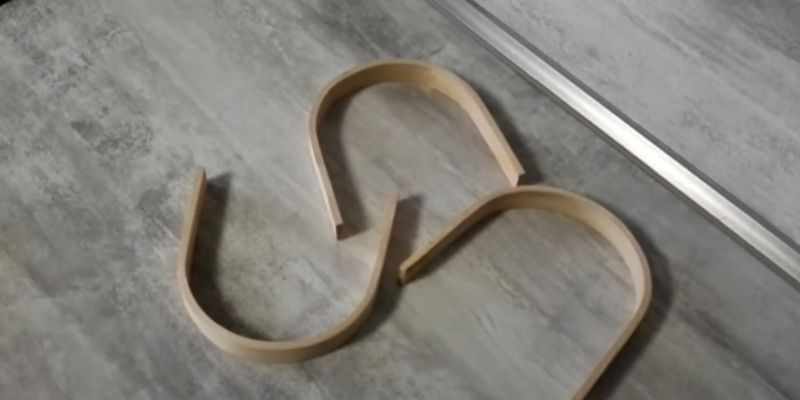
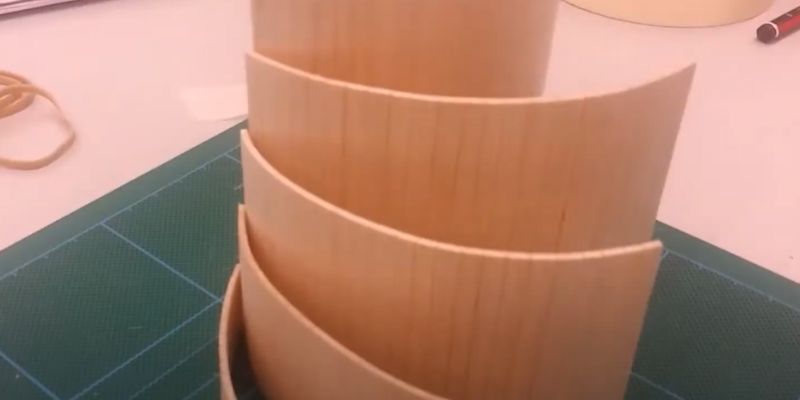
When it comes to working with balsa wood, being able to curve it to your desired shape is a valuable skill. By curving balsa wood, you can create intricate designs, add depth to your projects, and bring dimensionality to your craftsmanship. In this article, we will explore different methods and techniques for curving balsa wood, including steam bending, the water soaking method, and the use of a heat gun. Read on to discover how each of these techniques can help you achieve stunning curves in your balsa wood projects.
Steam Bending
Steam bending is a popular and effective method for curving balsa wood. This technique involves exposing the wood to steam, which softens the fibers and makes it more pliable. To steam bend balsa wood, follow these steps:
- Prepare a steam box by building a container that can hold both the balsa wood and a source of steam. Make sure to create a sealed environment to retain the steam.
- Cut the balsa wood to the desired length and soak it in water for 24 hours. This will prevent the wood from drying out during the steaming process.
- Place the soaked balsa wood inside the steam box and secure the lid tightly.
- Heat the steam source and allow the wood to steam for approximately 30 minutes per 2.54 centimeters (1 inch) of thickness.
- Once steamed, carefully remove the wood from the steam box and gently bend it to the desired shape. Use clamps or weights to hold the wood in place until it cools and retains its shape.
Water Soaking Method
Another method for curving balsa wood is the water soaking method. This technique involves fully submerging the wood in water to make it more flexible. Here’s how you can use the water soaking method to curve balsa wood:
- Fill a container with enough water to fully submerge the balsa wood.
- Place the balsa wood in the water and let it soak for at least 24 hours. You can weigh it down with stones or other heavy objects to ensure it stays fully submerged.
- Remove the wood from the water and wipe off any excess moisture. The wood should be damp but not dripping wet.
- Bend the damp balsa wood to the desired shape and hold it in place using clamps or weights until it dries completely.
- Once dry, the balsa wood will retain its curved shape.
Use Of Heat Gun
If you don’t have access to a steam box or prefer a quicker method, you can use a heat gun to curve balsa wood. The heat gun softens the wood, allowing you to mold it into the desired shape. Here’s how to use a heat gun for curving balsa wood:
- Ensure you have a well-ventilated workspace and protective gear, such as gloves and safety glasses.
- Hold the heat gun approximately 6 inches away from the balsa wood and move it back and forth, focusing on the area you want to bend.
- Continue heating the wood until it becomes flexible. Avoid overheating as it can lead to scorching or burning.
- Once the wood is pliable, gently bend it to the desired shape. Use clamps or weights to hold the wood in place until it cools and retains its shape.
- Allow the balsa wood to cool completely before removing the clamps or weights.
By using these methods and techniques – steam bending, the water soaking method, and the use of a heat gun – you can achieve beautiful curves in your balsa wood projects. Each technique offers its own advantages, so feel free to experiment and find the method that works best for your specific needs. With a little practice and patience, you’ll be able to create stunning curved designs that enhance your balsa wood craftsmanship.
Tips And Tricks For Perfectly Curving Balsa Wood
If you’re a woodworking enthusiast or enjoy building model airplanes, you probably know how versatile and lightweight balsa wood can be. Curving balsa wood allows you to create beautiful and intricate shapes that can add a whimsical touch to any project. However, achieving perfectly curved balsa wood requires some know-how and careful techniques. In this article, we will delve into some essential tips and tricks to help you achieve flawless curves in your balsa wood projects.
Planning The Grain Orientation
Before you begin the curving process, it’s important to pay attention to the grain orientation of the balsa wood. The grain refers to the linear direction of the wood fibers. By carefully planning the grain orientation, you can manipulate the wood’s natural tendencies to enhance the curving process.
For convex curves, where the wood is bending outward, align the grain parallel to the curve. This helps prevent the wood from splitting or splintering during the bending process. On the other hand, for concave curves, where the wood bends inward, align the grain perpendicular to the curve. This gives the wood more flexibility and reduces the risk of breakage. Taking the time to plan the grain orientation is a simple yet crucial step to ensure successful and precise curving of balsa wood.
Using Templates For Precision
When it comes to achieving perfectly curved balsa wood, using templates can be a game-changer. Templates provide you with precise measurements and angles to follow, ensuring that your curves are symmetrical and consistent. To create a template, start by drawing the desired curve on a piece of sturdy material, such as cardboard or plywood.
Next, carefully cut out the template with a jigsaw or scroll saw. Make sure to follow the marked line accurately for the best results. Once you have the template ready, secure it to the balsa wood using clamps or double-sided tape. By using the template as a guide, you can then carefully shape the wood to match the desired curve. The template acts as a reliable reference point, yielding professional-looking curves every time.
Allowing Sufficient Drying Time
After you’ve curved your balsa wood, it’s crucial to allow sufficient drying time before moving forward with your project. Balsa wood contains a fair amount of moisture, which can cause the curved shape to deform or shrink if not given enough time to dry. Allowing the wood to dry properly ensures that the curved shape will hold and maintain its integrity.
To dry your curved balsa wood, place it in a well-ventilated area with consistent temperature and humidity levels. Depending on the thickness of the wood and environmental conditions, drying can take anywhere from a few hours to several days. Remember to turn the wood occasionally to ensure even drying on all sides. Patience is key during this stage, as rushing the drying process can lead to disappointing results.
By following these tips and tricks for curving balsa wood, you can create stunning and flawless curves in your woodworking or model airplane projects. Remember to plan the grain orientation, use templates for precision, and allow sufficient drying time for the best results. With some practice and attention to detail, you’ll be able to achieve beautifully curved balsa wood pieces that will impress both yourself and others.
Enhancing And Finishing Curved Balsa Wood
Learn how to curve balsa wood with our step-by-step guide. Enhance and finish your projects with ease using these simple techniques. Level up your woodworking skills today!
Sealing And Protecting The Curved Surface
Once you have successfully curved your balsa wood, the next step is to focus on enhancing and protecting its surface. Sealing the curved surface is an essential step to ensure the longevity and durability of your balsa wood project. A properly sealed surface not only protects the wood from moisture and warping but also provides a smooth and uniform base for additional finishes.
There are several effective methods to seal the curved surface of balsa wood. One popular option is using wood sealant or wood glue. Apply a thin, even layer of sealant or glue over the curved surface using a brush or foam applicator. Make sure to cover all areas and allow the sealant to dry completely according to the manufacturer’s instructions. This will create a protective barrier, preventing moisture from entering the wood and causing damage.
Another method to seal the curved surface of balsa wood is by applying a layer of sanding sealer. Sanding sealer helps to fill any pores or imperfections in the wood, ensuring a smoother finish. To apply the sanding sealer, use a brush or a clean, lint-free cloth. Apply the sealer in thin, even coats, allowing each coat to dry before applying the next. Sand the surface lightly with fine-grit sandpaper between coats to achieve a smooth finish.
Staining And Painting Techniques
Once the curved surface is sealed, you can enhance the appearance of your balsa wood project with staining and painting. Staining is a popular technique that allows you to add color while highlighting the natural grain of the wood. Painting, on the other hand, provides endless possibilities for creativity and customization.
Staining Techniques:
- Choose a high-quality wood stain in your desired color. Make sure to select a stain that is compatible with balsa wood.
- Apply the stain using a brush or cloth, following the manufacturer’s instructions.
- Allow the stain to penetrate the wood for the recommended amount of time.
- Wipe off any excess stain with a clean cloth, following the wood grain.
- Allow the stained surface to dry completely before adding any other finishes.
Painting Techniques:
- Prepare the curved surface by lightly sanding it to create a smooth base for paint.
- Choose a high-quality wood paint in your desired color. Consider using acrylic or latex-based paints, as they adhere well to balsa wood.
- Apply the paint using a brush or spray, following the manufacturer’s instructions.
- Allow each coat of paint to dry before applying additional coats, if desired. Sand lightly between coats for a smoother finish.
Applying Varnish And Gloss Coat
For a final touch of protection and a glossy finish, applying varnish and gloss coat to your curved balsa wood is recommended. Varnish adds an extra layer of protection against moisture, while the gloss coat enhances the overall appearance of the wood, making it look polished and professional.
Here’s how you can apply varnish and gloss coat:
- Choose a high-quality varnish and gloss coat suitable for balsa wood.
- Apply a thin, even coat of varnish using a brush, making sure to cover all areas of the curved surface.
- Allow the varnish to dry completely between coats. Lightly sand the surface with fine-grit sandpaper between coats for a smoother finish.
- Once the varnish is dry, apply a thin, even coat of gloss coat using a brush or spray. This will give your balsa wood project a glossy, professional-looking finish.
- Allow the gloss coat to dry completely before handling or displaying your curved balsa wood.
By following these steps to seal, stain, and apply varnish and gloss coat, you can enhance and protect the curved surface of your balsa wood project, ensuring its longevity and a stunning final result.
Frequently Asked Questions For How To Curve Balsa Wood
Can Balsa Wood Be Steam Bent?
Yes, balsa wood can be steam bent.
How Do You Bend Wood With Water?
To bend wood with water, you need to soak the wood in water until it becomes pliable. Then, slowly bend the wood to the desired shape and secure it in place. Allow the wood to dry completely, and it will retain its new shape.
Is Balsa Wood Flexible?
Yes, balsa wood is flexible due to its lightweight and porous nature which allows it to bend easily.
Does Ammonia Weaken Balsa Wood?
Yes, ammonia weakens balsa wood.
Conclusion
Curving balsa wood is an art that requires patience and skill. By following the steps outlined in this blog post, you can successfully shape this versatile material into the desired form. Remember to always take necessary precautions and use appropriate tools.
With practice and experimentation, you’ll be able to create beautiful, curved structures and enhance your woodworking projects. So, go ahead and explore the endless possibilities of curving balsa wood!