How to Cut Laminate Flooring Already Installed Like a Pro
To cut laminate flooring already installed, measure and mark the area, use a circular saw or jigsaw to make the cuts, and remove any obstacles in the way. Cutting laminate flooring may require some precision and caution to avoid damaging the existing floor, but with the right tools and technique, it can be done effectively.
Whether you need to trim the edges or create space for a room transition, follow the instructions below to cut laminate flooring that is already in place.
Choosing The Right Tools
Cutting laminate flooring that is already installed requires careful consideration and the use of appropriate tools. With the right tools, you can achieve precise cuts and ensure a professional finish. In this section, we will discuss two important aspects of choosing the right tools: selecting the proper saw and gathering safety equipment.
Selecting The Proper Saw
When it comes to laminate flooring, using the right saw is crucial for achieving clean and accurate cuts. Here are a few saw options to consider:
- Miter Saw: A miter saw is a popular choice for cutting laminate flooring due to its versatility and ability to make angled cuts. It provides clean and precise cuts, making it ideal for trim work.
- Table Saw: A table saw is another reliable option for cutting laminate flooring. It offers stability and control, allowing you to make straight and consistent cuts.
- Circular Saw: The circular saw is a portable and cost-effective choice. It is easy to maneuver and can be used for both straight cuts and angled cuts. This saw is recommended for smaller flooring projects.
Choosing the right saw depends on the project size, complexity, and personal preference. Consider the scope of your project and select a saw that suits your needs and budget.
Gathering Safety Equipment
Before you start cutting laminate flooring, it is important to gather the necessary safety equipment. Here are some essentials:
- Safety Glasses: Protect your eyes from any potential flying debris by wearing safety glasses. They are essential in ensuring your safety during the cutting process.
- Dust Mask: Cutting laminate flooring generates dust particles that can be harmful if inhaled. Wear a dust mask to prevent respiratory issues and keep the air clean.
- Gloves: Protect your hands from cuts, scratches, and splinters by wearing a pair of gloves. They provide added grip and prevent accidents during the cutting process.
- Ear Protection: Power saws can produce high levels of noise that can be damaging to your ears. Use ear protection, such as earplugs or earmuffs, to safeguard your hearing.
Having the right safety equipment ensures a safe working environment and minimizes the risk of injuries. Be sure to wear the necessary gear before you start cutting laminate flooring.
Preparing The Area
To cut laminate flooring that is already installed, it’s crucial to prepare the area first. Clear the space of any furniture or obstacles, ensure the floor is clean and dry, and use a proper cutting tool for the best results.
Taking these steps will make the cutting process easier and more precise.
Clearing The Space
Before you start cutting your laminate flooring, it is important to clear the space to ensure you have enough room to maneuver and work comfortably. Remove any furniture, rugs, or obstacles from the area where you will be cutting. This will not only make the job easier but also reduce the risk of accidents or damage to your furniture. Sweep or vacuum the floor to remove any dirt, dust, or debris that may interfere with the cutting process. Taking these simple steps will help create a clean and safe workspace.
Measuring And Marking
Accurate measurements are vital when it comes to cutting laminate flooring. You want to ensure that your cuts are precise and fit perfectly into your designated space. Start by measuring the length and width of the area where the laminate flooring needs to be cut. Use a tape measure to determine the exact dimensions, and jot them down for reference. Once you have measured, mark the cutting lines on the laminate flooring. You can use a pencil or a piece of chalk to make these marks clearly visible. Take your time to double-check the measurements and ensure they are accurate before proceeding.
Cutting Techniques
Now that you have prepared the area and marked your measurements, it’s time to cut the laminate flooring. There are several techniques you can use depending on the tools you have and the type of cuts you need to make.
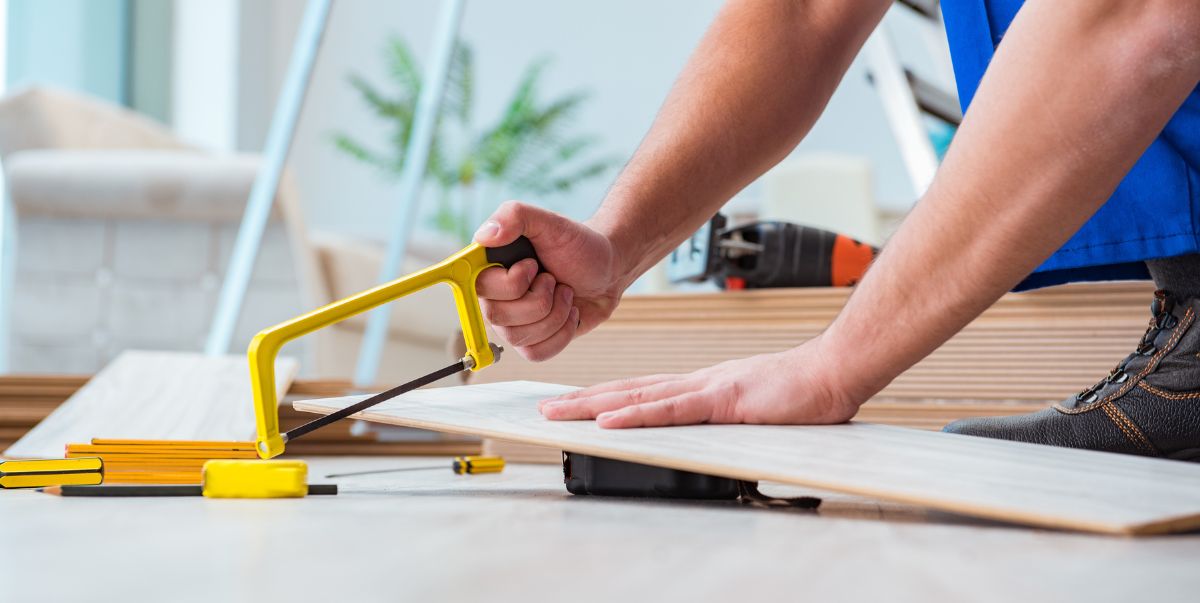
For straight cuts, you can use a circular saw or a miter saw. If you are using a circular saw, attach a fine-toothed blade specifically designed for laminate flooring. Guide the saw along the cutting line, applying gentle and steady pressure. Remember to wear safety goggles and gloves for protection.
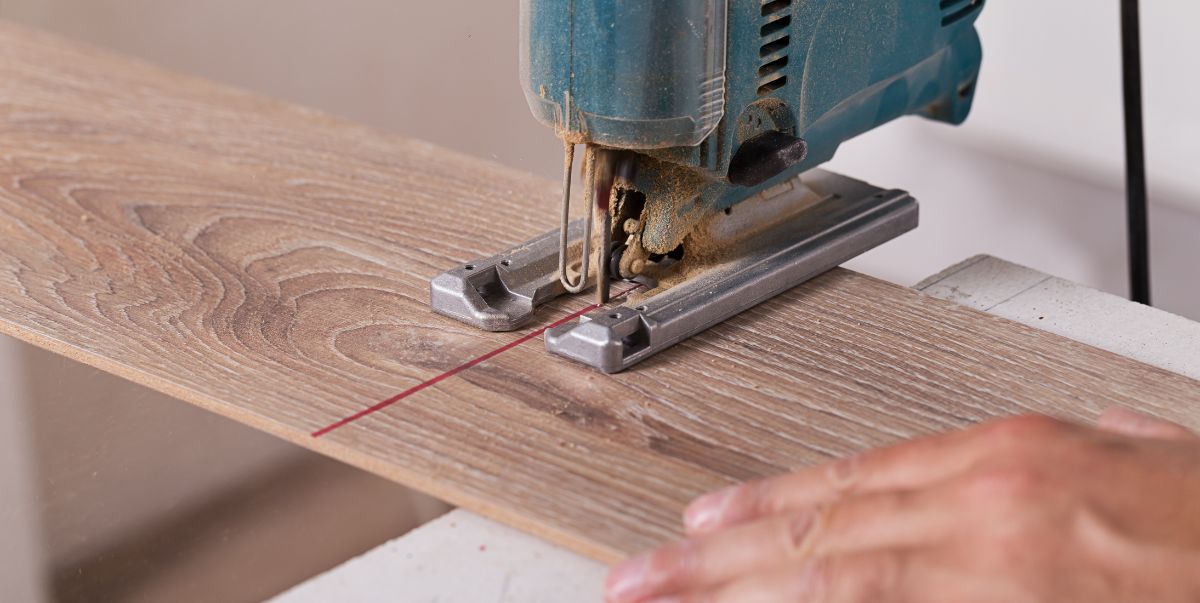
To make curved or irregular cuts, a jigsaw is a handy tool. Use a fine-toothed blade for smoother cuts. Start by drilling a hole large enough for the jigsaw blade to fit through. Then carefully cut along the marked line, following the desired shape.
When making notches or cutouts for pipes or irregular shapes, a coping saw or a utility knife may be used. A coping saw allows for more precise cuts, while a utility knife can be used for scoring and snapping the laminate along the marked lines.
Remember to always follow the manufacturer’s instructions and take all necessary safety precautions when using power tools. Double-check your measurements before making any cuts to ensure accuracy. With the right tools and techniques, you can achieve clean and precise cuts on your laminate flooring.
Now that you are familiar with the process of preparing the area, measuring and marking, as well as different cutting techniques, you are ready to tackle cutting your laminate flooring. Taking the time to properly prepare and measure will result in a professional-looking installation that fits perfectly into your space. Happy cutting!
Techniques For Cutting Laminate Flooring
Cutting laminate flooring can be a daunting task, especially when the flooring is already installed. However, with the right techniques and tools, you can achieve precise cuts without compromising the integrity of the floor. Whether you need straight cuts or curved cuts, there are specific methods to ensure a clean and professional finish.
Straight Cuts With A Circular Saw
When it comes to making straight cuts on laminate flooring, a circular saw is the ideal tool. Here are the steps to achieve clean and precise straight cuts:
- Measure and mark: Use a measuring tape and pencil to mark the cutting line on the laminate flooring.
- Set the saw: Adjust the depth of the circular saw blade to match the thickness of the flooring.
- Secure the flooring: Use clamps to secure the flooring in place to prevent shifting during cutting.
- Cut with precision: Carefully guide the circular saw along the cutting line, keeping a steady hand for a clean cut.
- Protect the edges: To prevent chipping, cut with the finished side facing down.
Curved Cuts With A Jigsaw
For curved or irregular cuts on laminate flooring, a jigsaw is the go-to tool. Follow these steps to achieve accurate and smooth curved cuts:
- Trace the curve: Using a template or carefully tracing the desired curve on the flooring, mark the cutting line with a pencil.
- Choose the right blade: Ensure the jigsaw blade is suitable for cutting laminate flooring to avoid splintering or rough edges.
- Secure the flooring: Just like with straight cuts, use clamps to secure the flooring in place.
- Slow and steady cutting: Slowly guide the jigsaw along the marked curve, allowing the blade to smoothly follow the line for a precise cut.
- Finish the edges: Use sandpaper to smooth any rough edges and ensure a seamless finish.
Dealing With Obstacles
Learn the step-by-step process for cutting laminate flooring that has already been installed. Discover tips and techniques to overcome obstacles for a clean and precise finish.
Cutting Around Door Frames
Cutting laminate flooring around door frames can be a challenge, but with the right technique, it can be done easily. Start by measuring the height of the door frame using a tape measure. Then, transfer this measurement onto a piece of laminate flooring by marking it with a pencil. Using a jigsaw, carefully cut along the marked line, ensuring you stay within the line.
Handling Odd-shaped Corners
Dealing with odd-shaped corners when cutting laminate flooring requires a bit of creativity. One effective method is to create a cardboard template of the corner. First, measure the angle by placing a bevel gauge against the corner and adjusting it until it matches the angle. Transfer this angle onto a piece of cardboard and cut it out.
Once you have your cardboard template, use it as a guide to mark the angle onto the laminate flooring. Use a jigsaw to cut along the marked line, making sure to follow the template closely. This technique will ensure a precise fit around those tricky corners.
Important Tips
When cutting laminate flooring, it’s important to consider a few things to make the process smoother and more efficient:
1. Wear safety goggles and a dust mask to protect yourself from any flying debris and dust.
2. Always use a sharp jigsaw blade designed specifically for cutting laminate flooring.
3. Take your time and make slow, steady cuts to avoid any mistakes or accidents.
4. Double-check your measurements before making any cuts to ensure a proper fit.
5. Don’t forget to leave a small expansion gap around the edges of the flooring to allow for natural movement.
By following these guidelines and techniques, you’ll be able to cut laminate flooring around obstacles like door frames and odd-shaped corners with precision and ease. Remember to measure twice and cut once to ensure a perfect fit, and don’t be afraid to ask for help if needed. With a little patience and practice, you’ll soon master the art of cutting laminate flooring.
Finishing Touches
Finishing Touches: After successfully cutting and installing laminate flooring, there are a few final steps to take to ensure a polished and professional appearance. These finishing touches can make all the difference in the overall aesthetic of your flooring project. In this section, we will cover how to properly install transition strips and the importance of cleaning up and inspecting the newly cut and installed laminate flooring.
Installing Transition Strips:
Transition strips are an essential component in any laminate flooring installation. They provide a seamless transition between different types of flooring or between rooms with different floor heights. To install transition strips:
- Measure the length of the doorway or the area where the transition strip will be placed.
- Cut the transition strip to the appropriate size using a saw or a miter box.
- Apply adhesive to the bottom of the transition strip.
- Press the transition strip firmly into place, ensuring it is level and flush with the laminate flooring.
- Allow the adhesive to dry according to the manufacturer’s instructions before walking on the transition strip.
Cleaning Up And Inspecting:
Once the laminate flooring has been cut and installed, it is important to clean up any debris and inspect the entire area to ensure a flawless finish. Follow these steps to clean up and inspect the newly cut laminate flooring:
- Remove any excess laminate dust and debris using a broom or vacuum cleaner.
- Inspect the seams between the laminate flooring pieces to ensure they are properly aligned and flush.
- Check for any visible gaps or inconsistencies in the flooring surface.
- Use a damp cloth to wipe down the laminate flooring, removing any smudges or marks.
- Allow the flooring to dry completely before placing furniture or walking on it.
By following these steps, you can ensure that your laminate flooring looks its best and provides a seamless and durable surface in your home. Taking the time to complete these finishing touches will result in a professional and visually appealing end result.
Frequently Asked Questions For How To Cut Laminate Flooring Already Installed
What Is The Best Tool To Cut Laminate Flooring Already Installed?
The best tool for cutting laminate flooring already installed is a laminate flooring cutter. It is efficient and provides smooth, precise cuts for a professional finish.
How Do You Cut Vinyl Flooring That Is Already Installed?
To cut vinyl flooring that is already installed, use a sharp utility knife or vinyl cutter. Score the flooring several times to create a clean cut, then carefully snap the pieces apart. For curves or corners, use a template and carefully cut with precision.
Can Laminate Flooring Be Cut With A Utility Knife?
Yes, laminate flooring can be cut with a utility knife. Utility knives are effective in making precise cuts on laminate flooring. It is important to use a sharp blade and to take proper safety precautions while cutting.
Can A Multi-Tool Cut Laminate Flooring?
Yes, a multi-tool can cut laminate flooring. It has versatile blades that can easily slice through the laminate material, making it a convenient option for DIY projects.
Conclusion
After learning how to cut laminate flooring already installed, you now have the skills to tackle flooring renovations confidently. By following the outlined steps, you can achieve professional-looking results without the need for professional installation. Remember to always measure twice, cut once, and be mindful of safety precautions.
With these techniques, you can customize your space and enhance its aesthetic appeal.