How to Rip a Board With a Circular Saw (Rip Fence + Blade Guide)
A circular saw rips a board by running its shoe along a clamped straightedge or rip fence with an 18-to-36-tooth rip blade set about 1/4 inch below the board’s thickness — never freehand on a pencil line alone. OSHA data shows kickback happens more often during rip cuts than crosscuts, since the closing kerf can pinch the blade. This guide covers rip fence setup, blade choice, feed rate, and long-board support.
What You Need to Rip a Board With a Circular Saw
Before you make the cut, gather a rip blade rated for your saw’s arbor size, a rip fence or a straight board to clamp as a guide, bar clamps, safety glasses, and hearing protection. A push stick helps on narrow rips where your hand would otherwise pass close to the blade.
- Circular saw with a sharp rip blade (18–36 teeth)
- Rip fence attachment, or a straight board/track clamped to the workpiece
- Bar or F-style clamps (at least two)
- Tape measure, pencil, and a combination square
- Push stick for rips narrower than about 3 inches
- Safety glasses and hearing protection
Choosing the Right Blade for Ripping a Board
A dedicated rip blade is a blade with 18 to 36 teeth, a flat-top grind, and a wide gullet that clears large chips quickly — because wood cut with the grain is far less prone to chipping than wood cut across it, ripping blades don’t need the fine tooth count a crosscut blade uses. A general combination blade will rip acceptably, but a true rip blade feeds faster and binds less on long cuts. For blade wear and when to replace one, see our circular saw blade lifespan guide.
| Blade Type | Teeth Count | Best For |
|---|---|---|
| Rip blade | 18–36 (flat-top grind) | Fast, straight cuts along the grain |
| Combination blade | 40–50 (alternating bevel) | General-purpose rip and crosscut work |
| Crosscut/finish blade | 60–80 (high ATB grind) | Smooth cuts across the grain — more resistance and heat when ripping |

Setting Up a Rip Fence or Straightedge Guide
Most circular saws accept a rip fence — a T-shaped bar that slots into the shoe and rides along the board’s edge to hold a fixed cutting width, usually up to about 6–7 inches. For wider rips, clamp a straight board or an aluminum track guide to the workpiece instead, offset from your cutline by the exact distance between your saw’s blade and the edge of its shoe.
Measure that shoe-to-blade offset once with a ruler and keep it written on a piece of tape stuck to the saw — it saves re-measuring on every job. This is the step that separates a clean rip from a wandering one, and it’s the main technique difference between ripping and the general straight-line cutting covered in our guide to cutting straight lines with a circular saw.
Best Rip Guide Pick
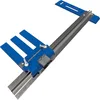
Kreg Rip-Cut Circular Saw Guide (KMA2685)
Clamps to the board and rides your saw’s shoe for repeatable rip widths without re-measuring a fence offset every time.
- Best for: repeat rip cuts on plywood and dimensional lumber
- Why we picked it: adjustable up to 24 inches, works with most side-blade circular saws
- Main drawback: needs a flat, clampable edge — awkward on irregular stock
Compare more rip-cutting options
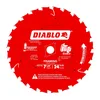 Option 1 Diablo D0724X 7-1/4″ 24T Rip Blade
|
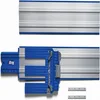
 Option 2 Milescraft 1409 Track Saw Guide
|
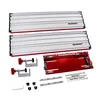
 Option 3 Kreg KMA2700 Accu-Cut Guide System
|
As an Amazon Associate we earn from qualifying purchases.
How to Rip a Board With a Circular Saw: Step-by-Step
Once the blade and guide are set up, the cut itself follows six steps:
- Choose a rip blade: Fit an 18–36 tooth flat-top rip blade before you start — a fine-tooth crosscut blade will bog down and burn on a long rip.
- Mark and clamp the guide: Mark the rip line at both ends of the board, then clamp a rip fence or straightedge parallel to it, offset by your saw’s exact shoe-to-blade distance.
- Set the blade depth: Set the blade about 1/4 inch deeper than the board’s thickness — deep enough to cut through cleanly, not so deep that more blade than necessary is exposed.
- Support both sides of the cut: Support the keeper piece and the waste piece independently so neither sags and pinches the blade partway through.
- Start the cut: Let the saw reach full speed before the blade touches the board, then feed it forward at a steady pace against the guide — never force it.
- Finish the cut: Keep the shoe flat against the guide for the entire length of the board, and let the blade come to a stop before lifting the saw clear.
Preventing Kickback When Ripping
Kickback is the single biggest safety risk in this cut. It happens when the closing kerf behind the blade pinches the plate and throws the saw back toward you — and it’s specifically a rip-cut hazard more than a crosscut one, because a long rip has more board length available to sag and close the kerf.
📊 Kickback is more likely to occur when ripping than when crosscutting, according to OSHA — a direct result of the closing kerf pinching the blade on long, grain-direction cuts. — Source: OSHA Woodworking eTool, Machine Hazards: Kickbacks
- Use a rip blade with an anti-kickback tooth profile or a riving knife/splitter behind the blade to hold the kerf open
- Never set the blade deeper than about 1/4 inch below the material — more exposed blade means more surface area that can bind
- Keep the saw’s guard functioning; never wedge or tape it open
- Stand slightly to the side of the cutting line, never directly behind the saw
- If the blade binds, release the trigger immediately and back the saw out — don’t force it through
“In the shop, the fastest fix for a rip cut that starts to bind isn’t a better blade — it’s support directly under the cutline, not just at the board’s ends. A long board that sags in the middle closes the kerf onto the blade well before the cut is done.”

Ripping Wide Boards, Bevel Cuts, and Long Stock
For boards wider than your rip fence’s range, clamp a full-length straightedge or track guide instead of relying on the shoe-mounted fence. For bevel rips, set the bevel angle before clamping the guide, since tilting the blade changes the shoe’s effective offset from the cutline. On long stock, add a mid-span sawhorse or roller stand — unsupported spans over about 4 feet are where most kerf-binding kickback starts.
For material-specific ripping — sheet goods, narrow strips, or dimensional lumber — see our guides to ripping plywood with a circular saw, ripping narrow boards, and ripping a 2×4. If splintering on plywood veneer is the main problem rather than the rip technique itself, see our guide on cutting plywood without splintering.
Common Mistakes When Ripping With a Circular Saw
- Setting the blade too deep: more exposed blade increases friction, heat, and kickback risk — 1/4 inch past the material is enough.
- Skipping the guide: freehanding along a pencil line drifts on anything longer than about 2 feet.
- Using a crosscut blade: high tooth-count blades bog down and burn when fed along the grain at rip speed.
- Letting the waste piece hang unsupported: an unsupported offcut sags, closes the kerf, and binds the blade near the end of the cut.
- Forcing the feed rate: push too fast and the blade bogs down and can grab; too slow and the blade can burn the cut edge.
How do you rip straight with a circular saw?
Clamp a straightedge or rip fence parallel to your cutline, offset by your saw’s exact shoe-to-blade distance, then feed the saw steadily with the shoe held flat against the guide for the full length of the cut.
What blade should you use to rip a board with a circular saw?
Use a dedicated rip blade with 18 to 36 teeth and a flat-top grind. Fewer teeth and a wider gullet clear material faster along the grain than a 60–80 tooth crosscut blade, which bogs down and heats up on long rip cuts.
Why does a circular saw kick back when ripping?
Kickback happens when the closing kerf behind the blade pinches the plate as the cut progresses, throwing the saw back toward the operator. OSHA notes this is more common on rip cuts than crosscuts because longer, grain-direction cuts give the kerf more length to close and bind.
Can you rip a 2×4 with a circular saw instead of a table saw?
Yes — clamp a straightedge guide at the measured offset, set the blade about 1/4 inch below the 2×4’s thickness, and feed steadily. Exact measurements for this specific board size are covered in the ripping wide boards section above.
What is the best tool to rip a board?
A table saw with a rip fence gives the most repeatable results for shop work. A circular saw with a clamped guide is the better choice for boards too large to handle on a table saw, or for job-site cuts where a table saw isn’t practical.
How do you keep a circular saw from wandering on a long rip cut?
Use a full-length clamped guide rather than a short fence, support the board at mid-span on cuts longer than about 4 feet, and keep a steady feed rate — wandering usually comes from the shoe lifting off the guide or the board flexing mid-cut.
Conclusion
Ripping a board with a circular saw comes down to three things: a rip blade with the right tooth count, a clamped guide set at the correct offset, and support that keeps the kerf from closing on the blade. Get those three right and the technique scales from a single 2×4 to a full sheet of plywood. For general straight-line cuts across the grain, see the guide linked above, and for the full lineup of blade and setup guides, visit our circular saw hub.