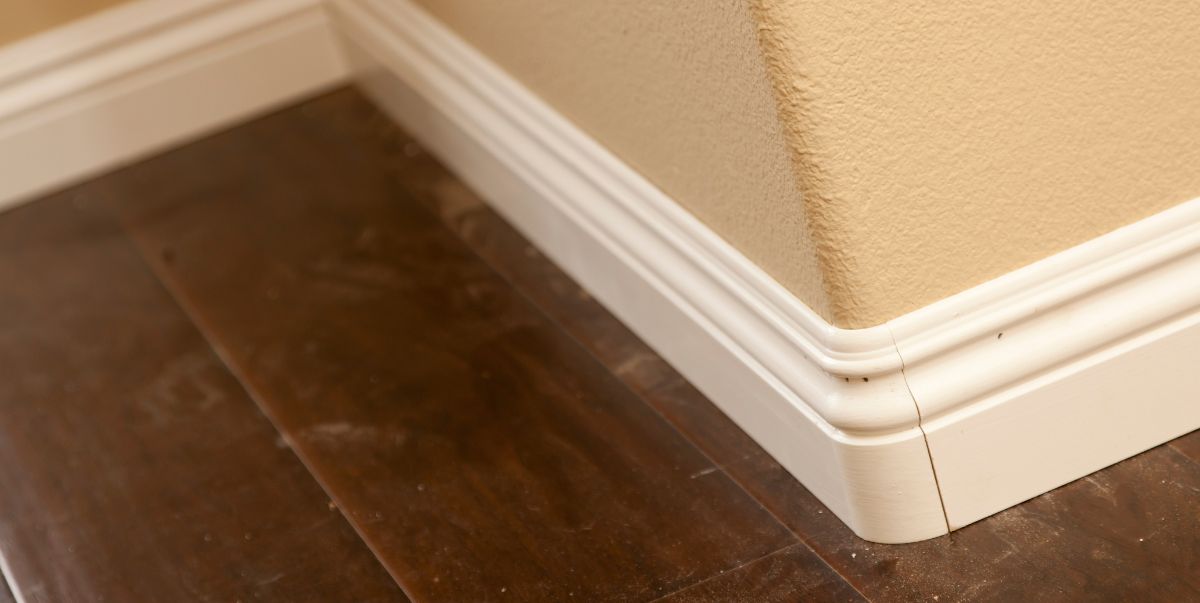
How to Cut Outside Corner Baseboard Molding: Expert Techniques Revealed
Cutting outside corner baseboard molding is a straightforward process. Simply measure and mark the molding, cut at a 45-degree angle, and then attach it to the wall for a clean finish.
Choosing The Right Tools
When cutting outside corner baseboard molding, it’s crucial to use the right tools for a precise and professional finish. A miter saw and coping saw is essential for achieving clean and accurate cuts. Measure and mark the molding accurately before cutting to ensure a seamless fit.
When it comes to cutting outside corner baseboard molding, having the right tools is essential for achieving a professional finish. With the proper tools, you can ensure precision and efficiency while minimizing the risk of mistakes. In this section, we will discuss the key tools you need to have in your arsenal to get the job done right.
Selecting The Correct Saw
In order to cut outside corner baseboard molding accurately, it is crucial to select the correct saw for the job. The two most common types of saws used for this purpose are a miter saw and a coping saw.
A miter saw, also known as a chop saw, is ideal for making precise angled cuts. It allows you to set the saw at the desired angle, ensuring a clean and accurate cut. With its rotating blade, a miter saw can easily create the beveled edges required for outside corners.
On the other hand, a coping saw is perfect for intricate cuts and shaping the molding to fit tighter corners. This saw has a narrow, fine-toothed blade that is adjustable and can be angled as needed. While it requires more manual effort, the coping saw allows for greater flexibility and precision when working with complex corner angles.
Ensuring Precision With Measuring Tools
Accurate measurements are vital to ensure that your outside corner baseboard molding fits perfectly and aligns seamlessly. Here are some essential measuring tools that will help you achieve precision:
- A measuring tape: A staple in any toolbox, a measuring tape allows you to take precise measurements of the length and width of the molding pieces.
- A combination square: This tool is handy for checking if corners are 90 degrees and for marking the angles accurately.
- A miter gauge: When using a miter saw, a miter gauge is invaluable for setting and adjusting the angles of the saw blade.
- A bevel gauge: This tool helps you determine the angle of the corner you are working on, ensuring an accurate cut.
By using these measuring tools in combination with the correct saw, you can cut your outside corner baseboard molding flawlessly, resulting in a professional-looking finish.
Preparing The Molding
Learn how to cut outside corner baseboard molding like a pro with these simple steps. Achieve a clean and professional look for your home by following our easy-to-understand instructions.
Measuring And Marking
Before you begin cutting the outside corner baseboard molding, you need to make sure you have accurate measurements and clear markings. This will ensure that your cuts are precise and the molding fits perfectly into place.
Start by measuring the length of the wall where the molding will be installed. Use a measuring tape to get an accurate measurement from one corner to the other. Write down this measurement as it will be crucial for cutting the molding at the correct angle.
Cutting The Molding At The Correct Angle
Once you have the measurements and markings in place, it’s time to cut the outside corner baseboard molding at the correct angle. This step is crucial to ensure a seamless and professional-looking installation.
To cut the molding at the correct angle, you can use either a miter saw or a miter box with a hand saw. These tools will allow you to make precise angled cuts that fit perfectly into the corner.
Place the molding securely in the miter saw or miter box and align the marked line with the appropriate angle guide. Take your time to ensure the molding is held firmly in place to avoid any mishaps during the cutting process.
Tips For Success
To achieve the best results when cutting outside corner baseboard molding, keep these tips in mind:
- Always wear safety goggles and gloves to protect yourself during the cutting process.
- Double-check your measurements and markings to avoid any mistakes.
- Start with a longer piece of molding than needed to allow for any adjustments or errors.
- Make test cuts on scrap material to verify the accuracy of your angles before cutting the actual molding.
- Take your time and cut slowly to ensure clean and precise cuts.
By following these steps and tips, you will be able to effectively cut outside corner baseboard molding and achieve a professional-looking finish. Taking the time to properly prepare and measure the molding will ensure that your installation goes smoothly and the end result is visually pleasing.
Cutting Techniques
Cutting baseboard molding for the outside corner requires precision and skill. Understanding the cutting techniques is crucial for a professional finish. Let’s delve into the essential cutting techniques for baseboard molding.
Making The Initial Cut
When cutting outside corner baseboard molding, the initial cut is crucial for a seamless fit. Measure the length of the baseboard molding and mark the measurement with a pencil. Use a miter saw to make an angled cut at 45 degrees in the opposite direction for each board. Ensure that the angle matches the corner’s angle precisely.
Fine-tuning The Fit
After the initial cuts, fine-tuning the fit ensures a perfect alignment. Use a coping saw to meticulously trim the inside edge of the molding where it meets the other piece. This allows the pieces to fit together seamlessly, creating a professional finish. Take time to ensure that the cuts perfectly align and create a smooth joint for an impeccable result.
Attaching The Molding
Once you have measured, cut, and prepared your outside corner baseboard molding, it’s time to attach it to the wall. This is the final step in achieving a polished and professional look for your room. In this section, we will guide you through the process of positioning, aligning, and securing the molding in place.
Positioning And Aligning The Molding
To position and align the molding accurately, follow these steps:
- Clean the wall surface thoroughly to remove any debris or dirt that may hinder proper adhesion.
- Hold the molding against the wall, ensuring that the mitered or coped ends fit snugly at the corner.
- Use a level to ensure the molding is straight and even across the length. Adjust as necessary.
- Check the alignment with a plumb line or a level vertically to ensure that the molding is straight from top to bottom.
- Make any necessary adjustments to achieve perfect positioning and alignment.
Securing The Molding In Place
Once the molding is properly positioned and aligned, it’s time to secure it in place. Follow these steps to ensure a secure and long-lasting installation:
- Apply a bead of construction adhesive along the backside of the molding, focusing on the edges and corners.
- Press the molding firmly against the wall, ensuring even contact with the adhesive.
- Use a nail gun or finish nails to secure the molding to the wall, placing nails every 16 inches or so along the length.
- Counter-sink the nails slightly to ensure they are flush with the surface of the molding.
- Fill the nail holes with wood filler, allowing it to dry before sanding it smooth.
- Finally, touch up any gaps or imperfections with caulk or additional wood filler for a seamless finish.
Attaching the molding is the final step in bringing your outside corner baseboard to life. By following these steps and utilizing the right tools and materials, you can achieve a professional and visually appealing result that enhances the overall look and feel of your room.
Finishing Touches
Once you have successfully cut and installed the outside corner baseboard molding, it’s time to focus on the finishing touches. These final steps will ensure that your baseboard molding looks clean, and polished, and seamlessly blends with your room’s decor.
Sanding And Smoothing The Edges
Before applying the paint or stain, it’s crucial to sand and smooth the edges of the baseboard molding. This step will eliminate any rough or uneven areas, giving your molding a professional and finished appearance.
- Start by using fine-grit sandpaper to gently smooth out the edges of the molding. Be sure to sand in the direction of the wood grain to avoid causing any damage or splintering.
- After sanding, use a damp cloth to remove any residual dust or debris from the surface of the molding.
- Inspect the molding for any remaining imperfections or rough spots. If necessary, repeat the sanding process until the edges are completely smooth.
Applying Paint Or Stain
Now that your baseboard molding is properly smoothed, it’s time to apply the paint or stain to achieve a flawless finish.
- First, choose a color of paint or stain that complements your room’s decor. Consider creating a sample board by applying small amounts of paint or stain to a spare piece of wood to ensure you’re happy with the color before application.
- If you’re painting the baseboard molding, use a high-quality brush or roller to apply a thin and even coat of paint. Allow the first coat to dry completely before applying additional coats (if required).
- If you prefer the natural beauty of the wood, use a brush or cloth to apply the stain in the direction of the wood grain. After applying the stain, be sure to wipe off any excess to avoid uneven coloration.
- For both paint and stain, allow the final coat to dry thoroughly according to the manufacturer’s instructions before handling or reinstalling the baseboard molding.
With these simple steps, you can achieve a professional-looking finish for your outside corner baseboard molding. Whether you choose to paint or stain, remember to take your time and ensure the application is smooth and even. Now, stand back and admire your perfectly finished baseboard molding that adds a touch of elegance and sophistication to your space.
Frequently Asked Questions For How To Cut Outside Corner Baseboard Molding
What Angle Do You Cut Trim For Outside Corners?
To cut trim for outside corners, use a miter saw to make a 45-degree angle cut. This will ensure a clean and professional-looking corner.
How Do You Mitre External Corner Trim?
To miter the external corner trim, measure and mark the trim at a 45-degree angle. Use a miter saw to make the cuts, ensuring they fit together snugly. Secure the trim in place with nails or adhesive for a clean finish.
How Do You Install Outdoor Corner Molding?
To install outdoor corner molding, follow these steps:
1. Measure and cut the molding to fit the corner.
2. Apply adhesive to the back of the molding.
3. Press the molding firmly onto the corner, starting from the bottom.
4. Use finishing nails or screws to secure the molding in place.
5. Fill any gaps with caulk and paint or stain as desired.
How Do You Cut 90 Degree Trim?
To cut 90-degree trim, follow these steps:
1. Measure and mark the trim accurately.
2. Use a miter saw to make precise 45-degree cuts on each end.
3. Fit the trim together at a right angle and secure it with nails or adhesive.
4. Take your time and double-check your measurements for a seamless fit.
Conclusion
Mastering the technique of cutting outside corner baseboard molding is a valuable skill for any DIY enthusiast. With the right tools and a bit of practice, you can achieve professional-looking results. By following the steps outlined in this guide, you’ll be able to confidently trim your baseboard molding for a seamless finish.
Happy renovating!