
How to Cut Plywood With a Circular Saw: Right Blade, No Splinters
A circular saw cuts plywood cleanly when you use a 60–80 tooth blade, set the depth about ¼ inch past the material, and keep the good face down — the blade exits through the top, so that’s where tear-out happens. Skip any of these and you’ll get burned edges, splintered veneer, or a wandering cut line. This guide covers blade selection, sheet support, the good-face-down rule, and keeping the saw running dead straight with a guide rail.
What You’ll Need
- Circular saw (corded or cordless, 7¼″ blade size is standard)
- 60–80 tooth carbide-tipped plywood/finish blade
- Straightedge, clamped board, or a track-style guide rail
- Rigid foam insulation board or scrap 2x4s for support
- Tape measure, pencil or chalk line, safety glasses, dust mask

What Blade Should You Use to Cut Plywood With a Circular Saw?
Use a carbide-tipped blade with 60 to 80 teeth for veneered plywood — the stock 24-tooth framing blade that ships with most saws is built for fast, rough cuts in construction lumber and will chip the face veneer badly. More teeth means each tooth removes a smaller bite, which is what produces a clean edge instead of a torn one.
| Tooth Count | Best For | Trade-Off |
|---|---|---|
| 24T (stock framing blade) | Fast, rough construction cuts | Heaviest tear-out on veneer |
| 40T (general purpose) | Everyday plywood breakdown, sheds, subfloor | Visible tear-out on cross-grain cuts |
| 60T (ATB fine-finish, e.g. Diablo D0760A) | Veneered plywood, cabinet-grade cuts | Slower feed rate; can burn if pushed too fast |
| 80T (ultra-fine) | Melamine and laminate-faced panels | Slowest cut; clogs faster in resinous wood |
For most furniture and cabinet plywood, a 60-tooth blade is the sweet spot — it cuts clean without slowing the saw to a crawl. Save 80-tooth blades for melamine or laminate panels where any tear-out shows.
Setting the Right Blade Depth
Set the blade so it extends about ¼ inch below the plywood’s bottom face — enough to cut all the way through cleanly without dragging excess blade through the cut. Line the blade up against the edge of the sheet and adjust the depth with the saw unplugged, then double-check once the saw is resting on your guide rail or straightedge, since the track itself lifts the saw slightly.
📊 Blade depth should extend about ¼ inch past the plywood’s bottom face — deeper cuts drag more blade through the material and raise binding and kickback risk. Source: Family Handyman, Kreg Tool.
How to Support Plywood So It Doesn’t Bind or Kick Back
Plywood that isn’t fully supported will sag and pinch the blade mid-cut, which is the most common cause of kickback. Lay the sheet on a piece of 1″ rigid foam insulation board (reusable for dozens of cuts) or a row of scrap 2x4s spaced close enough that the sheet can’t flex between them. Set your blade depth so it just nicks the foam or the 2x4s underneath — you’re not trying to protect the floor, you’re trying to keep the workpiece from collapsing on itself as the cut finishes.
Clamping the sheet to a workbench and letting the cutoff fall away works for small pieces, but avoid it for anything wider than a foot or so — a large offcut can snap and tear out before the cut finishes.
Why the Good Face Should Go Down
A hand-held circular saw’s motor sits above the workpiece, and the blade spins so the teeth are moving upward at the point of contact — they enter the plywood from underneath and exit through the top face. That upward exit is what tears the wood fibers on the up-facing side. Flip the sheet so the good, show-facing side is down; whatever splintering happens lands on the hidden bottom face instead.
This is specific to top-mounted circular saws (and track saws ridden in their normal position) — it has nothing to do with grain direction, and it applies the same way whether you’re ripping with the grain or crosscutting across it. If you need both faces clean, score the cut line first with a utility knife through the top veneer layer, or run a strip of painter’s tape along the line to hold the fibers down before cutting.

Setting Up a Straightedge or Guide Rail for Straight Cuts
The simplest guide is a straight board clamped to the sheet, positioned so the saw’s shoe rides against it — you just need to account for the offset between the blade and the edge of the saw’s base plate, since the blade doesn’t sit flush with the shoe. Measure that offset once with a test cut and you can reuse the number every time.
If you break down plywood often, a track-style guide rail removes the offset math and the clamping entirely — you align the track to your cut line and the saw’s sled rides the track. For a full breakdown of every method, from a clamped scrap board to a dedicated track, see our guide on how to cut straight with a circular saw.
Best Plywood Guide Rail Pick
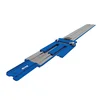
Kreg Accu-Cut Circular Saw Track Guide (KMA2700)
A clamp-free aluminum track that rides against anti-chip strips, so it guides the saw straight and protects the top face from tear-out at the same time.
- Best for: Repeat straight rip and crosscuts on plywood up to 50″ long without clamping anything down
- Why we picked it: The anti-chip guide strips do double duty as splinter protection, which matters most on cross-grain cuts
- Main drawback: Not compatible with worm-drive saws or saws with a plastic upper blade guard
Compare more plywood-cutting options
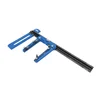 Budget Pick Kreg Rip-Cut Circular Saw Guide (KMA2400)
|
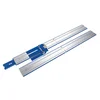 Full-Sheet Pick Kreg Accu-Cut XL Track Guide (KMA3700)
|
 Blade Pick Diablo D0760A 60T Ultra Finish Blade
|
As an Amazon Associate we earn from qualifying purchases.
How to Cut Plywood With a Circular Saw, Step by Step
- Mount the right blade: Install a 60–80 tooth carbide blade and set the depth about ¼ inch past the plywood’s bottom face.
- Support the sheet: Lay the plywood on rigid foam board or spaced 2x4s so it can’t sag or pinch the blade mid-cut.
- Orient the good face down: Flip the sheet so the show face is against the support material, then mark your cut line on the back.
- Set up your guide: Clamp a straightedge or align a track guide rail to the cut line, accounting for the saw’s blade-to-edge offset.
- Start the cut at full speed: Let the blade reach full RPM before it touches the plywood, then feed the saw at a steady, even pace — too fast tears the wood, too slow can burn it.
- Check the edge: Light sand any rough spots; if you need both faces clean, score the line with a utility knife or tape it before you start.
Cutting Curves, Angles, and Large Sheets
For angled cuts, use an angle finder or protractor to mark the angle on the plywood, then set your saw’s bevel adjustment (not the blade guide) to match — cut slowly, since an angled cut has more blade surface in contact with the material at once. For curves, a circular saw isn’t the right tool past a very gentle radius; switch to a jigsaw once the curve gets tight.
Breaking down a full 4×8 sheet alone is mostly a support problem, not a cutting problem — keep both the piece you’re cutting and the offcut fully supported so neither can drop and bind the blade before the cut finishes.
Preventing Splinters and Tear-Out
A 60–80T blade and the good-face-down orientation handle most of the work, but two extra steps help on veneered or melamine-faced sheets: run a strip of low-tack painter’s tape along the cut line before you cut, or score the line with a utility knife through the top veneer layer first. Both hold the surface fibers in place as the blade passes through.
If splinter-free edges on both faces are the whole point of the project — not just one technique among several — our dedicated guide on how to cut plywood without splintering compares circular saw, table saw, and track saw methods side by side.
Common Mistakes to Avoid
- Using the stock blade: The 24-tooth blade that ships with most saws is built for framing lumber, not veneer — swap it before you touch plywood.
- Setting the blade too deep “to be safe”: This drags more blade through the cut, adds heat, and makes tear-out worse, not better.
- Cutting on an unsupported span: An unsupported sheet sags and pinches the blade, which is the most common cause of kickback.
- Starting the cut before the blade is at full speed: This can cause the saw to jump off your cut line the instant it contacts the wood.
“The mistake I see most often in the shop is guys setting the blade way too deep ‘to be safe.’ All that does is drag more blade through the cut, add heat, and make tear-out worse — a quarter inch past the material is plenty.”
Before you cut, it’s worth knowing which way the blade should face on your saw, and if you’re working without a saw on hand at all, see our guide on cutting plywood without a circular saw. For more circular saw techniques, browse our full circular saw guide hub.
Frequently Asked Questions
What blade should I use to cut plywood with a circular saw?
Use a carbide-tipped blade with 60 to 80 teeth. That range gives a clean, low-tear-out cut on veneered plywood without slowing the saw down as much as an 80-100 tooth blade would. The 24-tooth blade that ships with most saws is meant for rough construction lumber, not plywood.
Should the good side of plywood face up or down when cutting?
Face down. A hand-held circular saw’s blade exits through the top of the material as it cuts, and that’s the side where tear-out happens. Flipping the good, visible face down puts any splintering on the hidden bottom face instead.
What should I put under plywood when cutting it with a circular saw?
A sheet of 1-inch rigid foam insulation board or a row of closely spaced scrap 2x4s. Either one keeps the sheet from sagging mid-cut, which is the main cause of the blade binding and kicking back.
Do I need a guide rail to cut plywood straight?
No, but it helps a lot. A clamped straightedge works fine for occasional cuts once you account for the offset between the blade and the saw’s base plate. A track-style guide rail, like a Kreg Accu-Cut, removes that offset math and speeds up repeat cuts.
How deep should I set my circular saw blade to cut plywood?
About ¼ inch past the plywood’s bottom face. Line the blade up against the edge of the sheet with the saw unplugged to set it, and recheck the depth once the saw is resting on a guide rail, since the track lifts the saw slightly.
How do you measure and cut angles for plywood?
Use an angle finder or protractor to find and mark the angle on the plywood, then set your saw’s bevel adjustment to match before cutting. Cut slowly on angled cuts since more of the blade is in contact with the material at once.
Conclusion
Get the blade, depth, support, and orientation right and a circular saw will break down plywood as cleanly as a table saw for most projects. Add a guide rail once you’re making these cuts often enough that the clamp-and-measure routine starts to slow you down.