How to Engrave Wood With a Dremel
Engraving on wood with a Dremel can be done using a compact desktop laser cutter or hand tools like chisels and gouges. For a more modern approach and precision, a Dremel can be used to carve wood.
Tools Required For Engraving On Wood With A Dremel
Engraving on wood with a Dremel requires specific tools such as a Dremel rotary tool kit, various types of Dremel carving bits, and safety gear such as goggles and dust masks. With the right tools and techniques, engraving on wood can be easily accomplished using a Dremel.
Dremel Rotary Tool
Engraving on wood using a Dremel rotary tool requires a good quality rotary tool, which is usually made of plastic and metal components. This tool is equipped with a motor that spins a grinding or cutting accessory. When choosing a Dremel rotary tool, it’s important to choose one that’s powerful enough for the job, yet comfortable to grip, easy to use, and lightweight. The Dremel 3000, 4000, and 4300 are some popular models which offer flexibility, speed, and improved ergonomics while engraving.
Engraving Bits And Accessories
Using the right engraving bits and accessories is essential when engraving on wood with a Dremel. A Dremel offers a variety of accessories and bits to choose from. The most common accessories for wood engraving include high-speed cutters, diamond points, and sanding drums. Engraving bits come in different shapes and sizes such as diamond tip bits, carbide bits, and high-speed steel bits. It’s essential to choose the right bit for the particular wood and engraving needs for the best results.
Safety Gear
When using a Dremel rotary tool for engraving, it’s essential to use proper safety gear to protect yourself from flying debris, dust, or metal shavings. Eye protection, such as safety glasses or goggles, and a dust mask are necessary to prevent eye and respiratory problems. Some Dremel tools come with a plastic safety shield that provides an extra layer of protection. It’s recommended to read the operator’s manual before starting to use the Dremel tool.
Choosing The Right Wood For Engraving
Engraving on wood can be done with a Dremel, but it’s important to choose the right type of wood for the job. Softer woods like basswood and butternut are great options for carving, while harder woods like oak and maple can be more challenging.
With the right tools and techniques, anyone can create beautiful engravings on wood.
When it comes to engraving on wood with a Dremel, choosing the right wood is crucial to ensure that the engraving turns out well. The wrong choice of wood can make or break an engraving project. The softer the wood, the easier it is to engrave. However, it is essential to consider the grain pattern of the wood when choosing the right type of wood for engraving. This article will focus on the subheading, “Choosing the Right Wood for Engraving,” and discuss the best softwoods for easy carving.
Softwoods For Easy Carving
Softwoods are ideal for engraving because they are easy to carve and engrave. They usually have straight grain patterns, making them great for detailed work. The best softwoods for engraving are:
- Cedar: Cedar is a popular choice for engraving because it has a smooth, fine grain that makes it easy to carve.
- Pine: Pine is an excellent choice for engraving because it has a soft texture and a clear grain pattern that is easy to follow.
- Balsa: Balsa is another softwood that is great for engraving. It is incredibly lightweight and has soft, delicate grains that make it easy to work with.
When choosing softwoods for engraving, it is essential to ensure that they are dry and well-seasoned. Wet or green wood tends to shrink and warp, resulting in an uneven engraving.
In conclusion, choosing the right wood for engraving on wood with a Dremel is crucial for a successful project. Softwoods are the best choice for carving because they are easy to work with and have clear grain patterns. However, it is essential to ensure that the wood is dry, well-seasoned, and free from warping to achieve the best results.
Preparing The Wood Surface For Engraving
Preparing the wood surface before engraving with a Dremel is crucial to ensure a clean and polished finish. Sanding the wood with fine-grit sandpaper and removing any particles on the surface with a damp cloth can help create a smooth and even base for engraving.
Before you begin engraving on the wood surface, it’s important to prepare it properly to ensure the best results. This process involves sanding and cleaning the surface, so you can work on a smooth and clean canvas. Below is a breakdown of the steps you need to take to prepare your wood surface for engraving:
Sanding the Wood:
The first step to prepare your wood surface for engraving is to sand it. Sanding smoothens any rough edges and makes the surface uniform, allowing you to easily carve on it. You can use a sandpaper block or an electric sander to sand the surface of the wood. Gently move the sandpaper or sander over the surface in circular motions, covering the entire surface, until the surface is smooth to the touch.
Cleaning the Wood Surface:
Cleaning the wood surface is the next important step in preparing the wood for engraving. This step involves removing any sawdust, dirt, or debris left from sanding. Any residue left on the surface can interfere with the engraving and ruin the finished design. You can use a clean, dry cloth or a brush to remove any dust or debris on the surface. Additionally, you can wipe the surface with a damp cloth to ensure all residue is removed.
Once you have completed these two steps, your wood surface is now ready for engraving. These steps may seem basic, but taking the time to properly prepare the wood surface will help you achieve the best results possible and save you time in the long run. So, make sure to spend the extra time in preparing your wood surface before engraving.
Techniques For Engraving On Wood With A Dremel
If you want to engrave on wood, Dremel is the perfect tool for it. There are various techniques for engraving on wood with a Dremel that you can use. Here are some of the most common techniques:
Freehand Engraving
Freehand engraving is a technique where you carve on wood without any pre-made guide or template. This technique is perfect if you want to create an organic and unique design. To master this technique, start by drawing your design on the wood with a pencil. Then, using a Dremel tool with a suitable attachment, follow the outline of the drawing. Start with a low speed and gradually increase it as you go along. Be sure to control the speed and pressure of the tool to achieve the desired depth of the engraving.
Using Stencils Or Templates
If you are new to engraving or want to create a specific design, using stencils or templates is a great option. You can easily find templates online or create them yourself. Attach the template on the surface of the wood with masking tape and trace it with a pencil. After tracing, use a Dremel tool with a suitable attachment to engrave the design. Be sure to choose the right attachment to replicate the lines of the template.
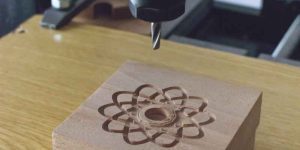
Etching And Carving Techniques
Etching and carving techniques allow you to create intricate and detailed designs on wood. Etching involves lightly scoring the surface of the wood to create a design. On the other hand, carving entails removing parts of the wood to create depth and texture. Dremel offers various attachments that can help you achieve these techniques effectively. Be sure to practice on a scrap piece of wood to avoid mistakes before attempting a final project.
Tips For Achieving The Best Results
Engraving on wood with a Dremel can be a rewarding project, resulting in beautiful and intricate designs. However, to achieve the best results possible, there are a few tips to keep in mind:
Use A Light Touch
It may be tempting to apply more pressure when engraving on wood, but a light touch is key to achieving precise and accurate results. Too much pressure can cause the tool to slip or create uneven lines, which can be difficult to fix. Instead, let the tool do the work and gently guide it along the surface of the wood.
Work In A Well-lit Area
Good lighting is crucial when engraving on wood, as it allows you to see the details of your design more clearly. Working with a backlight or a well-lit area can help you to avoid making mistakes and ensure that your lines are straight and even.
Practice On Scrap Wood
Before engraving on your final piece of wood, it’s a good idea to practice on a piece of scrap wood first. This will allow you to get familiar with the tool and experiment with different techniques and designs without the risk of ruining your final piece of wood.
Moreover, practicing on scrap wood will also give you the opportunity to adjust the speed of the tool and gain a better understanding of how to achieve different effects.
Take Breaks To Avoid Fatigue
Engraving on wood can be a time-consuming process, especially if you’re working on a large or intricate design. Taking breaks every now and then is important to avoid fatigue and rest your hands. This will help you maintain a steady hand and avoid mistakes caused by shaky hands or tiredness.
To summarize, a light touch, good lighting, practice on scrap wood, and taking breaks are key factors when engraving on wood with a Dremel. By following these tips, you can achieve the best results and create beautiful designs on your woodwork.
Finishing Touches For Engraved Wood
Engraving on wood with a Dremel can be a great way to personalize gifts or add a decorative touch to your woodworking projects. To add the finishing touches to your engraved wood piece, you can use wood stain, sandpaper, and a clear protective finish to enhance its beauty and durability.
Sanding The Engraved Surface
Once you have engraved your design onto the wood, it is important to give it a smooth finish. Using sandpaper, gently sand the engraved surface in the direction of the grain. Sanding will smooth out any rough edges or bumps left behind by the engraving process. This will also help the finish adhere better to the wood. Remember to start with a coarse grit sandpaper, such as 120 grit, and gradually switch to a finer grit, such as 220 grit.
Applying A Finish
Applying a finish to the engraved wood will protect it from wear and tear, preserving your design for years to come. There are many types of finishes to choose from, such as clear lacquer, polyurethane, or even beeswax. To apply the finish, first, remove any sawdust or sanding debris from the wood. Then, using a brush, apply a thin coat of the finish to the entire piece of wood. Allow the finish to dry completely before applying a second coat.
Adding Color To The Engraving
If you want to add some color to your engraved design, there are different methods you can use. One option is to use a wood stain. Simply apply a small amount of stain to a brush and lightly brush it onto the engraved surface. Allow the stain to dry, and then use a clean cloth to wipe away any excess. Another option is to use acrylic paint. Apply the paint to the engraved surface using a small brush, and then wipe away any excess with a clean cloth. Remember to let the paint dry completely before handling the engraved wood.
In conclusion, giving your engraved wood a smooth finish, applying a protective coat, and adding some color to the design can take it to the next level. These finishing touches will not only make your design look more professional but will also help it withstand the test of time. With these tips, you can create beautiful and lasting engraved wood pieces that will be cherished for years to come.
Frequently Asked Questions For How To Engrave On Wood With A Dremel
Can I Engrave Wood With Dremel?
Yes, you can engrave wood with a Dremel. In fact, all Dremel Multi-Tools can be used for carving wood, making it an easy and accessible tool for beginners. To ensure precision, it is recommended to start with a softwood, sketch the letters onto the wood, and chisel inside the outlines of the letters.
A Dremel tool is also great for power carving letters onto the wood.
What Is The Easiest Way To Engrave Wood?
The easiest way to engrave wood is by using a compact desktop laser cutter or traditional hand tools like chisels and gouges. For a more modern approach and precision, a laser cutter is a great option. Softwood like basswood, butternut, or walnut should be used for easy and reliable carving.
Sketch the letters onto the wood freehand or trace printed letters using carbon paper onto the surface. Chisel inside the outlines of the letters with a right-angle chisel, tapping it firmly with a rubber mallet.
How Do You Etch Words Into Wood?
To etch words into wood, use a softwood like basswood, butternut, or walnut. Trace the letters onto the wood freehand, or use carbon paper to trace printed letters onto the surface. Chisel inside the outlines of the letters with a right-angle chisel, tapping its handle firmly with a rubber mallet.
Alternatively, a compact desktop laser cutter can be used for precision and modern approach.
What Is The Best Dremel Tool For Wood Carving?
All Dremel Multi-Tools can be used for carving wood, making it difficult to pinpoint one “best” tool. However, the Dremel 8220-1/28 is a popular option due to its cordless design and powerful motor.
Conclusion
Engraving on wood can seem daunting, but with the right tools and techniques, it can be a fun and rewarding project. The Dremel rotary tool is a versatile option for both beginners and experienced carvers alike. Remember to choose the right bit for your project and take your time with each stroke.
Whether you’re looking to create personalized gifts or simply add decorative touches to your home, engraving on wood with a Dremel is a skill worth mastering. Get creative and enjoy the process!