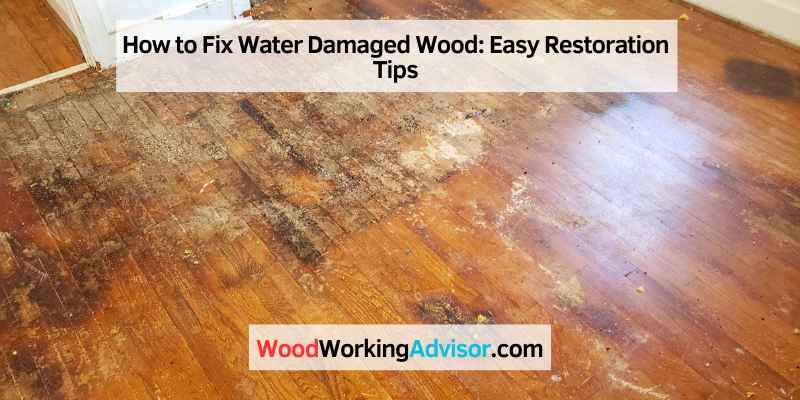
How to Fix Water Damaged Wood: Easy Restoration Tips
Water-damaged wood can almost always be repaired — the key is acting fast and choosing the right repair method for the type of damage. Surface stains and mild swelling are easy DIY fixes. Warped boards, soft punky areas, and deep structural damage require more intensive techniques. This guide covers how to fix water-damaged wood on furniture, floors, and outdoor structures step by step, plus how to tell when a board is beyond saving.
Learn more in our wood care & protection guide.
Quick Answer
To fix water-damaged wood: (1) dry the wood completely using fans and a dehumidifier — no direct heat; (2) sand off surface stains, soft gray spots, and raised grain; (3) apply wood hardener to any soft or punky areas; (4) fill gaps and checks with exterior wood filler; (5) refinish with stain and sealer to match. For warped boards, apply weight or clamps while drying — mild warps often flatten; severe warping usually requires board replacement.

Identifying Water Damage
Correctly identifying the type and extent of water damage determines the repair approach. Surface damage — dark stains, white rings, minor swelling — is straightforward to fix. Structural damage — soft punky wood, severe warping, mold penetration — requires more intensive intervention or replacement.
Signs Of Water Damage
- Dark spots or black staining: Prolonged moisture exposure; often penetrated into the wood fibers — needs sanding to remove
- White cloudy rings or haze: Moisture trapped under the finish (not in the wood itself) — can often be fixed without sanding by using heat or a commercial finish restorer
- Warped, buckled, or cupped boards: Uneven moisture absorption causing the board to change shape — severity determines whether it can be corrected or must be replaced
- Soft, spongy texture (punky wood): Most serious sign — wood fibers have broken down from prolonged moisture and rot; needs wood hardener to consolidate before filler
- Mold or mildew growth: Gray, green, or black surface growth — must be killed and removed before any repair or finishing
- Musty odor: Sign of moisture penetration into the wood fibers even if surface appears dry
Assessing The Extent
Probe suspicious areas with a screwdriver — press the tip gently against the wood surface. If it resists firmly, the wood structure is intact. If it sinks in easily, the wood fibers have deteriorated and you are dealing with rot or severe moisture damage. Check a moisture meter reading: above 18–20% moisture content means the wood is still wet and must continue drying before any repair work begins. Attempting to fill or refinish wet wood traps moisture inside and the repair will fail within weeks.
What To Do Immediately When Wood Gets Wet
The first 24–48 hours after water exposure are the most critical. Acting fast prevents surface damage from becoming structural damage, and can often prevent warping entirely.
- Remove the water source immediately — stop the leak, move the item away from standing water, remove soaked items sitting on the wood surface (wet towels, clothing, etc.)
- Blot up surface water with dry towels — press firmly, don’t wipe (wiping spreads moisture deeper)
- Set up airflow — position fans to blow across the wet surface; open windows if possible
- Use a dehumidifier in the room — pulling moisture out of the air accelerates drying significantly; maintain indoor RH below 50%
- Do NOT use direct heat — hair dryers, heat guns, or space heaters dry the surface too fast while the interior stays wet, causing cracking and checking
- For furniture and boards: apply weight immediately — if the wood has begun to cup or warp, place heavy objects on top while it dries to counteract the warp before it sets
If water has been sitting for more than 24 hours or if you see mold growth beginning, you have moved from simple drying into a repair scenario — proceed to the steps below.
Will Water Damaged Wood Warp Back To Normal?
This is the most common question after a water incident, and the honest answer depends on how severe the warping is and how quickly you respond.
Mild cupping or bowing (boards slightly curved): Yes — if the wood is dried completely and weight is applied during the drying process, mild warps often flatten on their own. The key is that drying must be even across both faces of the board. A board that dries fast on top and slow on the bottom will stay warped. Flip boards periodically during drying, or clamp them to a flat surface to force them flat as the moisture leaves.
Moderate warping (visible curve but board still usable): May partially correct but rarely returns to perfectly flat without intervention. For furniture boards: dampen the concave (hollow) side, lay the board concave-side down on a flat surface, and place heavy weights on top for 24–72 hours. The controlled moisture on one face forces the board to flatten as it dries. For floors: dry thoroughly, then sand back to flat.
Severe warping, buckling, or structural softness: Will not return to normal through drying alone. Boards that have buckled, developed significant checks (surface cracks), or gone soft/punky are typically beyond straightforward repair and need replacement. For floors, matching the new boards to the existing finish is the main challenge.
Preparation For Restoration
Gathering Necessary Tools
- Moisture meter (confirms when wood is dry enough to repair — below 15–18%)
- Stiff-bristle brush and bucket for cleaning
- Mold killer or oxalic acid wood brightener
- 80, 120, and 220-grit sandpaper
- Wood hardener (for soft or punky areas)
- Exterior wood filler or epoxy wood filler
- Putty knife and sanding block
- Stain to match existing finish
- Exterior sealer or polyurethane for finishing
Safety Measures
Wear nitrile gloves when working with mold cleaners and wood hardener — both can irritate skin. Use an N95 respirator when sanding water-damaged wood, especially if mold is present — airborne spores and fine dust are respiratory hazards. Ensure the work area is well-ventilated when applying wood hardener or solvent-based finishes. If the water damage originated from sewage or flood water (gray or black water), the wood may be contaminated — wear full PPE and consider professional remediation for significant exposure.
Drying Out Water Damaged Wood
Natural Vs. Artificial Drying Methods
Natural drying (air circulation + ventilation) is the safest method for solid wood furniture and flooring — it minimizes stress on the wood fibers. Move items outdoors in warm, dry conditions or to a well-ventilated room. Prop boards off the floor to allow airflow on all sides. Natural drying takes days to weeks depending on thickness and ambient humidity. Artificial drying (fans + dehumidifier) accelerates the process significantly and is the standard for indoor water damage — use box fans aimed at the surface and run a room dehumidifier continuously. Target ambient humidity below 50% RH. Drying time for 3/4″ thick boards: 3–7 days with fans and dehumidifier in typical conditions.
Preventing Further Damage
While drying, protect the wood from additional moisture — cover it at night if humidity rises, and keep the drying area sealed against outdoor humidity during rain. Check progress daily with a moisture meter. Do not attempt any sanding, filling, or finishing until moisture readings are consistently below 15–18%. Attempting repairs on wet wood is the most common mistake — all subsequent work will fail.
Cleaning The Affected Area
Choosing The Right Cleaning Solutions
For surface dirt and mild staining: warm water with a few drops of dish soap, applied with a soft cloth. For gray oxidation and weathered water stains: oxalic acid-based wood brightener (available at hardware stores) — apply, let sit 10–15 minutes, scrub with a stiff brush, and rinse thoroughly. Oxalic acid restores natural wood color and opens the grain before repair. For mildew and mold: a solution of 1 cup bleach per gallon of water, scrubbed on and rinsed — or a dedicated mold-killing wood cleaner. Allow the wood to dry completely after any cleaning before proceeding to sanding or filling.
Mold And Mildew Removal
Surface mold on wood (gray, green, or black fuzz on the surface) can usually be cleaned without replacement. Apply a bleach solution or commercial mold remover for wood, scrub with a stiff brush, and allow the wood to dry in direct sunlight if possible — UV light kills residual mold spores. Sand the surface after cleaning and drying to remove any remaining staining. Deep black staining that persists after cleaning and sanding indicates the mold has penetrated into the wood fibers — at that depth, replacement is more reliable than surface repair.
Sanding And Scraping
Techniques For Effective Sanding
Start with 80-grit sandpaper on a sanding block to remove surface stains, gray oxidation, and raised grain. Work with the grain — sanding across the grain leaves scratches that show through stain. Progress to 120-grit to smooth the surface, then 150–180-grit for the final surface before applying stain or sealer. For water stains that have penetrated deeper than 1/16″, sanding alone may not remove all discoloration — apply wood bleach (two-part A/B bleach) to neutralize the stain before the final sand.
When To Scrape Vs. Sand
Use a paint scraper or card scraper to remove lifting, peeling, or bubbling finish before sanding — scraping removes the failed finish layer cleanly without loading sandpaper. On floors with a thick polyurethane buildup, scraping removes high spots before belt sanding. On furniture with detailed moldings or carved profiles, a card scraper reaches areas a sanding block cannot. Sand after scraping to smooth the surface and feather the edges where old finish meets bare wood.
Applying Wood Filler
Selecting The Right Wood Filler
For soft or punky areas (wood that feels spongy when probed), apply wood hardener first — this liquid consolidant penetrates the deteriorated fibers and binds them back together before filler is applied. Without hardener, filler applied to soft wood will fail because the surrounding wood has no strength to hold it. After hardener has fully cured (24 hours typically), fill voids with two-part epoxy wood filler for exterior or structural applications — it bonds chemically to the hardener, does not shrink, and can be shaped, drilled, and painted. For interior surfaces, a latex wood filler works for cosmetic repairs in stable, dry conditions.
Application Tips
- Apply filler in layers no more than 1/4″ thick — thick single applications can crack as they cure
- Slightly overfill voids — filler sands down; you cannot add back material that is short
- Allow full cure time per the manufacturer’s instructions before sanding
- Sand flush with 80-grit, then finish to 120–150-grit to match the surrounding wood texture
- Prime filler before applying stain if a color match is needed — raw filler absorbs stain differently than wood
★ Recommended Product
PC-Petrifier Wood Hardener + PC-Woody Epoxy Filler
The two-part solution for repairing severe water damage — harden soft punky wood first, then fill and shape with epoxy filler that bonds permanently and won’t shrink.
- Consolidates deteriorated wood fibers before filling
- Epoxy filler bonds to hardener — no shrinkage or cracking
- Can be drilled, nailed, sanded, and painted
- Ideal for window sills, door frames, outdoor furniture, decking
As an Amazon Associate we earn from qualifying purchases.
Finishing Touches
Repairing Water Damaged Wood Finish
Water damage to the finish (the clear or tinted coating on top of the wood) is different from water damage to the wood itself. Finish damage is usually easier to fix and does not require sanding to bare wood unless the damage is severe.
- White rings or haze (moisture trapped under the finish): Try rubbing petroleum jelly or mayonnaise into the ring, leave overnight, and wipe clean — the oil displaces the trapped moisture. Alternatively, apply gentle heat with a hair dryer on low 3–4 inches from the surface and rub briskly with a soft cloth. If the ring remains, lightly sand with 0000 steel wool and apply a fresh coat of finish.
- Peeling or bubbling finish: The finish bond has failed. Scrape the failed area, sand smooth, apply a compatible finish over the repair area. Feather the edges carefully to blend with surrounding finish.
- Dark water stains under the finish: These have penetrated the wood — the finish must be fully removed by sanding before the stain can be treated. Use wood bleach (oxalic acid) on the bare stain, neutralize, dry, then re-sand and refinish.
- Checking (network of fine surface cracks) in finish: Caused by finish becoming brittle from moisture cycling. Sand off the old finish and apply a fresh flexible exterior finish.
Staining To Match
Matching stain on a repair area is the most challenging part of water damage restoration. Bare wood or filler absorbs stain differently than the surrounding original wood. Test your stain on an inconspicuous area first. For stubborn matches, apply a wash coat of diluted shellac to the repair area before staining — this controls absorption and brings the repair closer to the surrounding wood’s tone. Use a stain pen for very small repair areas. See our full guide to how to stain wood filler to match for detailed color-matching techniques.
Sealing For Protection
After staining, apply two to three coats of the appropriate sealer to protect the repair. For indoor wood furniture and floors: water-based or oil-based polyurethane. For outdoor surfaces: spar urethane or a quality exterior penetrating sealer. Sand lightly with 220-grit between coats for maximum adhesion and a smooth final surface. The sealed repair should be indistinguishable from the surrounding wood if color-matching and sanding have been done carefully.

Preventive Measures
Regular Maintenance Tips
Preventing water damage is far easier than repairing it. Inspect outdoor wooden structures annually — check for failed caulk around window frames, checking in deck boards, and peeling sealer on fences. Reapply exterior sealer every 2–3 years before it fails completely. Keep indoor humidity between 35–55% — extreme humidity fluctuations cause wood to swell and shrink repeatedly, eventually leading to checking and finish failure. Place coasters under glasses on wood furniture, and use felt pads under plant pots (drainage water is the most common cause of white rings). For outdoor structural wood, always seal cut ends immediately after cutting — end grain absorbs moisture 10–15x faster than face grain.
Frequently Asked Questions
Can Water Damaged Wood Be Saved?
In most cases, yes — water-damaged wood can be repaired rather than replaced. Surface staining, white rings, minor swelling, and finish damage are all fixable with DIY methods. Even soft or punky wood can often be saved using wood hardener and epoxy filler. The exceptions are: boards that have buckled or warped severely beyond flattening, wood with deep mold penetration through the full thickness, and structural members that have lost significant strength. For these, replacement is safer and more cost-effective than repair.
How Long Does It Take For Water Damaged Wood To Dry?
Drying time depends on thickness, species, and ambient conditions. 3/4″ hardwood boards in a well-ventilated room with fans and a dehumidifier: 3–7 days. 1.5″ structural lumber: 1–3 weeks. Subfloor or structural framing after a flooding event: 3–6 weeks minimum. Always verify with a moisture meter — do not proceed to repair until readings are consistently below 15–18%. “Dry to the touch” does not mean dry enough to repair.
Will Wet Wood Go Back To Its Original Shape After Drying?
Mildly cupped or bowed wood often flattens back to near-original shape as it dries, especially if weight is applied during the drying process. Apply consistent pressure across the board’s face (heavy books, clamps, or a weighted flat surface) while it dries. For floorboards, dry the room with fans and dehumidifiers for 2–3 weeks — mild cupping often resolves on its own once the moisture level normalizes. Moderate to severe warping, buckling, or twisting does not reverse on its own and requires mechanical correction (clamping + moisture) or replacement.
Can I Paint Over Water Damaged Wood?
Only after full repair. Painting over wet, soft, or stained wood without proper prep leads to instant failure — the paint will peel within weeks. The correct sequence is: dry completely → sand off damage → treat mold → apply wood hardener to soft spots → fill voids → sand → prime → paint. Skipping any of these steps shortens the life of the paint dramatically. For exterior water-damaged wood, use a stain-blocking primer (Zinsser BIN shellac or Bulls Eye 1-2-3) before applying topcoat paint to prevent water stains bleed-through.
Fixing water-damaged wood takes more patience than skill — the most important steps are drying completely and doing thorough surface prep before any filling or finishing. Rush either of those and the repair fails. Take the time to let the wood dry, remove all damaged material by sanding, use wood hardener on any soft areas, and match the finish carefully. Done right, a repaired water damage area is indistinguishable from the surrounding wood.