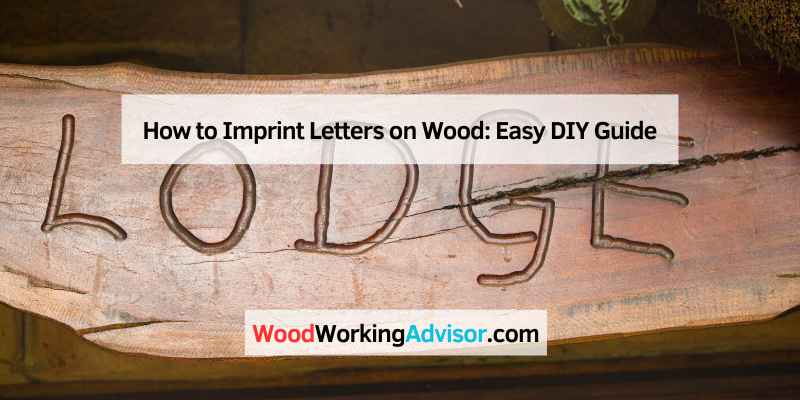
How to Imprint Letters on Wood: Easy DIY Guide
To imprint letters on wood, use a wood-burning tool or a stamp. Both methods create clear, lasting impressions.
Imprinting letters on wood adds a personal touch to various projects, from home decor to gifts. This technique allows for creativity and customization, making your items stand out. Whether you’re a DIY enthusiast or a beginner, understanding how to imprint effectively can enhance your woodworking skills.
Various tools and methods exist, each offering unique results. The right choice depends on your project and desired finish. This guide will provide simple steps and tips to help you master this craft. With practice, you can create beautiful, personalized wooden pieces that showcase your style and craftsmanship.
Introduction To Wood Imprinting
Wood is a popular choice for imprinting letters. It is durable and versatile. Many enjoy the natural look of wood. It adds charm to any project.
Here are some tools and materials you need:
| Tool/Material | Description |
|---|---|
| Wood Piece | Choose a smooth and clean piece of wood. |
| Letter Stamps | Use metal or rubber stamps for clear impressions. |
| Hammer | A sturdy hammer helps to press the stamps. |
| Sandpaper | Sand the wood to make it smooth. |
| Finishing Oil | This adds a protective layer to your wood. |
Selecting The Right Wood
Selecting the right wood is key for imprinting letters. Different types of wood have unique properties. Here are some common choices:
| Type of Wood | Features |
|---|---|
| Pine | Soft, easy to carve, affordable. |
| Oak | Strong, durable, good for detailed work. |
| Maple | Smooth finish, great for clean letters. |
| Cedar | Lightweight, pleasant aroma, resists decay. |
Preparing the wood surface is very important. Start by sanding the wood until it is smooth. This helps the letters stand out clearly. Clean the surface to remove dust and debris. A clean surface ensures better results when imprinting.
Designing Your Imprint
To create a design for wood imprinting, start with a simple idea. You can use software or draw by hand. Choose fonts and images that match your style.
After making your design, it’s time to transfer it onto wood. Print the design on transfer paper. Place the paper on the wood and rub it gently. This helps the design stick to the wood surface.
Another method is to use carbon paper. Place it under your design and trace over it. The carbon will leave a mark on the wood.
Always remember to choose high-contrast colors for better visibility. This makes it easier to see your design on the wood.
Manual Imprinting Techniques
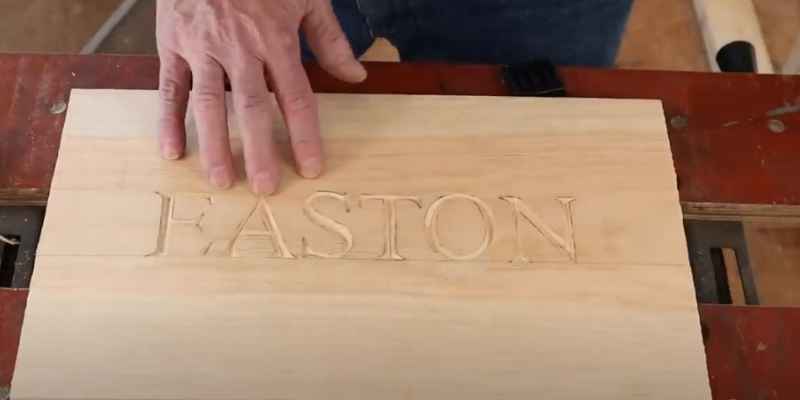
Imprinting letters on wood can be fun and creative. Using a hammer and nails is a simple method. Start by marking the letters on the wood. Choose a sharp nail for clear impressions. Tap the nail gently to avoid splitting the wood. Repeat for each letter until finished.
Wood burning is another interesting technique. A wood burner heats up and allows you to draw letters. Practice on scrap wood first. This helps improve your skills before working on your project. Take your time to create neat and clear letters. Always remember to work in a well-ventilated area.
Using Stamps For Imprinting
Choosing the right stamps is key for clear letter imprinting. Look for deeply engraved designs. These create crisp impressions on wood surfaces. Consider the size of the stamps based on your project. Smaller stamps work well for detailed designs.
Ink application affects the final outcome. Use a foam brush for even coverage. Apply a thin layer of ink to avoid smudges. Press the stamp firmly onto the wood for best results. Lift straight up to maintain the imprint’s clarity.
Power Tools For Precision
Setting up a Dremel is easy and fun. Start by choosing the right bit for your project. A fine-point bit works well for letters. Ensure the bit is securely attached to the tool. Adjust the speed based on the wood type. Soft woods need a lower speed, while hard woods can handle a higher speed.
Safety is very important. Always wear safety goggles to protect your eyes. Use a dust mask to avoid inhaling particles. Keep your workspace clean and organized. Make sure to unplug the Dremel when changing bits. Never rush the process; take your time for better results.
Finishing Touches
Start by carefully sanding the imprinted wood. Use fine-grit sandpaper for a smooth finish. Sand in the direction of the wood grain. This helps avoid scratches and keeps the letters clear.
After sanding, clean off any dust. A damp cloth works well for this task. Make sure the surface is dry before moving on.
Applying sealants protects the wood and the imprints. Choose a clear sealant to maintain the natural look. Use a brush or spray to apply it evenly.
Let the sealant dry completely before adding any finishes. A coat of polyurethane can add shine and durability. Follow the manufacturer’s instructions for the best results.
Creative Project Ideas
Creating personalized gifts is a fun way to show love. Use wood to make unique items like name plaques or keychains. These gifts are perfect for birthdays or holidays. A special message can make them more meaningful.
For home decor applications, consider making wooden signs. Add your family name or a favorite quote. These signs can brighten up any room. Another idea is to design coasters with initials or fun designs. They protect furniture while looking stylish.
Maintenance Of Imprinted Pieces
To keep your imprinted wood pieces looking great, regular cleaning is essential. Use a soft, dry cloth to wipe off dust. For deeper cleaning, use a damp cloth with mild soap. Avoid harsh chemicals that can damage the finish.
Wear and tear can happen over time. For small scratches, sand the area gently with fine sandpaper. After sanding, apply a wood finish to restore the look. For deeper scratches, consider filling them with wood filler. Once dry, sand and finish for a smooth look.
Troubleshooting Common Issues
Smudging can ruin your wood letters. Clean the wood surface before you start. Use a soft cloth to remove dust.
Use the right tools for imprinting. A sharp tool gives clearer lines. Test the tool on scrap wood first.
For uneven imprints, apply steady pressure. Press down evenly as you move. If the imprint is too light, try again.
Sometimes, change the angle of your tool. A different angle can help create a better imprint.
Always check your work as you go. Small adjustments can make a big difference. Take your time to achieve the best result.
Eco-friendly Practices
Choosing sustainable materials is key for eco-friendly practices. Select wood that is sourced from responsible forests. Look for products certified by organizations like the FSC (Forest Stewardship Council).
Recycling wood scraps is a great way to reduce waste. Use leftover pieces for small projects. These scraps can be transformed into unique letter designs. Consider donating unused wood to local schools or community centers.
Using reclaimed wood is another excellent option. This wood has a history and adds character. It is also better for the environment compared to new timber.
Frequently Asked Questions
How Can I Imprint Letters On Wood?
Imprinting letters on wood can be done using various methods. Popular techniques include wood burning, engraving, and stenciling. Each method has its own tools and skills required. Choose the one that matches your project needs and skill level for best results.
What Tools Do I Need For Wood Lettering?
Essential tools for wood lettering include a wood burner, engraving tool, or stencils. Sandpaper is also helpful for smoothing the wood surface. Paint or wood stain can enhance the final look. Choose quality tools to achieve clean and precise results for your lettering project.
Is Wood Burning Safe For Beginners?
Yes, wood burning is safe for beginners with precautions. Always work in a well-ventilated area to avoid fumes. Use a wood burner with adjustable temperature settings. Ensure you have a safe work surface and protective gear. Follow instructions carefully to enjoy this creative hobby safely.
Can I Use Paint For Wood Lettering?
Absolutely! Paint is a versatile option for wood lettering. Use acrylic or specialty wood paint for durability and appearance. Ensure the wood surface is clean and sanded before application. Apply multiple thin coats for a professional look and finish your project with a sealant.
Conclusion
Imprinting letters on wood is a rewarding craft. With the right tools and techniques, you can create beautiful, personalized pieces. Whether for home decor or gifts, this skill adds a unique touch. Embrace your creativity, and enjoy the process of transforming simple wood into meaningful art.
Happy crafting!