How to Join 1/4-Inch Wood
To join 1 4 inch wood, use wood glue and clamps for a secure bond. Apply glue evenly, clamp pieces together, and let dry.
Are you looking to create sturdy wood projects but unsure how to join 1 4 inch wood effectively? Understanding the right techniques is crucial for a successful outcome. By following simple steps and using the appropriate tools, you can achieve a strong and durable bond in your woodworking projects.
In this blog post, we will explore the best methods to join 1 4 inch wood and provide you with practical tips to enhance your woodworking skills. Let’s dive in and discover how to create reliable joints in your wood pieces for your next project.
Introduction To Joining 1/4 Inch Wood
Joining 1/4 inch wood may seem like an easy task, but it requires precision and skill. In this article, we will guide you on how to join 1/4 inch wood and discuss the challenges that come with working with thin materials.
Why Precision Matters
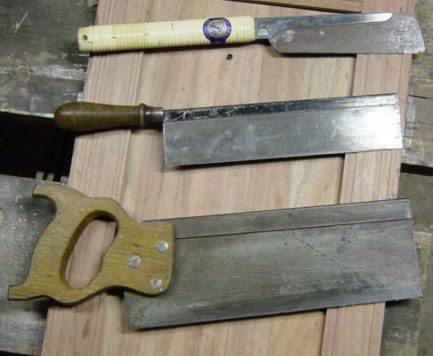
Precision is crucial when joining 1/4 inch wood. Even the slightest error can affect the overall quality of the project. To ensure precise joints, use the right tools and techniques. For instance, using a high-quality saw blade with a fine tooth count can help achieve a clean and accurate cut. Additionally, measuring twice before cutting can save you from making mistakes.
The Challenge With Thin Materials
Joining 1/4 inch wood can be challenging due to the material’s thinness. Thin materials tend to split or break easily, making it crucial to handle them with care. When joining 1/4 inch wood, use clamps to hold the pieces in place firmly. This not only prevents the wood from moving but also ensures that the pieces stay aligned.
Another challenge with thin materials is that they require delicate handling during sanding and finishing. Using a sanding block instead of a power sander can help you avoid removing too much material accidentally. Similarly, using a fine-grit sandpaper can give the wood a smooth finish without damaging it.
By keeping these challenges in mind and using the right tools and techniques, you can successfully join 1/4 inch wood and create high-quality projects.
Selecting The Right Wood
When it comes to joining 1/4 inch wood, selecting the right type of wood is crucial for ensuring a strong and aesthetically pleasing result. Different types of wood offer varying levels of strength and visual appeal, so it’s important to consider these factors before embarking on your woodworking project.
Types Of Wood Suitable For Thin Joinery
For thin joinery such as joining 1/4 inch wood, certain types of wood are better suited due to their strength and workability. Maple, cherry, and walnut are popular choices for thin joinery due to their durability and attractive grain patterns. These hardwoods are less prone to splitting or warping, making them ideal for creating strong and visually appealing joints.
Considerations For Strength And Aesthetics
When selecting wood for thin joinery, it’s essential to consider both strength and aesthetics. Strength is crucial for ensuring the durability and longevity of the joints, especially in applications where the wood will be subject to stress or weight. Additionally, aesthetics play a significant role, as the visual appeal of the wood can enhance the overall look of the finished project.
Essential Tools And Materials
To join 1/4 inch wood, essential tools and materials include a clamp, wood glue, and a drill with appropriate bits. Secure the wood pieces with a clamp, apply wood glue along the joint, then drill pilot holes for screws to reinforce the connection.
Essential Tools and Materials for Joining 1 4 Inch Wood
Joining 1 4 inch wood requires the right tools and materials to ensure a secure and professional bond. Whether you’re working on a woodworking project or making repairs, having the essential tools and materials at hand is crucial for a successful joinery job. In this section, we will explore the must-have tools for fine joinery and the adhesives and clamps that will help you achieve a secure and lasting bond.
Must-have Tools For Fine Joinery
To achieve precise and accurate joinery, you’ll need a set of essential tools. These tools will enable you to make clean and accurate cuts, ensuring a seamless fit between the 1 4 inch wood pieces. Here are some must-have tools for fine joinery:
- Table Saw: A table saw is a versatile tool that allows you to make precise cuts in wood. With its adjustable fence and blade, you can easily achieve accurate cuts for joining 1 4 inch wood.
- Miter Saw: A miter saw is ideal for making angled cuts, which is often required in joinery projects. It allows you to cut the wood at precise angles, ensuring a tight and seamless joint.
- Chisels: Chisels are essential for fine joinery work. They help you remove excess wood and create clean and precise cuts, ensuring a perfect fit between the wood pieces.
- Router: A router is a versatile tool that can be used for various joinery techniques. It allows you to create intricate designs, shape edges, and create precise joints.
- Drill: A drill is necessary for drilling pilot holes and creating space for screws or dowels. It ensures a secure and strong bond between the 1 4 inch wood pieces.
Adhesives And Clamps For Secure Bonding
In addition to the right tools, using the correct adhesives and clamps is crucial for achieving a secure and long-lasting bond between 1 4 inch wood pieces. Here are some options to consider:
- Wood Glue: Wood glue is a popular choice for joining wood pieces. It provides a strong bond and dries clear, ensuring a seamless finish. Look for a high-quality wood glue that is specifically designed for woodworking projects.
- Epoxy: Epoxy adhesive is known for its exceptional strength and durability. It is an excellent choice for joining 1 4 inch wood pieces that require extra reinforcement.
- Clamps: Clamps are essential for holding the wood pieces together while the adhesive dries. They ensure even pressure and a tight bond. Consider using bar clamps, pipe clamps, or spring clamps depending on the size and nature of your project.
By having the must-have tools for fine joinery and using the right adhesives and clamps, you can confidently join 1 4 inch wood pieces with precision and durability. Remember to always follow safety guidelines and take necessary precautions while working with tools and adhesives.

Preparing Wood Surfaces
When joining 1 4 inch wood, properly preparing the wood surfaces is crucial to ensure a strong and seamless connection. Achieving flatness and smoothness, as well as measuring and marking for precision, are essential steps in the process.
Achieving Flatness And Smoothness
Before joining the wood pieces, ensure that the surfaces are flat and smooth to achieve a seamless connection. Use a planer or sander to level the surfaces and remove any imperfections.
Measuring And Marking For Precision
Precision is key when joining wood pieces. Use a straight edge and marking gauge to measure and mark the wood for accurate cuts and placements. This ensures that the pieces fit together perfectly.
Techniques For Joining 1/4 Inch Wood
When working with 1/4 inch wood, it’s essential to master the right techniques for joining it effectively. Whether you’re a beginner or a seasoned woodworker, understanding different joining methods can help you achieve strong and durable connections. In this guide, we’ll explore various techniques for joining 1/4 inch wood, including the glue and clamp method, dowel and biscuit joinery, and using splines for reinforcement.
Glue And Clamp Method
One of the simplest yet effective techniques for joining 1/4 inch wood is the glue and clamp method. This method involves applying wood glue to the mating surfaces of the wood pieces and then using clamps to hold them together tightly until the glue dries.
Dowel And Biscuit Joinery
Dowel and biscuit joinery are popular methods for creating strong and precise connections in 1/4 inch wood. Using wooden dowels or biscuit joiners, you can align and join the wood pieces securely, resulting in a seamless and sturdy bond.
Using Splines For Reinforcement
When seeking additional reinforcement for joining 1/4 inch wood, using splines can be a viable option. This technique involves cutting a slot across the joint and inserting a thin piece of wood, known as a spline, to strengthen the connection and prevent movement or separation.
Finishing Touches For Joined Wood
Begin by sanding the joined wood to achieve a smooth surface.
Use fine-grit sandpaper to remove any rough edges or imperfections.
Choose a suitable finish to protect and enhance the wood.
Apply the finish evenly using a brush or cloth for a polished look.
Common Mistakes To Avoid
When joining 1 4 inch wood, it’s important to be mindful of common mistakes that can compromise the quality of your project. By understanding and avoiding these errors, you can ensure a successful and sturdy wood joint.
Overclamping And Wood Damage
- Using excessive pressure can lead to wood damage.
- Overclamping can cause uneven distribution of glue.
Misaligned Joints And How To Correct Them
- Check for alignment before final clamping.
- Adjust the position of the wood carefully if misaligned.
Advanced Tips From The Experts
Learn the advanced techniques for joining 1 4 inch wood from the experts. Discover innovative methods to achieve a strong and seamless wood joinery. Master the art of creating precise and durable connections for your woodworking projects.
Working With Exotic Woods

Innovative Joinery Techniques
Are you ready to elevate your woodworking skills? Let’s delve into some advanced tips from the experts.
When working with exotic woods, choose high-quality pieces. Ensure moisture content is optimal for stability.
- Consider using dovetail joints for added strength and aesthetic appeal.
- Experiment with biscuit joinery for seamless connections in 1 4 inch wood.
- Utilize mortise and tenon joints for durable and reliable joinery.
For intricate designs, try the box joint technique. It provides both strength and visual interest.
| Joinery Technique | Advantages |
|---|---|
| Dovetail Joints | Strength and aesthetics |
| Biscuit Joinery | Seamless connections |
| Mortise and Tenon Joints | Durability and reliability |
| Box Joint Technique | Strength and visual interest |
Frequently Asked Questions
How Do You Join 1/4 Inch Wood?
To join 1/4 inch wood, you can use glue and clamps. Apply glue on both surfaces and clamp them together for a few hours. Another option is to use a pocket hole jig and screws to join the wood.
Can You Use Nails To Join 1/4 Inch Wood?
Yes, you can use nails to join 1/4 inch wood, but it’s not recommended as they can split the wood. If you want to use nails, pre-drill the holes and use a nail set to avoid damaging the wood.
What Is The Best Type Of Glue To Join 1/4 Inch Wood?
The best type of glue to join 1/4 inch wood is a PVA (polyvinyl acetate) glue. It’s strong, dries clear, and can be sanded and painted over. Make sure to follow the manufacturer’s instructions for the best results.
Can You Join 1/4 Inch Wood Without Clamps?
Yes, you can join 1/4 inch wood without clamps by using weights or heavy objects to hold the pieces together while the glue dries. Another option is to use painter’s tape to hold the pieces together until the glue sets.
Conclusion
Joining 1 4 inch wood can be a simple yet crucial task in woodworking. By following the steps outlined in this blog post, you can ensure a strong and secure joint that will withstand the test of time. Remember to measure accurately, choose the appropriate tools and techniques, and take your time to ensure a precise fit.
With practice and patience, you’ll soon be joining wood with confidence and creating beautiful projects. Happy woodworking!