How to Join Wood at a 45 Degree Angle
To join wood at a 45-degree angle, use a miter saw for accurate cuts. Secure pieces with glue and screws for a strong bond.
Creating angled joints in woodworking adds visual interest and structural integrity to your projects. By mastering the technique of joining wood at a 45-degree angle, you can elevate the craftsmanship of your furniture, frames, and other woodworking endeavors. Whether you are a seasoned woodworker or a novice DIY enthusiast, learning how to achieve precise angled cuts and secure joints will enhance the quality and aesthetics of your creations.
Let’s delve into the process of joining wood at a 45-degree angle and explore the tools and methods needed to accomplish this woodworking technique effectively.
Introduction To Joining Wood At A 45 Degree Angle
Learn how to create strong wood joints at a 45-degree angle with precision and accuracy. This technique enhances structural stability and adds a professional touch to your woodworking projects. Mastering this method opens up a world of design possibilities for furniture, frames, and other woodworking creations.
The Importance Of Precise Angles
When it comes to woodworking, achieving precise angles is crucial for creating strong and visually appealing joints. Joining wood at a 45 degree angle is a popular technique that adds both strength and aesthetic appeal to various woodworking projects. Whether you’re building furniture, picture frames, or decorative boxes, understanding how to join wood at this angle is an essential skill to have.
Tools Needed For The Job
To successfully join wood at a 45 degree angle, you’ll need a few essential tools:
- Miter Saw: A miter saw is a versatile tool that allows you to cut precise angles in wood. With its adjustable blade and rotating table, it’s the perfect tool for creating clean and accurate 45 degree cuts.
- Measuring Tape: Accurate measurements are crucial for achieving precise angles. A measuring tape helps ensure that your cuts are the correct length, resulting in a tight and secure joint.
- Clamps: Clamps are essential for holding the wood pieces together while you join them. They keep the pieces stable and ensure a tight bond. Make sure to use clamps that are appropriate for the size and weight of your project.
- Wood Glue: A reliable wood glue is necessary for creating a strong and durable joint. Look for a glue that is specifically designed for woodworking and provides a strong bond. Apply the glue evenly to both surfaces before joining the wood together.
- Sanding Block: After joining the wood at a 45 degree angle, you may need to smooth out any rough edges or imperfections. A sanding block with fine-grit sandpaper is ideal for achieving a smooth and polished finish.
By having these tools readily available, you’ll be well-equipped to join wood at a 45 degree angle effectively and efficiently.

Preparing The Wood
When it comes to joining wood at a 45-degree angle, proper preparation is key to achieving a strong and precise result. Before diving into the actual joining process, it’s crucial to ensure that the wood is suitably selected, measured, and marked for accurate cuts.
Selecting The Right Type Of Wood
Choose a high-quality, straight-grained wood for your project. Opt for durable hardwoods such as oak, maple, or cherry for structural stability and a clean finish. Softwoods like pine or cedar are suitable for decorative purposes but may require additional support for structural applications.
Measuring And Marking Accurately
Precision is essential when working with angled cuts. Use a reliable measuring tool, such as a combination square or a bevel gauge, to ensure accurate angles. Measure twice, cut once to avoid wastage and achieve precise joints.
Cutting Techniques For A 45 Degree Angle
Using A Miter Saw For Precision
A miter saw offers accurate cuts at a 45-degree angle.
Hand Saw Alternatives
Hand saws can be used as manual options for cutting wood.
Joining Methods For 45 Degree Angles
Joining wood at a 45 degree angle can be achieved through various methods. Options such as miter joints, dovetail joints, or even using corner braces can ensure a strong and precise connection. Explore these techniques to create clean and professional-looking woodwork projects.
Joining wood at a 45-degree angle can be a daunting task for beginners in woodworking. But it’s an essential technique that every woodworker should know to create stunning woodworking projects. In this post, we’ll discuss some of the best methods for joining wood at a 45-degree angle. We’ll cover gluing basics and reinforcing with nails or screws to ensure your joints are strong and durable.
Gluing Basics
Gluing is one of the most popular methods of joining wood at a 45-degree angle. Here are the steps to follow when gluing wood at a 45-degree angle:
- Apply a generous amount of glue to both pieces of wood that you want to join.
- Align the two pieces of wood at a 45-degree angle, making sure they fit together perfectly.
- Clamp the pieces of wood together tightly to ensure a strong bond.
- Wipe off any excess glue that seeps out of the joint.
- Allow the glue to dry completely, following the manufacturer’s instructions.
Reinforcing With Nails Or Screws
Gluing alone may not be enough to create a strong joint, especially if you’re working with larger pieces of wood. In such cases, reinforcing the joint with nails or screws can provide additional strength. Here’s how to reinforce a 45-degree joint with nails or screws:
- Drill pilot holes into both pieces of wood at the joint.
- Insert nails or screws into the pilot holes.
- Use a hammer or screwdriver to drive the nails or screws into the wood.
- Countersink the nails or screws slightly below the surface of the wood.
- Fill the countersink holes with wood filler.
- Sand the joint until it’s smooth and even.
By following these methods, you can join wood at a 45-degree angle effectively. Whether you’re a beginner or an experienced woodworker, these techniques will help you create strong and durable joints that will last for years to come.
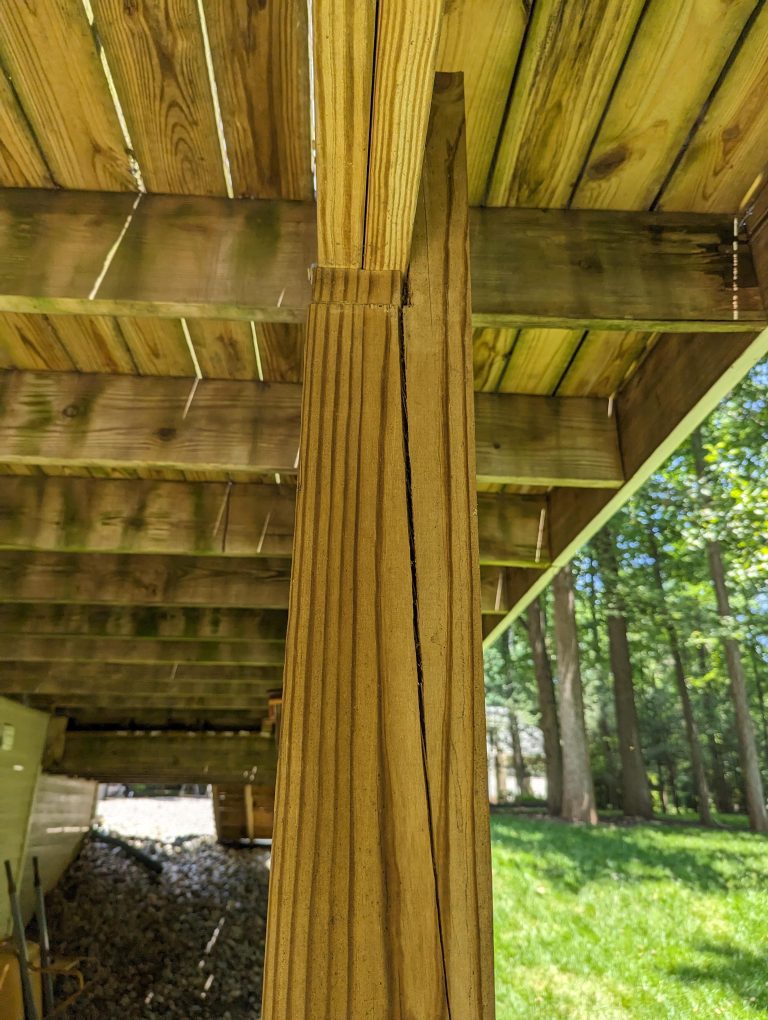
PONY 90° Corner Clamp Set
Holds both mitered pieces square while glue sets — exactly the “square and even joint” step this guide flags as the most common source of gaps.
- Best for: picture frames, boxes, and any 45-degree corner joint
- Why we picked it: holds a true 90-degree angle automatically, removing guesswork during clamping
- Main drawback: limited to a 3-inch max opening, not for thick stock


As an Amazon Associate we earn from qualifying purchases.
Clamping And Setting
To join wood at a 45 degree angle, clamping and setting are crucial. First, clamp the wood together tightly. Next, set the saw blade to the correct angle and make the cut. Finally, glue the pieces together and use clamps again to hold them in place until the glue dries.
Choosing The Right Clamps
When it comes to joining wood at a 45-degree angle, selecting the right clamps is crucial. The clamps you choose will determine the stability and accuracy of your joint. To ensure a secure and precise connection, consider the following:
- Types of Clamps: There are various types of clamps available, such as bar clamps, pipe clamps, and corner clamps. Each type has its own advantages and is suitable for different woodworking projects. Evaluate your needs and select the appropriate clamp for the job.
- Clamp Size: The size of the clamp should match the dimensions of your workpiece. Using a clamp that is too small may result in uneven pressure distribution, leading to an imperfect joint. Conversely, a clamp that is too large might be difficult to handle and control. Ensure the clamp size aligns with your project requirements.
- Clamp Pressure: Achieving the right amount of pressure is essential for a successful joint. Apply enough pressure to hold the pieces firmly together without causing damage. Consider using clamps with adjustable pressure settings to maintain control over the clamping force.
Ensuring A Square And Even Joint
Creating a square and even joint is crucial to achieving a seamless connection between the wood pieces. Here are some tips to ensure a precise and professional-looking joint:
- Measuring and Marking: Before clamping the wood pieces together, measure and mark the exact positions where the joint will be made. Use a reliable square to ensure accurate angles and markings.
- Cutting Techniques: Utilize precise cutting techniques, such as using a miter saw or a table saw with a miter gauge, to achieve clean and accurate 45-degree cuts. Take your time and maintain a steady hand for best results.
- Dry Fit: Before applying any adhesive or fasteners, perform a dry fit by aligning the pieces and checking for any gaps or misalignments. This step allows you to make any necessary adjustments before permanently joining the wood.
- Clamping Technique: When clamping the pieces together, ensure even pressure distribution along the joint. Use additional clamps if needed to prevent any movement or shifting during the setting process.
Remember, choosing the right clamps and ensuring a square and even joint are crucial steps when joining wood at a 45-degree angle. By following these guidelines, you can achieve a strong and aesthetically pleasing connection in your woodworking projects.
Finishing Touches
Achieving a seamless 45-degree angle joint in woodworking requires precision cutting and accurate assembly. The finishing touches are crucial for a professional and sturdy result. Utilize quality tools and techniques for a flawless finish that enhances the overall aesthetics of your woodworking project.
Sanding For A Smooth Finish
Start by sanding the joint with fine-grit sandpaper.
Use a back-and-forth motion for even smoothing.
Applying Wood Filler For Gaps
Fill any gaps with wood filler for a seamless look.
Smooth the filler with a putty knife for clean edges.
After joining wood at a 45-degree angle, it’s crucial to focus on the finishing touches to achieve a polished result.
Sanding the joint is essential to ensure a smooth and professional finish. Wood filler can be used to fill any gaps, ensuring a seamless and clean appearance.
Advanced Techniques
Achieve a seamless 45-degree wood join with advanced techniques. Master the process for creating strong and aesthetically pleasing angled wood connections. Discover the key steps for precision and durability in woodworking projects.
Joining wood at a 45-degree angle is a great way to add a unique touch to your woodworking projects. However, it can be a challenging task that requires advanced techniques to achieve precise and strong joints. In this section, we will explore two advanced techniques for joining wood at a 45-degree angle: using biscuits or dowels and tips for complex projects.
Creating Stronger Joints With Biscuits Or Dowels
Biscuits and dowels are two popular methods for creating stronger joints when joining wood at a 45-degree angle. Biscuits are small, oval-shaped pieces of wood that are placed in matching slots on two pieces of wood to create a strong joint. Dowels are cylindrical pieces of wood that are inserted into matching holes on two pieces of wood to create a strong joint.
To use biscuits or dowels, you will need a biscuit joiner or a doweling jig. A biscuit joiner is a power tool that cuts slots in the wood for the biscuits to be inserted. A doweling jig is a tool that helps you drill precise holes for the dowels.
Here are the steps for using biscuits or dowels to join wood at a 45-degree angle:
- Cut the wood at a 45-degree angle.
- Using a biscuit joiner or doweling jig, create slots or holes in the wood.
- Insert the biscuits or dowels into the slots or holes.
- Apply glue to the joints and clamp the pieces together.
- Allow the glue to dry completely before removing the clamps.
Using biscuits or dowels can create a stronger joint than just gluing the wood together. It also helps to align the pieces of wood and prevent them from shifting during the clamping process.
Tips For Complex Projects
Joining wood at a 45-degree angle can be a challenging task, especially when working on complex projects. Here are some tips to help you achieve precise and strong joints:
- Use a miter saw or a table saw to make accurate cuts at a 45-degree angle.
- Make sure the pieces of wood are the same thickness and width to ensure a flush joint.
- Use a square to check the accuracy of the joint before gluing and clamping.
- Consider using clamping jigs or corner clamps to hold the pieces of wood in place during the gluing process.
- Allow the glue to dry completely before removing the clamps.
By following these tips, you can ensure that your joints are precise and strong, even on complex projects.
In conclusion, joining wood at a 45-degree angle can be a challenging task that requires advanced techniques to achieve precise and strong joints. By using biscuits or dowels and following the tips for complex projects, you can create beautiful and functional woodworking projects.
Troubleshooting Common Issues
Joining wood at a 45-degree angle is a popular technique used to create a variety of woodworking projects, including picture frames, jewelry boxes, and furniture. However, like any woodworking technique, problems can arise. In this section, we will discuss some common issues that can occur when joining wood at a 45-degree angle and provide solutions to these issues.
Dealing With Misalignment
Misalignment can occur when the two pieces of wood are not cut or clamped correctly. If you find that your wood pieces are not aligned, there are a few things you can do to fix the issue:
- Use a clamp to hold the two pieces of wood together while you adjust the angle.
- Check the angle of each piece of wood to ensure they are both at a 45-degree angle.
- Measure the length of each piece of wood to ensure they are the same length.
Fixing Gaps In The Joint
Gaps in the joint can be caused by a variety of issues, including misalignment or incorrect cutting. To fix a gap in the joint:
- Use wood glue to fill in the gap. Apply a small amount of glue to the gap and use a putty knife to spread it evenly.
- If the gap is too large to be filled with glue, use a wood filler to fill the gap. Apply the wood filler with a putty knife and allow it to dry before sanding it down.
- If the gap is small, you can use a sanding block to sand down the joint until the gap is gone.
By following these tips, you can troubleshoot common issues that may arise when joining wood at a 45-degree angle. With a little patience and practice, you will be able to create beautiful woodworking projects that will last for years to come.

Frequently Asked Questions
What Tools Are Needed To Join Wood At A 45 Degree Angle?
To join wood at a 45 degree angle, you will need a miter saw, wood glue, clamps, and a square to ensure accurate cuts.
What Is The Best Method For Joining Wood At A 45 Degree Angle?
The best method for joining wood at a 45 degree angle is to use a miter saw to make precise cuts, then use wood glue and clamps to secure the joint.
Can Wood Be Joined At A 45 Degree Angle Without A Miter Saw?
While a miter saw provides the most precise cuts, you can also use a miter box and hand saw to achieve a 45 degree angle joint.
How Can I Ensure A Strong And Stable Joint At A 45 Degree Angle?
To ensure a strong and stable joint at a 45 degree angle, apply a generous amount of wood glue and use clamps to hold the pieces firmly in place while the glue sets.
Conclusion
Mastering the technique to join wood at a 45-degree angle opens up a world of possibilities for your woodworking projects. By following the steps outlined in this guide, you can create strong and visually appealing joints that will elevate the quality of your craftsmanship.
Embrace this skill and watch your woodworking prowess flourish.