Step-By-Step Guide: How To Make A Wooden Printers Tray In No Time
A printer’s tray is a type of tray that is used to hold and organize printing materials. It is usually made out of wood and has a variety of compartments that can be used to store different printing supplies. If you are looking for a way to organize your printing materials, here are some tips on making your wooden printer tray.
- Measure the wood and cut it to size
- Drill holes in the wood for the screws
- Attach the screws to the wood
- Place the printer on the tray and screw it in place
How Do I Make My Printer Print from a Certain Tray?
Assuming you would like tips on making your printer print from a particular tray, you first need to open the printer’s driver. The driver should have an option that says “Input Source” or “Media Type.”
Click on that option and select the name of the paper tray you want to use. If your desired paper tray isn’t listed, make sure it’s loaded with paper and click “OK.” The job will now print using the specified paper tray.

How Do I Add a Printer Tray?
Assuming you would like tips on adding a printer tray: Adding an extra paper tray to your printer can be very useful. It allows you to keep different types of paper loaded and ready to go, so you don’t have to reload the form whenever you want to print something constantly.
Here are some tips on how to add a printer tray:
1. Decide where you want to place the new tray. Most printers have room for at least one additional tray, so take advantage of that space.
Keep in mind, though, that the further away the tray is from the printer’s body, the more unstable it may become. So if you have a small or lightweight printer, it’s probably best not to put the new tray too far away from the rest of the machine.
2. Attach any necessary brackets or supports before setting the new tray.
This will help ensure that your new addition doesn’t topple over when you’re not around and damage itself and your printer.
3. Load up the new tray with whatever type of paper you want it dedicated to holding. Be sure to label it clearly, so there’s no confusion later.
And that’s all there is to it!
Why is It Called a Printer’ Tray?
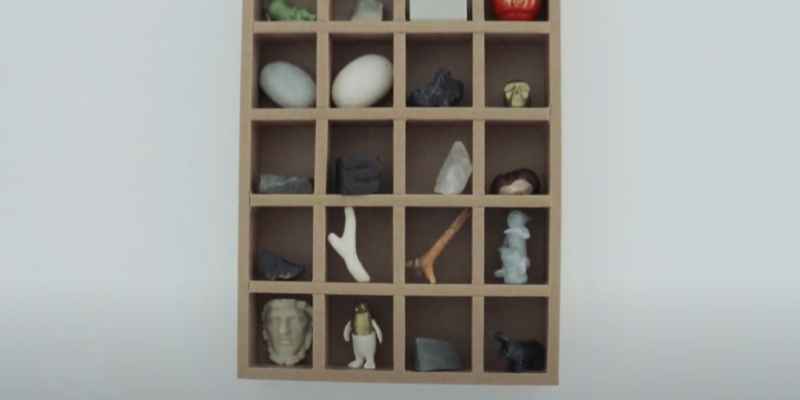
Printers trays (sometimes called type trays) are shallow, rectangular boxes with compartments for each letter of the alphabet. They were used to hold individual pieces of the lead type so that typesetters could easily find and grab the notes they needed to set a line of text. The name “printers tray” comes from their original use in printing presses.
The type was set on a bed of sorts and fed into the press. The word “tray” likely came into use because the type resembled food or other items that would be served on a tray. Nowadays, printer trays are often used as decorative objects, especially when filled with vintage-style letters.
They make unique and eye-catching displays, whether used alone or in groups.
What is Paper Tray in Printing?
When you think of a printer, you probably picture the paper tray. This is the catch-all for all printed pages that come from your machine. The paper tray is an essential part of the printer, and it can be helpful to understand how it works.
The paper tray is where the printer pulls in sheets of paper to print on. Most trays can hold multiple sheets at a time, which makes printing large documents much faster. Many trays also have adjustable settings to customize how much paper is fed into the printer.
To load paper into the tray, open the lid and place your stack of papers inside. Ensure the documents are aligned correctly before closing the cover; otherwise, your prints may appear crooked. Once the top is closed, your printer will start automatically pulling in pages and printing them.
If your prints are coming out poorly or there seems to be a problem with feeding, check to see if something is blocking the path from the paper tray to the printing mechanism. Sometimes a piece of debris can get caught in this area and cause problems. If everything looks clear, try adjusting the settings on your paper tray; sometimes, changing things like Paper Size or Orientation can help fix feeding issues.
DIY Letterpress Tray
A letterpress tray is a great way to add some personality to your papercrafts. They are easy to make and can be customized to fit any project.
Here is a step-by-step guide to making your letterpress tray.
You will need the following:
-1/4″ plywood (I used birch) -a jigsaw
-a drill -1/8″ dowel rods -wood glue
-clamps -sandpaper (120 and 220 grit)
-stain or paint (optional)
First, you need to decide on the size of your tray. I wanted mine to be about 9×12, so I cut my plywood accordingly. If you don’t have a jigsaw, you could use a handsaw or have the plywood cut for you at the hardware store.
Next, draw out your design on the wood. I freehanded mine, but if you’re not confident in your drawing skills, you can print out a template from the internet or create one in Photoshop. Just be sure that whatever design you choose will fit within the dimensions of your tray.
Once you have your design drawn out, it’s time to start cutting! Use a jigsaw with a fine tooth blade to get clean cuts through the wood. If your plan is intricate, you may want to drill pilot holes first, so the jigsaw doesn’t wander off course. Now it’s time to assemble your tray! Fit the dowel rods into the slots you cut earlier and apply wood glue liberally before clamping everything together overnight. In the morning, unclamp your tray and sand down any rough edges with 120-grit sandpaper before switching to 220-grit for a smooth finish. At this point, you can also stain or paint your tray if desired – I chose not to because I liked the natural look of birch plywood.
Configuration Box
If you’re a web developer, then you know that one of the most critical aspects of your job is keeping track of all the different configuration settings for your projects. If you’re working on multiple projects at once, this can quickly become a daunting task. That’s where the Configuration Box comes in.
The Configuration Box is a simple yet powerful tool that allows you to manage all your project’s configuration settings in one place. With the Configuration Box, you can easily add, edit, and delete settings for each project. Plus, the box comes with a handy search feature to quickly find the location you’re looking for.
So if you’re looking for an easy way to keep track of all your project’s configuration settings, then be sure to check out the Configuration Box.
Conclusion
This blog post provides a step-by-step guide for creating a wooden printer tray. The author begins by outlining the supplies needed, including wood, screws, hinges, and handles. Next, the author walks readers through measuring and cutting the wood to create the tray’s frame.
Once the frame is assembled, the author recommends adding a layer of dark paint or stain to achieve the desired look. Finally, handles are added to either side of the tray for easy transport. With these simple steps, anyone can create their own unique wooden printer tray.