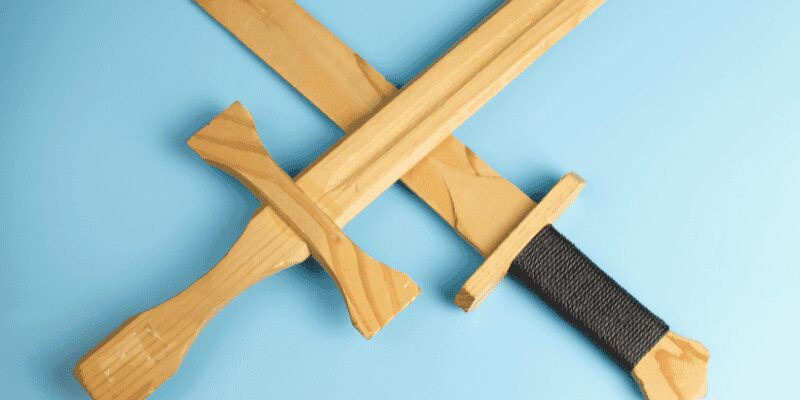
How to Make a Wooden Sword
To make a wooden sword, carve a piece of wood into the desired shape, smooth the edges, and apply a protective finish. Carving and finishing a wooden sword requires careful attention to detail and proper tools.
Creating a wooden sword can be a fun and rewarding project for enthusiasts of all ages. Whether you’re a cosplayer, a DIY enthusiast, or simply looking for an engaging weekend activity, making your own wooden sword allows you to exercise your creativity and craftsmanship.
By following a few simple steps, you can transform a piece of raw wood into a beautifully crafted weapon replica to add to your collection. In this guide, we will walk you through the process of making a wooden sword using basic woodworking techniques and materials readily available. So, grab your tools and let’s get started on this exciting and fulfilling woodworking adventure.
Credit: simplepracticalbeautiful.com
Choosing The Right Wood For Your Wooden Sword
Choosing the right wood for your wooden sword is crucial in ensuring its durability and strength. Consider factors like flexibility, density, and grain pattern to create a sturdy and reliable weapon.
Factors To Consider When Selecting Wood For Your Wooden Sword
- Density: Choose a wood with a high density, as this will provide strength and durability to your wooden sword.
- Straight grain: Opt for wood with a straight grain pattern, as it will enhance the structural integrity of your sword.
- Hardness: Look for wood that is hard enough to withstand the impact and stress caused during swordplay.
- Moisture content: Ensure the wood has a low moisture content to prevent warping or splitting over time.
- Workability: Consider the ease of working with the wood, as it will affect the carving and shaping process.
- Sustainability: If eco-friendliness is important to you, select wood from sustainable sources to minimize environmental impact.
Popular Wood Types For Making Wooden Swords
When it comes to selecting the right wood for your wooden sword, certain types have proven to be popular among sword enthusiasts. Here are some of the common wood choices:
- Ash: Known for its exceptional strength, ash is a popular choice due to its durability and shock resistance.
- Oak: Recognized for its toughness, oak is a reliable option for crafting sturdy swords that can endure rigorous use.
- Hickory: With its high density and straight grain, hickory excels in providing superior strength and resilience.
- Hard maple: Renowned for its hardness, hard maple offers excellent durability and a smooth finish.
- Cherry: Although not as dense as some other woods, cherry’s attractive grain patterns make it a popular choice for decorative swords.
Tips For Finding High-Quality Wood For Your Project
When searching for high-quality wood for your wooden sword, keep the following tips in mind:
- Visit a local wood supplier or specialty store to get a hands-on look at different wood options.
- Inspect the wood for any visible defects, such as knots or cracks, as these can weaken the sword’s structure.
- Feel the weight and density of the wood to ensure it meets your requirements for strength and durability.
- Request information from the supplier about the wood’s moisture content to avoid issues with warping.
- Consider purchasing kiln-dried wood, as it is often more stable and less prone to moisture-related problems.
- Research and consult experienced woodworkers or sword makers for recommendations on suitable wood types.
- If possible, obtain samples or small pieces of the wood you are considering to test its workability and suitability for your project.
- Prioritize responsibly sourced wood to support sustainable practices and minimize environmental impact.
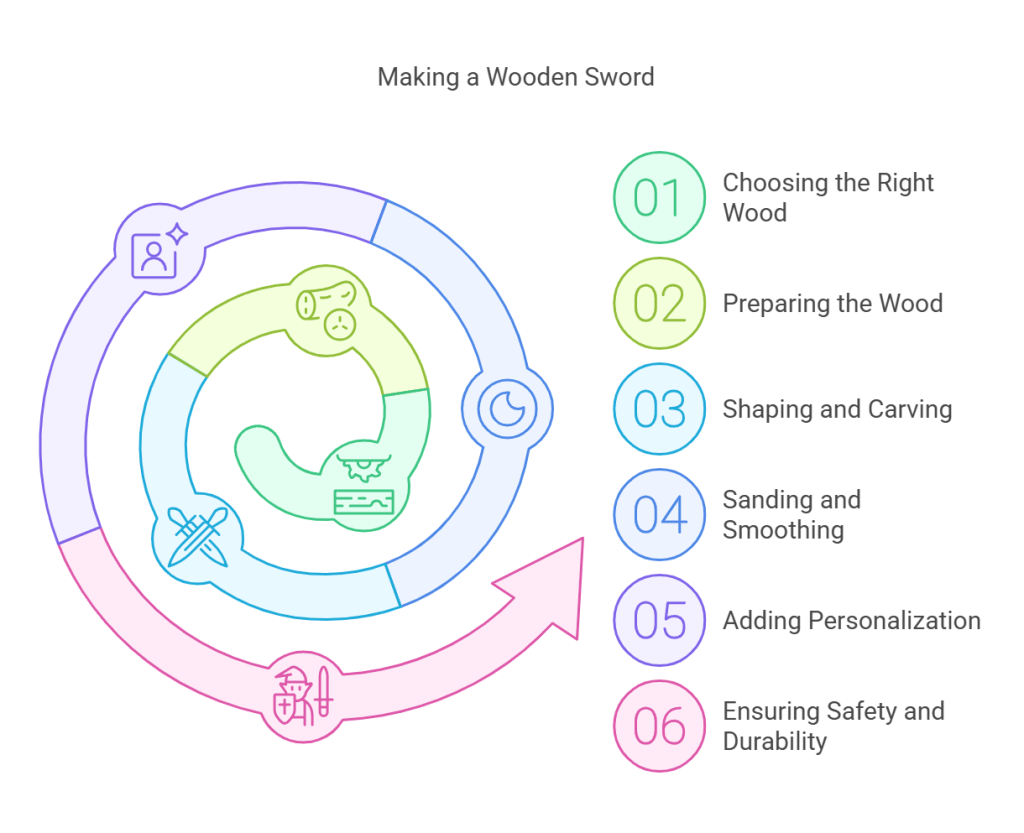
Preparing The Wood For Your Wooden Sword
To prepare the wood for your wooden sword, start by selecting a high-quality and durable piece of wood. Clean it thoroughly, smooth out any rough edges, and shape it into the desired sword shape. Finally, sand the wood to create a smooth finish before adding any additional details or decorations.
When it comes to making a wooden sword, the first step is to properly prepare the wood. This involves cutting the wood to the desired length and shape, as well as removing any imperfections or rough edges from the wood.
By following these steps, you’ll have a solid foundation for crafting your own wooden sword.
Tools And Equipment Needed For Wood Preparation:
- Measuring tape: A measuring tape will come in handy for accurately determining the length you want your wooden sword to be.
- Saw: You’ll need a saw to cut the wood to the desired length. Make sure to choose a saw that is appropriate for the type of wood you are working with.
- Sandpaper: Sandpaper is essential for smoothing out any rough edges or imperfections on the wood. Opt for a coarser grit initially, then gradually move on to finer grits for a smoother finish.
- Clamps: Clamps are useful for securing the wood in place while you work on it, preventing any accidental movement or slips.
Cutting The Wood To The Desired Length And Shape:
- Measure: Use a measuring tape to determine the desired length for your wooden sword. Mark the measurements on the wood.
- Secure the wood: Use clamps to firmly hold the wood in place, ensuring stability and preventing it from moving during the cutting process.
- Cut: With a suitable saw, carefully cut the wood along the marked lines. Take your time and make sure to follow the lines accurately for the desired shape.
Removing Imperfections And Rough Edges From The Wood:
- Inspect the wood: Examine the surface of the wood for any imperfections, such as knots or rough patches.
- Sand rough edges: Using coarse-grit sandpaper, gently sand any rough edges or splintered areas of the wood. Work in the direction of the wood grain to avoid causing further damage.
- Smooth the surface: Gradually switch to finer-grit sandpaper and continue sanding the entire surface of the wood. This will help achieve a smooth finish and remove any remaining imperfections.
- Finish with fine-grit sandpaper: For a polished look, finish sanding with a fine-grit sandpaper to remove any remaining marks.
By following these steps, you will have successfully prepared the wood for your wooden sword. Now you can move on to the next stage of the crafting process, such as shaping the handle or adding decorative details. Remember, attention to detail and patience will result in a high-quality wooden sword.
Happy crafting!
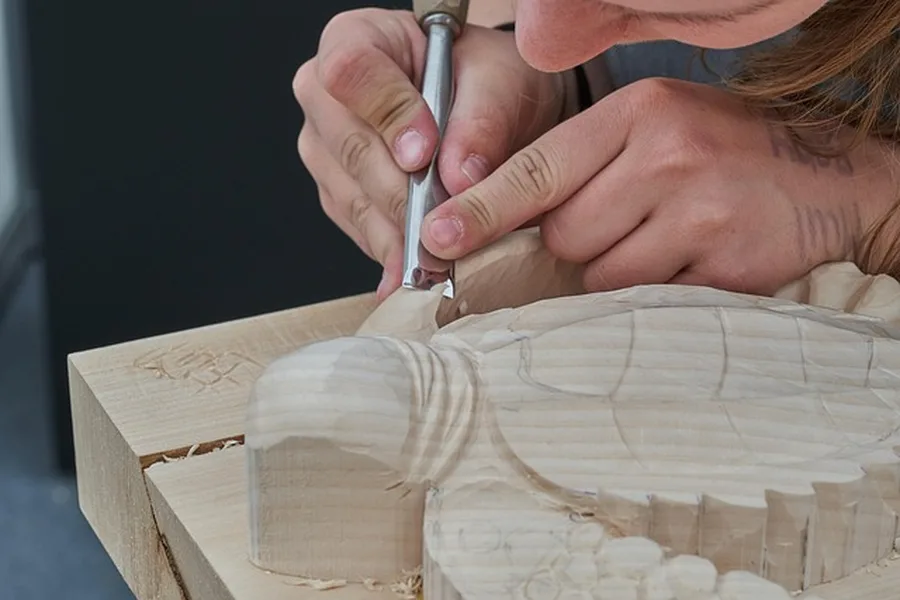
Shaping And Carving Your Wooden Sword
Learn the art of shaping and carving your wooden sword with these easy-to-follow steps. Create a unique and personalized weapon using simple techniques and tools.
If you’ve decided to embark on the journey of making your own wooden sword, shaping and carving it is a crucial step in bringing your design to life. With the right tools and techniques, you can create a sturdy and aesthetically pleasing sword that will impress your friends and add a touch of medieval charm to your collection.
So, let’s get started on shaping and carving your wooden sword with these following steps:
Planning The Design And Dimensions Of The Sword:
- Decide on the desired length and width of your wooden sword, keeping in mind the proportions and ergonomics for a comfortable grip.
- Research different sword designs and choose the one that aligns with your vision – whether it’s a classic medieval style or a fantasy-inspired creation.
- Sketch the outline of your sword on a piece of paper to visualize and refine your design.
- Determine the type of wood you’ll be using for your sword, taking into consideration its strength, durability, and availability.
Marking The Outline Of The Sword On The Wood:
- Transfer the outline of your sword design onto the wooden plank using a pencil or marker.
- Ensure that the grain of the wood runs parallel to the length of the sword to enhance its strength.
- Double-check your markings for accuracy and make any necessary adjustments before moving on to the next step.
Carving And Shaping The Sword Using Appropriate Tools:
- Start by securing the wooden plank in a vise or clamp to provide stability while you work.
- Use a coping saw or jigsaw to carefully cut along the marked outline of your sword, following the curves and contours of the design.
- Use a wood rasp or file to shape the blade, gradually removing excess material to create a smooth and symmetrical edge.
- Pay attention to balance and weight distribution, ensuring that the blade and hilt are proportionate for optimal handling.
- Employ finer tools such as sandpaper, sanding blocks, and carving knives to refine the shape, smooth out rough edges, and achieve the desired finish.
- Take breaks to assess your progress, making adjustments as needed to achieve the desired shape and feel of the wooden sword.
With these steps, you’re well on your way to shaping and carving your very own wooden sword. Remember to pay attention to detail, take your time, and let your creativity shine through as you bring your unique design to life.
Happy sword making!
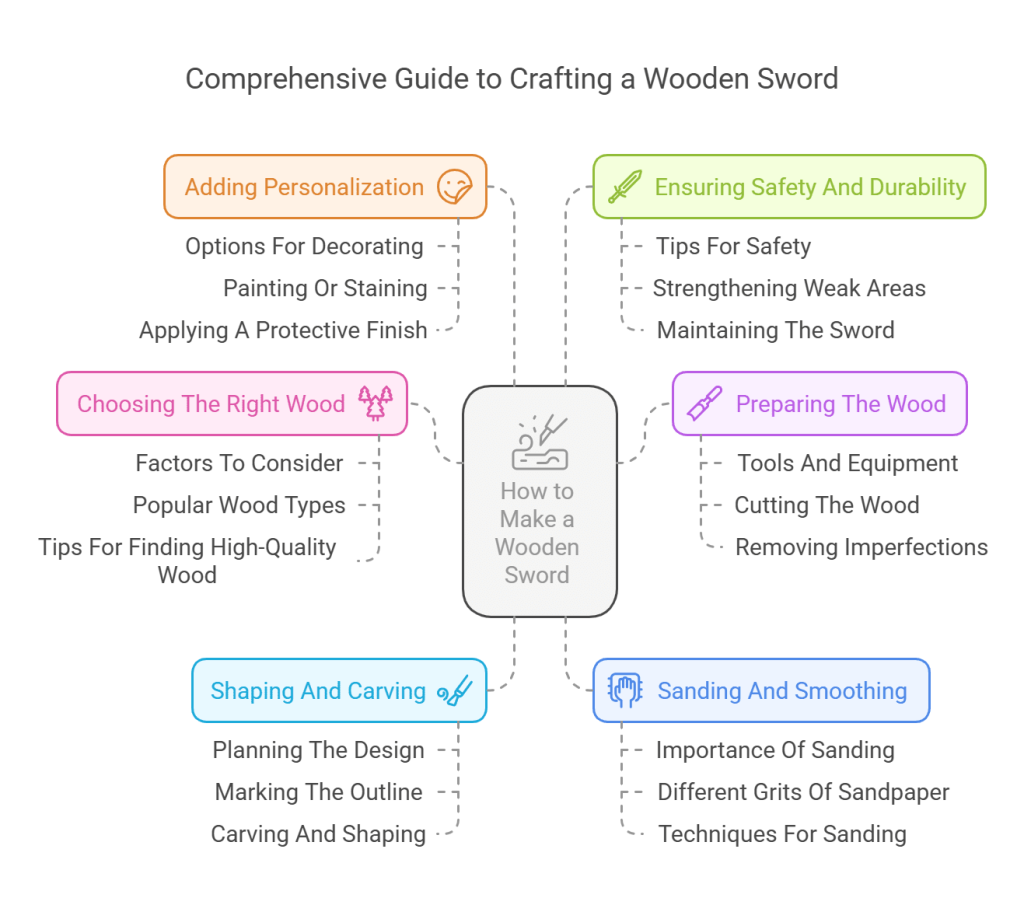
Sanding And Smoothing The Wooden Sword
Learn how to make a wooden sword by sanding and smoothing it for a professional finish. The process involves carefully shaping the wood and removing any rough edges to create a durable and visually appealing sword.
Importance Of Sanding The Sword To Achieve A Smooth Finish
Sanding is a crucial step in the process of making a wooden sword. It not only helps to achieve a smooth and polished surface but also ensures safety by removing any rough edges or splinters. By taking the time to properly sand your wooden sword, you can elevate its overall appearance and make it look more professional.
Here are some key reasons why sanding is essential:
- Smooth finish: Sanding helps to remove any imperfections on the surface of the wooden sword, such as rough patches, blemishes, or small dents. This results in a smooth finish that enhances the overall aesthetic appeal of the sword.
- Safety: Sanding removes any sharp edges or splinters that can pose a risk of injury. It ensures that the wooden sword is safe to handle and reduces the chance of accidental cuts or scratches.
- Stripping previous finishes: If you are working with a previously finished wooden sword, sanding helps to strip off any existing coatings or varnishes. This step is crucial to create a clean canvas for applying new finishes or paints.
- Consistency: Sanding helps to achieve a consistent surface texture throughout the wooden sword. This is particularly important when you plan to apply paints, stains, or clear finishes, as a uniform surface ensures better adhesion and a more professional look.
Different Grits Of Sandpaper To Use For Sanding
Choosing the appropriate grit of sandpaper is vital to achieve the desired level of smoothness and to effectively remove any imperfections from the wooden sword. Here are some common options for sandpaper grits and their purposes:
- Coarse grits (60-80): Coarse-grit sandpaper is ideal for rough shaping and initial sanding. It can help remove larger imperfections and shape the basic outline of the sword.
- Medium grits (100-150): Medium-grit sandpaper is used for further refining the shape and eliminating deeper gouges or scratches left by coarse-grit sandpaper. It prepares the wooden sword for finer sanding.
- Fine grits (180-220): Fine-grit sandpaper is suitable for the final sanding stages. It helps to smooth out any remaining roughness or unevenness and creates a polished surface.
- Extra-fine grits (240+): Extra-fine-grit sandpaper is used for achieving a high level of smoothness and preparing the surface for finishing touches, such as applying paints or stains.
Techniques For Sanding The Sword To Ensure A Professional Look
Sanding requires technique and attention to detail to achieve a professional finish on your wooden sword. Here are some techniques to follow:
- Start with coarse grit: Begin sanding with a coarse-grit sandpaper to shape and remove larger imperfections. Move the sandpaper in the direction of the wood grain and apply even pressure. Be careful not to oversand and remove too much material.
- Gradually progress to finer grits: As you progress to finer grits, continue sanding in the direction of the wood grain. Use light pressure and make smooth, even strokes. This helps to ensure a consistent and polished surface.
- Sand all surfaces evenly: Pay attention to sanding all surfaces of the wooden sword, including the handle, guard, and blade. Neglecting any area can result in an uneven or unprofessional appearance.
- Smooth edges and corners: Use sandpaper or sanding blocks to round the edges and corners of the wooden sword. This not only improves the look but also enhances safety by making it less prone to splintering or catching.
- Check for smoothness: Regularly check the wooden sword’s surface for smoothness by running your hands along it. If you feel any rough spots or unevenness, continue sanding with finer grits until the desired smoothness is achieved.
Remember, sanding is a process that requires patience and attention to detail. Taking the time to do it properly will ensure a professional and polished finish for your wooden sword.

Adding Personalization And Details To Your Wooden Sword
Learn how to take your wooden sword to the next level by adding personalized details. Elevate your craftsmanship and create a unique piece that reflects your style and creativity.
Making your own wooden sword is already a satisfying endeavor, but adding personalization and attention to detail can take it to the next level. Whether you’re planning to use your wooden sword for cosplay, a LARP event, or simply as a unique decorative piece, there are several options for decorating it and making it stand out.
From painting or staining the sword to applying a protective finish, let’s explore how you can enhance its appearance and protect the wood.
Options For Decorating Your Wooden Sword:
- Burning designs: Use a wood burning tool to create intricate patterns, symbols, or names on the surface of your wooden sword. This method allows for precise and detailed designs that can add a touch of elegance or authenticity.
- Carving: If you have some carving skills, consider creating decorative motifs or adding texture to the handle or blade of your wooden sword. This technique allows you to add personalized and unique elements that truly make your sword one-of-a-kind.
- Inlay and adornments: Get creative by adding inlay materials like colorful stones, shells, or metal accents to your wooden sword. These embellishments can add a hint of sparkle or a touch of sophistication, depending on your desired aesthetic.
- Leather wrapping: Consider wrapping the handle of your wooden sword with strips of leather. This provides a comfortable grip and adds a rustic, medieval look to the overall design.
- Etching: Using an etching tool or a small rotary tool, you can etch intricate designs or patterns onto the surface of your wooden sword. This technique works especially well on softer woods and can create a beautiful, engraved effect.
Painting Or Staining The Sword To Enhance Its Appearance:
- Choose your colors: Decide on a color scheme that fits your personal taste or the character you’re portraying. Whether you opt for a natural wood color, metallic hues, vibrant shades, or a weathered look, the choice is yours.
- Preparing the surface: Before applying any paint or stain, make sure to sand the wooden sword to create a smooth and even surface. This step helps the paint or stain adhere better and ensures a professional finish.
- Painting techniques: You can either use a brush or spray paint to apply color to your wooden sword. Experiment with techniques such as dry brushing, layering, or stenciling to achieve different effects and textures.
- Staining: If you prefer a more natural look, staining the wooden sword can enhance its grain and give it a rich, warm finish. Choose a stain that complements the wood type and apply it evenly using a cloth or brush.
- Sealing the paint or stain: To protect the paint or stain from chipping or fading, it’s important to seal the wooden sword properly. Apply a clear lacquer or varnish as a protective topcoat, following the manufacturer’s instructions.
Applying A Protective Finish To Protect The Wood:
- Sanding: Before applying any protective finish, ensure that the wooden sword is sanded smooth to remove any imperfections or rough areas.
- Types of finishes: Consider using a polyurethane finish, which provides a durable and protective coating for the wood. Other options include shellac, lacquer, or wax, depending on your preference and the level of sheen you desire.
- Application process: Use a brush or a cloth to apply the protective finish, following the manufacturer’s instructions. Ensure that the finish is applied evenly and covers all exposed areas of the wooden sword.
- Drying time: Allow sufficient drying time between coats as recommended by the manufacturer. This ensures that the finish properly adheres to the wood and provides the desired level of protection.
- Additional coats: Depending on the type of finish chosen, you may need to apply multiple coats for optimal protection. Be patient during this process, as each coat contributes to the overall durability and longevity of the wooden sword.
By adding personalization and details to your wooden sword, you can transform a simple DIY project into a work of art. From decorating options like burning, carving, or inlaying, to enhancing its appearance with painting or staining, and applying a protective finish to ensure longevity, these steps will help you create a wooden sword that is not only functional but also visually captivating.
So, unleash your creativity and let your imagination run wild as you breathe life into your very own customized wooden sword.
Ensuring Safety And Durability Of Your Wooden Sword
Craft a safe and long-lasting wooden sword with these essential tips. Discover how to ensure durability and security, making your creation both reliable and enjoyable.
Tips For Making The Sword Safe To Use:
- Sand the edges and surfaces of the wooden sword to remove any rough or splintered areas.
- Round off the pointed tip of the sword to reduce the risk of injury during play.
- Use non-toxic and child-safe paint or varnish to seal the wood and prevent splinters.
- Avoid using any sharp or metal objects during the construction process.
- Ensure that the sword’s handle is comfortable to grip, preventing it from slipping during use.
Strengthening Weak Areas Of The Sword:
- Use wood glue to reinforce any areas of the sword that may be weak or prone to breaking.
- Consider adding additional padding or wrapping to the handle for improved grip and durability.
- Reinforce the hilt with an extra layer of wood or strong adhesive tape for added strength.
- Avoid using weak or brittle types of wood for constructing the sword.
- Regularly inspect the sword for any signs of wear or damage and repair it promptly.
How To Maintain And Preserve The Wooden Sword For Long-Lasting Use:
- Store the wooden sword in a cool and dry place, away from direct sunlight or moisture.
- Regularly clean the sword by wiping it with a dry cloth to remove any dust or dirt.
- Avoid exposing the sword to excessive humidity or extreme temperatures, as this can cause warping or cracking.
- Apply a coat of wood polish or wax every few months to maintain the sword’s shine and protect it from drying out.
- Periodically check the sword for any loose parts or signs of damage and repair them immediately.
Remember, safety and durability should be your top priority when making and using a wooden sword. By following these tips, you can create a safe and sturdy weapon for both fun and display purposes. Enjoy the process of crafting your own wooden sword and ensure that it lasts for a long time with proper care and maintenance.
Frequently Asked Questions Of How To Make A Wooden Sword
How To Craft A Wooden Sword?
To craft a wooden sword, follow these steps:
1. Find a sturdy piece of wood, preferably hardwood, with a length of your desired sword.
2. Use a saw to shape the wood into the desired sword shape, considering a handle and blade.
3. Smooth the edges and surfaces using sandpaper or a file for a polished finish.
4. Apply a protective coat of varnish or paint to preserve the wood and enhance its appearance.
Can You Make A Sword Out Of Wood?
Yes, it is possible to make a wooden sword that can be used for decoration or cosplay.
What Is The Best Wood To Make A Sword Out Of?
The best wood for making a sword is typically hardwoods like oak, ash, or hickory.
Are Wooden Swords Illegal?
No, wooden swords are not illegal. They are typically used for training or cosplay purposes.
Conclusion
When crafting a wooden sword, following the proper steps and techniques is essential for creating a safe and durable weapon. By carefully selecting the right wood, carving and shaping it to perfection, and incorporating the necessary structural elements, you can bring your wooden sword to life.
Remember to sand and finish the sword to ensure a smooth and comfortable grip. Additionally, take the time to paint or stain the sword to add a personal touch and enhance its appearance. With the right tools, materials, and a little patience, anyone can create their own wooden sword.
So why not give it a try? Whether you’re a fan of medieval history, a cosplayer, or simply looking for a fun woodworking project, making a wooden sword can be a rewarding and enjoyable experience. Embrace your creativity and unleash your inner warrior!