How to Make Cedar Shingles: DIY Roofing Mastery
To make cedar shingles, start by splitting cedar blocks with a froe and mallet. Use hand tools to shape and anchor the shingles.
Cedar shingles can be crafted from red or white cedar, with red cedar being of higher quality and cost. DIY enthusiasts can create their own cedar shakes using basic tools like a froe and mallet. Maintaining consistent thickness and flipping the shake block after each split are key tips for crafting quality cedar shingles.
While commercially made shingles are suitable for new construction, handmade cedar shingles can add a unique touch as an accent. By following traditional techniques, anyone can produce hand-split wooden shingles for various projects.
Introduction To Diy Cedar Shingles
Learn how to make DIY cedar shingles in this informative guide. Discover the step-by-step process and techniques for creating your own cedar shingles using hand tools. Perfect for adding a rustic touch to your home or cabin.
Why Choose Cedar?
Cedar is a popular choice for shingles due to its natural durability, resistance to insects, and beautiful appearance. Its lightweight nature makes it easy to work with, and it ages gracefully, developing an attractive silver-grey patina over time.
Tools And Materials Needed
When embarking on a DIY cedar shingle project, you will require basic tools such as a froe, mallet, and a cleaving brake. Additionally, you will need rounds of cedar wood that can be turned into shakes. It’s essential to keep the thickness of the shakes consistent for a uniform finished product.
Are you considering a DIY project to create your own cedar shingles? Cedar is a fantastic choice for its durability and aesthetic appeal. To get started, you’ll need tools like a froe, mallet, and cleaving brake, along with cedar wood rounds for splitting into shakes. Keep the shake thickness consistent for a professional finish.
Selecting The Right Cedar Wood
Selecting the right cedar wood is crucial for crafting durable cedar shingles. Red cedar is a premium choice due to its superior quality, making it ideal for roofing and siding projects. Ensure consistent thickness and quality when hand-splitting cedar shakes for longevity.
Red Vs. White Cedar
When it comes to selecting the right cedar wood for making shingles, it’s important to consider the two main types available: red cedar and white cedar. These types of cedar differ in terms of their qualities and characteristics, which can impact the overall quality of your shingles.
Assessing Wood Quality
When assessing the quality of cedar wood for making shingles, there are a few key factors to consider. By paying attention to these factors, you can ensure that you choose the best wood for your shingle-making project.
- Appearance: Look for cedar wood that has a straight grain and minimal knots. This will ensure that your shingles have a smooth and uniform appearance.
- Durability: Cedar wood is known for its natural durability and resistance to decay. However, it’s still important to select wood that is free from any signs of rot or damage.
- Moisture Content: Cedar wood should have a moisture content of around 15% for optimal shingle-making. Wood that is too wet or too dry can lead to issues such as warping or cracking.
- Thickness: Consistency in the thickness of the cedar wood is crucial for creating uniform shingles. Aim for a thickness of around 3/8 inch for the best results.
By taking the time to carefully assess the quality of the cedar wood you use, you can ensure that your shingles are durable, visually appealing, and long-lasting.
Safety First
Making cedar shingles can be a rewarding and fulfilling process, but it’s crucial to prioritize safety at every step. From wearing the right protective gear to handling tools with care, following safety protocols is essential to prevent accidents and ensure a smooth shingle-making experience.
Protective Gear
When crafting cedar shingles, it’s vital to wear the appropriate protective gear to safeguard yourself from potential hazards. The following protective equipment is recommended:
- Safety goggles: Protect your eyes from wood splinters and debris.
- Gloves: Ensure a firm grip and shield your hands from cuts and abrasions.
- Ear protection: Guard against the loud noise generated by tools.
- Dust mask: Prevent inhalation of wood dust and particles.
- Work boots: Provide stability and safeguard your feet from falling objects.
Safe Handling Of Tools
Proper handling of tools is essential to minimize the risk of accidents and injuries. Follow these guidelines for safe tool usage:
- Sharp tools: Ensure that cutting tools are sharp to reduce the risk of slips and accidents.
- Secure work area: Keep your work area clean and organized to avoid tripping hazards.
- Stable work surface: Use a stable workbench or surface to prevent tools from slipping or falling.
- Correct tool for the job: Use the appropriate tool for each task to prevent accidents and achieve precise results.
- Proper storage: Store tools in a safe and organized manner to prevent injuries and damage.
Preparing The Cedar Logs
Before you can start making cedar shingles, it’s crucial to properly prepare the cedar logs. This involves debarking the logs and cutting them into shingle bolts.
Debarking Basics
Debarking the cedar logs is an essential step in the process of making cedar shingles. It involves removing the outer bark from the logs, which can be done using various tools such as draw knives or mechanical debarkers. The debarking process helps to expose the raw wood underneath, preparing the logs for the next stage of the shingle-making process.
Cutting Into Shingle Bolts
Once the logs have been debarked, they need to be cut into shingle bolts. This involves cutting the debarked logs into sections of the desired length, typically around 16 inches long. These shingle bolts will serve as the raw material for crafting the cedar shingles.
Splitting Shingles With A Froe
Position the froe blade on the cedar block, then strike the back of the blade with a mallet.
Maintaining Consistent Thickness
Ensure each split is uniform in thickness to create even cedar shingles.
Refining The Shingles
Refining cedar shingles involves using hand tools to split wood rounds into consistent thicknesses for use as roofing or siding. Red and white cedar are the two main types of wood used for crafting shingles, with red cedar being the more expensive and higher quality option.
DIY enthusiasts can make their own shingles with a froe and mallet, but commercial options are also available.
Refining the Shingles is a crucial step in the process of making cedar shingles. It involves smoothing the edges and achieving the desired shape. This step ensures that the shingles are of high quality and will last for a long time. Let’s take a closer look at the process involved in refining the shingles.
Smoothing Edges
After the cedar blocks have been split into shingles, the edges may be rough and uneven. To smooth the edges, you can use a drawknife or a handplane. Start by holding the shingle with one hand and the drawknife or handplane with the other. Gently run the blade along the edge of the shingle, removing any rough spots or splinters. Repeat this process on all edges until they are smooth and even.
Achieving The Desired Shape
To achieve the desired shape of the shingles, you can use a shingle gauge. A shingle gauge is a tool that helps you to ensure that all the shingles are the same size and shape. To use a shingle gauge, place it on the cedar block and slide it along until it reaches the desired thickness. Then, use a saw to cut the block along the edge of the gauge. Repeat this process until all the shingles are the same size and shape.
In addition to using a shingle gauge, you can also achieve the desired shape by using a froe and mallet. Start by placing the cedar block on a chopping block and positioning the froe along the grain of the wood. Use the mallet to gently strike the froe, causing it to split the block into shingles. With a little practice, you can use the froe to create shingles of varying thicknesses and shapes.
In conclusion, refining the shingles is an important step in the process of making cedar shingles. It involves smoothing the edges and achieving the desired shape. By following the steps outlined above, you can ensure that your cedar shingles are of high quality and will last for many years to come.
Drying And Preservation
After the cedar shingles have been cut and shaped, the next crucial step is the drying and preservation process. Proper drying and preservation are essential to ensure the longevity and durability of the cedar shingles, protecting them from decay and damage caused by environmental factors.
Air Drying Tips
Air drying is a natural and effective method for drying cedar shingles. Here are some tips for successful air drying:
- Avoid stacking the shingles too tightly to allow for adequate air circulation.
- Place the shingles in a well-ventilated area with good exposure to sunlight.
- Regularly check the shingles for moisture content and ensure they are drying uniformly.
- Protect the shingles from direct contact with the ground to prevent moisture absorption.
Applying Protective Coatings
Applying protective coatings is a crucial step in preserving cedar shingles and safeguarding them from weathering and decay. Various protective coatings, such as oils and stains, can be applied to enhance the durability and weather resistance of the shingles.
It’s important to choose a high-quality protective coating that is specifically designed for cedar shingles. Ensure that the shingles are clean and thoroughly dry before applying the protective coating to achieve optimal adhesion and effectiveness.
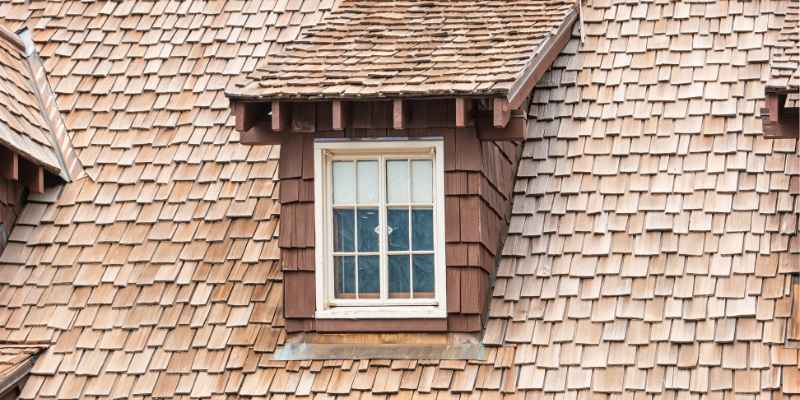
Installation Best Practices
When installing cedar shingles, following best practices can ensure a durable and visually appealing result.
Starter Courses And Layering
When starting the installation, it’s crucial to begin with proper starter courses to provide a solid foundation for the rest of the shingles. This involves using shingles with a consistent thickness and aligning them carefully to ensure a straight and level base for the subsequent layers.
Nailing Techniques
Utilizing the correct nailing techniques is essential for securing the cedar shingles effectively. It’s advisable to use corrosion-resistant nails to prevent rust stains and ensure longevity. Nails should be driven in at an angle to allow for expansion and contraction, but not so deep as to crack the shingles.
Maintenance And Longevity
Learn how to make cedar shingles for your roofing or siding needs. Discover the techniques to ensure maintenance and longevity, including tips on splitting the wood and dressing the shingles. Create beautiful and durable cedar shingles with these DIY methods.
Cedar shingles are a popular choice for roofing and siding due to their natural beauty, durability, and resistance to decay. However, like any other roofing or siding material, cedar shingles require regular maintenance to ensure their longevity. In this section, we will discuss the importance of regular inspection, repair, and replacement of cedar shingles to maintain their beauty and extend their lifespan.
Regular Inspection
Regular inspection of cedar shingles is crucial to identify any potential issues before they become major problems. It is recommended to inspect cedar shingles at least once a year, preferably in the spring or fall, to check for any signs of damage, such as cracks, splits, or curling. Inspecting cedar shingles can be done by simply walking around the perimeter of your home or using a ladder to climb up and visually inspecting the shingles for any damage.
Repair and Replacement
If any damage is found during the inspection, it is important to repair or replace the damaged cedar shingles promptly. Repairing cedar shingles involves filling any cracks or splits with a wood filler and sanding the surface to a smooth finish. However, if the damage is severe or affects a large area, replacement of the damaged cedar shingles may be necessary.
When replacing cedar shingles, it is important to match the new shingles with the existing ones in terms of size and thickness. This ensures a seamless appearance and prevents any water penetration. It is also recommended to hire a professional contractor for the repair or replacement of cedar shingles to ensure proper installation and to avoid any further damage.
In conclusion, regular inspection, repair, and replacement of cedar shingles are essential to maintain their beauty and extend their lifespan. By following these maintenance tips, you can enjoy the natural beauty and durability of cedar shingles for many years to come.
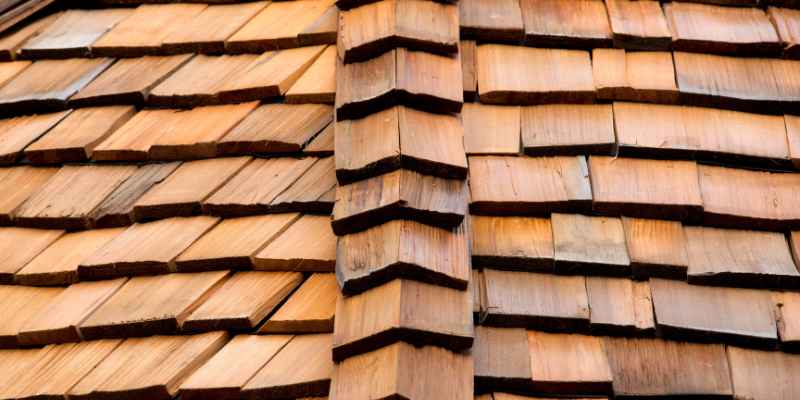
Customizing Your Shingle Design
Crafting your own cedar shingles allows for unique customization. Using hand tools, split cedar shakes for a rustic touch. By following traditional methods, create durable and distinctive shingle designs for your projects.
Adding Personal Touches
Personalize your cedar shingles by:
- Carving initials or symbols
- Burning designs onto the surface
- Painting unique patterns
Creative Patterns And Installations
Get creative with:
- Creating geometric shapes
- Arranging shingles in mosaic patterns
- Experimenting with different color combinations
Environmental Considerations
When crafting cedar shingles, it’s crucial to consider the environmental impact. From the sourcing of the raw materials to the treatments applied, every step should align with sustainable and eco-friendly practices.
Sustainable Sourcing
When sourcing cedar for shingles, it’s essential to prioritize sustainable forestry practices. Choose suppliers who adhere to responsible logging methods, ensuring the long-term health of cedar forests. Look for certifications such as Forest Stewardship Council (FSC) to guarantee sustainable sourcing.
Eco-friendly Treatments
Utilizing eco-friendly treatments is paramount in the production of cedar shingles. Opt for natural, non-toxic preservatives and finishes that are safe for the environment. Consider alternatives such as linseed oil or water-based stains, avoiding harmful chemicals that can leach into the soil or waterways.
Concluding Your Project
After all the hard work and dedication you’ve put into making your own cedar shingles, it’s time to conclude your project. The final steps involve ensuring that everything is in place and taking a moment to appreciate your DIY achievement.
Final Checks And Clean-up
Before wrapping up your project, it’s essential to conduct a few final checks and tidy up the workspace. Here’s a quick checklist to ensure everything is in order:
- Inspect the cedar shingles for any irregularities or imperfections.
- Remove any excess wood debris and clean the work area thoroughly.
- Check that all tools and equipment are properly stored and organized.
- Dispose of any waste materials responsibly, following local regulations.
Celebrating Your Diy Achievement
Now that your cedar shingle project is complete, take a moment to celebrate your hard work and dedication. Here are a few ways to commemorate your DIY achievement:
- Take photos of the finished cedar shingles and share your success with friends and family.
- Reflect on the skills you’ve learned and the satisfaction of creating something with your own hands.
- Consider using your handcrafted cedar shingles for a special project, such as a small roofing or siding application.
Frequently Asked Questions
Can I Make My Own Wood Shingles?
Yes, you can make your own wood shingles using cedar or other suitable wood, a froe, and a mallet.
What Kind Of Cedar Is Used For Shingles?
Red cedar and white cedar are the two main types of cedar used for shingles. Red cedar is more expensive due to its high quality, making it a popular choice for roofing and siding. You can also make your own cedar shakes using rounds of wood and basic tools.
Can You Make Cedar Shakes?
Yes, cedar shakes can be made by using rounds of wood that can be turned into shakes, a froe, and a mallet. Cedar is the ideal wood for making shakes, but they can also be split from other woods such as pine.
Consistent thickness of the shakes should be maintained and the shake block should be flipped end over end after each split. Tools like a chain saw, wedges, and a small sledgehammer are needed to get shingle bolts out of a whole tree.
How To Split Wood For Shingles?
To split wood for shingles, use a froe and mallet to carefully split cedar rounds into shakes. Maintain consistent thickness and direct the split to control shape.
Conclusion
To conclude, making cedar shingles is a rewarding and eco-friendly DIY project that can enhance the aesthetic appeal and durability of your home. By following the proper techniques and using the right tools, you can create beautiful and long-lasting cedar shingles.
Remember to keep the thickness consistent and dress the edges for a professional finish. Whether you choose red cedar or white cedar, these shingles will add charm and value to your property. So, roll up your sleeves and enjoy the satisfaction of crafting your own cedar shingles!