How to Make Wood Ash Face Mask: Revitalize Your Skin
Imagine discovering a secret beauty ingredient right in your backyard. That’s wood ash, an unexpected but powerful ally in your skincare routine.
You’re about to learn how to transform this humble material into a rejuvenating face mask that could change the way you think about natural beauty. Why spend a fortune on commercial products when you can harness the purity of nature?
This article will guide you through the simple steps to create your own wood ash face mask, unlocking the potential of clearer, softer skin. Dive in to find out how you can embrace this eco-friendly skincare alternative and why your complexion will thank you.

Credit: www.pinterest.com
Benefits Of Wood Ash For Skin
Wood ash can naturally exfoliate and cleanse the skin. Mix it with water or honey to create a face mask. This simple remedy may help remove impurities and offer a refreshing glow.
Natural Exfoliant
Wood ash acts as a gentle scrub for your skin. It removes dead skin cells. Your skin feels smooth and fresh. The texture of ash helps clean pores. This reduces blackheads and pimples.
Rich In Minerals
Wood ash contains minerals like calcium and potassium. These minerals nourish your skin. They help keep your skin healthy and glowing. Nutrients in ash can improve skin tone. They add a natural glow to your face.
Detoxifying Properties
Ash draws out toxins from the skin. It cleanses and purifies. Your skin feels refreshed and renewed. This helps reduce blemishes. It gives your skin a clear look. Purifying properties make your face look bright.
Gathering Ingredients
Choose fine wood ash from untreated wood. It should be clean and dry. Avoid ash from painted or treated wood. These can harm your skin.
Consider lavender or tea tree oil. These oils add calmness to your mask. Just a few drops are enough. They bring extra freshness.
- Honey – makes skin soft.
- Oatmeal – acts as a gentle scrub.
- Aloe Vera – cools and soothes skin.
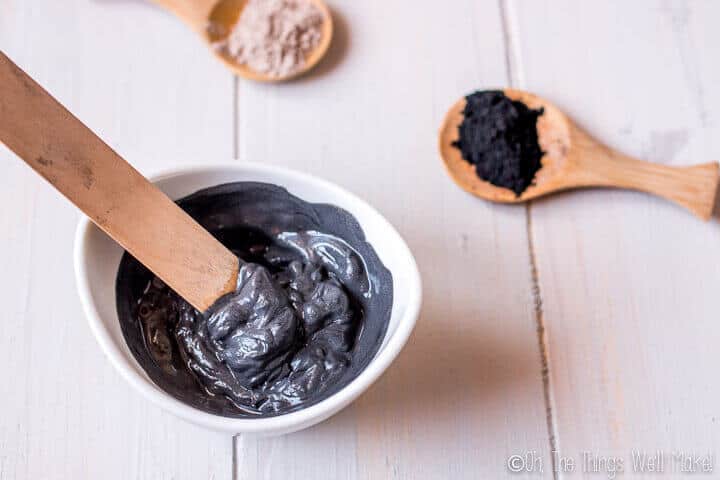
Preparing The Face Mask
Crafting a wood ash face mask involves mixing fine ash with water to form a smooth paste. Apply gently to your skin. Let it dry for 10 minutes. Rinse with warm water for a refreshed feel. This natural mask helps in exfoliating and purifying the skin.
Creating A Smooth Paste
Mix wood ash with water. Stir until it looks smooth. Smooth paste helps the mask spread evenly. Use a spoon or stick to mix. Keep adding water slowly. Avoid lumps in your paste. Smooth paste feels nice on the skin.
Balancing Consistency
Add water if the paste is thick. Too thick paste won’t spread well. If it’s too thin, add more ash. Balance is key. Aim for a creamy texture. The mask should stay on your face easily. Test it on your hand first.
Adjusting For Skin Type
Everyone’s skin is different. For dry skin, add a drop of honey. Honey keeps the skin soft. Oily skin may need lemon juice. Lemon helps control oil. Customize your mask for the best results. Don’t forget to rinse off with water.

Credit: www.pinterest.com
Application Process
Creating a wood ash face mask involves mixing wood ash with water to form a paste. Apply the paste evenly on the face, avoiding the eyes and mouth. Let it dry for 15 minutes, then rinse off with warm water for refreshed skin.
Prepping Your Skin
Wash your face with warm water. Use a gentle cleanser. Dry your face with a soft towel. This removes dirt and oil. It helps the mask work better. Ensure your face is dry before the mask.
Proper Application Technique
Mix wood ash with water. Create a smooth paste. Use your fingers to apply the mask. Cover your face, avoiding eyes and mouth. Spread the mask evenly. Use a mirror for help. Ensure even coverage for the best results.
Optimal Duration For Results
Leave the mask on for 10 minutes. Relax and let it dry. Do not move your face too much. Rinse with cool water after. Pat your skin dry with a clean towel. Feel the fresh, clean skin.
Post-application Care
Moisturizing Tips: After using the wood ash mask, apply a gentle moisturizer. Choose one with natural ingredients. Aloe vera or coconut oil are good choices. They help keep the skin soft and hydrated. Apply the moisturizer evenly on the face. Avoid rubbing too hard. Gentle pats work best.
Frequency of Use: Use the mask once or twice a week. Too often can dry out the skin. Balance is key. Listen to what your skin needs. If it feels dry, wait longer between uses. Follow the skin’s reaction closely.
Monitoring Skin Reaction: Watch for redness or itchiness after use. These can be signs of irritation. Stop using the mask if irritation occurs. Seek advice from a skin expert if needed. Keep track of how your skin responds each time. Adjust the routine based on reactions.
Potential Side Effects
Wood ash face masks might cause irritation or dryness for sensitive skin. Always test a small area before applying. Discontinue use if you experience redness or burning.
Identifying Allergic Reactions
Using a wood ash face mask might cause some allergic reactions. Redness and itching are common signs. Watch for swelling or burning feelings. These can mean an allergy. Always test on a small area first. This helps find reactions early. Breathing issues can also occur. This is rare but serious. If breathing feels hard, stop using the mask. Seek help if needed. Always stay safe when trying new skin products.
Preventing Skin Irritation
To keep skin safe, start with clean skin. Dry skin after washing. Use a thin layer of the mask. Do not rub it in hard. Leave it on for a short time at first. This helps skin get used to it. Moisturize after removing the mask. This keeps skin soft. Avoid using the mask every day. Give your skin a break. This helps prevent irritation. Your skin will thank you for being gentle.
Sustainable Sourcing
Wood ash is a natural ingredient. It comes from burned wood. This process is gentle on nature. Eco-friendly practices make sure forests stay healthy. Trees are cut with care. This helps the earth stay green. No harm to animals or plants. Using wood ash supports nature. It makes our planet happy.
Getting wood ash locally is smart. It helps the community. Farmers and small businesses sell wood ash. Buying local reduces shipping. Less fuel means less pollution. Local sourcing is good for everyone. Prices are often lower. It’s easy to find local sellers. Supporting them helps the local economy. It’s a win for everyone.
Frequently Asked Questions
Is Wood Ash Good For The Face?
Wood ash can irritate the skin and is not recommended for facial use. It may cause dryness and discomfort. Always consult with a dermatologist before trying new skincare products. Use gentle, proven ingredients for facial care to maintain healthy skin.
Can Ash Be Used On The Face?
Ash can be used on the face for skincare. It helps in exfoliation and cleansing. Ensure the ash is from natural sources and is finely powdered. Test on a small skin area first to avoid irritation. Always follow up with a moisturizer for hydration.
Does Wood Ash Have Healing Properties?
Wood ash contains minerals like calcium and potassium, which can aid minor skin irritations. Its antiseptic properties may help in wound cleaning. Always consult a healthcare professional for serious conditions.
How Do You Make Wood Ash Solution?
To make wood ash solution, mix one cup of wood ash with two liters of water. Stir well and let it sit for 24 hours. Strain the mixture using a fine cloth or sieve. Use the filtered solution for cleaning or as a fertilizer.
Conclusion
Creating a wood ash face mask is simple and beneficial. The mask offers natural exfoliation and cleanses your skin. Using it regularly can lead to smoother and healthier skin. Remember to test it on a small area first. This helps avoid any skin reactions.
Ensure your skin is clean before applying the mask. It’s a cost-effective way to pamper yourself. Nature provides wonderful ingredients for beauty care. Enjoy the process and feel the difference. Your skin deserves a gentle touch. Embrace the simplicity of natural skincare.