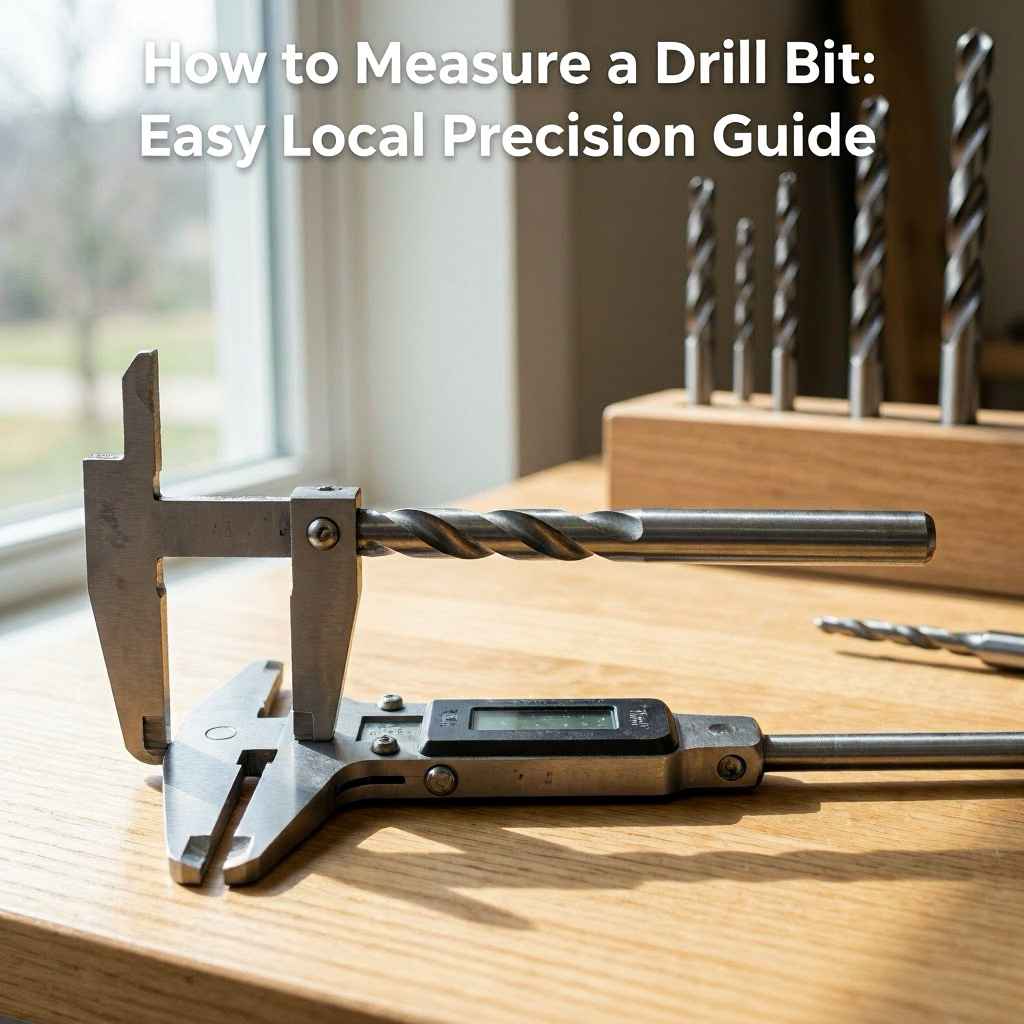
How to Measure a Drill Bit: Easy Local Precision Guide
Measuring a drill bit might seem simple, but for many folks just starting out with DIY projects, it can be a bit tricky. You might wonder if you’re getting the right size or if your measurement is accurate enough. This can slow down your work or lead to frustration.
Don’t worry! This guide will show you exactly How to Measure a Drill Bit: Easy Local Precision Guide step by step. We’ll break it down so anyone can do it with common tools.
Understanding Drill Bit Sizes
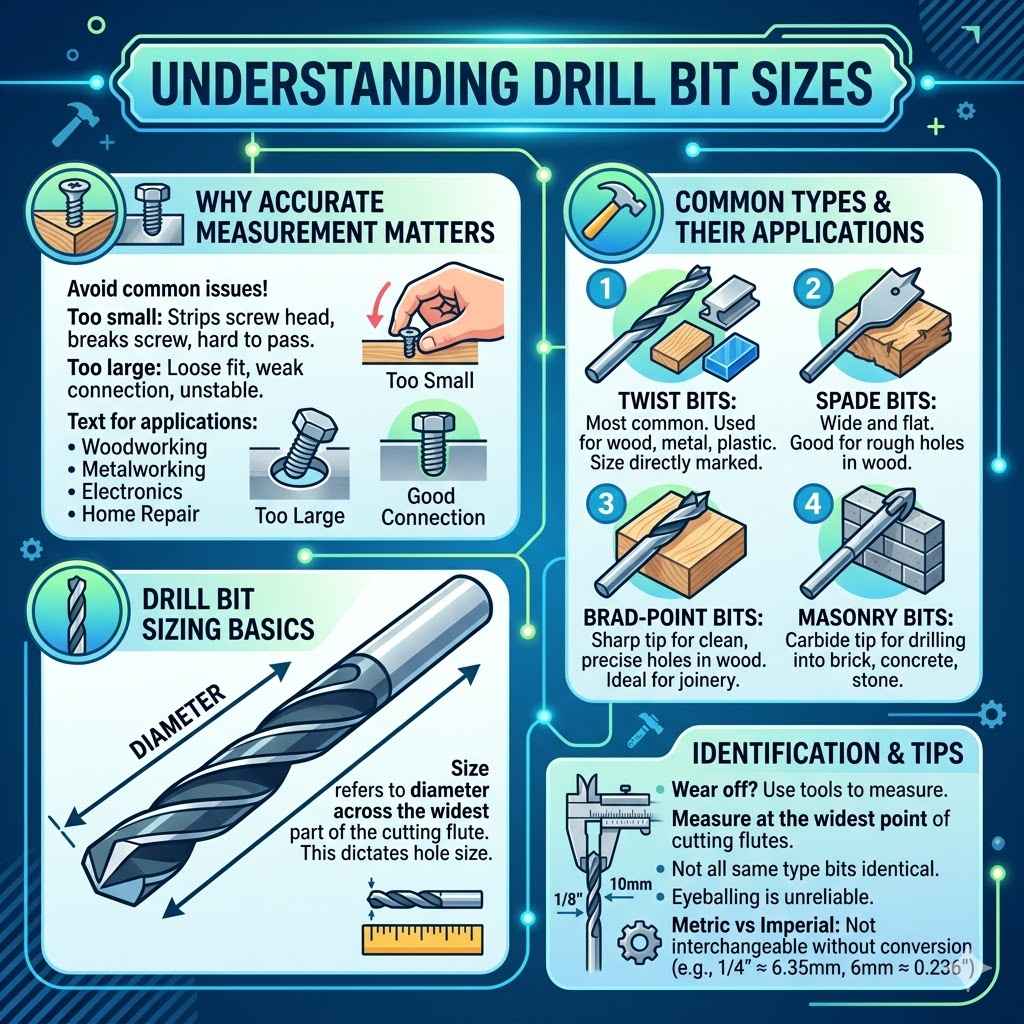
Drill bits come in many sizes, and knowing how to measure them accurately is important for choosing the right one for your project. The size of a drill bit usually refers to its diameter, which is the distance across the widest part of the cutting edge. This measurement dictates the size of the hole the drill bit will create.
Different materials and tasks require specific drill bit sizes. For example, a small screw might need a pilot hole drilled with a small bit, while a larger bolt would require a bigger bit. Getting the measurement right ensures your fasteners fit perfectly and your holes are the size you expect.
This guide will help you master this essential skill for any maker or fixer.
Why Accurate Measurement Matters
Accurate drill bit measurement is key for successful projects. If a drill bit is too small, the hole won’t be large enough for your screw or bolt to pass through comfortably, potentially stripping the screw head or even breaking the screw. If it’s too large, the hole will be too big, and your fastener will be loose, making the connection weak and unstable.
This is especially critical in woodworking, metalworking, and electronics where precision is vital. Imagine trying to hang a shelf; if the pilot hole for your anchor is too small, the anchor won’t go in. If it’s too big, the anchor will just spin.
So, knowing how to measure your drill bit correctly prevents these common issues.
In home repair, using the correct drill bit size can mean the difference between a job done right and one that needs redoing. For instance, when installing new hardware on cabinets, you need to drill pilot holes for the screws. If these holes are off, the new knobs or handles might not sit flush or could be misaligned.
In automotive repairs, drilling into sheet metal or engine blocks requires precise hole sizes for bolts and fittings. A slightly off measurement could compromise the structural integrity or the seal of a component. This careful attention to detail saves time, materials, and headaches down the road.
Common Misconceptions About Drill Bit Sizing
One common idea is that all drill bits of a certain type are the same size. This isn’t true. Drill bits are manufactured to specific tolerances, but slight variations can occur.
Another misconception is that you can eyeball the size. While you might get lucky sometimes, this approach is unreliable for anything requiring accuracy. Many people also think metric and imperial measurements are interchangeable without conversion, which can lead to confusion.
Understanding the difference between millimeters and inches is crucial. For example, a 1/4 inch bit is not the same as a 4mm bit, though they are close. This guide will clarify these points for you.
Types of Drill Bits and Their Sizing
Drill bits come in various types, each designed for specific materials and tasks. Common types include twist bits, spade bits, brad-point bits, and masonry bits. Twist bits are the most common, used for wood, metal, and plastic.
Spade bits are wide and flat, good for rough holes in wood. Brad-point bits have a sharp tip, ideal for clean holes in wood. Masonry bits have a carbide tip for drilling into brick, concrete, or stone.
Each type might have slight differences in how its size is indicated, but the core principle of measuring its diameter remains the same.
The marking on a drill bit often indicates its size directly. However, these markings can wear off, or you might have a bit without any visible size indication. In such cases, precise measurement becomes necessary.
The diameter is always measured at the widest point of the cutting flute. This is where the bit makes contact with the material to remove it. Ensuring your measuring tool is accurate and you’re measuring the correct part of the bit will lead to reliable results.
We’ll cover the tools and methods you can use next.
Tools for Measuring Drill Bits
To get accurate measurements of your drill bits, you’ll need a few simple tools. The most common and effective tools are a ruler, a caliper, and a drill bit gauge. Each tool offers different levels of precision and ease of use.
For most home projects, a good quality ruler might suffice, but for more critical applications, a caliper provides much better accuracy. A drill bit gauge is specifically designed for this purpose and is very convenient if you have many bits to measure. Having the right tool makes the process straightforward and reliable.
Using a Ruler or Tape Measure
A standard ruler or a tape measure can be used to measure drill bits, especially for larger sizes. You’ll need a ruler with clear inch and millimeter markings. To measure, lay the drill bit flat on a surface.
Place the zero mark of your ruler at the very edge of one of the cutting edges. Then, read the measurement where the opposite cutting edge ends. Make sure you are measuring the shank end of the bit where it will enter the drill chuck, or the cutting tip end if that’s what you need to measure.
For precision, ensure the ruler is perfectly aligned with the bit’s diameter.
It’s important to hold the ruler steady and keep your eye directly above the measurement point to avoid parallax error, where the reading appears different depending on your viewing angle. For smaller bits, a ruler might not be precise enough. The markings on most rulers are typically 1/16th of an inch or 1 millimeter, which can be too coarse for very small drill bits used in delicate work.
However, for general purposes, like checking if a bit is roughly 1/4 inch or 6mm, a ruler is a quick and accessible tool. It’s best for bits that are 1/8 inch (about 3mm) or larger.
The Precision of a Caliper
A caliper, whether digital or manual, is a superior tool for measuring drill bits. Calipers have jaws that can precisely grip the object being measured. To measure a drill bit with a caliper, open the jaws wide enough to encompass the drill bit’s widest cutting edge.
Carefully close the jaws around the bit, ensuring they are snug but not crushing it. Read the measurement displayed on the caliper. Digital calipers offer readings in decimal points of millimeters or inches, providing much higher accuracy than a ruler.
For example, a digital caliper can easily show a measurement like 6.35mm, which is precisely 1/4 inch. This level of detail is essential when you need to match a drill bit to a specific screw size or a pre-drilled hole. Manual calipers, while requiring a bit more skill to read, also offer excellent precision.
They usually have a vernier scale, a sliding scale, and a main scale. Learning to read a vernier caliper takes practice but is a valuable skill for precise measurement. Calipers are ideal for all drill bit sizes, from the smallest micro-bits to the largest auger bits.
Using a caliper is straightforward. Place the drill bit between the outside jaws for an external measurement. Ensure the jaws are perpendicular to the surface being measured to get an accurate diameter.
If you are using a dial caliper, locate the main scale and the vernier scale on the dial. Align the zero on the dial with the indicator mark on the main scale, and then find the line on the dial that perfectly aligns with a line on the main scale. This combination gives you the exact measurement.
Drill Bit Gauges
A drill bit gauge is a specialized tool designed specifically for measuring drill bits. It typically consists of a metal plate with a series of precisely sized holes or slots, each marked with its diameter in inches or millimeters. To use a drill bit gauge, you simply insert the drill bit’s shank or cutting end into the holes or slots until you find one that fits snugly.
The marking on that hole or slot is the size of your drill bit. This tool is incredibly fast and easy to use, especially if you have a large collection of drill bits.
Drill bit gauges are very convenient for quick checks. Many gauges include both fractional inch sizes (like 1/16, 3/32, 1/8, etc.) and metric millimeter sizes (like 1mm, 2mm, 3mm, etc.). Some advanced gauges even include decimal inch sizes.
They are particularly useful for quickly sorting bits or identifying unlabeled ones. While a gauge provides a precise size, it doesn’t allow for measuring between standard sizes as a caliper does. For instance, if a bit is slightly larger than 1/4 inch but smaller than 9/32 inch, a gauge might not have a slot for that exact intermediate size, whereas a caliper would provide the exact decimal measurement.
Step-by-Step Guide: How to Measure a Drill Bit
Now that you know the tools, let’s walk through the process of measuring your drill bits. We’ll cover different scenarios and tools to ensure you can get an accurate reading every time. Follow these steps carefully, and you’ll be confident in your measurements, leading to better results in all your drilling tasks.
Measuring with a Ruler (for larger bits)
This method is best for drill bits that are 1/8 inch (about 3mm) or larger.
- Place the drill bit on a flat, stable surface. Ensure it’s clean so you can see the edges clearly.
- Take your ruler and align the zero mark with the outermost edge of one of the drill bit’s cutting edges. It’s usually easiest to measure the tip.
- Carefully extend the ruler to the opposite cutting edge. Try to ensure the ruler is perfectly perpendicular to the line connecting the two cutting edges. This measures the diameter.
- Read the measurement at the point where the opposite cutting edge falls on the ruler. Note whether you are reading in inches or millimeters.
- If the measurement falls between two marks, estimate the fraction or decimal as best as you can. For greater accuracy, consider using a caliper for bits in this size range.
For example, if you are measuring a bit and the edge lines up perfectly with the 1/4 inch mark on your ruler, then the bit is 1/4 inch in diameter. If it’s slightly past the 1/4 inch mark, you might estimate it as 1/4 plus a little more, perhaps around 5/16 inch if it looks about halfway to the next mark. However, this estimation is where rulers can become imprecise.
Measuring with a Caliper (for all bits)
This is the most accurate method for all sizes of drill bits.
- Clean the drill bit to remove any debris that could affect the measurement.
- If using a digital caliper, turn it on. If using a manual caliper, ensure the jaws are clean and the sliding mechanism moves smoothly.
- Open the caliper jaws wider than the drill bit.
- Place the drill bit between the outside jaws of the caliper. Position the jaws so they touch the widest points of the drill bit’s cutting edges. Make sure the jaws are directly across from each other, forming a straight line through the center of the bit’s diameter.
- Slowly close the jaws until they are snug against the drill bit. Do not overtighten.
- Read the measurement displayed on the digital screen or the scales of the manual caliper. Note the units (inches or millimeters).
- If you are using a manual vernier caliper, take your time to correctly read both the main scale and the vernier scale.
Let’s say you measure a drill bit with a digital caliper and it reads 5.5mm. This is a precise measurement that you can then use to find the correct screw size or compare to charts. If you need to convert this to inches, you can use a conversion factor (1 mm is approximately 0.03937 inches).
So, 5.5mm would be about 0.2165 inches. This level of detail is extremely useful for engineering or precision woodworking.
Using a Drill Bit Gauge
This is the quickest method for identifying standard-sized bits.
- Select a drill bit you want to identify.
- Locate the set of holes or slots on your drill bit gauge.
- Take the drill bit and try to insert its cutting end or shank into the holes or slots.
- Find the hole or slot that the drill bit fits into snugly without any wobble.
- Read the number or fraction marked next to that hole or slot. This is the size of your drill bit.
Imagine you have a bit that you can’t read the size on. You pick up your drill bit gauge and try inserting it into various slots. It fits perfectly into the slot labeled “3/16”.
You now know your drill bit is 3/16 of an inch. This is significantly faster than measuring with a ruler, especially if you have many bits to sort.
Interpreting Drill Bit Measurements
Once you have your measurement, it’s important to know what it means and how to use it. Drill bit sizes are typically given in inches or millimeters. Understanding the relationship between these units and standard fastener sizes is crucial for your projects.
Inch Measurements
Drill bit sizes in inches can be expressed in several ways:
- Fractional Inches: These are common sizes like 1/8, 3/16, 1/4, 5/16, 3/8, 1/2 inch, and so on. They represent fractions of a full inch. For example, 1/4 inch is one-quarter of an inch.
- Decimal Inches: These measurements use decimal points, such as 0.125 (which equals 1/8 inch), 0.250 (which equals 1/4 inch), or 0.3125 (which equals 5/16 inch). Decimal measurements are often more precise and are frequently used in machining and engineering.
- Number Sizes: There is also a set of numbered drill bits, ranging from #1 (the smallest, 0.073 inch or 1.85mm) up to #80 (the smallest, 0.0135 inch or 0.34mm). These are typically used for very precise work, like drilling small holes in electronics.
A common task is finding the right pilot hole size for a screw. For instance, if you are using a #8 screw, which has a diameter of about 0.164 inches, you might choose a drill bit around 0.125 inches (1/8 inch) for softwoods. For hardwoods, you might go a bit larger, say 0.150 inches (a bit less than 5/16 inch or just over 3/8mm).
This prevents the screw from splitting the wood. You would measure your screw diameter and then consult a pilot hole chart or use experience to choose the appropriate bit size.
Metric Measurements
Metric drill bit sizes are based on millimeters (mm).
- These sizes are usually whole numbers or have decimal points, such as 1mm, 2mm, 5mm, 6mm, 10mm, or 3.5mm, 8.2mm.
- The metric system is very straightforward; a 5mm bit is 5 millimeters in diameter.
- Most woodworking and metalworking in countries using the metric system will use these sizes.
When working with metric fasteners, you will use metric drill bits. For example, if you are drilling a hole for an M6 bolt (which has a metric thread diameter of 6mm), you will typically use a drill bit that is slightly smaller than 6mm to create a pilot hole for tapping threads. A common size for tapping an M6 thread might be a 5mm or 5.2mm drill bit, depending on the specific thread pitch.
This ensures the tap can cut new threads into the material.
Converting Between Inches and Millimeters
It’s very common to encounter both inch and metric measurements, especially when working with tools or materials from different regions. Knowing how to convert between them is essential.
- Inch to Millimeter: 1 inch = 25.4 millimeters. To convert an inch measurement to millimeters, multiply the inch value by 25.4. For example, a 1/4 inch drill bit is 0.25 inches. So, 0.25 inches * 25.4 mm/inch = 6.35mm.
- Millimeter to Inch: To convert millimeters to inches, divide the millimeter value by 25.4. For example, a 10mm drill bit is 10mm. So, 10mm / 25.4 mm/inch ≈ 0.394 inches.
A common scenario is when a project calls for a 5/16 inch drill bit, but your drill bit set is all metric. You would convert 5/16 inch to decimal, which is 0.3125 inches. Then, you would convert that to millimeters: 0.3125 inches * 25.4 mm/inch = 7.9375mm.
You would then select the closest metric bit, likely an 8mm bit, for your task. Being able to perform these conversions accurately prevents mistakes and ensures you use the correct drill bit size.
Here is a small comparison table for some common sizes
| Fractional Inch | Decimal Inch | Millimeters (approximate) |
|---|---|---|
| 1/16″ | 0.0625″ | 1.59mm |
| 3/32″ | 0.09375″ | 2.38mm |
| 1/8″ | 0.125″ | 3.18mm |
| 5/32″ | 0.15625″ | 3.97mm |
| 3/16″ | 0.1875″ | 4.76mm |
| 7/32″ | 0.21875″ | 5.56mm |
| 1/4″ | 0.25″ | 6.35mm |
| 5/16″ | 0.3125″ | 7.94mm |
| 3/8″ | 0.375″ | 9.53mm |
| 1/2″ | 0.5″ | 12.7mm |
Practical Tips for Drill Bit Measurement
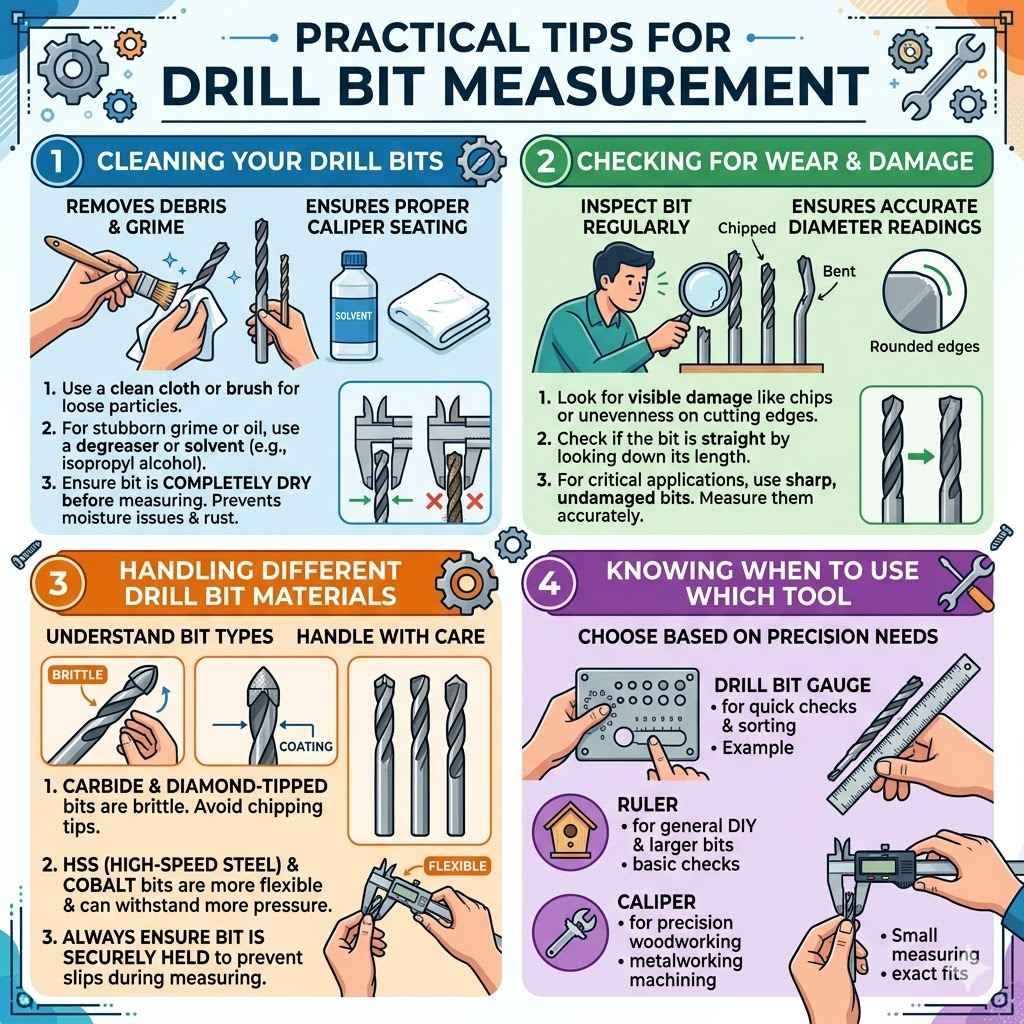
Beyond just using the right tools, there are some practical tips that can help you get even better results when measuring drill bits. These include proper cleaning, checking for wear, and understanding how to handle different types of bits. Applying these tips will ensure your measurements are always reliable.
Cleaning Your Drill Bits
Before measuring any drill bit, it’s essential to clean it thoroughly. Bits can accumulate metal shavings, wood dust, oil, or other debris. This debris can interfere with the accuracy of your measurement, especially when using calipers.
- Use a clean cloth or brush to remove loose particles.
- For stubborn grime or oil, a degreaser or solvent like isopropyl alcohol can be helpful.
- Ensure the bit is completely dry before measuring. Moisture can also affect readings on some measuring tools and can lead to rust.
A clean drill bit allows the jaws of a caliper to seat properly against the cutting edges, giving a true diameter reading. For example, if there’s a bit of metal swarf stuck on the edge, your caliper might be reading the height of the swarf rather than the actual diameter of the bit. This can lead to an overestimation of the bit’s size.
Checking for Wear and Damage
Drill bits, especially those that are used frequently, can become worn or damaged. The cutting edges can dull, chip, or even bend. This wear can affect the actual diameter of the hole the bit creates and also make measurements appear slightly different.
- Inspect the cutting edges for any visible damage, such as chips or unevenness.
- Look down the length of the bit to see if it appears straight or if it has a slight bend.
- If a bit is significantly worn or damaged, its measured diameter might not reflect the true size of the hole it will produce. It might be time to sharpen or replace the bit.
For example, a drill bit that has been used extensively on hard materials might have its cutting edges rounded off. When you measure this bit with calipers, it might give a slightly smaller reading than its original diameter. Similarly, if a bit has a small chip on one edge, measuring across that chipped edge might yield an inaccurate diameter.
For critical applications, it’s always best to use sharp, undamaged bits and measure them accurately.
Handling Different Drill Bit Materials
Drill bits are made from various materials like High-Speed Steel (HSS), cobalt, carbide, and diamond. While the material doesn’t change the fundamental measurement of diameter, it might influence how you handle the bit.
- Carbide and diamond-tipped bits are often more brittle. Handle them with care to avoid chipping the tips.
- HSS and cobalt bits are more flexible and can withstand more pressure.
- Regardless of material, always ensure the bit is securely held or positioned when measuring to prevent slips.
If you are measuring a very fine carbide bit, you need to be extra careful not to apply too much pressure with calipers, as this could potentially damage the bit. Gentle, consistent pressure is key. For diamond-tipped bits used in masonry, the diamond coating is on the very tip.
Ensure your measurement is taken across the widest cutting part of the bit, which is usually the carbide or steel shank just before the diamond coating.
Knowing When to Use Which Tool
The choice of measuring tool depends on your needs.
- For quick checks and sorting, a drill bit gauge is excellent.
- For general DIY and when precision is needed but absolute perfection isn’t critical, a good ruler can work for larger bits.
- For precision woodworking, metalworking, machining, or when exact fits are required, a caliper is the best choice.
A common scenario is when you’re building a birdhouse. You might use a ruler to quickly check if your bits are around 1/4 inch or 1/2 inch for general assembly. However, if you’re installing small hinges that require tiny screws, you’d switch to a caliper to ensure the pilot hole is perfectly sized for the screw threads.
This layered approach ensures efficiency and accuracy.
Frequently Asked Questions
Question: How do I know if my drill bit is the right size for a screw
Answer: You generally need to drill a pilot hole that is smaller than the screw’s shank diameter but large enough to allow the threads to grip the material. For most woods, a pilot hole that’s about 60-75% of the screw’s major diameter is a good starting point. You can measure your screw and then measure your drill bit to find a match.
Question: Can I use a sewing measuring tape to measure a drill bit
Answer: A sewing measuring tape might be too flexible and have markings that are not precise enough for drill bits. It’s better to use a rigid ruler, caliper, or drill bit gauge for accurate measurements.
Question: What is the difference between a 1/4 inch drill bit and a 6mm drill bit
Answer: A 1/4 inch drill bit is 0.25 inches, which is approximately 6.35mm. A 6mm drill bit is exactly 6mm. So, the 1/4 inch bit is slightly larger than the 6mm bit.
Question: Do I measure the cutting edge or the shank of the drill bit
Answer: You measure the diameter of the cutting edge, which is the widest part of the bit that removes material. The shank diameter might be different and is less important for hole size.
Question: How often should I check my drill bit sizes
Answer: You should measure a drill bit if you are unsure of its size, if the markings are worn off, or if you need a precise size for a specific fastener or hole. Regular checking is good practice for important bits.
Wrap Up
Learning How to Measure a Drill Bit: Easy Local Precision Guide is a skill that makes your projects much smoother. You now know how to use simple tools like rulers and calipers, or specialized gauges, to get accurate measurements. Whether you’re dealing with inches or millimeters, these methods ensure you always select the right bit.
Go ahead and measure your bits with confidence for your next DIY task.