How to Repair Rotten Wood: Quick & Easy Fixes
To repair rotten wood, remove the affected area and apply a wet rot wood hardener. Once dry, fill the area with a soft wood polyester filler or wood putty.
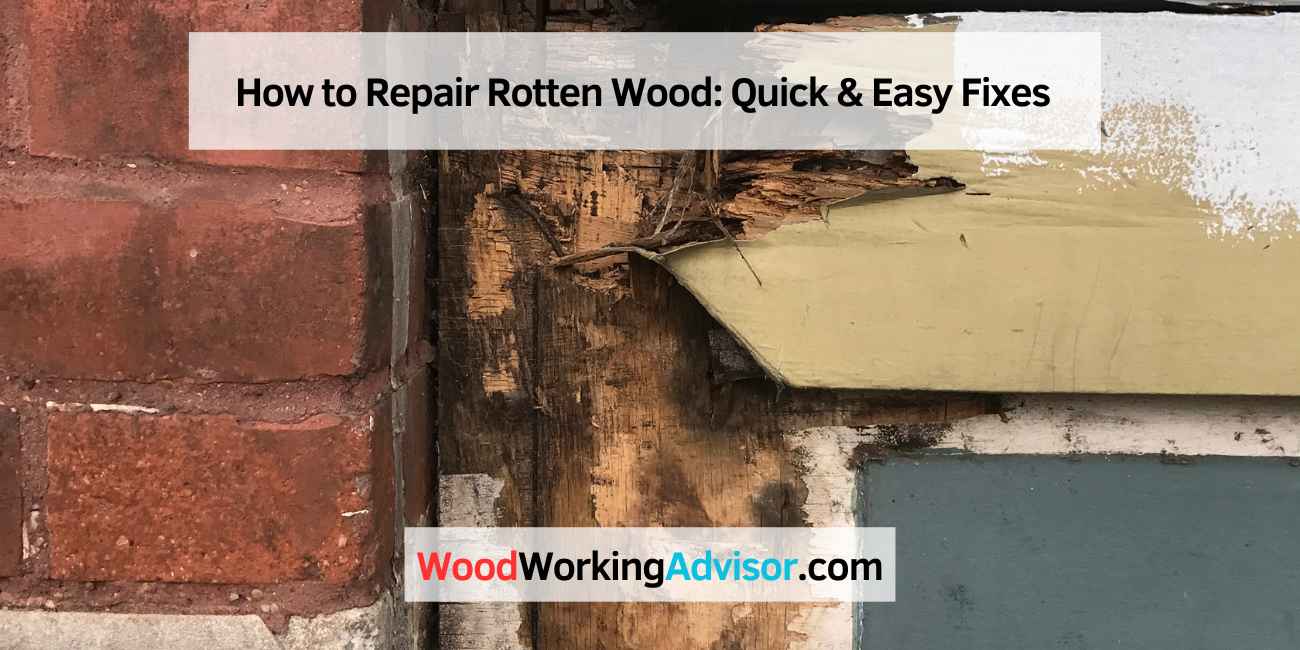
Repairing wood rot in its early stages is cost effective and prevents ongoing damage. However, when wood rot is advanced, ongoing repair and damage can be more costly than replacement. Rotten wood is a common issue for homeowners, especially those living in humid climates.
It can weaken the structure of your home and pose safety hazards. But repairing rotten wood is not as daunting as it may seem. With the right tools and techniques, you can restore your wood to its original strength and appearance. We’ll provide a step-by-step guide on how to repair rotten wood and offer tips on when to repair or replace. So, let’s get started!
Introduction To Rotten Wood Repair
Discover the art of restoring rotten wood with simple steps. Start by removing decayed parts, applying wood hardener, and filling with epoxy for a sturdy repair. Restoring rotted wood is essential to maintain the integrity of structures and prevent further damage.
Why Repairing Rotten Wood Is Crucial
Rotten wood not only compromises the structural integrity of a building but also creates an ideal environment for pests and mold to thrive. Addressing wood rot promptly is crucial to prevent further deterioration and costly repairs.
Common Causes Of Wood Rot
Wood rot is commonly caused by prolonged exposure to moisture, such as rain, leaks, or high humidity. Lack of proper ventilation and maintenance can also contribute to the development of wood rot. Identifying and addressing the underlying causes is essential to prevent future wood rot issues.
Identifying Rotten Wood
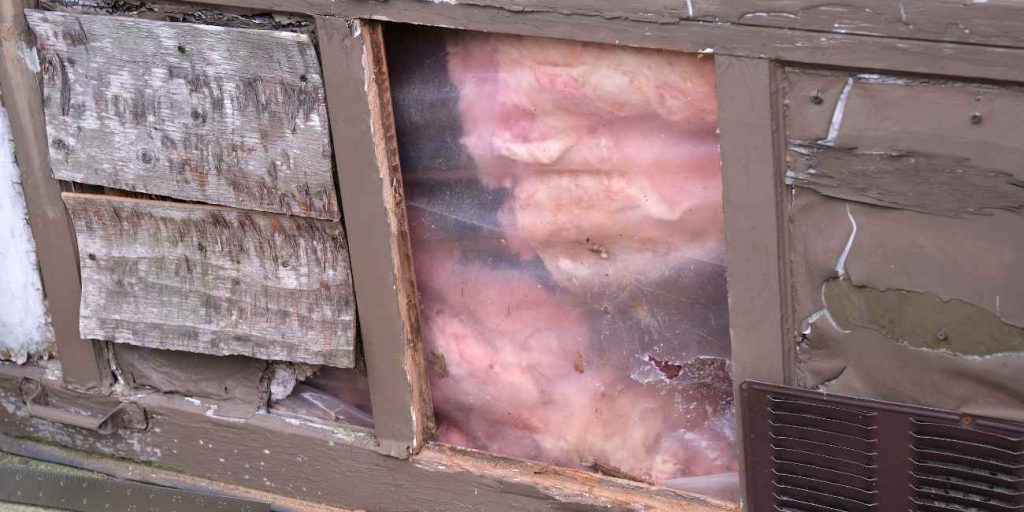
Rotten wood can be a common issue in homes, especially in areas prone to moisture. Identifying rotten wood early is crucial to prevent further damage and costly repairs.
Signs Of Wood Rot
- Soft, spongy texture when touched
- Discoloration or dark spots on the surface
- Pungent, musty odor
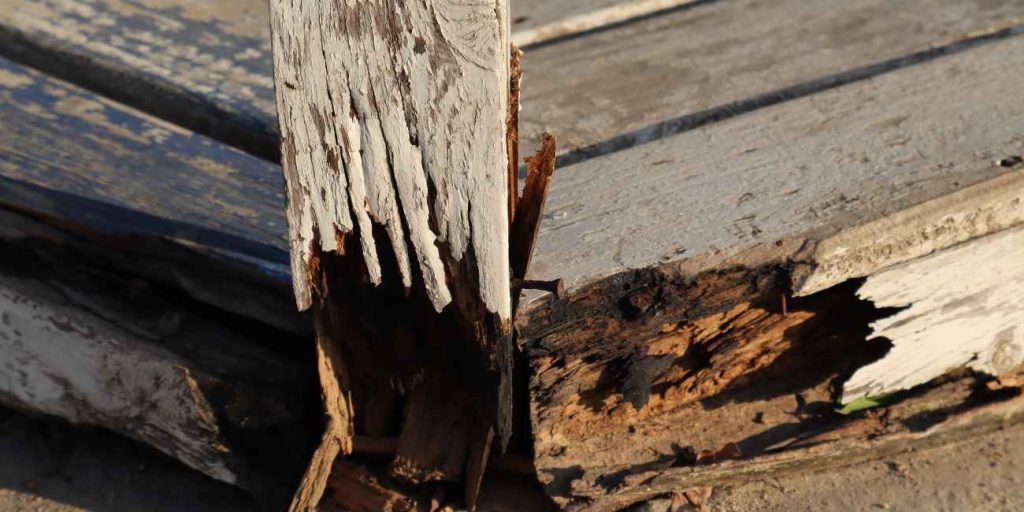
Assessing The Damage
- Inspect the wood for signs of decay
- Probe the wood with a screwdriver to check for softness
- Look for cracks or splits in the wood
Preparation For Repair
To repair rotten wood, start by removing the decayed portions and then apply a wet rot wood hardener generously with a paintbrush. Allow it to soak in and dry completely. Once the hardener is dry, the wood should regain its strength.
Fill any remaining voids with a soft wood polyester filler or wood putty, ensuring durability and resilience. Regular maintenance and early intervention can help prevent further damage and costly replacements.
Safety Measures
Before beginning any repair work on rotten wood, it is important to take necessary safety precautions to avoid any potential accidents. Always wear protective gear such as gloves, goggles, and a dust mask to protect your skin, eyes, and lungs from harmful debris and dust. Additionally, make sure to work in a well-ventilated area to prevent inhaling any toxic fumes from wood hardeners or other chemicals.
Tools And Materials Needed
To repair rotten wood, you will need a few essential tools and materials. These include a hammer, chisel, scraper, drill, wood filler, wood hardener, epoxy, and paint or stain to finish the repaired area. It is important to choose quality products that are specifically designed for repairing rotten wood to ensure a long-lasting repair.
Repair Process
To repair rotten wood, first, remove any loose or rotten wood with a chisel and scraper, making sure to go beyond the visibly damaged area. Then, use a wood hardener to strengthen the remaining wood and prevent further decay. Next, apply a wood filler to the area, smoothing it out with a putty knife, and let it dry completely. Finally, apply an epoxy to the repaired area, shaping it to match the surrounding wood, and finish with paint or stain to match the rest of the surface.
By following these steps and using the proper tools and materials, you can successfully repair rotten wood and restore its strength and beauty. Remember to take necessary safety measures and choose quality products to ensure a long-lasting repair.
Removing Rotten Wood
To repair rotten wood, start by removing the decayed sections. Apply a wet rot wood hardener generously, allowing it to penetrate the wood. Once the hardener dries, the wood should be restored to a healthy state. Consider using epoxy for the best results in repairing rotted wood.
Cutting Out The Rotten Parts
Use a chisel or a pry bar to carefully remove the rotted wood from the surrounding healthy wood. Make sure to cut out all the decayed sections until you reach solid, healthy wood.
Cleaning The Area
After removing the rotted wood, thoroughly clean the area to remove any remaining debris, dust, or loose particles. Use a brush or vacuum to ensure the area is clean and ready for repair.
Applying Wood Hardener
To repair rotten wood, start by removing the rotted parts and filling the surrounding area with a soft wood filler. For added strength and resilience, apply a wet rot wood hardener with a paintbrush and let it soak into the wood.
Once dry, the wood should be healthy again and ready for further repairs or painting.
Choosing The Right Hardener
When it comes to repairing rotten wood, choosing the right wood hardener is crucial. There are several options available in the market, such as epoxy-based and acrylic-based hardeners. Epoxy-based hardeners are known for their strong bonding properties and durability, making them suitable for larger areas of rot. On the other hand, acrylic-based hardeners are more suitable for smaller areas of rot and offer a quick-drying solution.
Application Techniques
Once you have chosen the appropriate wood hardener, it’s time to apply it to the rotten wood. Follow these simple application techniques to ensure a successful repair:
- Clean the surface: Start by removing any loose or crumbling wood from the affected area. Use a chisel or scraper to carefully remove the damaged wood.
- Prep the wood: Before applying the hardener, make sure the wood is dry and free from any dust or debris. Use sandpaper or a wire brush to clean the surface.
- Apply the hardener: Using a paintbrush, generously apply the wood hardener to the affected area. Make sure to saturate the wood thoroughly, allowing the hardener to penetrate deep into the fibers.
- Allow drying time: Give the hardener enough time to dry completely. This usually takes a few hours, but it’s best to check the manufacturer’s instructions for specific drying times.
- Sand and smooth: Once the hardener is dry, use sandpaper to smooth out the surface. Start with a coarse grit sandpaper and gradually move to a finer grit for a smooth finish.
- Prime and paint: After sanding, apply a primer to the repaired area to ensure proper adhesion of the paint. Once the primer is dry, you can paint the wood to match the surrounding area.
By following these application techniques and choosing the right wood hardener, you can effectively repair rotten wood and restore its strength and durability. Remember to always wear protective gloves and work in a well-ventilated area when handling wood hardeners.
Filling With Wood Filler Or Epoxy
Filling with wood filler or epoxy is a crucial step in repairing rotten wood. Here’s how to do it:
Selecting The Best Filler
- Choose a wood filler or epoxy specifically designed for repairing rotten wood.
- Consider the size of the repair area and the level of durability needed.
- Ensure the filler is suitable for both indoor and outdoor use.
Mixing And Applying Epoxy
- Follow the manufacturer’s instructions for mixing the epoxy resin and hardener.
- Use a disposable mixing container and stir thoroughly until the mixture is uniform.
- Apply the epoxy to the rotten wood using a putty knife, filling all the damaged areas.
- Smooth out the surface of the epoxy to match the surrounding wood texture.
- Allow the epoxy to cure completely before sanding and painting as needed.
Finishing Touches
Once the rotten wood has been repaired and restored, it’s time for the finishing touches to ensure a seamless and professional outcome. The final steps involve sanding for smoothness and matching the original finish for a cohesive look.
Sanding For Smoothness
After the wood filler has dried, gently sand the surface with fine-grit sandpaper to achieve a smooth and even finish. Ensure that the edges are blended seamlessly with the surrounding wood for a natural appearance.
Matching The Original Finish
Choosing the right stain or paint to match the original finish is crucial for a cohesive appearance. Test the color on a small, inconspicuous area to ensure a perfect match before applying it to the entire repaired section.
Preventing Future Wood Rot
To repair rotten wood effectively, start by removing decayed sections and applying a wet rot wood hardener generously. Allow it to penetrate the wood and dry completely for restored strength. Consider using epoxy or wood filler to fill voids for durability and resilience against future wood rot.
Regular Maintenance Tips
Regularly inspect and maintain the wood surfaces of your property to prevent future wood rot. Keep an eye out for any signs of water damage, such as discoloration, soft spots, or mold growth. Address any issues promptly to avoid further deterioration.
Protective Measures
Implement protective measures to safeguard wood from moisture and rot. Apply a high-quality wood sealant or paint to create a barrier against water intrusion. Ensure that all wood surfaces are properly sealed and maintained to prevent moisture from penetrating the wood.
Frequently Asked Questions
How Do You Fix Rotting Wood Without Replacing It?
To fix rotting wood without replacing it, use a wet rot wood hardener. Apply it generously and let it soak in. Once dry, the wood should be restored. You can also fill the surrounding area with wood filler to ensure strength and resilience.
What Is The Best Product To Repair Rotted Wood?
The best product to repair rotted wood is epoxy. Remove the rotted parts and apply a wet rot wood hardener to the remaining wood. Once dry, use epoxy to fill the void and ensure strength. Avoid replacing the entire wood, as repairing in the early stages is more cost-effective.
Can You Repair Rotted Wood With Wood Filler?
Yes, you can repair rotted wood with wood filler by removing the damaged parts and filling the area with wood putty for strength and resilience.
Does Rotten Wood Need To Be Repaired Or Replaced?
When wood rot is in its early stages, it can be repaired with a wood hardener or filler. However, if the rot is more advanced, ongoing repair can be costly and it may be more efficient to replace the wood entirely.
It’s important to address wood rot as soon as possible to prevent further damage.
Conclusion
Repairing rotten wood involves removing decay, applying hardener or filler, and ensuring strength. By following these steps, you can restore the integrity of the wood effectively. Remember, early intervention is key to preventing further damage and maintaining the structural integrity of your wooden surfaces.