How to Sharpen a Drill Bit by Hand: Pro Workshop Hacks
Many folks think sharpening drill bits by hand is tricky, especially when you’re just starting out. It seems like a job for fancy tools. But learning How to Sharpen a Drill Bit by Hand: Pro Workshop Hacks is actually super achievable!
We’ll show you the simple steps to make your dull bits sharp again, saving you money and frustration. Get ready to make your tools work like new!
Why Sharpen Your Drill Bits
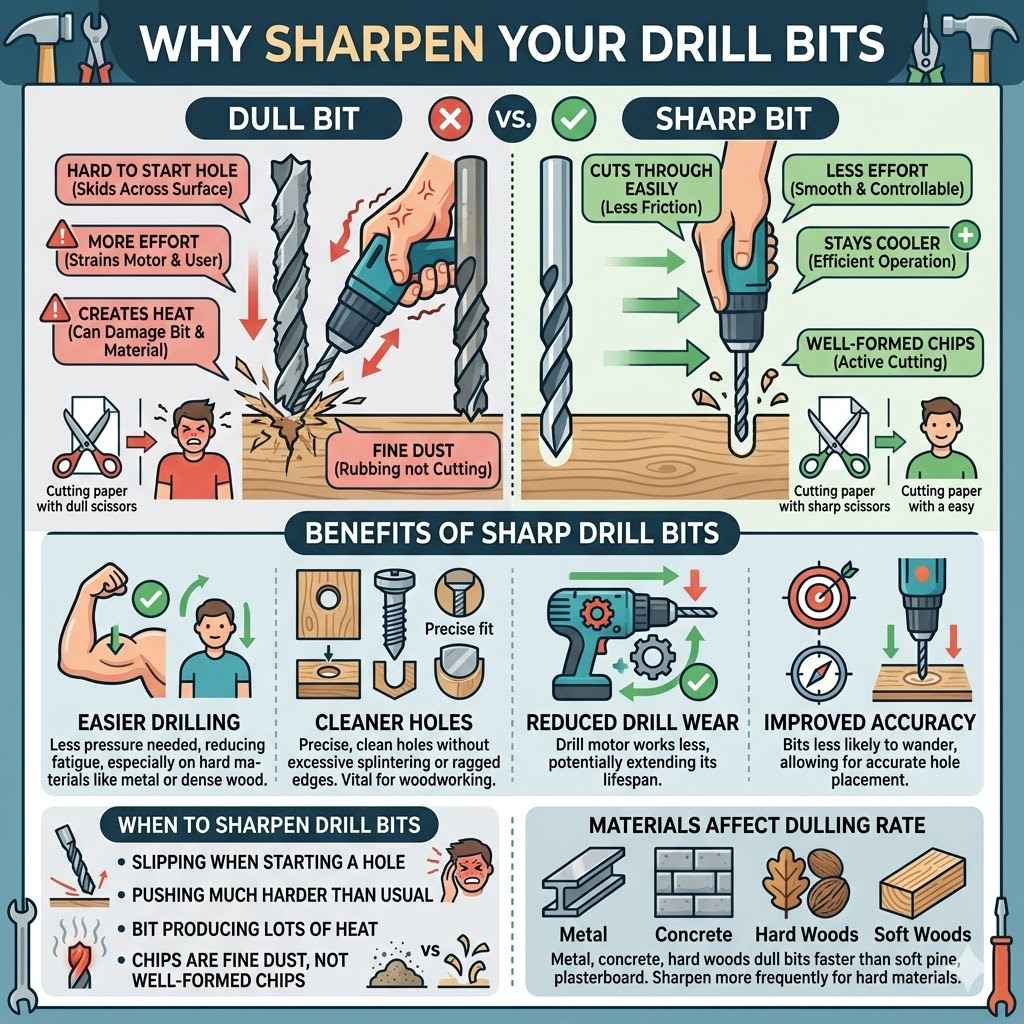
Keeping your drill bits sharp is a smart move for any DIYer or professional. A sharp bit cuts through materials much easier and cleaner. This means less effort for you, less strain on your drill motor, and a much nicer finish on your project.
Dull bits can wander, making it hard to start holes accurately. They also create more heat, which can damage the bit and the material you’re drilling. Imagine trying to cut paper with dull scissors versus sharp ones – it’s the same idea for drills!
Using sharp drill bits is more efficient. You can drill holes faster and more smoothly. This saves you time, which is valuable whether you’re working on a quick home repair or a large construction project.
Plus, a sharp bit is safer. It’s less likely to bind or get stuck, reducing the chance of kickback or injury. So, maintaining your drill bits is about performance, longevity, and safety.
Benefits of Sharp Drill Bits
Sharp drill bits offer several key advantages. They require less pressure to penetrate materials, reducing fatigue. This is especially important when drilling many holes or working with hard substances like metal or dense wood.
You’ll notice your drill doesn’t bog down as much.
Cleanliness of the hole is another benefit. Sharp bits create precise, clean holes without excessive splintering or ragged edges. This is vital for woodworking projects where appearance matters or for applications requiring exact fits.
- Easier Drilling: Less force is needed, making drilling less tiring and more enjoyable.
- Cleaner Holes: Achieve smooth, precise holes with fewer imperfections.
- Reduced Drill Wear: Your drill motor works less, potentially extending its lifespan.
- Improved Accuracy: Bits are less likely to wander, allowing for more accurate hole placement.
These points highlight why taking the time to sharpen your drill bits is a worthwhile investment of your time and effort. It directly impacts the quality of your work and the efficiency of your tools.
When to Sharpen Drill Bits
You’ll know it’s time to sharpen when you notice changes in how your drill bits perform. The most common sign is when a bit starts to slip when you try to start a hole. Instead of biting into the material, it skids across the surface.
This is a clear indicator that the cutting edges are no longer sharp enough to grip effectively.
Another sign is if you have to push much harder than usual to get the bit to cut. This increased effort is a direct result of dull edges struggling to slice through the material. You might also observe that the bit is producing a lot of heat.
Excessive heat indicates friction, which is a hallmark of a dull bit working inefficiently. Finally, look at the chips it produces. If they are very fine dust rather than well-formed chips, the bit is likely dull and just rubbing instead of cutting.
Some materials are harder on drill bits than others. Drilling through metal, concrete, or very hard woods will dull bits faster than drilling through soft pine. Even drilling into plasterboard can dull a bit over time.
Therefore, the frequency of sharpening depends on the types of materials you work with most often.
Essential Tools for Hand Sharpening
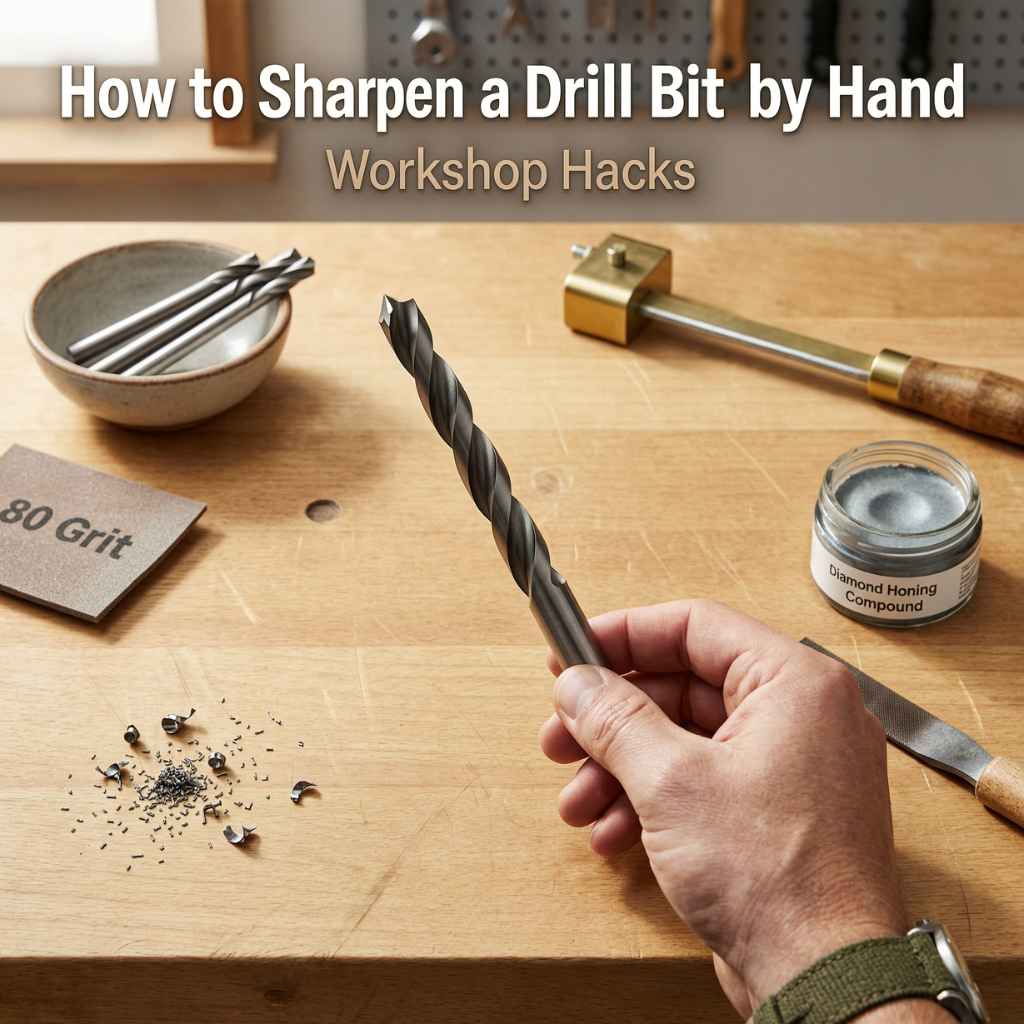
You don’t need a professional sharpening system to get your drill bits back in working order. A few basic hand tools can do the job effectively. The most common and accessible tool is a sharpening file, specifically a small, fine-toothed metal file or a diamond file.
These are ideal for carefully removing metal from the cutting edges of the bit. The size and shape of the file matter – a triangular or half-round file often works well for reaching the precise angles on a drill bit.
A vise is also incredibly helpful. It securely holds the drill bit, allowing you to work on it with both hands and maintain stability. A bench vise is perfect, but even a good quality hand vise can suffice.
Having the bit firmly clamped frees up your hands to control the file precisely. Safety glasses are a must-have for any workshop task involving grinding or filing, as small metal fragments can fly off. Lastly, a steady hand and good lighting are your best friends.
Sharpening Files and Their Uses
Files come in various shapes, sizes, and coarseness levels. For sharpening drill bits by hand, you’ll typically want a fine-cut file. This ensures you can make controlled passes without removing too much metal too quickly.
A common choice is a triangular file, which is useful for getting into the angled flutes of a drill bit. A half-round file can also be very effective, providing a curved surface that matches some of the bit’s contours.
Diamond files are another excellent option, especially for harder bits like those made from cobalt or carbide. These files use a layer of diamond dust bonded to metal. They cut very aggressively and can sharpen even the hardest materials.
When using a file, remember to move it in one direction, away from the cutting edge, to avoid damaging the newly formed sharp edge.
The key is to use a file that can create a sharp apex on the drill bit’s cutting edges. Think of it like sharpening a knife; you’re trying to create a very fine, sharp point where the metal meets itself.
Clamping Your Drill Bit Securely
Holding the drill bit steady is crucial for accurate sharpening. If the bit moves around, you’ll end up with uneven angles and a poorly sharpened edge, which can make the bit even less effective. A bench vise is the ideal tool for this.
You can clamp the shank of the drill bit firmly in the vise jaws. Make sure to clamp it securely enough so it doesn’t budge, but not so hard that you deform or damage the shank.
If you don’t have a bench vise, a sturdy hand vise that you can clamp to a workbench or table can work. Some people also use a drill press vise, which offers excellent stability. The goal is to have the bit positioned so that you can comfortably access its cutting edges with your file or other sharpening tool.
Good lighting is also essential here; you want to be able to see exactly what you’re doing.
Consider using a piece of wood or leather inside the vise jaws if you’re worried about marring the drill bit’s shank, though this is less critical for the part that will be clamped. The main focus is on preventing any wobble or shift during the sharpening process.
How to Sharpen a Drill Bit by Hand Step-by-Step
Learning How to Sharpen a Drill Bit by Hand: Pro Workshop Hacks involves a few key steps that focus on reshaping the cutting edges. First, you need to properly set up your workspace. Secure your drill bit in a vise.
You want the cutting end to stick out enough so you can work on it comfortably. Make sure you have good lighting so you can see the angles clearly. Always wear safety glasses to protect your eyes from metal shavings.
The main goal is to restore the original cutting angle. Most common drill bits have a 118-degree point angle. You’ll be using a file to carefully grind away metal from the bevel of the drill bit.
The bevel is the sloped surface leading to the cutting edge. You want to recreate a sharp edge at the end of this bevel.
Preparing the Drill Bit and Workstation
Before you start filing, inspect your drill bit. Identify the cutting lips, which are the sharp edges at the very tip of the bit. You’ll also see the clearance angle, which is the small surface behind the cutting lip that prevents it from dragging.
Your goal is to restore the sharp cutting lip without reducing the clearance angle too much.
Clean the drill bit. Remove any dirt, grease, or metal dust that might be clinging to it. This will allow you to see the true shape of the bit and ensure that the file bites cleanly.
If the bit has any major chips or damage, hand sharpening might be more challenging, but for general dullness, it’s very effective.
Ensure your vise is stable and at a comfortable working height. If the bit is clamped too high or too low, it can be awkward to file. You should be able to stand or sit comfortably and reach the bit with your file easily.
Good posture and a stable setup prevent fatigue and improve accuracy.
Filing the Cutting Edges
For a standard twist drill bit, you’ll be working on the two primary cutting edges at the tip. Hold your fine-toothed file at a slight angle to the bevel of one of the cutting edges. The angle of the file should generally match the existing bevel.
Start with light, firm strokes, moving the file away from the cutting edge.
Imagine you are trying to shave a thin layer of metal off the bevel. You don’t need to apply a lot of force; let the file do the work. After a few strokes on one side, rotate the drill bit so you can work on the other cutting edge.
Try to make the same number of strokes and apply the same amount of pressure to both edges to maintain symmetry.
Periodically, stop filing and examine your progress. You are looking for a fine, sharp edge to form. You can test this by gently running your fingernail over the edge; it should feel sharp, not smooth or rounded.
If you can see a shiny spot on the very edge, that’s usually where the metal is thinnest and sharpest.
Checking and Refining the Sharpening
Once you believe the cutting edges are sharp, it’s time to check. A simple test is to see if the bit cuts a small piece of scrap wood or plastic easily. Another visual check is to look at the tip under good light.
You should see two well-defined cutting edges meeting at the center of the bit’s point. The angle should be consistent all the way around.
If one side feels sharper or looks more refined than the other, go back and make a few more passes with the file on the duller side. The goal is to have both cutting edges identical. If the point angle seems off (too wide or too narrow), you may need to file the sides of the bit where the land meets the web, but this is a more advanced step.
For most common sharpening tasks, focusing on recreating a sharp cutting lip on each side is sufficient. The key is to remove just enough metal to create a fresh, sharp edge without altering the overall geometry of the bit significantly. A slightly imperfect sharpening is still far better than a completely dull bit.
Pro Tips for Sharpening Drill Bits By Hand
There are a few tricks that pros use to make hand sharpening even more effective and easier. One of the most valuable is understanding the importance of the clearance angle. This is the small surface directly behind the cutting edge that provides clearance as the bit rotates.
If this angle is too small, the bit will rub and heat up, not cut.
When filing, you’re primarily working on the bevel to create a sharp edge. However, a slight touch-up on the clearance angle can make a big difference. You achieve this by filing a tiny bit on the surface that follows the bevel, essentially widening that relief slightly.
This should be done very lightly, as removing too much material here will weaken the cutting edge.
Another tip is to use different types of files for different materials. While a standard metal file works for most bits, diamond files are superior for carbide or cobalt bits, which are very hard. These specialized bits are common for drilling into harder materials like stainless steel or tile.
Maintaining the Clearance Angle
The clearance angle, also known as the flank or relief angle, is crucial for a drill bit’s performance. It’s the surface behind the cutting edge that allows the bit to cut without the entire body of the bit dragging against the material. When sharpening, you are primarily reforming the cutting edge on the bevel.
However, you must also ensure this clearance angle remains adequate.
If the clearance angle becomes too small due to wear or aggressive filing, the bit will generate excessive heat and friction, even if the cutting edge feels sharp. You can often touch up the clearance angle by very lightly filing the surface just behind the cutting edge. This is typically done with the file held almost parallel to the axis of the drill bit, with a slight downward angle to match the original relief.
Be very conservative here; removing too much material will weaken the cutting edge and reduce the bit’s lifespan.
A common guideline for the clearance angle on standard twist drills is about 5 to 15 degrees. You don’t need a protractor to do this by hand; it’s more about a light touch and ensuring there’s a visible, slightly relieved surface behind the cutting edge.
Using Marking Aids
A simple yet effective pro trick is to use a marking aid to help you get the angles right. Before you start filing, you can color the cutting edge and the bevel with a permanent marker. As you file, you’ll be able to see exactly where the marker is being removed.
This helps you understand if you are filing the correct area and maintaining symmetry between the two cutting edges.
If you file and remove the marker from the very edge, you’re creating a new sharp point. If you remove marker from the side of the bevel, you’re reshaping the angle. This visual feedback is incredibly useful for beginners and experienced users alike.
It helps prevent over-filing and ensures that you’re addressing the areas that need it most.
You can also use this technique to check if you’re achieving an even grind on both sides. If one side is still marked while the other is clean, you know you need to spend more time on the marked side. It’s a low-tech but highly effective method for precision.
Cooling and Lubrication
When sharpening metal drill bits, especially with harder metals, heat can build up. This heat can be detrimental to the temper of the steel, making the bit softer and dulling it faster. While hand sharpening typically generates less heat than machine grinding, it’s still something to be aware of.
For general-purpose bits and light sharpening, you might not need any special cooling. However, if you’re sharpening often or working with tougher materials, a little bit of cutting fluid or even just a drop of oil can help. Apply it to the file and the drill bit.
This reduces friction, cools the metal, and helps the file cut more smoothly. It also helps to flush away metal shavings.
Some users like to dip the drill bit in water periodically to cool it down. This is especially important if the bit feels warm to the touch. Don’t quench it rapidly in cold water if the bit is very hot, as this can cause the metal to become brittle.
A gentle cooling process is best. For most simple sharpening tasks by hand, focusing on light strokes and taking breaks to cool the bit if necessary is sufficient.
Advanced Hand Sharpening Techniques
Once you’ve mastered the basic filing method, you might explore slightly more advanced techniques to achieve even better results, especially for specific types of drill bits or materials. One common advanced task is sharpening split-point or self-centering drill bits. These bits have a special point design that helps prevent them from “walking” or drifting when you start a hole, making them ideal for precision work on metal.
Another area is dealing with different types of drill bit geometry. While most common bits are twist drills, specialized bits like brad-point bits for wood or masonry bits for concrete have unique tip designs that require different sharpening approaches. However, for the purpose of common drill bit maintenance, the principles of creating sharp cutting edges remain similar.
Sharpening carbide or cobalt drill bits by hand requires specialized tools like diamond files, as standard steel files won’t cut these harder materials. Understanding the material of your drill bit is the first step in choosing the right sharpening method.
Sharpening Split Point Drill Bits
Split-point drill bits have a notch ground into the very tip, along the center line. This “split point” helps the bit self-center, meaning it won’t wander when you start drilling. Sharpening these requires attention to both the primary cutting edges and the split point itself.
You’ll start by sharpening the two main cutting edges as you would a regular drill bit, using a file to restore their sharpness. After that, you need to address the split point. This involves using a small file or a sharpening stone to create a small, sharp bevel on each side of the split, where the main cutting edges end.
The goal is to make these secondary cutting edges sharp enough to assist in starting the hole cleanly without creating too much drag.
The exact angle and size of this split-point sharpening can be tricky. It’s often a matter of light touch-ups to maintain its effectiveness. If the split point is damaged, it might be harder to restore by hand, but for general dullness, a careful touch-up can revive its self-centering properties.
The key is to maintain the symmetry and sharpness of all cutting surfaces.
Sharpening Brad-Point and Masonry Bits
Brad-point drill bits are designed for wood and have a sharp central point that guides the bit precisely, preventing it from wandering. They also have spurs on the outside of the tip that score the wood fibers before the main cutting edges enter. Sharpening a brad-point bit involves carefully touching up the central point and the two main cutting edges.
The spurs are harder to sharpen effectively by hand, and if they become dull, it might be time for a new bit.
Masonry bits, typically tipped with carbide, are designed for drilling into brick, stone, and concrete. They have a different geometry, often with a wider flute and a robust carbide tip. Hand sharpening masonry bits is challenging because the carbide tip is very hard.
While a diamond file can shape it, restoring the original cutting geometry precisely can be difficult. Often, for heavily used masonry bits, replacement is more economical than extensive hand sharpening.
For both types, the principle is to identify the primary cutting surfaces and use your file or diamond abrasive to restore a keen edge. Always refer to the bit’s original design to guide your sharpening process. For simple touch-ups on the main cutting edges, the same filing techniques apply, just adapted to the bit’s specific shape.
Sharpening Jig Usefulness
While this post focuses on sharpening by hand without special jigs, it’s worth noting that commercial sharpening jigs exist. These devices are designed to hold the drill bit at a precise angle and guide your file or grinding stone. They can be very helpful for ensuring consistent angles and improving the accuracy of your sharpening, especially for beginners.
A common type of jig will hold the bit in a rotating chuck and have a guide for your file. This makes it easier to maintain the correct bevel and clearance angles without needing to freehand the strokes. Some jigs are designed for bench grinders, while others can be used with files.
If you find yourself sharpening drill bits frequently and want to improve consistency, investing in a simple sharpening jig could be beneficial.
However, even without a jig, by paying close attention to angles and symmetry, you can achieve good results with just a file and a vise. The jigs simply add another layer of precision and ease to the process. For those committed to the “by hand” method, practice and careful observation are key to mastering it.
The Impact of Dull Drill Bits
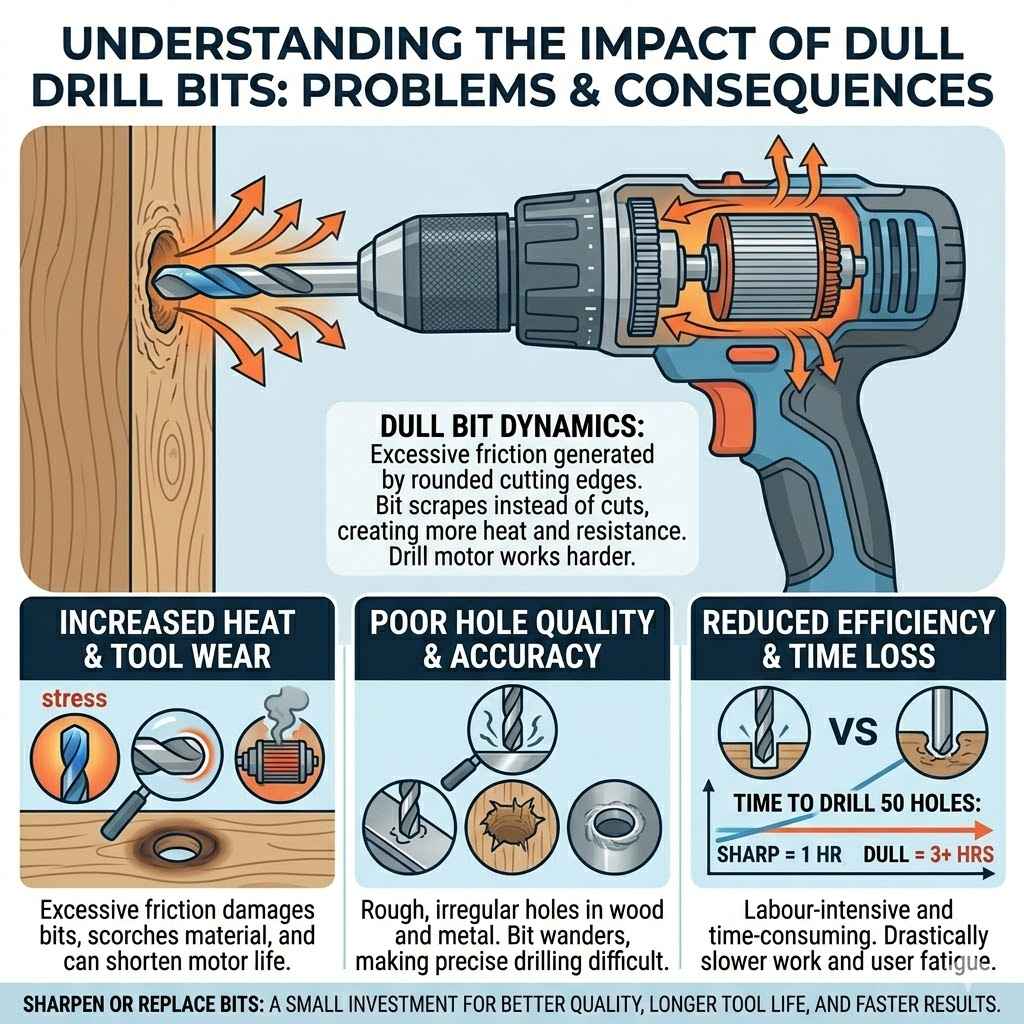
Using dull drill bits is more than just an annoyance; it has tangible negative impacts on your work and your tools. When a drill bit begins to dull, the cutting edges become rounded. Instead of slicing through the material, the bit starts to rub and abrade it.
This creates significantly more friction, leading to several problems. Your drill motor has to work harder, drawing more power and generating more heat.
The increased heat can damage the drill bit itself, softening the metal and further reducing its ability to cut. It can also scorch or discolor the material you are drilling, ruining the finish. For wood, dull bits can cause tear-out and splintering, leading to a rough and unsightly hole.
In metal, they can create burrs and deform the material. The precision of your work suffers as well; dull bits are more likely to wander off course.
One study found that using dull drill bits in a manufacturing setting could increase energy consumption by up to 40% compared to using sharp bits. This highlights the inefficiency that dull tools introduce. Imagine applying that inefficiency to your home projects; it means slower work, poorer results, and more wear on your tools.
Increased Heat and Tool Wear
As mentioned, dull drill bits create excessive friction. This friction generates heat. When drilling wood, this heat can scorch the wood.
When drilling metal, the heat can become so intense that it begins to affect the temper of the drill bit itself. High-speed steel (HSS) bits, for example, can lose their hardness if they overheat, making them dull even faster.
This excess heat also transfers to your drill. The motor has to work harder to overcome the increased resistance, leading to overheating of the drill’s motor and gearbox. Over time, this can significantly shorten the lifespan of your power tool.
A sharp bit cuts with less resistance, generating less heat and putting less strain on both the bit and the drill itself.
Think about the long-term cost. Constantly replacing drill bits and potentially shortening the life of your drill motor due to using dull bits can be more expensive than the small amount of time and effort required for sharpening. Sharpening is an investment in the longevity of your tools and the quality of your output.
Poor Hole Quality and Accuracy
The primary function of a drill bit is to create a hole. When a bit is dull, its ability to perform this function effectively is compromised. Instead of a clean cut, you get a scraping action.
This results in rough, irregular holes. For wood, this means splintering and tear-out around the edges of the hole, which is particularly problematic in visible applications where aesthetics matter.
Accuracy also suffers greatly. A sharp drill bit bites into the material immediately and stays on its intended path. A dull bit, however, tends to wander or skid across the surface, especially when you’re trying to start a hole.
This makes it difficult to drill holes in precise locations. If you need to drill multiple holes in a line or at specific points, a dull bit can throw off your entire layout and render your work inaccurate.
For example, if you are installing hinges on a cabinet door and the pilot holes for the screws are off because of a wandering drill bit, the hinges will not align properly. This small inaccuracy can cascade into bigger problems with the fit and function of the door. Proper hole quality and accuracy are fundamental to successful projects.
Reduced Efficiency and Increased Time
When your drill bits are dull, everything takes longer. You have to push harder, make more passes, and deal with the frustration of the bit not cutting cleanly. This drastically reduces your efficiency.
What could have been a quick drilling job becomes a laborious and time-consuming task. The time spent wrestling with dull bits adds up quickly.
Consider a scenario where you need to drill 50 holes in a piece of lumber. With sharp bits, this might take an hour. With dull bits, it could easily take two or even three hours, and you’ll be much more tired afterward.
The cumulative effect on your productivity can be significant, especially for professional tradespeople.
A sharp drill bit glides through materials with minimal effort. It produces clean chips and requires little downward pressure. This smooth action is what makes drilling efficient.
By investing a few minutes in sharpening, you save a considerable amount of time and energy on your projects. This is a direct return on your sharpening investment.
Frequently Asked Questions
Question: How often should I sharpen my drill bits?
Answer: The frequency depends on how often you use them and what materials you drill into. If you drill frequently through hard materials like metal or concrete, you might need to sharpen them after every few uses. For occasional use on softer materials like wood or plastic, you might only need to sharpen them every few months or when you notice them dulling.
Question: Can I sharpen any type of drill bit by hand?
Answer: You can sharpen most standard twist drill bits by hand effectively. Specialized bits like masonry bits with carbide tips or very small drill bits can be more challenging. For very hard materials, diamond files or specialized sharpening systems are often recommended.
Question: What happens if I remove too much metal when sharpening?
Answer: If you remove too much metal, you weaken the cutting edge of the drill bit. This can make the bit dull faster and may change the optimal angle for cutting. It’s important to use a light touch and remove only what’s necessary to restore a sharp edge.
Question: How can I tell if my drill bit is sharp enough?
Answer: A sharp drill bit will cut into material easily with little pressure. Visually, you should see a fine, sharp edge at the tip. You can gently run your fingernail across the edge; it should feel sharp, not smooth or rounded.
It should also cut clean chips, not just dust.
Question: Is it better to buy new drill bits or sharpen old ones?
Answer: For standard twist drill bits, sharpening is often more economical and environmentally friendly than constantly buying new ones. However, if a bit is severely damaged, chipped, or made of very hard material, replacement might be the better option. Sharpening is best for restoring dulled edges.
Summary
Learning How to Sharpen a Drill Bit by Hand: Pro Workshop Hacks empowers you to restore dull tools. You can make your drill bits cut like new again using simple tools like a file and a vise. This process saves money, improves your work quality, and extends the life of your tools.
Practice these steps to keep your drilling efficient and effective.