How to Waterproof Wood Floors Without Trapping Moisture Underneath
A wood floor that’s already warped from a “waterproofing” job usually failed for one reason: the finish went down before the wood underneath was actually dry. Sealing locks in whatever moisture content the boards have at that moment, so a sealer applied over a damp subfloor or right after a mopping mishap doesn’t stop water damage – it traps it under a film that now has to cup, crown, or peel to let the moisture back out. Done in the right order, waterproofing a wood floor is straightforward: confirm the wood is actually dry, pick a finish rated for floor traffic rather than furniture, apply it in thin coats with the right recoat timing, and add a real subfloor moisture barrier if the room sits on or below grade.
Why the Wrong Sealer Traps Moisture Instead of Blocking It
Polyurethane and other film-forming floor finishes work by curing into a continuous, mostly non-breathable layer on top of the wood. That’s exactly what you want against spills and foot traffic, but it also means the finish seals in whatever is already in the board at cure time. If the wood’s moisture content is elevated – from a recent flood, a leak that got mopped up but not fully dried, or a slab that’s still off-gassing moisture from below – the new film locks that moisture between the wood and the coating. The boards keep trying to release it, which is what shows up weeks later as cupping (edges higher than the center), a cloudy white haze under the finish, or the coating separating in sheets. None of that is a defect in the polyurethane itself; it’s a sequencing mistake that a moisture check before finishing would have caught.
Best Full-Floor Waterproofing Finish
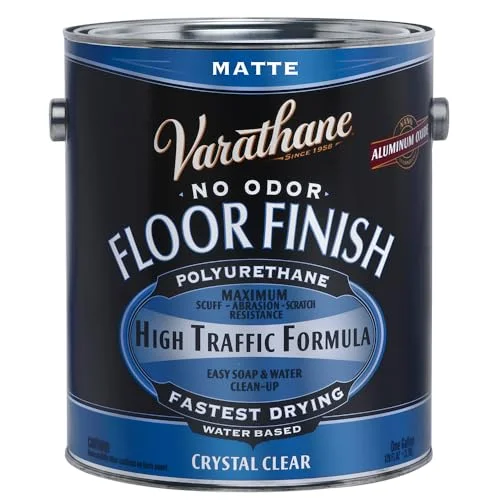 |
Varathane Water-Based Interior Floor Polyurethane – $93.74 Formulated for foot traffic and full-room coverage rather than a small furniture surface, with the fast recoat window that matters when you’re sealing an entire floor in stages.
|
Check Moisture Before You Seal Anything
Interior hardwood should sit at roughly 6-9% moisture content before it gets sealed, and most flooring manufacturers set 12% as the hard ceiling. A $20-30 pin-type moisture meter tells you the board’s actual number in seconds – test in a few spots, not just one, since a floor that dried unevenly after a spill can read fine in one corner and still be wet under a rug or near a baseboard.
If the floor sits on a concrete slab, check the slab too, not just the wood. Tape a 2-foot square of clear plastic sheeting to the concrete, seal all four edges, and leave it overnight. Condensation on the underside of the plastic, or a darker patch of concrete once you peel it back, means the slab is still releasing moisture and needs more drying time (or a vapor retarder, covered below) before anything gets sealed on top of it. Skipping this step is the single most common reason a “waterproofed” floor near a basement or slab-on-grade room fails within the first year.
Picking a Finish Built for a Floor, Not a Tabletop
A finish that’s perfect for a coffee table or a set of coasters isn’t automatically right for a full floor, and that distinction matters more than most guides admit. Tabletop epoxy is built to self-level in a thick, glass-like pour and cures rigid – great for a surface that never flexes, a poor choice for boards that expand and contract with the seasons across an entire room, where a rigid film is more prone to cracking along the seams. Floor-grade polyurethane, by contrast, is formulated to flex slightly with wood movement and to resist the specific kind of wear a floor takes: grit ground in by foot traffic, chair legs, and rolling loads, not just an occasional wet glass.
Within floor finishes, water-based polyurethane dries clear, stays low-odor, and is workable again in hours – useful if you can only take one room out of service at a time. Oil-modified polyurethane lays down a thicker film per coat and ambers slightly with age, which some owners want on darker floors but which will visibly shift a light or gray-stained floor’s color over a few years. Either one outperforms a penetrating oil finish (like tung or linseed oil) for actual waterproofing, since oils soak in and enhance water resistance rather than forming a true film barrier – fine for light-use furniture, not enough on its own for a floor that sees standing water.
How to Waterproof a Wood Floor Step by Step
- Confirm moisture content is under 12% with a pin meter, checked in several spots, before doing anything else.
- Clean thoroughly with a pH-neutral wood floor cleaner – skip vinegar and ammonia-based cleaners, which dull a finish’s ability to bond and can leave a residue the sealer won’t adhere to.
- Scuff-sand or screen the surface. On an existing finish, an orbital sander with 120-150 grit (or a floor buffer with a maroon screening pad) knocks down the gloss just enough for the new coat to grip. On bare wood, sand progressively to 120 grit and vacuum thoroughly – leftover dust is the most common cause of a gritty finish.
- Apply the first coat thin. A lambswool applicator pad or a natural-bristle brush along the grain gives a more even film than a paint roller, which tends to leave bubbles in floor-grade finishes.
- Respect the recoat window. Most water-based floor polyurethanes need recoating within 2-4 hours of the previous coat, or after a light scuff-sand if you miss that window – check your specific product’s label, since this varies by brand and humidity.
- Apply 2-3 total coats for real water resistance. A single coat looks finished but won’t hold up to standing water or a spill left overnight.
- Let it cure fully before heavy use. Dry-to-touch happens in hours, but most polyurethanes need roughly 2-4 weeks to reach full chemical cure and their rated water resistance – keep rugs and furniture off the floor during that window if you can.
Bare Wood vs. an Already-Finished Floor
New or fully sanded bare wood is the easier case: no old finish to worry about bonding to, just dust control and an even coat. An already-finished floor is trickier, because the new sealer has to chemically bond to whatever is already there. Oil-based finishes generally accept a water-based topcoat after a proper scuff-sand, but the reverse – putting an oil-modified poly over an old water-based finish – can have adhesion problems if the old coat wasn’t sanded aggressively enough. If you’re not sure what’s already on the floor, a cotton ball with a little acetone rubbed on an inconspicuous spot will tell you: if finish comes off on the cotton, it’s likely water-based; if it doesn’t budge, it’s more likely oil-based or a factory-cured finish that needs mechanical abrasion, not a chemical test, to prep.
Basements and Below-Grade Rooms Need a Subfloor Barrier Too
Surface sealer alone doesn’t solve moisture that’s coming up through a slab, and this is where a lot of basement wood-floor installs go wrong. Wood flooring below grade needs a vapor barrier between the subfloor and the wood itself – typically 6-mil polyethylene sheeting for a floating floor, or a dedicated vapor-retarding underlayment membrane for a nailed-down floor, lapped and taped at the seams so groundwater vapor can’t migrate up into the boards from underneath. This is also the reason engineered hardwood, not solid hardwood, is usually recommended below grade in the first place: its cross-ply construction resists the humidity swings that make solid boards cup and gap in a below-grade room, even with a good surface finish on top.
Common Mistakes That Ruin a Waterproofing Job
The failures that show up months later almost always trace back to one of a handful of shortcuts: sealing over wood that tested above 12% moisture, skipping the scuff-sand between coats and getting a finish that never fully bonds and peels in sheets, applying wax underneath polyurethane (wax blocks adhesion completely and has to be fully stripped with mineral spirits before any film finish will bond), or moving furniture and rugs back onto the floor before the finish has actually cured rather than just dried to the touch. Humidity swings during application matter too – finishing during a very dry winter and then living through a humid summer can open small gaps at the seams as the boards expand, which is a wood movement issue rather than a finish failure, but it’s worth timing a full refinish for a season with moderate, stable humidity when possible.
Keeping the Seal Working Long-Term
Once the floor is properly sealed, the maintenance that actually protects it is unglamorous: wipe up spills within a few minutes rather than letting them sit, keep indoor humidity in the 30-50% range so the finish isn’t fighting constant wood movement, and use a damp (not wet) mop with a cleaner made for finished wood floors. Most floor finishes benefit from a light screen-and-recoat – not a full strip and refinish – every few years in high-traffic areas, which renews the water-resistant surface layer long before the underlying finish actually fails.
Frequently Asked Questions About Waterproofing Wood Floors
Can you make a wood floor fully waterproof?
Not permanently waterproof in the way tile or vinyl can be, but a properly applied and cured floor polyurethane makes wood highly water-resistant against everyday spills, as long as standing water isn’t left sitting on it for hours.
How do I know if my wood floor is dry enough to seal?
Use a pin-type moisture meter and check several boards. Readings should be at or below 12% moisture content, ideally 6-9%, before applying any film-forming finish.
How do I protect my hardwood floors from water?
Apply a floor-rated polyurethane in 2-3 coats after confirming the wood’s moisture content, let it fully cure for 2-4 weeks before heavy use, control indoor humidity between 30-50%, and wipe up spills immediately rather than letting them sit on the finish.
Why did my wood floor cup or warp after I sealed it?
Cupping after a fresh seal almost always means moisture was trapped underneath the new finish – either the wood wasn’t dry enough before finishing, or the room sits on a slab that’s still releasing moisture and needed a vapor barrier first.
Conclusion
Waterproofing a wood floor comes down to sequencing more than product choice: confirm the wood and subfloor are actually dry, use a finish built for floor traffic rather than a furniture-grade oil or tabletop epoxy, apply thin coats with the correct recoat timing, and give it real cure time before putting the room back into heavy use. Add a vapor barrier for any below-grade or slab installation, and the floor will hold up to everyday water exposure for years without the cupping, cloudiness, or peeling that comes from sealing over moisture that was never allowed to leave in the first place.
Sponsored / affiliate links. As an Amazon Associate I earn from qualifying purchases. I may earn additional commission from eligible campaigns.