
Master Your Router with Porter Cable Edge Guide
The Porter Cable Router Edge Guide provides controlled cuts for consistent results, using the straight edge of the work-piece to guide for edge cuts. It is essential for achieving precise and accurate cuts on your woodworking projects.
Woodworking is a creative and satisfying activity that demands precision and accuracy, but even the most experienced woodworkers can struggle with getting that perfect edge. The Porter Cable Router Edge Guide is an invaluable tool for creating perfect routed edges every time.
This guide attaches to your router and uses the straight edge of the work-piece to guide for edge cuts, ensuring consistent results. The Router Edge Guide is perfect for professionals and DIY enthusiasts alike, allowing for controlled cuts that are essential for precise woodworking. If you’re looking for a tool that can elevate your woodworking to the next level, look no further than the Porter Cable Router Edge Guide.
Understanding The Porter Cable Edge Guide
The Porter Cable Edge Guide is a tool used in conjunction with a router for controlled cuts and consistent results. It uses the straight edge of the workpiece to guide the edge cuts, allowing for precise and accurate routing.
What Is The Porter Cable Edge Guide?
The Porter Cable Edge Guide is a router accessory that helps in creating accurate and straight edges in a wide range of woodworking applications. It is a versatile tool that allows precise adjustments and can be easily attached and detached from the router. The Edge Guide is compatible with most Porter Cable routers and is perfect for projects that require consistent and uniform cuts.
Parts Of The Edge Guide
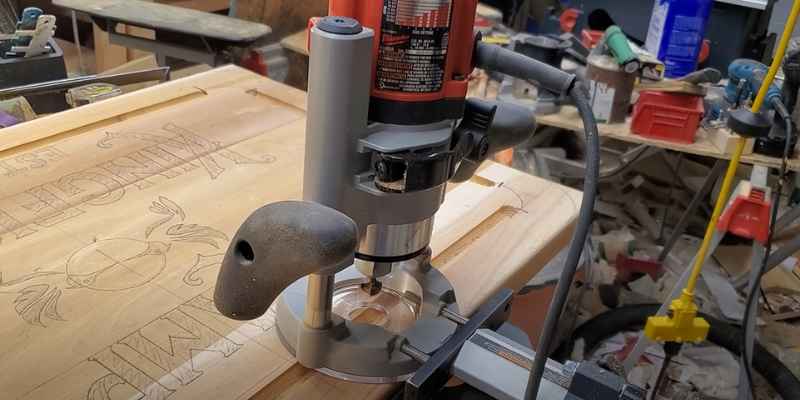
The Porter Cable Edge Guide is composed of three main parts: the adjustment rod, the guide assembly, and the lock nut. The adjustment rod connects the guide assembly to the router base and allows for accurate depth adjustment. The guide assembly comprises a pair of rods, a pivot plate, and a removable sub-base. The sub-base accommodates all the router bits and allows for a smooth and stable movement of the router. The lock nut secures the guide assembly in the desired position and prevents movement during operation.
How It Works
Using the Porter Cable Edge Guide is simple and intuitive. Start by attaching the guide assembly to the adjustment rod, which then attaches to the router’s base. Adjust the depth of the bit, and align the edge guide to the workpiece. Tighten the lock nut to secure the assembly in place, and you’re ready to start routing. The Edge Guide ensures that each cut is consistent and uniform, allowing for a professional-looking finish.
In conclusion, the Porter Cable Edge Guide is an essential accessory for any woodworking enthusiast looking to achieve precise and straight cuts. With easy installation and reliable performance, the Edge Guide is perfect for a range of projects, including creating decorative edges and trims, straightening and flattening boards, and even cutting dadoes and grooves.
Using Porter Cable Edge Guide
Achieve precise and consistent results with the Porter Cable Edge Guide for your router. Guide your edge cuts using the straight edge of the workpiece to create smooth and polished edges without any chips or imperfections.
The Porter Cable Edge Guide is a handy tool that assists in edging tasks with precision and accuracy, making it an indispensable tool for those who require high-quality edge cuts and routing.
What are the types of edging tasks that can be accomplished with the Edge Guide?
The Porter Cable Edge Guide is highly versatile, making it suitable for a variety of edging tasks. The tool is perfect for rounding over sharp edges, making indentation lines and sliding dovetails, shaping workpieces, and creating decorative edges. With this tool, you can achieve perfectly straight edges on your workpiece, making it easy to create symmetrical designs.
Steps on how to use the Edge Guide
Using the Porter Cable Edge Guide is simple and straightforward. Follow these steps to get started:
1) Install the router bit – to use the Porter Cable Edge Guide, start by installing the router bit that you will use to cut the edge on your workpiece.
2) Attach the Edge Guide – attach the Edge Guide to the base of your router. Porter Cable Edge Guides come with adjustable screws that you can use to attach the guide to the router base.
3) Set the Depth – adjust the Edge Guide so that it is at the right height for your workpiece. You can do this by setting the depth on your router, then aligning the Edge Guide along the edge of the workpiece.
4) Move the Router – move the router along the Edge Guide to cut the edge of your workpiece. Move the router slowly and steadily to ensure a clean, even cut.
5) Finish up – once you have completed cutting the edge of your workpiece, turn off the router and remove the Edge Guide.
How to get perfect routed edges
To get perfect routed edges using the Porter Cable Edge Guide, follow these tips:
1) Use a sharp router bit – using a dull router bit will make it difficult to achieve clean, precise cuts. Ensure that your router bit is sharp and in good condition before starting your edging task.
2) Use slow, steady movements – when using the Porter Cable Edge Guide, it is important to move the router slowly and steadily. This will ensure that your cuts are even and precise.
3) Plan your cuts – before starting your edging task, plan out your cuts. This will help you to avoid mistakes and ensure that your cuts are symmetrical.
4) Use a dust collector – when routing, it’s important to use a dust collector to keep the work area clean and reduce the risk of sawdust buildup.
5) Use clamps to secure the workpiece – before starting your edging task, secure your workpiece with clamps. This will prevent the workpiece from moving while you’re cutting, ensuring that your cuts are accurate and symmetrical.
In conclusion, the Porter Cable Edge Guide is an essential tool for anyone who wants to achieve high-quality, perfectly cut edges on their workpieces. By following these tips and using the Edge Guide correctly, you can create professional-looking designs that are sure to impress.
Changing Bits On Porter Cable Router
Learn how to change the bits on Porter Cable router using the Router Edge Guide for precise cuts. It adjusts to fit different router models and helps create consistent results by using the straight edge of the work-piece as a guide.
Watch tutorials for easy step-by-step instructions.
If you own a Porter Cable Router, changing bits is an essential skill to make the most out of your power tool. With a Router Edge Guide Porter Cable, the process becomes even easier while achieving perfect cuts. In this section, we’ll explore how to change bits on a Porter Cable Router, why it’s necessary, and the steps to follow.
How To Change Bits On A Porter Cable Router
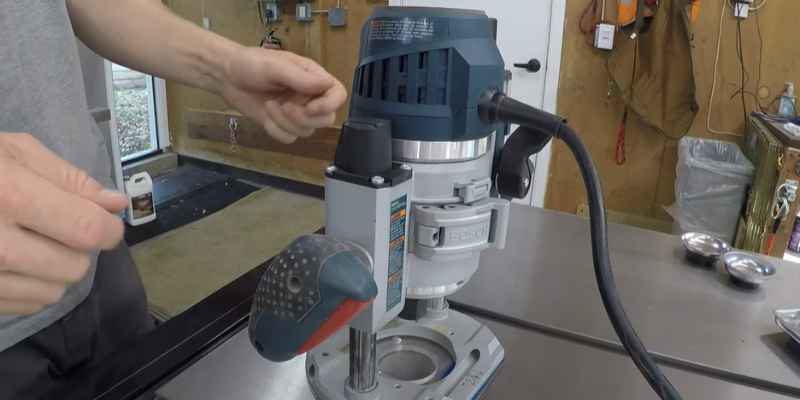
Changing bits on Porter Cable Router is a straightforward process that requires some basic hand skills. Here are the steps you need to follow:
- Unplug the router and remove the previous bit by inserting the supplied spanner into the two holes on the collet and turning it counterclockwise.
- Insert the new bit into the collet and tighten it by turning the spanner clockwise until it’s secure.
- Using the depth adjustment mechanism, set the desired cutting depth.
- You can now plug the router in and start routing.
Why Bit Changes Are Necessary
Changing the router bit on a Porter Cable Router is necessary because different bits are required to create different shapes and designs. Additionally, bits wear out over time, and you may need to replace them. Changing bits helps you achieve optimal results while avoiding accidents and injuries.
Steps To Follow While Changing Bits
Here are some tips to follow when changing bits on a Porter Cable Router:
- Always unplug the router before changing bits
- Use the two holes on the collet to insert the spanner for a firm grip
- Ensure the new bit is inserted firmly into the collet before tightening it
- Use protective gear like gloves and goggles to avoid accidents
- Always use the right bit for the task at hand
- Follow the manufacturer’s instructions on the bit changing process
With these steps, changing bits on a Porter Cable Router is safe, fast, and easy. Make sure to follow them to achieve perfect cuts with your Router Edge Guide Porter Cable.
Routing Edges With Porter Cable Edge Guide
Achieving perfect routed edges is made easier with the Porter Cable Edge Guide. This guide provides controlled cuts for consistent results by using the work-piece’s straight edge to guide for edge cuts. Say goodbye to uneven edges and hello to precision routing.
If you are somebody who enjoys woodworking, you are probably no stranger to the Porter Cable router edge guide. This tool acts as a guide for your router, allowing you to cut perfect edges every time. But using this tool effectively takes some practice. In this blog post, we will explore some tips and tricks for routing edges using a Porter Cable router edge guide.
How to Dress up Edges with a Roundover Bit
The roundover bit is a common router bit used for dressing up edges. To use it with the Porter Cable router edge guide, follow these simple steps:
1. Set up the router edge guide according to the instructions provided with the tool.
2. Choose the appropriate roundover bit for your project and attach it to your router.
3. Set the depth of the bit using the depth adjustment on your router.
4. Begin routing the edge, using the edge guide to keep your cuts consistent.
5. Move the router counterclockwise around the edge to avoid chip-out.
6. Once you have completed the first pass, adjust the depth of the bit and make another pass to achieve the desired shape.
Tips and Tricks for Routing Edges
Here are some useful tips and tricks for routing edges with the Porter Cable router edge guide:
1. Plan your cuts before you begin. Make sure you know which parts of the edge you want to cut and which ones you want to leave untouched.
2. Always rout the ends of the piece before the sides to minimize chip-out.
3. Move the router in the right direction. For outside edges, move the router counterclockwise. For inside edges, move the router clockwise.
4. Hold narrow strips with stops to ensure accurate cuts. You can adjust the stops on the edge guide to hold your material securely in place.
5. Lock small pieces in place with clamps or double-sided tape to prevent them from moving during routing.
6. To make moldings with your router, use a combination of different router bits to achieve the desired shape.
The Right Way to Hold Narrow Strips
Holding narrow strips securely is key to getting accurate cuts with the Porter Cable router edge guide. To do this, adjust the stops on the edge guide to hold your material in place. Alternatively, you can use clamps or double-sided tape to lock small pieces in place.
In conclusion, by following the tips and tricks outlined in this blog post, you can make the most of your Porter Cable router edge guide and create flawlessly routed edges every time. Remember to plan your cuts carefully, use the right bits, and hold your material securely to achieve the best results. Happy routing!
Customizing Your Porter Cable Edge Guide
Customizing your Porter Cable Edge Guide for your Router can be a game-changer in your woodworking projects. Adjust the guide to accommodate different sizes of materials and enjoy perfect and consistent cuts. Find a variety of parts and accessories to enhance your router’s performance and creativity.
Making Your Own Edge Guide
Are you looking to customize your Porter Cable Edge Guide? You can create an edge guide suitable for your specific needs quickly. Making your edge guide starts with measuring the exact radius you want to cut and making a straightedge guide to align with the edge of the material. You can then attach this straightedge to a piece of plywood or MDF and attach the edge guide to your router base. You can affix the straightedge to the router base to guide your routing measurements accurately, making it possible to make precise cuts.
How To Set Up And Replace The Edge Guide
Setting up and replacing the edge guide is a breeze. Position the edge guide to the router base and slide the rods through the holes in the base of the router. Ensure that you have aligned the rods with the holes, and slide the lock nut onto the rods. Tighten the lock nut to secure the edge guide in place. If you want to replace the edge guide, loosen the locking nuts and slide the edge guide out of the base. Slide in the new edge guide and tighten the locking nuts to ensure that it is secure.
Accessories For Porter Cable Edge Guide
With additional accessories, you can enhance the functionality of Porter Cable Edge Guide. Accessories such as the dovetail kit, round-over bit, and template guide will take your routing to the next level. The dovetail kit will make it easier to create dovetail joints with a variety of cutting angles. A round-over bit, on the other hand, rounds off sharp edges. With a template guide, you can make cuts that are difficult to create, such as curves, circles, and arc shapes. It is essential to purchase the right accessories to complement your Porter Cable Edge Guide and get the best out of it.
In conclusion, customizing your Porter Cable Edge Guide gives you an opportunity to create edges that are unique to your specific needs. Now that you know how to make your own edge guide, set up and replace the edge guide, and the accessories available, you can streamline and enhance your routing experience. With Porter Cable Edge Guide, creating unique and precise cuts on your woodwork is a breeze.
Comparing Porter Cable Edge Guide With Other Router Accessories
The Porter-Cable Edge Guide is an excellent router accessory that allows for precise, controlled cuts in your woodworking projects. When compared to other router accessories, the Porter-Cable Edge Guide stands out for its ease of use and versatility, making it a great investment for any DIY enthusiast or professional woodworker.
When it comes to woodworking, having the right tools and accessories is essential to ensure precise and consistent results. One of the must-have accessories for any woodworker is a router edge guide. It helps in cutting clean and straight edges, making it a popular choice for those who do edge work frequently. However, with so many options available, how do you know which edge guide to choose?
Difference between Edge Guide and other Router Accessories like Jigs and Plunges
There are several router accessories that can help in cutting edges, such as jigs and plunges. However, these have different functions than an edge guide. A plunge is a type of router that is used for cutting in the center of a workpiece, such as cutting a hole or groove. Meanwhile, a jig is used to help make more complicated cuts that cannot be done with a guide. The main purpose of the edge guide is to ensure straight and consistent edge routing for various types of cuts.
Reviews from users on the Edge Guide
Many users have praised the Porter Cable router edge guide for its precision and durability. It is compatible with most Porter Cable routers and can also be used with other brands, making it a versatile option for those who have multiple routers. Users have also noted that the guide is easy to adjust and use, allowing for quick and efficient edge routing.
Pros and Cons of Edge Guide
Like any other tool or accessory, the Porter Cable edge guide has its pros and cons. Here are some of them:
Pros:
– Provides consistent and straight edge routing
– Compatible with most Porter Cable routers and other brands
– Durable and long-lasting
– Easy to adjust and use
ons:
– Some users have reported difficulty attaching the guide to their routers
– May require additional adjustments for different types of cuts
In conclusion, the Porter Cable edge guide is a great accessory for any woodworker who needs precise and consistent edge routing. While it may have some downsides, the pros far outweigh the cons, making it a worthwhile investment.
Frequently Asked Questions Of Router Edge Guide Porter Cable
How Do I Use The Edge Guide On My Router?
To use the edge guide on your router, follow these steps: plan the cuts, rout the ends first and eliminate chips, move the router in the right direction (counterclockwise for outside edges and clockwise for inside edges), hold narrow strips with stops, lock small pieces in place, and make moldings with your router.
You can also refer to manufacturer’s instructions for specific guidance.
How Do You Change A Router Bit On A Porter Cable Router?
To change a router bit on a Porter Cable router, first unplug the router, then press and hold the spindle lock button while using a wrench to loosen and remove the collet nut. Slide out the old bit and insert the new one, making sure it’s secure.
Finally, re-tighten the collet nut.
How Do You Route Edges?
To route edges, follow these steps: plan the cuts and route the ends first, move the router in the right direction (clockwise for inside edges and counterclockwise for outside edges), hold narrow strips with stops, and make moldings with your router.
Additionally, use a router edge guide for controlled cuts and consistent results. Check out Porter Cable’s Standard Router Edge Guide or make your own with VerySuperCool Tools.
How Do You Change The Bit On A Porter Cable?
To change the bit on a Porter Cable, follow these simple steps: first, disconnect the power source. Next, loosen the collet nut with a wrench or spindle lock button. Insert the new bit into the collet, making sure it is fully seated.
Then, tighten the collet nut until it is secure. Finally, test the bit to make sure it is tight and functioning properly.
Conclusion
When it comes to creating straight and consistent cuts, using a router edge guide can make all the difference. The Porter Cable Router Edge Guide is a reliable and versatile tool that will help you achieve precision in your woodworking projects.
From controlling cuts to making moldings, this tool will increase your productivity and improve the quality of your work. With the useful tips and tricks on using the edge guide, you can achieve perfect routed edges in no time. Invest in this affordable and useful tool to take your woodworking skills to the next level.