Simple Wood Burning Designs for Beginners (Basswood-Friendly Patterns)
Looking for simple wood burning designs? Check out these easy and attractive designs for your next project.
Wood burning, also known as pyrography, is a versatile and rewarding art form that involves burning designs onto wood using a heated tool. Whether you’re a beginner or an experienced wood burner, there are plenty of simple designs to choose from.
From basic geometric patterns to nature-inspired motifs, the possibilities are endless. In this blog, we’ll explore some simple wood burning designs that anyone can try, along with tips for creating stunning results. Whether you want to decorate wooden items or create unique art pieces, these designs will inspire your creativity and help you hone your wood burning skills.
Introduction To Wood Burning Art
Discover the art of wood burning with simple and elegant designs. Unleash your creativity on wood surfaces effortlessly.
The Basics Of Pyrography
Pyrography is the art of creating designs on wood or other materials using a heated tool, typically called a pyrography pen or wood burning pen. This ancient art form has been practiced for centuries, with evidence of its existence dating back to ancient Egypt and China. Today, wood burning art has gained popularity among artists and hobbyists alike for its simplicity and versatility.
Tools And Materials Needed
To get started with wood burning art, you’ll need a few essential tools and materials. Here’s a list of what you’ll need:
| Tools | Materials |
|---|---|
| – Pyrography pen or wood burning pen | – Wood or other suitable materials |
| – Various interchangeable tips for different effects | – Sandpaper for preparing the surface |
| – Heat-resistant gloves for safety | – Graphite paper for transferring designs |
| – Safety glasses to protect your eyes | – Finishing products such as sealants or varnishes |
These tools and materials are readily available in most arts and crafts stores or online. It’s important to invest in good quality tools to ensure better control and longevity.
Now that you have a basic understanding of wood burning art and the tools needed, let’s dive into the world of simple wood burning designs. In the next sections, we’ll explore different techniques and ideas to create stunning wood burning art pieces.
First Steps In Wood Burning
When you’re just starting out with wood burning, it’s important to understand the basics before diving into more complex designs. The first steps in wood burning will set the foundation for your future projects, so it’s essential to get them right from the start.
Choosing The Right Wood
Before you begin your wood burning journey, it’s crucial to select the right type of wood for your projects. Softwoods like pine and cedar are ideal for beginners due to their ease of burning and affordability. On the other hand, hardwoods such as oak and maple offer durability and are great for intricate designs.
Safety Measures
When working with wood burning tools, safety should always be a top priority. Invest in a quality pair of heat-resistant gloves to protect your hands from burns. Additionally, ensure your workspace is well-ventilated to minimize exposure to harmful fumes. Never leave your wood burning tool unattended while it’s hot.
Basic Techniques To Master
When it comes to wood burning, mastering the basic techniques is essential for creating beautiful and intricate designs. Two fundamental techniques that every wood burning artist should learn are shading and texturing, as well as creating straight and curved lines. In this blog post, we will explore these techniques in detail to help you enhance your wood burning skills.
Shading And Texturing
Shading and texturing are crucial techniques that add depth and dimension to your wood burning designs. By carefully controlling the temperature and pressure of your wood burning tool, you can create varying shades and textures on the wood surface.
Here are some tips to master shading and texturing:
- Start with a light touch and gradually increase the pressure to achieve darker shades.
- Experiment with different tips on your wood burning tool to create various textures such as stippling, hatching, or cross-hatching.
- Practice blending different shades together smoothly for a more realistic and professional look.
- Use reference images or sketches to understand how light and shadows interact, and apply that knowledge to your wood burning designs.
Creating Straight And Curved Lines
Mastering the art of creating straight and curved lines is essential for achieving precision and fluidity in your wood burning designs. Whether you want to create intricate patterns or realistic portraits, having control over your lines is vital.
Here are some techniques to help you create straight and curved lines:
- Hold your wood burning tool at a consistent angle to achieve smooth and straight lines.
- Practice using different tips and speeds to create varying line thicknesses.
- For curved lines, move your tool slowly and steadily, maintaining a consistent radius.
- Use guidelines or stencils to help you create symmetrical and precise curves.
By mastering these basic techniques of shading and texturing, as well as creating straight and curved lines, you will be well on your way to creating stunning wood burning designs. Remember, practice makes perfect, so don’t be afraid to experiment and develop your own unique style.
Simple Designs To Start With
When starting out with wood burning, it’s best to begin with simple designs that allow you to practice and develop your skills. These simple designs are a great way to get comfortable with the tools and techniques before moving on to more complex projects.
Geometric Patterns
Geometric patterns are an excellent choice for beginners due to their simplicity and clean lines. Basic shapes such as squares, triangles, and circles can be easily translated into wood burning designs. These patterns are a great way to practice your control and precision when using the wood burning tool.
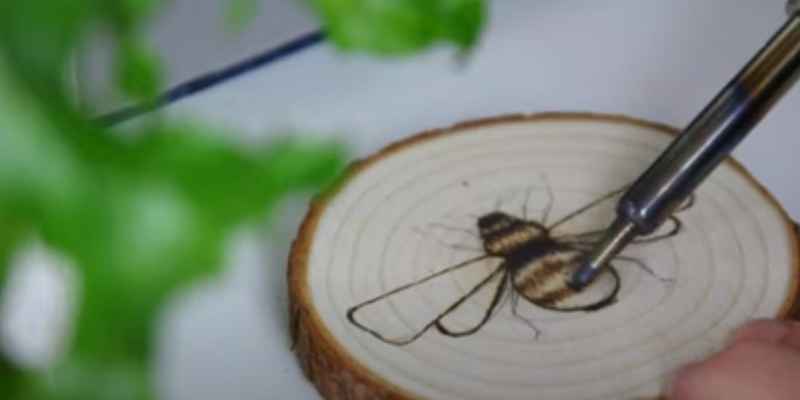
Nature-inspired Motifs
Nature-inspired motifs, such as leaves, flowers, and trees, are perfect for beginners who want to add a touch of natural beauty to their wood burning projects. These designs allow for creativity and can be adapted to different styles and skill levels. Start with simple leaf shapes and gradually progress to more intricate floral patterns as your confidence grows.
Adding Color To Your Creations
Add vibrant colors to your simple wood burning designs to make them stand out. By using different shades and combinations, you can create unique pieces that showcase your creativity and style. Experiment with color to enhance your creations and take your wood burning to the next level.
Adding color to your wood burning designs can elevate them to a whole new level. With the right selection of colors and application techniques, you can make your artwork pop. In this post, we’ll explore some tips on how to add color to your wood burning designs.
Selecting Suitable Colors
When it comes to selecting colors for your wood burning designs, it’s important to consider the type of wood you’re working with and the overall aesthetic you’re trying to achieve. Some colors may look better on lighter woods, while others may work better on darker woods. For example, lighter colors like yellows and pinks may not show up as well on darker woods, whereas darker colors like blues and greens may not show up as well on lighter woods.
Application Techniques
Once you’ve selected your colors, it’s time to start applying them to your wood burning designs. There are a few different techniques you can use to achieve different effects. Here are some popular techniques:
- Layering: This involves layering different colors on top of each other to create depth and dimension.
- Blending: Blending involves using a brush or a cloth to blend different colors together to create a smooth transition between colors.
- Stippling: Stippling involves using small dots to create texture and depth.
Adding color to your wood burning designs can be a fun and rewarding experience. By selecting suitable colors and using the right application techniques, you can create stunning works of art that are sure to impress. So go ahead and experiment with different colors and techniques to see what works best for you!

Finishing Touches
When it comes to wood burning designs, the finishing touches can truly elevate your project to the next level. Adding a sealant, finding the perfect way to display your work, and ensuring its longevity are key aspects to consider.
Sealing And Protecting Your Work
Sealing your wood burning piece with a protective finish is crucial to preserve the design and prevent damage. Be sure to choose a sealant that is suitable for wood and won’t alter the colors of your design.
Mounting And Displaying
How you choose to display your wood burning art is just as important as the design itself. Consider framing it, mounting it on a plaque, or incorporating it into a larger piece of artwork to showcase your talent.
Project Ideas To Spark Creativity
Looking for simple wood burning designs to get your creative juices flowing? Check out these project ideas to spark your creativity.
Personalized Gifts
Create customized wooden spoons, coasters, or cutting boards for loved ones.
Decorative Home Items
Add a personal touch to your home decor with wood burned wall art or candle holders.
Tips For Continuous Improvement
Enhancing your wood burning skills requires dedication and continuous effort. Here are some practical tips to help you progress with your simple wood burning designs:
Practicing Regularly
Consistent practice is key to improving your wood burning craft. Set aside dedicated time to work on different designs.
Seeking Inspiration And Learning
Explore various sources of inspiration such as nature, patterns, and online resources. Learn new techniques to expand your skills.
Frequently Asked Questions
What Tools Are Needed For Wood Burning Designs?
To create wood burning designs, you’ll need a wood burner tool, various tips, sandpaper, carbon paper, and protective gear like gloves and a mask. These tools help you achieve precise and detailed designs on your wood projects.
How To Choose The Right Wood For Wood Burning?
Select softwoods like pine, cedar, or basswood for easier burning. Avoid resinous woods like teak. Opt for smooth, untreated wood surfaces for better results in wood burning designs. The type of wood you choose can significantly impact the outcome of your project.
Are There Safety Precautions For Wood Burning?
Yes, safety is crucial when wood burning. Always work in a well-ventilated area, wear a mask to avoid inhaling fumes, use gloves to protect your hands, and keep a fire extinguisher nearby. Additionally, be cautious of the hot wood burner tip to prevent burns or accidents.
How To Maintain A Wood Burning Tool?
Regularly clean the wood burning tool’s tips with a damp cloth to remove any residue. Store the tool in a safe place away from flammable materials. Check the connections and temperature settings periodically to ensure optimal performance and longevity of the tool.
Conclusion
Simple wood burning designs are an excellent way to express your creativity and add a personal touch to your home decor. With a few basic tools and techniques, you can create beautiful designs on a variety of surfaces. Remember to start with a simple design and practice your technique before moving on to more complex projects.
By following these tips and guidelines, you can enjoy the art of wood burning and create unique pieces that will be admired for years to come.