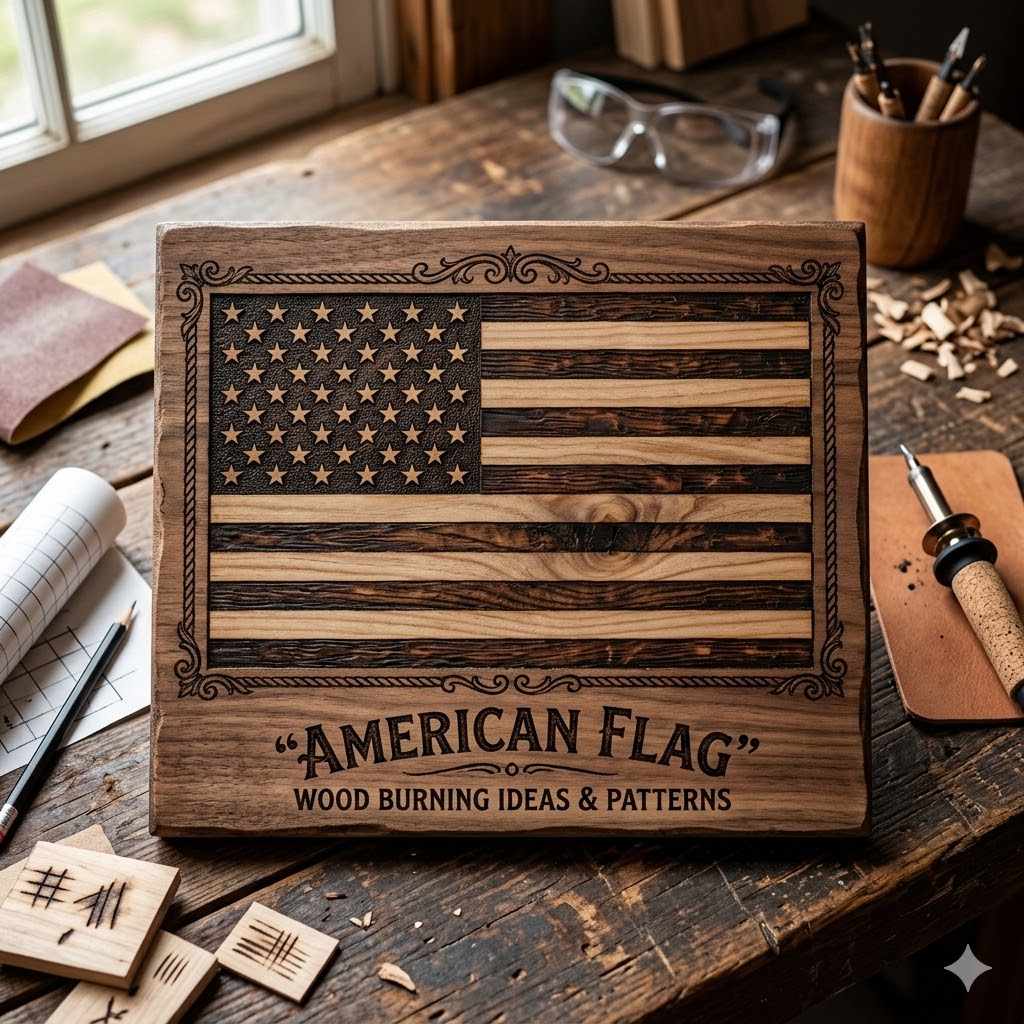
American Flag Wood Burning Ideas & Patterns
Making an American flag on wood can seem tricky, especially if you’re just starting out. Getting the stars and stripes just right might feel like a big job. But don’t worry, it’s totally doable!
We’ll show you how to create beautiful American Flag Wood Burning Ideas & Patterns step by step. Get ready to learn some simple ways to make your flag look amazing. We’ll cover everything you need to know to get started with this fun project.
Creating Stunning American Flag Wood Burning Art
This section will guide you through the exciting world of creating American flag designs on wood using burning techniques. We’ll explore different approaches, from simple patterns to more detailed artwork, helping you choose the best method for your skill level. Discover how to translate the iconic imagery of the American flag into a durable and beautiful wood-burned piece.
This is your starting point for making patriotic art that stands out.
Choosing Your Wood and Tools
Selecting the right wood is key for any wood burning project. Different types of wood react differently to heat, affecting the final look of your design. Softwoods like pine are easy to burn but can sometimes scorch.
Hardwoods like basswood or poplar offer a smoother surface and a clearer burn, making them great for detailed work. Think about the size of your project when choosing your wood. A smaller piece is perfect for practicing, while a larger plank can showcase a more elaborate design.
Your wood burning tools are just as important. A basic wood burning kit usually includes a handle and various tips. Different tips create different effects: a shader tip is good for filling large areas like stripes, while a fine-point tip is best for drawing small details like stars.
For American flag designs, you’ll want a variety of tips to achieve both broad strokes and fine lines. Safety is also a big deal when working with heat. Always have a safe place to rest your hot tools and work in a well-ventilated area.
- Wood Selection: Basswood and poplar are excellent choices for beginners due to their smooth texture and consistent grain, which makes burning easier and clearer. Pine can be used, but its knots and uneven grain might make the burning process more challenging and result in a less uniform finish. Consider the natural color of the wood; lighter woods will show the burned lines more prominently.
- Burning Tool Basics: Invest in a decent wood burning tool. Look for one with adjustable temperature control if possible. This allows you to fine-tune the heat for different wood types and tip applications, preventing scorching or incomplete burns.
Having a stand for your hot tool is essential for safety and convenience.
- Essential Tips: A set of interchangeable tips is crucial. You’ll likely use a shader tip for the broad red and white stripes, a ball tip for creating textured blue fields for the stars, and a fine-point tip for outlining or adding details. Experimenting with different tips on scrap wood will help you understand their effects.
- Safety First: Always work in a well-ventilated space, as wood burning produces smoke and fumes. Wear safety glasses to protect your eyes from any flying embers or debris. Ensure your work surface is heat-resistant, and keep flammable materials away from your burning area.
Never leave a hot tool unattended.

Mastering the Stripes and Stars
The core of any American flag design is its stripes and stars. For wood burning, recreating these elements requires precision and the right techniques. The stripes are often best approached with a shading tip to create smooth, consistent color.
For the stars, you have a few options depending on the look you want. You can burn them in individually, or create a negative space effect by burning around them. This section breaks down how to tackle each part effectively.
Getting the proportions right for the stripes is important. The 13 stripes represent the original colonies, alternating red and white. In wood burning, you’ll often burn the red stripes to a darker shade and leave the white stripes as the natural wood color.
For the stars, the blue field with 50 stars can be a bit more intricate. Beginners might opt for a simpler star pattern or even a single large star. We’ll explore methods to make both the stripes and stars look sharp and defined.
Techniques for Burning Stripes
Creating the iconic red and white stripes on wood requires a steady hand and the right burning tips. For the red stripes, you will want to achieve a consistent, rich brown color that contrasts with the natural wood color of the white stripes. A shader tip, held at a slight angle, can be used to fill in the areas designated for the red stripes.
Apply even pressure and consistent strokes to avoid blotchy areas. You might need to go over an area a couple of times to achieve the desired depth of color.
The white stripes are simply the areas of wood that you leave unburned. It’s important to plan your layout carefully so that these stripes are the same width as the burned stripes. When you are burning the red stripes, try to stay within your lines.
If you accidentally burn into a white stripe area, it can be difficult to correct. Using a fine-point tip for outlining the edges of the red stripes before shading can help maintain clean lines and prevent stray burns. This precise outlining will make your stripes pop.
Creating the Star Field
The field of blue with 50 stars is often the most detailed part of a wood-burned American flag. For beginners, a simplified star pattern or a smaller flag can make this area more manageable. One popular method is to burn the blue field first, creating a solid background, and then burn the stars on top.
Alternatively, you can draw your stars and then carefully burn around them, leaving the stars as unburned wood.
To burn the blue field, use a wide shader tip or a ball tip to fill the rectangular area with a consistent burn. For the stars themselves, you can use a fine-point tip to draw each star individually. Another effective technique is to use a small circular tip to create a series of dots that form the shape of a star.
If you are creating negative space stars, carefully outline each star with a fine-point tip and then use a shader tip to burn the blue field around it. This requires a very steady hand.
One effective approach for beginners is to simplify the stars. Instead of 50 individual stars, you might opt for a smaller number, or even a single large star in the corner. This still captures the spirit of the flag while being much easier to execute.
For example, a single, bold star burned into the blue field can be very striking. Practice drawing the star shape freehand or use a stencil to ensure accuracy before you start burning.
American Flag Wood Burning Ideas & Patterns Showcase
This section is dedicated to showcasing inspiring American Flag Wood Burning Ideas & Patterns that you can adapt for your own projects. We’ll look at various styles, from rustic and distressed looks to more polished and modern interpretations. You’ll see how different techniques can create unique textures and visual effects, adding depth and character to your wooden flags.
Get ready to find the perfect design to ignite your creativity and guide your burning process.
Rustic Charm Designs
Rustic American flag designs evoke a sense of history and tradition. They often feature slightly imperfect lines, textured wood grain, and a weathered appearance. To achieve this look, you might choose a piece of reclaimed wood or intentionally distress a new piece.
After burning your flag design, you can use techniques like wire brushing or sanding to create an aged effect. Some artists even use a dark stain or wash over the burned areas to enhance the rustic feel, making the burned lines appear more ancient and weathered.
The stripes in a rustic flag might not be perfectly uniform in color. You can allow the wood grain to show through more, giving each stripe character. For the stars, a slightly uneven burn can add to the charm.
Some rustic flags feature a border that looks like it’s been hand-hewn. This style embraces the imperfections, making each flag a unique piece of folk art. It’s about capturing a feeling of timelessness and heritage.
- Distressed Wood Base: Start with wood that has a natural weathered look, such as pallet wood or reclaimed barn wood. If using new wood, you can distress it by sanding with coarse-grit sandpaper, hitting it with a hammer lightly, or using a wire brush to create gouges and scrapes. This gives your flag an instant antique appearance.
- Uneven Burning Tones: Don’t aim for perfectly uniform burn colors. Allow the natural variations in the wood grain to create subtle differences in tone within the stripes. Lightly go over some areas more than others to give a sense of depth and age.
This makes the flag look like it has endured the elements.
- Simplified Star Patterns: Instead of 50 intricate stars, consider a simplified design. This could be a cluster of dots forming stars, a single large star, or even just outlining the star shapes without filling them in. This approach reduces the complexity and enhances the rustic aesthetic.
- Darker Stain or Wash: After burning, apply a dark stain or a thin wash of paint (like a diluted black or brown) over the entire piece. Wipe off the excess, allowing the stain to settle into the burned lines and the wood grain, creating a dramatic, aged contrast. This makes the flag appear older and more storied.
Modern and Minimalist Flags
Modern and minimalist American flag designs focus on clean lines, geometric shapes, and a less cluttered aesthetic. These designs often use a single type of wood with a smooth finish. The burning might be precise and sharp, with a focus on contrast between burned and unburned areas.
Think of a flag where the stripes are clearly defined and the stars are uniformly placed, perhaps with fewer stars or a more abstract representation of them.
Color can also play a role here, though it’s often subtle. Some modern designs might incorporate a touch of color through paint accents applied after burning. The overall feel is sleek and contemporary.
These flags are great for spaces that favor a cleaner, more understated decorative style. The focus is on the bold graphic elements of the flag.
Adding Color and Finishing Touches
Once you’ve completed your wood burning, the finishing touches can elevate your American flag art. You can choose to leave the burned wood natural, which has a beautiful, earthy appeal. However, adding color can make your flag pop and is a popular choice for many.
Stains, paints, and sealants are all options to consider. Each will give your piece a different look and feel, so it’s important to think about the final aesthetic you desire.
The method you use to color your flag will depend on the style you’re going for. For a more natural, woodsy look, wood stains are a great option. They allow the wood grain to show through while adding color.
If you want bolder, brighter colors, acrylic paints are a good choice. They offer a wide range of pigments and can be applied opaquely or thinned for a more transparent effect. Finally, a protective sealant will keep your masterpiece looking great for years to come.
Using Stains for Color
Wood stains are an excellent way to add color to your American flag while still highlighting the natural beauty of the wood. For the red stripes, a deep red or mahogany stain can create a rich, vibrant look. For the blue field, a navy blue or even a dark indigo stain works well.
It’s important to apply the stain evenly to avoid streaks. Using a foam brush or a soft cloth can help achieve a smooth application.
After burning your flag, you can apply stains to specific sections. Use painter’s tape to mask off the areas you don’t want to stain, ensuring crisp lines between colors. For the white stripes and stars, you’ll want to leave them as the natural wood color or apply a very light, clear sealant.
This contrast will make the stained areas stand out beautifully. Remember that some stains might darken the burned areas slightly, so consider this effect when choosing your colors.
Painting Your Wooden Flag
If you want vibrant, opaque colors for your American flag, acrylic paints are your best bet. They are versatile and easy to work with. You can use traditional red, white, and blue, or get creative with slightly different shades.
When painting, it’s best to work from the background forward or use painter’s tape to create sharp divisions between colors.
For the stripes, paint the red stripes first, let them dry, then mask them off and paint the white stripes. Similarly, paint the blue field and then add the stars. Many artists prefer to burn the outlines of the stars and stripes first for definition, and then fill in the colors with paint.
This method ensures clear, sharp edges. A good quality acrylic paint will provide excellent coverage and a beautiful finish for your wooden flag.
Protective Sealants
Once your wood-burned and colored American flag is complete, applying a protective sealant is a crucial step. This not only protects the wood from moisture and UV damage but also enhances the overall appearance of your artwork. There are several types of sealants you can use, each offering different finishes.
A clear polyurethane varnish is a popular choice. It’s durable and comes in different sheens, such as matte, satin, or gloss. A matte finish will give your flag a natural, non-reflective look, while a gloss finish will make the colors appear richer and provide a shiny surface.
For a more subtle protection that doesn’t alter the look of the wood too much, a wax-based sealer can also be effective. Always apply sealants in a well-ventilated area according to the manufacturer’s instructions. Multiple thin coats are usually better than one thick coat for a smooth, even finish.
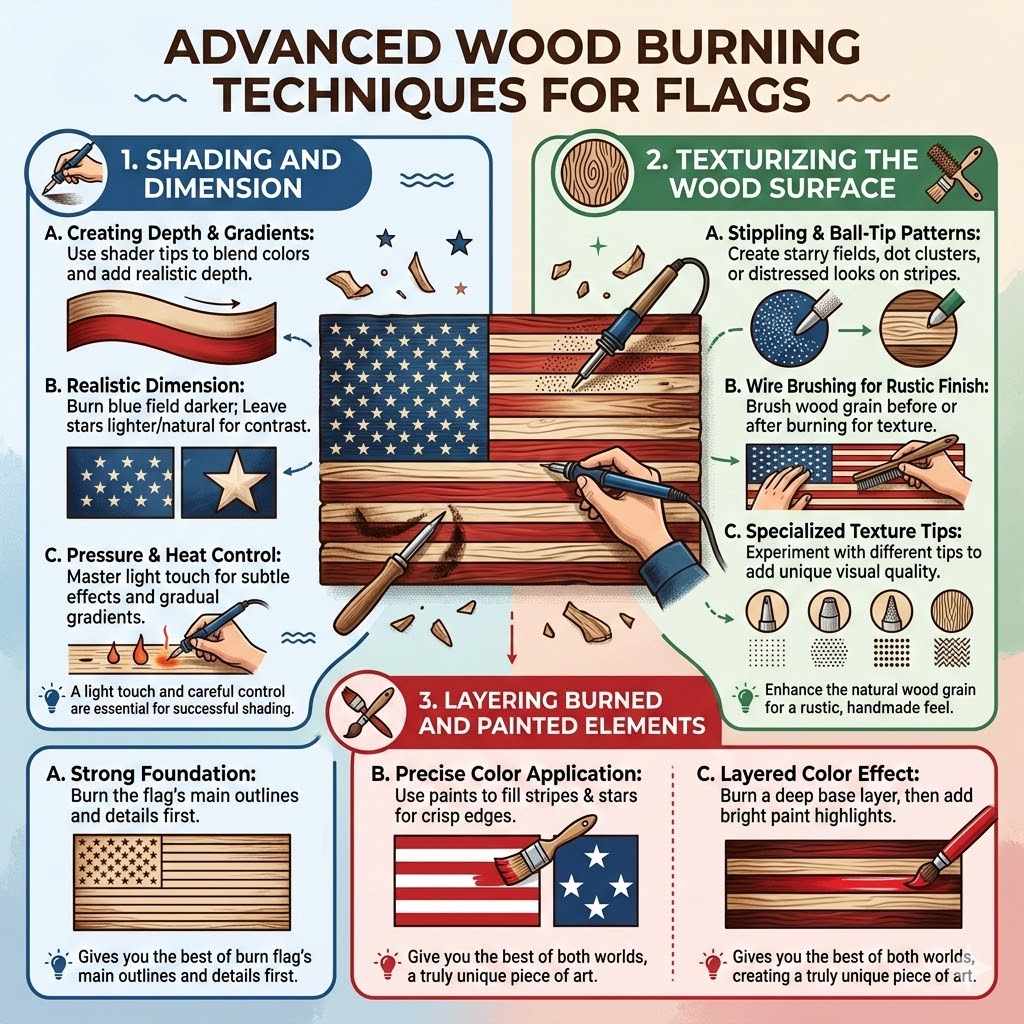
Advanced Wood Burning Techniques for Flags
Once you’ve got the basics down, you can explore more advanced techniques to make your American flag wood burning even more impressive. This involves using different heat settings, specialized tools, and layering effects to create depth and texture. These methods can transform a simple flag into a true work of art, adding unique character and visual interest that goes beyond basic burning.
Think about creating effects like wood grain enhancement or subtle color blending. You can also experiment with pyrographic shading to add dimension to the stripes or stars. Mastering these advanced skills will allow you to produce highly detailed and professional-looking flags that are sure to impress.
This section is about pushing your boundaries and discovering new creative possibilities.
Shading and Dimension
Adding shading is a key technique for creating depth and dimension in your wood-burned American flag. Instead of just burning lines, you can use shader tips to create subtle gradients of color. This can make the stripes appear to have a slight curve or the stars to look more three-dimensional.
For instance, you can shade the edges of the red stripes to make them appear more rounded.
To create dimension, you might burn the blue field to a darker shade and then highlight the stars by burning them slightly lighter or leaving them as natural wood. Another way is to use shading to create the illusion of texture on the wood surface itself, making it look more realistic. Experimenting with different pressure and heat levels will help you achieve various shading effects.
A light touch and careful control are essential for successful shading.
Texturizing the Wood Surface
Texturizing the wood surface can add a unique tactile and visual quality to your American flag. This can be done in several ways. One common method is using a ball-tip or stippling tip to create patterns of dots.
This can be used to give the blue field a starry texture or to create a distressed look on the stripes. The density and depth of the dots will determine the intensity of the texture.
Another technique is to use a wire brush to create a brushed or grain-like effect on the wood surface before or after burning. This can enhance the natural wood grain and give the flag a rustic, handmade feel. Some artists even use specialized texture tips that create unique patterns.
When incorporating texture, consider how it will interact with your burned lines and colors. The goal is to add visual interest without overpowering the flag’s iconic design.
Layering Burned and Painted Elements
Combining wood burning with paint offers a fantastic way to add both depth and vibrant color to your American flag. You can burn the main outlines and details of the flag, creating a strong foundation. Then, use paints to fill in the stripes and stars.
This allows for very precise color application and crisp edges, especially if you use painter’s tape to mask off sections.
Alternatively, you can burn a base layer of color, and then use paint to add highlights or specific details. For example, you could burn the red stripes to a deep brown and then add a brighter red acrylic paint over them for a layered color effect. This technique allows for a rich visual complexity that neither burning nor painting alone can achieve.
It gives you the best of both worlds, creating a truly unique piece of art.
Frequently Asked Questions
Question: What kind of wood is best for American flag wood burning?
Answer: Basswood and poplar are excellent choices for beginners because they have smooth, fine grain that makes burning easier and cleaner. Pine can be used but might be more challenging due to its grain variations.
Question: Do I need a special wood burning tool for American flags?
Answer: A basic wood burning kit with interchangeable tips is usually sufficient. Having adjustable temperature control is helpful but not strictly necessary for beginners. Variety in tips like shaders and fine points is key.
Question: How can I make the stripes look clean and even?
Answer: Use a shader tip for smooth filling of the red stripes. Before shading, use a fine-point tip to outline the stripe edges precisely. Painter’s tape can also help create very sharp lines between stripes.
Question: What is the easiest way to burn the stars?
Answer: For beginners, simplifying the stars is recommended. You can use a fine-point tip to draw them, a ball tip to create dots that form a star, or even just outline the star shapes. A single large star is also a great option.
Question: Can I add color to my wood-burned American flag?
Answer: Yes, you can add color using wood stains or acrylic paints. Stains provide a more natural look that lets the wood grain show through, while paints offer vibrant, opaque colors. Always protect the finished piece with a sealant.
Wrap Up
Creating your own American flag wood burning art is a rewarding project. You’ve learned about picking the right wood and tools. You now know how to burn the stripes and stars with confidence.
Exploring different patterns and finishing touches makes each flag unique. You have the ideas and techniques to make your own beautiful wooden flag.