Can I Paint Eggshell Over Semi Gloss: The Proven Best Way
Yes, you can absolutely paint eggshell over semi-gloss, but you must prep the surface first. The key is to clean and then de-gloss the shiny finish by sanding or using a liquid deglosser. After that, a quality bonding primer will guarantee your new eggshell paint sticks perfectly for a durable, beautiful finish.
Have you ever spent a weekend painting, only to see your hard work start to peel or chip a few months later? It’s a frustrating feeling, and one of the most common reasons this happens is painting over a glossy surface without the right preparation. Many homeowners want to switch from a shiny semi-gloss to a softer eggshell finish, but they don’t realize that the old paint job is working against them.
That slick, durable semi-gloss finish is designed to repel stains and moisture. Unfortunately, it also repels new paint. But don’t worry! This is not a difficult problem to solve. You just need to know the right steps. I’m here to walk you through the proven best way to get that new eggshell paint to stick for good. We’ll make sure your next paint job is your last for a long, long time.
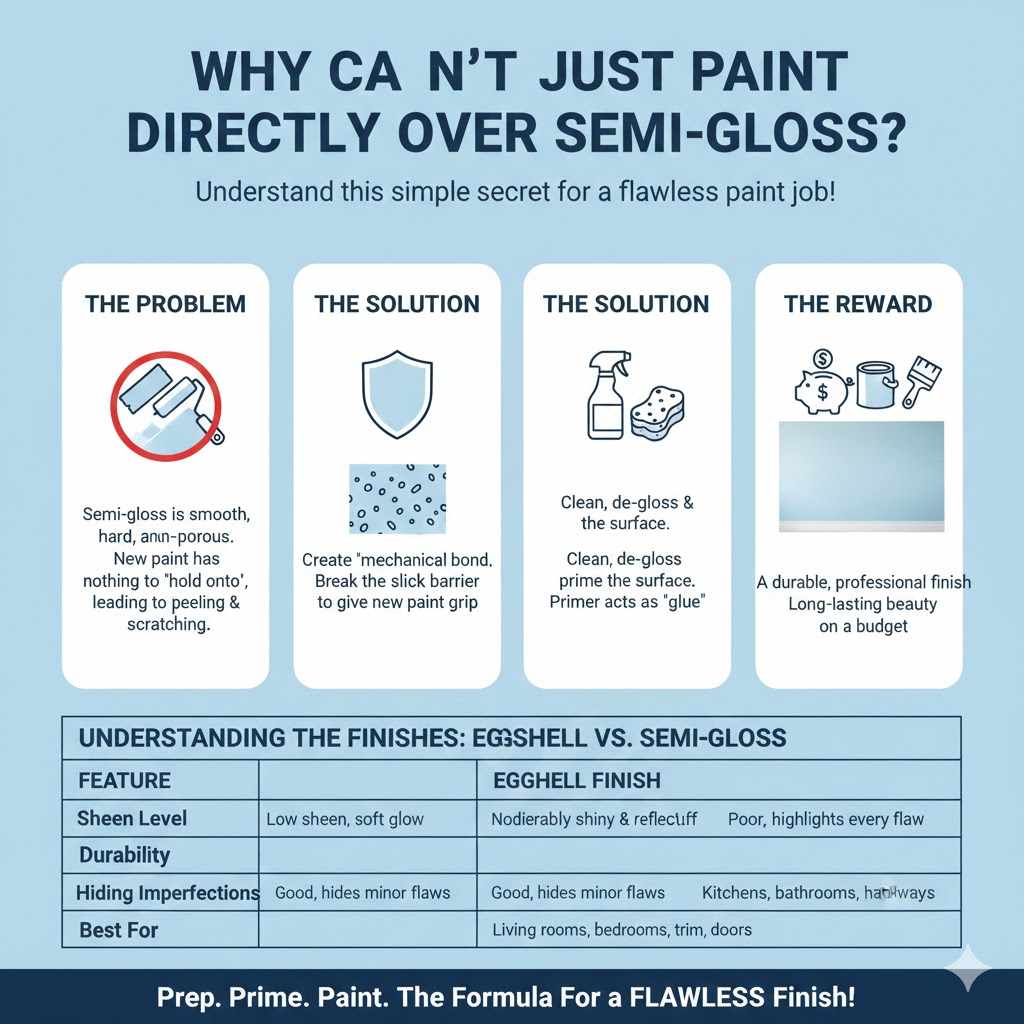
Why You Can’t Just Paint Directly Over Semi-Gloss
Before we grab our rollers, let’s talk about why this is such an important topic. Think of a semi-gloss surface like a piece of glass. It’s smooth, non-porous, and slick. If you tried to paint on glass, the new paint would have nothing to hold onto. It would bead up, streak, and once dry, it would peel off with the slightest scratch.
Semi-gloss paint acts in much the same way. Its tight, glossy molecular structure creates a protective shell. This is great for high-traffic areas like bathrooms, kitchens, and trim because it’s easy to clean. However, that same quality makes it a poor base for a new coat of paint. The new eggshell paint can’t form a strong mechanical bond with the slick surface.
The solution is simple: we need to break that slick surface and give the new paint something to grip. This process involves cleaning, dulling the finish (de-glossing), and priming. By following these steps, you create the perfect canvas for your new eggshell paint, ensuring it adheres properly and gives you a professional-looking, long-lasting finish.
Understanding the Finishes: Eggshell vs. Semi-Gloss
Choosing the right paint finish can dramatically change the look and feel of a room. Eggshell and semi-gloss are two of the most popular choices, but they serve very different purposes. Understanding their unique characteristics will help you appreciate why the prep work is so necessary.
| Feature | Eggshell Finish | Semi-Gloss Finish |
|---|---|---|
| Sheen Level | Low sheen with a soft, subtle glow. It’s just a step above flat/matte. | Noticeably shiny and reflective. It catches the light. |
| Durability | Moderately durable. Easier to clean than flat paint, but can scuff. | Very durable and moisture-resistant. Designed to be scrubbed. |
| Hiding Imperfections | Good. The low sheen helps hide minor bumps, dents, and texture on walls. | Poor. The high shine highlights every flaw, bump, and nail hole. |
| Best For | Living rooms, bedrooms, dining rooms, hallways. Basically, most walls in your home. | Kitchens, bathrooms, laundry rooms, trim, doors, and cabinets. |
As you can see, the very thing that makes semi-gloss so great for a bathroom—its tough, slick surface—is exactly what we need to overcome to paint over it. Now, let’s get into the step-by-step process that will guarantee your success.
The Proven Best Way: A Step-by-Step Guide
This method is all about preparation. Don’t be tempted to skip a step! Each one is crucial for a finish that looks great and stands the test of time. Think of it as building a strong foundation for your new paint color.
Step 1: Gather Your Tools and Materials
Having everything ready before you start makes the whole process smoother and more enjoyable. You don’t want to be running to the store mid-project with a half-sanded wall. Here’s a checklist of what you’ll need:
- Safety Gear: Safety glasses, gloves, and a dust mask or respirator are non-negotiable, especially for sanding.
- Cleaning Supplies: Bucket, sponges or cloths, and a good cleaner. I recommend a Trisodium Phosphate (TSP) substitute, as it’s effective and safer for home use.
- Drop Cloths: Canvas or plastic drop cloths to protect your floors and furniture.
- Painter’s Tape: High-quality tape to protect trim, ceilings, and outlets.
- De-glossing Tools (Choose one method):
- For Sanding: A sanding sponge or sandpaper (120 to 180-grit is perfect), and a pole sander for large walls.
- For Liquid Deglosser: A good quality liquid sandpaper/deglosser and several lint-free rags.
- Primer: A high-quality bonding primer. This is key! Look for products labeled “for glossy surfaces” or “bonding.” Brands like Kilz Adhesion or Zinsser B-I-N are excellent choices.
- Paint: Your beautiful new eggshell paint.
- Painting Tools: A good quality paintbrush for cutting in, a roller frame, and roller covers (a 3/8-inch nap is great for most walls). You’ll also need a paint tray and liners.
Step 2: Protect and Clean the Surface
First things first, clear the room as much as possible. Move furniture to the center and cover it completely with a drop cloth. Lay drop cloths on the floor and use painter’s tape to protect your baseboards, window frames, and ceiling line. This prep work might seem tedious, but it will save you a huge amount of cleanup time later.
Now, it’s time to clean. Over the years, walls accumulate a thin layer of dust, grease, and grime, even if they look clean. Paint cannot stick to dirt. Mix your TSP substitute cleaner with warm water according to the directions on the package. Wearing your gloves, use a sponge to scrub the entire semi-gloss surface. Work in manageable sections, from the top down. Pay extra attention to areas around light switches, doorways, and in kitchens, where grease and fingerprints build up.
After scrubbing, you must rinse the wall thoroughly. Use a clean sponge and fresh water to wipe away any cleaner residue. If you leave a soapy film behind, the primer won’t stick properly. Let the surface dry completely before moving on. This usually takes at least 2-4 hours, but waiting overnight is even better to be safe.
Step 3: De-Gloss the Surface (The Most Important Step!)
This is where the magic happens. We need to dull that shiny semi-gloss finish to create a rougher texture, called “tooth,” for the primer to grip. You have two excellent methods to choose from: traditional sanding or using a liquid deglosser.
Method A: Sanding (The Tried-and-True Approach)
Sanding is the classic method for a reason: it’s incredibly effective. The goal here is not to remove all the old paint. You are simply scuffing up the surface to get rid of the shine.
- Put on your safety gear. A dust mask is essential to avoid inhaling paint dust.
- Use medium-grit sandpaper. A 120- to 180-grit sanding sponge or paper is perfect. It’s aggressive enough to scuff the shine without gouging the wall.
- Sand with light, even pressure. Move the sander in circles or back-and-forth motions. You will see the shiny surface turn into a dull, chalky finish. That’s how you know it’s working.
- Cover the entire area. Be systematic. Work from top to bottom, making sure you don’t miss any spots, especially in the corners. For large walls, a pole sander will save your back and speed up the process.
- Wipe away the dust. Once you’re done, the wall will be covered in fine dust. Use a damp cloth or a tack cloth to wipe it all away. If you leave dust behind, it will mix into your primer and create a gritty, uneven finish. Let the wall dry completely.
Method B: Liquid Deglosser (The Less-Mess Option)
If the thought of dust covering your entire house makes you cringe, a liquid deglosser (also called liquid sandpaper) is a fantastic alternative. It’s a chemical solvent that softens and dulls the paint surface, creating that necessary tooth for the new paint to adhere to. It’s especially useful for detailed trim or intricate doors where sanding would be difficult.
However, these products contain chemicals called Volatile Organic Compounds (VOCs), so proper safety is critical.
- Ensure good ventilation. Open all windows and doors. Use a fan to circulate air out of the room. Wear chemical-resistant gloves and safety glasses. A respirator is also a very good idea.
- Apply the deglosser. Pour a small amount of the liquid onto a clean, lint-free rag. Do not pour it directly onto the wall.
- Wipe it on the surface. Rub the deglosser onto the semi-gloss paint in a circular motion with firm pressure. You’re not scrubbing; you’re applying a chemical that does the work for you. The paint will become slightly tacky or hazy.
- Follow the product instructions. Some deglossers require you to paint over them within a specific time window (e.g., within one hour), while others need to be wiped off. Read the label on your product carefully and follow its specific instructions.
Which De-glossing Method is Right for You?
Both methods work well, so the best choice depends on your project and personal preference. Here’s a quick comparison to help you decide:
| Factor | Sanding | Liquid Deglosser |
|---|---|---|
| Mess Level | Creates a lot of fine dust that gets everywhere. Requires thorough cleanup. | Virtually no dust. The main mess is used rags, which need to be disposed of properly. |
| Effort | Requires physical effort (elbow grease), especially on large surfaces. | Less physical effort, more like wiping a surface down. Faster on detailed areas. |
| Best For | Large, flat surfaces like walls and doors. Provides a very reliable mechanical bond. | Ornate trim, detailed cabinets, spindles, and areas where dust is a major concern. |
| Safety Concerns | Inhaling dust. Requires a good quality dust mask. | Inhaling chemical fumes. Requires excellent ventilation, gloves, and a respirator. |
Step 4: Apply a Bonding Primer
After all that prep work, you might be tempted to skip priming. Please don’t! Primer is the essential bridge between the old, problematic surface and your new eggshell paint. It’s specially formulated to do three critical things:
- It adheres to difficult surfaces. A “bonding” primer is made to stick to glossy, slick materials. It grabs onto your newly scuffed semi-gloss surface tenaciously.
- It provides a uniform base. Primer seals the old surface and creates an even, non-porous canvas, so your topcoat will have a consistent color and sheen.
- It blocks stains. If you have any water spots or crayon marks, a good stain-blocking primer will prevent them from bleeding through your new paint.
Using a paintbrush, “cut in” the primer around the edges of the walls, ceilings, and trim. Then, use a roller to apply a thin, even coat of primer to the main surface. Don’t try to get perfect coverage in one coat. The goal is a consistent, thin layer. Let the primer dry completely according to the manufacturer’s instructions. This is typically 2-4 hours, but some oil-based primers may need to dry overnight.
Step 5: Apply Your Eggshell Paint
Finally, the moment you’ve been waiting for! The surface is clean, dull, and primed. It’s the perfect canvas. Now you can apply your eggshell paint with confidence.
- Stir your paint thoroughly. Use a paint stirrer and mix for a few minutes to ensure the color is consistent.
- Cut in the edges. Just like you did with the primer, use your brush to paint along the tape lines and in the corners.
- Roll on the paint. Pour your paint into a tray. Lightly load your roller and apply the paint to the wall in a “W” or “M” pattern to distribute it evenly. Then, fill in the shape with vertical strokes.
- Apply thin coats. Don’t try to cover everything in one thick coat. This leads to drips, an uneven texture, and a longer drying time. Two thin coats will always look more professional than one thick one.
- Let it dry and apply a second coat. Follow the recoat time on the paint can, which is usually 4-6 hours. A second coat will deepen the color and ensure a perfectly even sheen.
- Remove the tape. Pull off the painter’s tape while the second coat is still slightly wet. Pull it at a 45-degree angle for the cleanest line.
And that’s it! Stand back and admire your beautiful, professional-looking new walls. By taking the time to prepare the surface correctly, you’ve ensured your hard work will last for years to come.
Frequently Asked Questions (FAQ)
Do I really need to sand semi-gloss before painting?
Yes, or you need to use a liquid deglosser. The goal is to get rid of the shine so the new paint has something to grip. Without this step, your new paint is very likely to chip, bubble, or peel off easily. Think of it as the most important step in the entire process.
What happens if I paint directly over semi-gloss without prepping?
The new paint will have a very weak bond to the slick surface. Initially, it might look okay, but it won’t be durable. It can be easily scratched off with a fingernail, and it’s prone to peeling over time, especially in areas with humidity or temperature changes.
Can I use a “paint and primer in one” product for this?
For this specific job, I strongly advise against it. “Paint and primer in one” products are great for painting over a similar, flat-finish paint. However, they are not formulated to be true “bonding” primers. To go from a slick semi-gloss to eggshell, you need a dedicated, high-adhesion bonding primer to ensure the best possible result.
How do I know when I’ve sanded enough?
You’ve sanded enough when the entire surface has lost its reflective shine. The goal is a uniform, dull, and chalky appearance. If you run your hand over it, it should feel slightly rough, not slick. You don’t need to see the material underneath; you just need to knock down the gloss.
How long should primer dry before painting?
Always check the instructions on the primer can. Most latex-based primers are dry to the touch in about an hour and ready for a topcoat in 3-4 hours. However, factors like humidity and temperature can affect drying time. When in doubt, it’s always better to wait a little longer.
Is liquid deglosser as good as sanding?
Yes, for creating adhesion, liquid deglosser is very effective. It chemically etches the surface instead of physically abrading it. It is an excellent alternative, especially for projects where dust is a major concern or on surfaces with lots of intricate details that are difficult to sand.
Do I have to clean the wall if it looks clean?
Absolutely. Walls collect invisible contaminants like oils from hands, cooking grease, and general atmospheric dust. Paint and primer cannot adhere to these substances. A quick cleaning is a simple insurance policy for a long-lasting paint job.
Conclusion: The Prep Work is Worth It
So, can you paint eggshell over semi-gloss? The answer is a resounding yes, as long as you embrace the prep work. It might seem like a lot of steps before you even open your new can of paint, but cleaning, de-glossing, and priming are the secrets to a professional, durable finish. This isn’t about making the job harder; it’s about making your results last.
By transforming that slick, shiny surface into a clean, dull, and primed canvas, you are giving your new eggshell paint the best possible foundation for success. The time you invest upfront will pay off for years in a beautiful finish that won’t chip, peel, or let you down. So roll up your sleeves, follow these steps, and get ready to enjoy a perfectly painted room that you can be proud of.