Can You Cut Finished Butcher Block Safely
Many DIYers wonder, Can You Cut Finished Butcher Block Safely, especially when they’ve invested time and money into their project. It can seem tricky to make a clean cut without damaging that beautiful, finished surface. You might worry about splintering, uneven edges, or ruining the protective sealant.
But don’t worry! It’s totally doable with the right tools and a few simple steps. We’ll walk you through exactly how to do it so you can feel confident about your next steps.
Preparing Your Butcher Block For Cutting
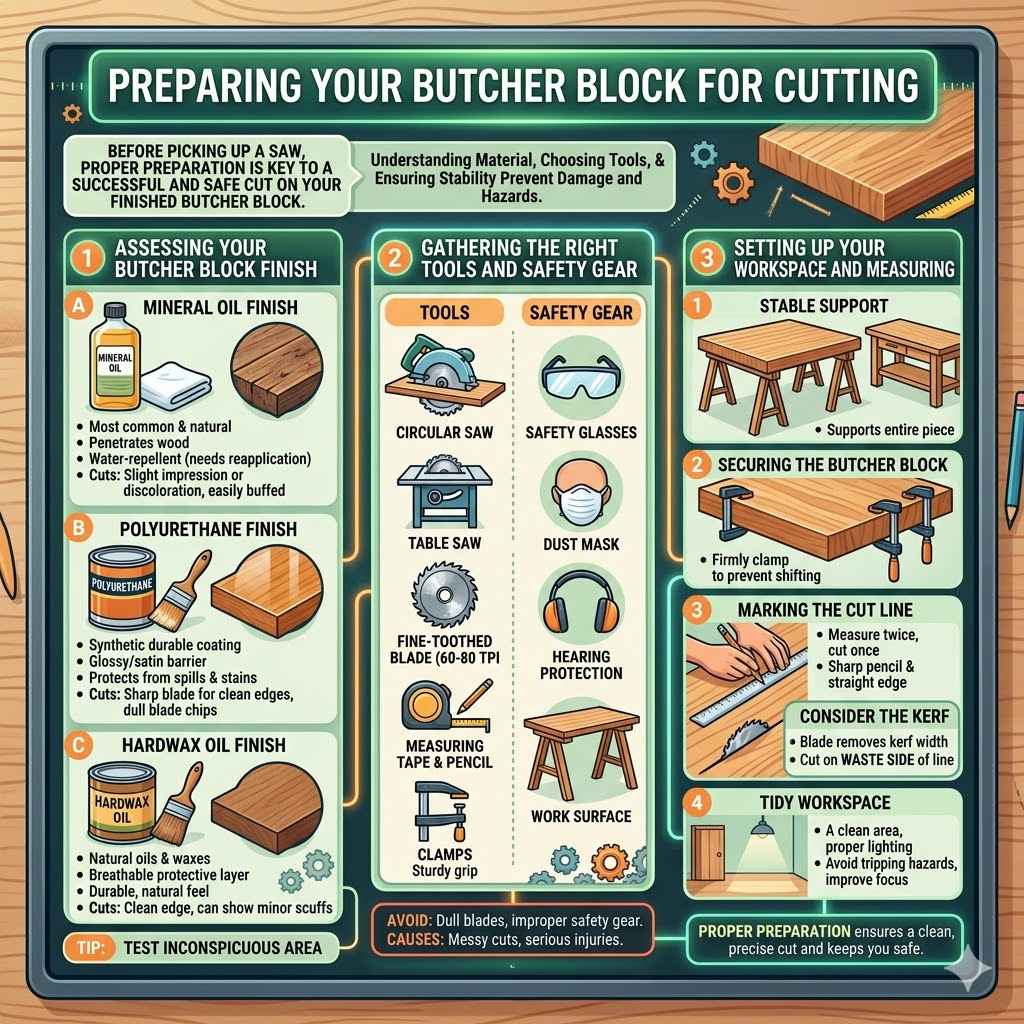
Before you even think about picking up a saw, proper preparation is key to a successful and safe cut on your finished butcher block. This stage involves understanding the material, choosing the right tools, and ensuring a stable workspace. Skipping these steps can lead to a poor finish, safety hazards, or even damage to your butcher block.
This section will guide you through everything you need to get ready for a clean and precise cut.
Assessing Your Butcher Block Finish
Understanding the type of finish on your butcher block is the first crucial step. Different finishes require slightly different handling to avoid damage. Most butcher blocks come with a food-safe mineral oil finish, a polyurethane coating, or a hardwax oil.
Mineral Oil Finish: This is the most common and natural finish. It penetrates the wood, offering protection and enhancing its natural beauty. While food-safe, it doesn’t offer a hard protective layer against scratches or deep cuts. It requires regular reapplication to maintain its water-repellent properties. If you cut into a mineral oil finish, you might see a slight impression or slight discoloration, but it’s usually easy to buff out or reapply oil.
Polyurethane Finish: This is a synthetic coating that creates a durable, water-resistant barrier on the surface. It’s often used for a glossy or satin look. Polyurethane offers excellent protection against spills and stains, and it’s generally quite hard. When cutting, a sharp blade will slice through it cleanly, but if the blade is dull or the cut is rough, it can chip or peel at the edges. It’s important to use a fine-toothed blade for a smooth finish.
Hardwax Oil Finish: This finish combines natural oils and waxes to create a protective layer that is still breathable. It’s known for its natural feel and durability, often feeling more matte than polyurethane. Hardwax oil penetrates the wood to protect it from within while forming a light protective film on top. When cutting, it should yield a clean edge, similar to polyurethane, but can sometimes show minor scuff marks if the blade isn’t perfectly aligned.
Knowing your finish helps you choose the right cutting tools and techniques. For instance, a very sharp blade is essential for all finishes, but especially important for polyurethane to prevent chipping. Always test a small, inconspicuous area if you’re unsure about your finish.
Gathering the Right Tools and Safety Gear
To safely cut your finished butcher block, you need the right equipment. Having everything ready beforehand makes the process smoother and reduces the risk of accidents. It’s not just about the saw; other tools play a vital role in achieving a clean cut and ensuring your safety.
- Circular Saw or Table Saw: For long, straight cuts, a circular saw is ideal. A table saw offers even more precision and stability for repeatable cuts.
- Fine-Toothed Blade: This is non-negotiable for a clean cut on finished wood. A blade with 60-80 teeth per inch (TPI) will slice through the wood and finish with minimal tear-out or splintering. Avoid using standard framing blades.
- Measuring Tape and Pencil: Accurate measurements are crucial for a perfect fit. Use a sharp pencil to mark your cut line clearly.
- Clamps: Sturdy clamps are essential to hold the butcher block securely in place while you cut. This prevents the wood from moving, which is a major safety concern.
- Safety Glasses: Always protect your eyes from sawdust and debris.
- Dust Mask: Cutting wood creates fine dust that can be harmful if inhaled.
- Hearing Protection: Power saws can be very loud.
- Work Surface: Ensure you have a stable, flat surface to work on.
Using dull blades or improper safety gear can lead to messy cuts and serious injuries. Always inspect your tools before use to ensure they are in good working condition. A clean, well-lit workspace also contributes to safety and precision.
Setting Up Your Workspace and Measuring
A well-prepared workspace is fundamental for safety and accuracy when cutting finished butcher block. You need a stable surface that won’t move and clear space around you. Good lighting is also important so you can see your markings clearly.
- Stable Support: Use sawhorses or a workbench that can support the entire piece of butcher block. Make sure the supports are at an appropriate height for comfortable and safe operation of your saw. If the butcher block is too large to handle easily, get a helper.
- Securing the Butcher Block: Use heavy-duty clamps to firmly attach the butcher block to your work surface. The clamps should be positioned so they don’t interfere with your saw’s path but provide enough hold to prevent any shifting during the cut.
- Marking the Cut Line: Measure twice, cut once. Carefully measure the desired length or width. Use a sharp pencil and a straight edge, like a speed square or a long level, to draw a clear, precise line where you intend to cut. For saws that cut from the bottom up, like some circular saws, you might want to mark your line on the top surface.
- Consider the Kerf: Remember that your saw blade has a “kerf,” which is the width of the cut it makes. When measuring, account for this. If you need a piece to be exactly X inches, and your blade is 1/8 inch thick, you need to position your cut line so the blade removes that 1/8 inch. Generally, you want to cut on the waste side of your marked line.
A tidy workspace prevents tripping hazards and allows you to focus on the task at hand. This preparation ensures that the butcher block stays put, and your measurements are accurate, leading to a successful cut.
The Cutting Process: Techniques for a Clean Finish
Achieving a clean and safe cut on finished butcher block involves using the right cutting techniques and being mindful of the wood’s grain and finish. This is where the preparation pays off, allowing you to execute the cut with confidence. The goal is to minimize tear-out and ensure the edges are smooth and ready for the next steps in your project.
Making the First Cut with a Circular Saw
Using a circular saw can be very effective for straight cuts, but it requires careful handling, especially on finished surfaces. The key is a controlled, steady motion with the right blade.
Setting the Blade Depth: Before you cut, adjust the blade depth on your circular saw. The blade should extend just slightly below the bottom surface of the butcher block, typically about 1/8 to 1/4 inch. This ensures a clean cut through the material without cutting too deeply into your work surface or sawhorses.
Using a Straight Edge Guide: For the most precise cuts, attach a clamped-on straight edge or a commercially available circular saw guide to your butcher block. This guide will ensure your saw travels in a perfectly straight line, mimicking a table saw’s capability. Mark your desired cut line and align the guide so that the saw’s blade will follow that line precisely, accounting for the blade’s kerf.
Starting the Cut: Place the circular saw on the butcher block with the blade just touching the surface. Ensure the saw is held firmly and that your hands are safely away from the blade path. Start the saw and let it reach full speed before engaging the wood.
Maintaining a Steady Pass: Move the saw forward at a consistent, moderate pace. Don’t force the saw. Let the blade do the work. Keep the base of the saw firmly against the straight edge guide. Listen to the sound of the saw; a consistent hum means you’re cutting smoothly. If it strains, you might be pushing too hard or the blade is dull.
Completing the Cut: Continue the cut all the way through the end of the butcher block. Once the cut is complete, allow the blade to stop spinning completely before lifting the saw away from the material. This prevents the blade from catching and creating a rough edge or damaging the wood.
A common mistake is pushing too fast, which can lead to splintering. Take your time and let the saw do the work. The goal is a smooth, continuous motion for the best results.
Using a Table Saw for Precision
A table saw offers superior accuracy and stability for cutting butcher block, making it a preferred choice for many woodworkers. Its design allows for repeatable, precise cuts with less physical effort once set up correctly.
- Blade Selection and Setup: Similar to a circular saw, a high TPI (60-80) blade is crucial for a clean cut on finished butcher block. Ensure the blade is installed correctly and is perfectly flat. Set the blade height so it extends just slightly above the top surface of the butcher block (about 1/8 to 1/4 inch). This minimizes the risk of the blade catching and kicking back.
- Using the Rip Fence: For cuts parallel to the grain (ripping), the rip fence is your guide. Measure the distance from the blade to the fence and adjust the fence accordingly. Ensure the fence is locked securely in place and parallel to the blade.
- Feeding the Butcher Block: Place the butcher block onto the table saw surface, ensuring it is flat against the table and against the rip fence. Use a push stick or push block to guide the wood through the blade, especially for narrower pieces or when the blade is close to the fence. Your hands should always be kept a safe distance from the blade.
- Controlled Movement: Feed the butcher block forward at a steady, consistent speed. Let the motor maintain its speed. Do not force the wood. If the saw bogs down, you are pushing too hard. Take a break and assess the situation.
- Blade Guard and Safety: Always use the blade guard unless a specific operation requires its removal (which is rare for simple cuts). Many table saws also have a splitter or riving knife behind the blade, which helps prevent kickback. Ensure these are in place and functioning correctly.
Table saws, while offering great precision, require respect for their power. Always follow the manufacturer’s safety instructions and wear all recommended safety gear.
Alternative Cutting Methods
If you don’t have a circular saw or table saw, or for smaller, more intricate cuts, other tools can be used. These methods might take a bit more time but can yield good results with practice.
- Jigsaw: A jigsaw is excellent for curved cuts and can be used for straight cuts if you attach a straight edge guide. Use a fine-tooth blade designed for hardwoods or laminate. Keep the jigsaw flat against the wood and move it steadily.
- Hand Saw: A sharp, fine-toothed hand saw, like a Japanese pull saw, can produce surprisingly clean cuts. It requires more physical effort and skill to maintain a straight line. Ensure the butcher block is well-supported and clamp a guide if possible.
- Track Saw: A track saw is a highly accurate portable cutting tool that uses a guide rail to ensure perfectly straight cuts, similar to a table saw. It’s excellent for making long, precise cuts in large pieces of butcher block.
Each of these methods has its strengths. The jigsaw is versatile, the hand saw offers control, and the track saw provides precision similar to a table saw in a portable package. Choose the tool that best suits your needs and skill level.
Dealing with Tear-Out and Finishing Touches
Even with the best tools and techniques, a little tear-out might occur. Tear-out happens when wood fibers are pulled or splintered away from the surface instead of being cleanly cut. This is most common on the exit side of the cut.
- Preventing Tear-Out: Using a sharp, fine-toothed blade is the first line of defense. Supporting the wood from underneath, especially on the exit side, can also help. Some people use masking tape along the cut line; press it down firmly. This can help hold the wood fibers together as the blade passes through.
- Sanding the Edges: Once the cut is made, you’ll need to sand the edges. Start with a medium-grit sandpaper (e.g., 120-grit) to smooth out any rough spots or minor imperfections. Follow up with finer grits (e.g., 180-grit, then 220-grit) to achieve a smooth finish. Sand with the grain of the wood.
- Applying Finish to Cut Edges: After sanding, the freshly cut edges will be unfinished. You need to reapply the same finish that was on the rest of your butcher block. If it’s mineral oil, simply wipe it on generously and let it soak in, wiping off any excess. For polyurethane or hardwax oil, apply thin, even coats, following the product’s instructions. This protects the exposed wood and matches the appearance of the rest of the surface.
- Chamfering or Rounding Edges: For a more finished look and to prevent sharp corners, you can lightly chamfer or round over the cut edges. A block plane, sandpaper, or a router with a small rounding-over bit can achieve this.
The final sanding and refinishing steps are crucial for making the cut blend seamlessly with the rest of your butcher block. This attention to detail ensures your project looks professionally done.
Common Challenges and How to Overcome Them
Even with careful preparation, issues can arise when cutting butcher block. Knowing these common challenges and having solutions ready will save you frustration and ensure a better outcome. These problems often stem from not anticipating how the wood will react during the cutting process.
Splintering and Tear-Out on Finished Surfaces
This is perhaps the most frequent issue encountered. The smooth, finished surface of butcher block can be prone to splintering, especially if the grain is irregular or if the cutting tool isn’t optimal.
- The Cause: Splintering or tear-out occurs when the saw blade doesn’t cleanly slice through the wood fibers. Instead, it rips them apart, especially on the exit side of the cut. This can be exacerbated by dull blades, too fast a cutting speed, or insufficient support for the wood. The protective finish can also sometimes flake if the blade is not sharp enough.
- Solutions:
- Use a very sharp, fine-toothed blade (60-80 TPI). This is the most effective solution.
- Score the cut line with a utility knife to score the finish and fibers before cutting.
- Apply painter’s tape along the cut line, pressing it down firmly. This can help hold fibers together.
- Support the wood from underneath, especially on the exit side, to minimize sagging.
- Use a zero-clearance insert on your table saw if applicable. This provides better support around the blade.
- Cut with a steady, moderate pace. Don’t force the saw.
- Repairing Minor Splintering: Small splinters can often be sanded away. For more significant tear-out, you might need to fill the void with wood filler and then sand and refinish the area to match.
Remember that a perfect cut is the goal, but even if minor issues arise, they are usually repairable with careful sanding and refinishing.
Inaccurate Measurements and Uneven Cuts
When your cuts don’t match your measurements, or they end up crooked, it’s a disappointing setback. This often comes down to how measurements are taken and how the saw is guided.
- The Cause: Inaccurate measurements can happen from using a worn tape measure, not accounting for the blade’s kerf, or marking the line on the wrong side. Uneven cuts can result from a wobbly saw, poor support, not using a guide, or an unsteady hand. The finished surface can also be slippery, making it harder to keep the saw steady.
- Solutions:
- Double- and triple-check all measurements. Ensure your tape measure is accurate.
- Always account for the blade’s kerf. Cut on the waste side of your marked line.
- Use a reliable measuring tool like a combination square or a digital caliper for precision.
- For circular saws, always use a straight edge guide or a dedicated track.
- For table saws, ensure the rip fence is perfectly parallel to the blade and locked tight. Use a push stick.
- Take your time. Rushing leads to mistakes.
- Practice on scrap wood first if you are new to the tool or the material.
- Correcting Uneven Cuts: If a cut is slightly off, it might be possible to sand down the edge to make it straighter, but this can affect the dimensions. For significant errors, you might need to cut a new piece.
The best way to avoid these problems is through meticulous planning and careful execution. Each measurement and each pass of the saw needs your full attention.
Damage to the Existing Finish During Cutting
The beautiful finish you worked hard to achieve can be marred if the cutting process isn’t managed correctly. This can leave unsightly scratches or chips around the new cut edge.
- The Cause: A dull blade is the primary culprit. It can snag and pull the finish, causing chips. Rubbing the saw base or the wood against the surface during the cut can also cause scratches. If the wood isn’t properly supported, it can shift, leading to gouges.
- Solutions:
- Always use a sharp, high-quality blade appropriate for hardwood.
- Ensure the base plate of your saw is clean and free of debris.
- If using a circular saw, consider applying a layer of painter’s tape along the cut line. This provides a sacrificial surface that the saw base can slide on, preventing scratches.
- Work from the finished side of the butcher block up whenever possible, depending on your saw. For a circular saw, cutting from the bottom up exposes the top finish to the blade, so supporting the wood and using a guide is paramount.
- Clean your saw blade periodically. Resin buildup can affect cutting performance and finish.
- Repairing Finish Damage: Minor scratches can often be buffed out. Deeper chips or gouges in the finish will require touch-up with matching stain and sealant. Sand the damaged area lightly, apply the finish, and blend it in.
Protecting the existing finish is just as important as making a clean cut. By using the right tools and taking precautions, you can keep your butcher block looking pristine.
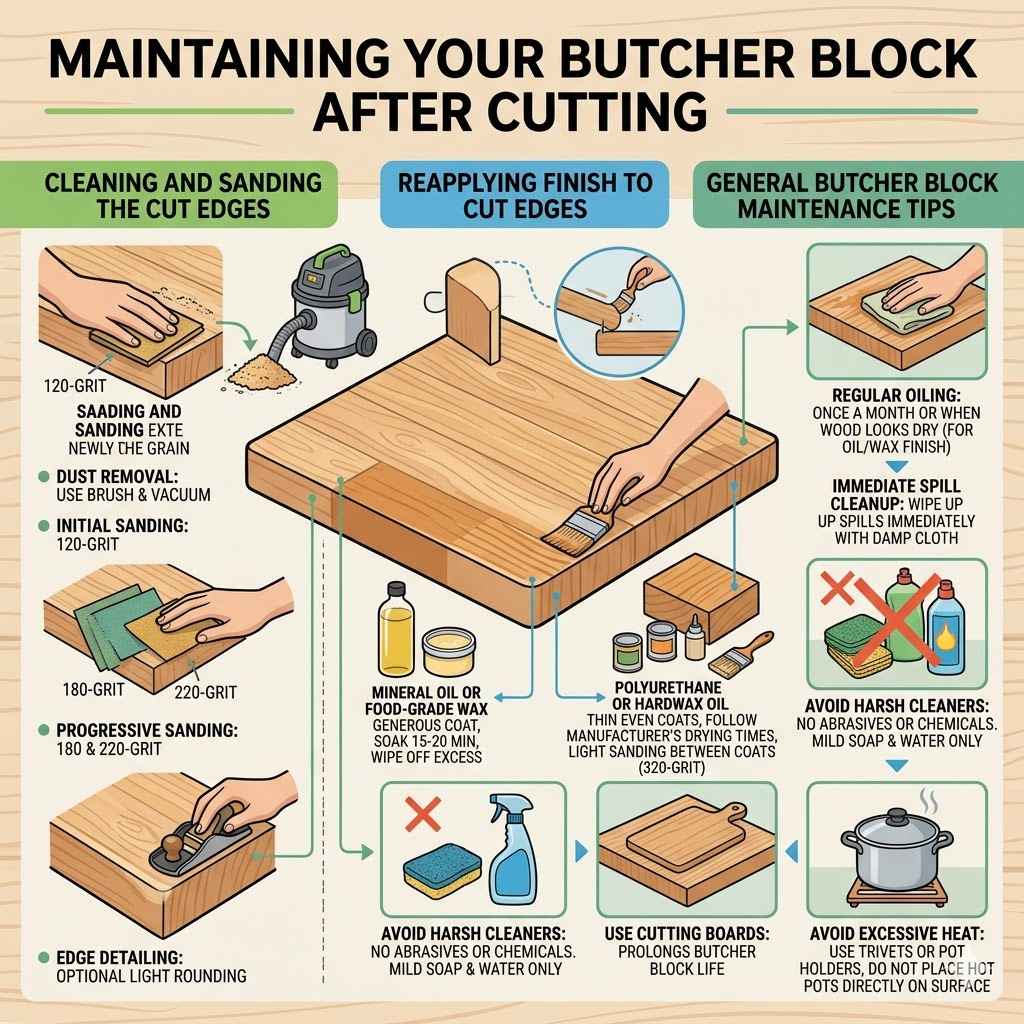
Maintaining Your Butcher Block After Cutting
Once you’ve successfully cut your butcher block, the job isn’t entirely done. Proper post-cut care is essential to maintain its beauty, durability, and functionality. This involves cleaning up, re-sealing the cut edges, and continued general maintenance.
Cleaning and Sanding the Cut Edges
After making the cut, there will likely be sawdust and perhaps some small imperfections along the new edge. These need to be addressed to prepare for refinishing.
- Dust Removal: Use a brush and a vacuum cleaner to thoroughly remove all sawdust from the cut edge and the surrounding area. Compressed air can also be useful for blowing dust out of crevices.
- Initial Sanding: Begin with a medium-grit sandpaper, such as 120-grit. Sand the cut edge with the grain of the wood. This will remove any rough spots, saw marks, or minor splintering.
- Progressive Sanding: Move to finer grits of sandpaper, such as 180-grit and then 220-grit. Each successive grit will smooth the surface further, leaving a silky-smooth finish that is ready for sealing. Always sand in the direction of the wood grain for the best results and to avoid creating visible scratches.
- Edge Detailing: If desired, you can lightly round over the cut edge with sandpaper or a block plane for a softer feel and to prevent chipping. This also gives a more professional appearance.
The goal of sanding is to create a surface that is as smooth as the original finished parts of the butcher block, ensuring a seamless integration.
Reapplying Finish to Cut Edges
Cutting exposes fresh wood fibers that are unprotected. Reapplying the finish to these newly cut surfaces is critical for preventing moisture absorption, staining, and premature wear.
- Identify Original Finish: It’s important to know what finish was originally used on your butcher block. Common finishes include mineral oil, food-grade waxes, polyurethane, or hardwax oils. If you are unsure, it’s best to test a small, inconspicuous area first.
- Mineral Oil or Wax Application: For butcher blocks finished with mineral oil or wax, apply a generous coat of the appropriate product to the cut edges. Let it soak in for at least 15-20 minutes, then wipe off any excess. For enhanced protection, multiple applications over a few days can be beneficial.
- Polyurethane or Hardwax Oil Application: If your butcher block has a polyurethane or hardwax oil finish, you will need to apply thin, even coats of the same or a compatible product. Follow the manufacturer’s instructions carefully, paying attention to drying times and recoat windows. Sand lightly between coats with a very fine grit (320 or higher) if recommended by the product.
- Ensuring a Seamless Match: The aim is to make the refinished edge blend perfectly with the rest of the butcher block. Apply the finish evenly and ensure there are no brush strokes or uneven patches.
Properly sealing the cut edge ensures that your butcher block remains durable and attractive for years to come, preventing potential damage from everyday use.
General Butcher Block Maintenance Tips
Beyond the immediate post-cut care, ongoing maintenance will keep your butcher block in excellent condition. Regular attention prevents issues from developing and extends the life of your investment.
- Regular Oiling: If your butcher block is finished with mineral oil or wax, it should be oiled regularly, typically once a month or whenever the wood starts to look dry. This keeps the wood hydrated and repels moisture.
- Immediate Spill Cleanup: Wipe up spills immediately with a soft, damp cloth. Avoid letting liquids sit on the surface, as this can lead to staining or water damage, especially if the finish is compromised.
- Avoid Harsh Cleaners: Do not use abrasive cleaners, scouring pads, or harsh chemicals on your butcher block, as these can damage the finish and the wood. A mild soap and water solution is usually sufficient for cleaning.
- Use Cutting Boards: While butcher block is designed to be cut on, using a separate cutting board for everyday chopping will significantly prolong its life and keep it looking newer for longer.
- Avoid Excessive Heat: Do not place hot pots or pans directly on the butcher block surface. Use trivets or pot holders to protect it from heat damage.
These simple maintenance practices will ensure your butcher block remains a functional and beautiful centerpiece in your home.
Frequently Asked Questions
Question: Can I cut butcher block with a dull saw blade
Answer: No, using a dull saw blade is highly discouraged. It can lead to splintering, tear-out, and damage to the finished surface, as well as being more dangerous due to increased resistance. Always use a sharp blade.
Question: What is the best way to get a perfectly straight cut on butcher block
Answer: The best way is to use a table saw with a sharp blade and a well-aligned rip fence, or a circular saw with a clamped-on straight edge guide or track saw system. Precision requires a stable guide.
Question: How do I fix a small chip in the finish after cutting
Answer: For small chips in the finish, you can lightly sand the area, apply a matching stain if needed, and then carefully reapply the same type of sealant (e.g., polyurethane, hardwax oil) to blend it in.
Question: Should I cut finished butcher block from the top or the bottom
Answer: For circular saws, cutting from the bottom up is often recommended to prevent splintering on the top finished surface, but it requires good support and a guide. Table saws cut from the top down. Always consider how the blade interacts with the finished surface.
Question: How often should I reapply finish to cut edges
Answer: If using mineral oil, reapply monthly or when the wood looks dry. For polyurethane or hardwax oil, reapply as needed, typically after sanding or if wear is visible, following product instructions for recoating.
Conclusion
Yes, you absolutely can cut finished butcher block safely and achieve beautiful results. By preparing your tools, workspace, and the butcher block itself, and by using precise cutting techniques, you will get clean edges. Always remember safety first with sharp blades and protective gear.
After cutting, proper sanding and refinishing the edges ensures a perfect match. Enjoy your newly sized butcher block!