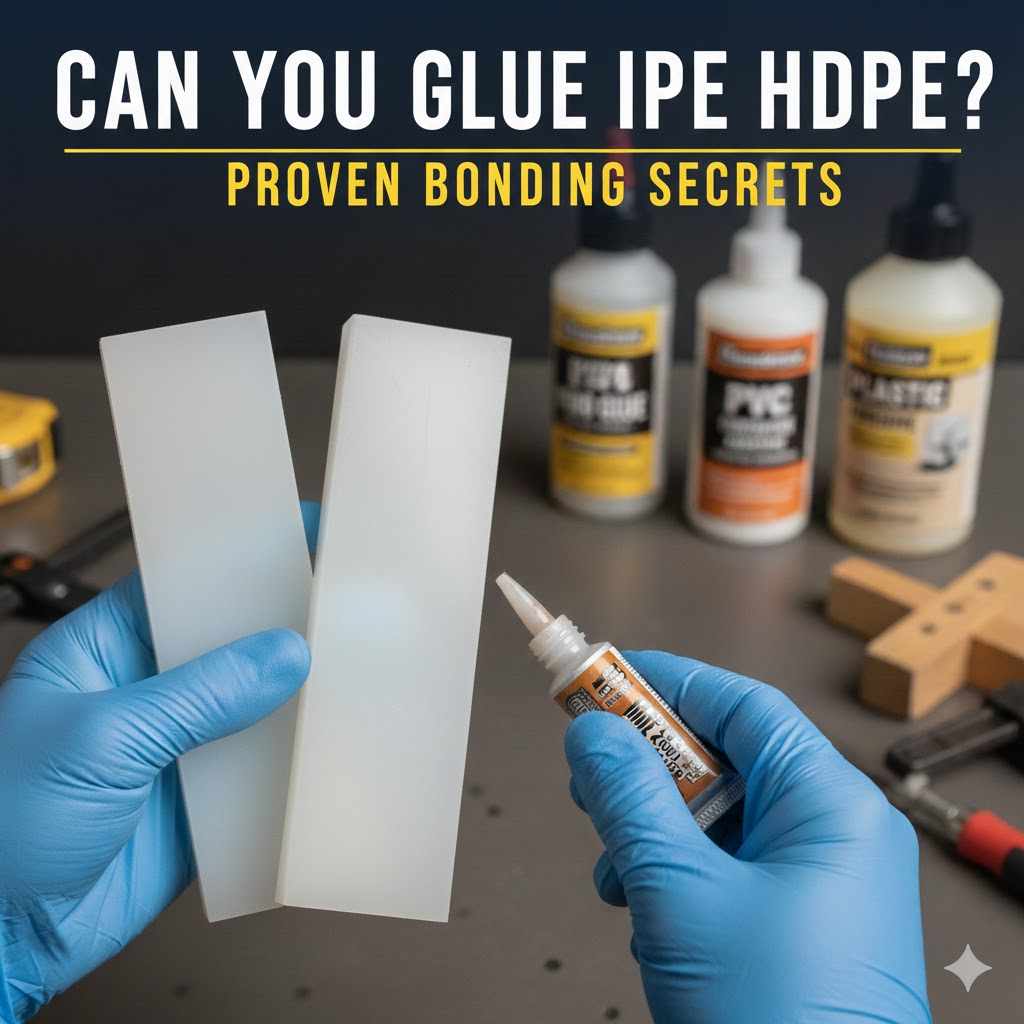
Can You Glue HDPE? Proven Bonding Secrets
Yes, you absolutely can glue HDPE (High-Density Polyethylene), but standard glues won’t work because HDPE has very low surface energy, making it slick. Success depends entirely on preparing the surface correctly, often involving specialized primers or heat treatment, to create a bondable surface before using the right adhesive like specialized two-part epoxy or Cyanoacrylate (Super Glue) formulated for plastics.
Welcome to the workshop! Have you ever tried to stick two pieces of slippery plastic together, only to have them slide apart? You are definitely not alone. That plastic is likely HDPE—the sturdy stuff used for milk jugs, plastic lumber, and storage bins.
HDPE is fantastic because it resists chemicals and moisture, but those exact properties make gluing it a real headache for DIYers. It’s tough plastic to conquer!
Don’t worry about throwing that project away. As a mentor, I can tell you that with the right preparation, you can make HDPE stick reliably. We are going to break down exactly why it resists glue and share the proven bonding secrets that professional fabricators use.
Ready to turn that frustrating slick plastic into a strong, lasting bond? Let’s dive into the simple science and the step-by-step techniques you need to master HDPE gluing today.
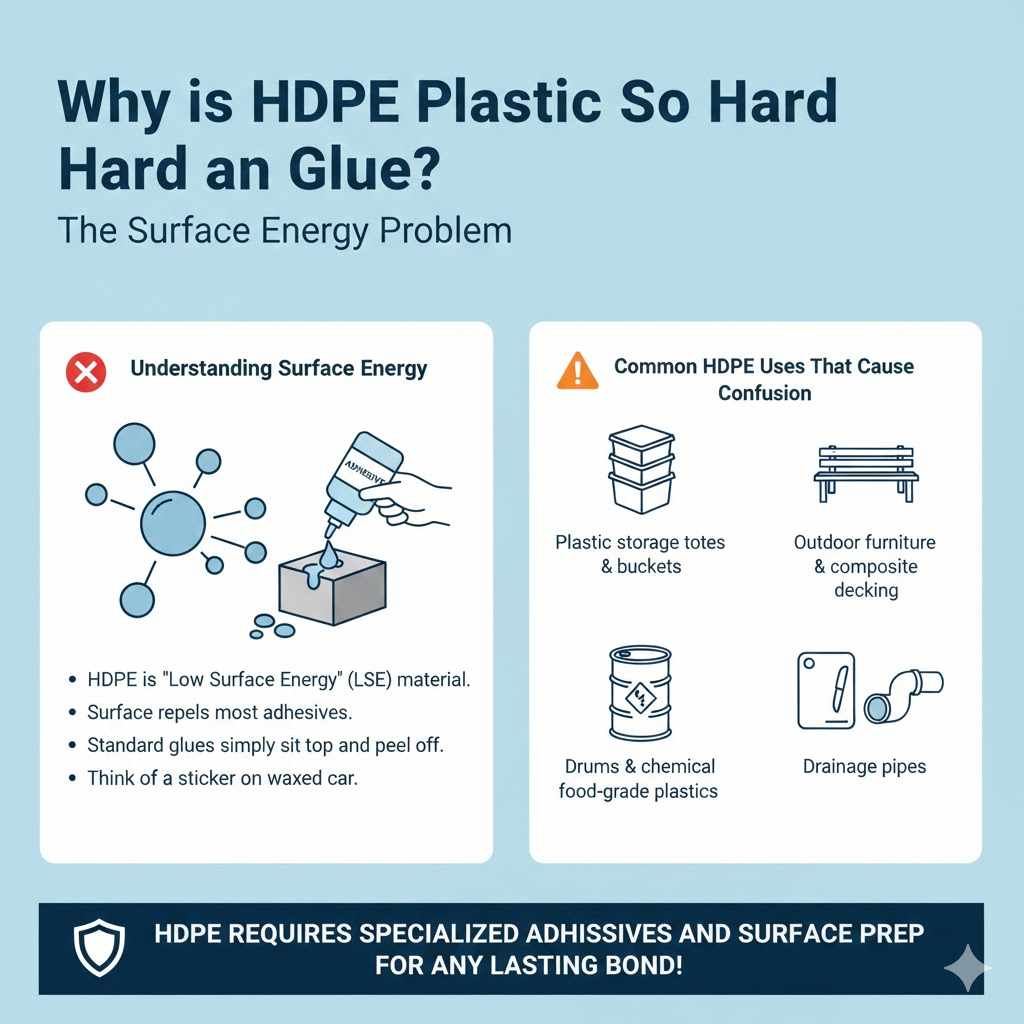
Why is HDPE Plastic So Hard to Glue? The Surface Energy Problem
Before we talk glue, we must understand why HDPE fights back. It’s not you; it’s the material itself! Understanding this helps us choose the right strategy.
Understanding Surface Energy
In simple terms, plastic molecules hate sticky things. Plastics like HDPE are classified as “Low Surface Energy” (LSE) materials. Think of it like trying to stick a wet sticker onto a freshly waxed car. The sticker can’t grip because the surface repels anything trying to adhere to it.
Most standard adhesives (like basic wood glue or construction adhesive) rely on microscopic roughness and chemical interaction to grab hold. Because HDPE is so smooth and non-porous, these glues simply sit on top and peel right off once cured.
Common HDPE Uses That Cause Confusion
HDPE is everywhere, leading many people to assume they can fix it easily. You often encounter HDPE in:
- Plastic storage totes and buckets.
- Outdoor furniture and composite decking (lumber made from recycled plastic).
- Dunnage tanks, drums, and chemical containers.
- Certain cutting boards or food-grade plastics.
- Plastic drainage pipes and geomembranes.
The Three Secrets to Successfully Gluing HDPE
Since standard glue won’t work, we have to cheat the plastic’s chemistry. There are three main ways DIYers and professionals approach this challenge. Success always involves one of these three modifications, usually used in combination.
Secret 1: Use the Right Adhesive (The Chemical Match)
You cannot use general-purpose glues. You need adhesives that are chemically designed to bond with LSE plastics. These often come in multi-part kits.
Top Adhesive Recommendations for HDPE
When you need a strong bond, look for products specifically marketed for polyolefin or plastic bonding. Always check the bottle—it must list HDPE as a compatible material.
| Adhesive Type | Best For | Considerations |
|---|---|---|
| Two-Part Acrylic/Epoxy Kits | Structural, large gaps, load-bearing repairs. | Usually require a primer; excellent strength. |
| Cyanoacrylate (CA Glue) with Activator/Primer | Small breaks, quick fixes, thinner pieces. | Primer must be an HDPE/Polyolefin-specific type. |
| Polyolefin Weld Rods (Heat Welding) | Long-term, permanent repairs (advanced). | Requires a plastic welder or high-power heat gun. |
Secret 2: Primer Application (The Game Changer)
For nearly every adhesive other than specialized, full-system plastic weld kits, a chemical primer is non-negotiable. Think of the primer as a chemical handshake between the glue and the slick plastic.
These primers chemically alter the surface of the HDPE, making it temporarily compatible with the adhesive. Most CA glue and some specialized epoxies require this step for HDPE.
Safety Note: Primers often contain strong solvents. Always work in a well-ventilated area and wear gloves, just as you would when working with harsh finishes or strong solvents on wood finishes. Reviewing guidelines from adhesive manufacturers, like those provided by Loctite or 3M, confirms the crucial role of primers for these challenging surfaces (3M Primer Application Guidance offers detailed information on surface prep for industrial bonding).
Secret 3: Surface Preparation (The Essential Scrub)
No matter how good your glue or primer is, if the surface isn’t clean, you are only gluing dirt and grease together. This is where many DIY repairs fail.
For HDPE, you need to do more than just wipe it down. You must aggressively clean the surface.
Step-by-Step Guide: How to Properly Glue HDPE
This method focuses on the most common, beginner-friendly repair path: using a plastic bonding kit (CA Glue + Primer or specialized two-part plastic epoxy). Follow these steps exactly for the best results.
Phase 1: Cleaning and Preparing the Surface
This is 80% of the battle. Take your time here!
- Wipe Down: Use a clean, lint-free cloth and wipe away any visible dirt or grime.
- Degrease: This is crucial for HDPE. Use a strong solvent like Isopropyl Alcohol (IPA) or acetone to thoroughly wash the mating surfaces. Acetone works well on HDPE for cleaning grease, but check the manufacturer’s safety data sheet for compatibility if you are unsure of the plastic type, as it can sometimes affect clarity or other specialized plastics.
- Light Abrasion (Scuffing): Since we can’t rely on texture like wood, we must introduce a microscopic profile. Use 100 to 150-grit sandpaper to gently scuff the areas to be glued. You aren’t trying to sand deep grooves; you are just trying to break that super-slick outer layer so the primer has something to bite into.
- Final Clean: Wipe down the scuffed area again with clean solvent (IPA or acetone) to remove all sanding dust. Let it fully evaporate.
Phase 2: Priming and Bonding
Once the surfaces are clean and dry, move quickly, as oils from your hands can contaminate the area.
- Apply Primer: If using a kit, apply the primer thinly and evenly to both mating surfaces. If the primer evaporates too quickly before you apply the glue, reapply it right before bonding. Most primers need to sit for only 30 seconds to a minute, depending on humidity. Check your specific product directions.
- Apply Adhesive: Immediately after the primer flash-off time, apply your adhesive. For CA glue, run a thin bead on one side. For two-part epoxies, mix the components carefully as directed.
- Join Immediately: Press the two pieces together firmly. Alignment is critical because plastic doesn’t usually allow for repositioning once the primer is active.
- Clamp and Cure: Clamp the pieces using gentle, even pressure. For CA glue kits, you might use an accelerator spray on the outside edge to speed the set time (though gentle clamping is still recommended). Allow the adhesive to cure fully—this usually means leaving it clamped for several hours or overnight, even if it feels “solid” in minutes.
Alternative Bonding Method: Surface Treatment Without Primers (Flaming HDPE)
I want to mention a technique used professionally when primers aren’t an option. This method dramatically changes the plastic’s surface chemistry by oxidizing it—making it “hotter” and ready to accept glue. As a mentor, I must strongly emphasize safety here, as this involves controlled flame exposure.
The Propane Torch Method (Oxidation)
This process is called flame treating. By briefly exposing HDPE to a clean, blue flame, you break down the LSE surface molecules into High Surface Energy (HSE) molecules, making them chemically ready for many standard strong epoxies or specialized plastic glues (though primers are still easier for beginners).
When to Use This: When working on very large parts, or when bonding high-value HDPE parts where you must achieve maximum bond strength without reliance on commercial primers.
Safety First with Flame Treating
- Only use a clean propane torch (MAPP gas burns too hot and leaves soot).
- Work in a non-flammable area, away from any fumes or chemicals.
- Keep the flame moving constantly.
Steps for Flame Treating HDPE
- Ensure the HDPE is completely clean of all residues and degreased (see Phase 1 above).
- Light your propane torch and adjust it to a steady, soft blue flame.
- Pass the very tip of the flame very quickly over the surface area where the glue will go. You want to apply just enough heat for about 0.5 to 1 second per spot. You are NOT trying to melt or scorch the plastic.
- You are looking for a very subtle change in the surface color, often described as making the plastic look slightly duller where the flame touched it. If you see black soot or bubbling, you held the flame too long—you must sand off the damaged area and start over.
- Immediately after treating (within minutes, before the surface reverts), apply your chosen specialized epoxy or high-strength structural adhesive. Do not touch the treated surface.
This method significantly improves adhesion because it introduces oxygen-containing functional groups to the surface. This concept is a common practice in manufacturing when dealing with various polyolefins (NIST technical reports often cover surface treatments for polymer bonding, showcasing the scientific background behind this). While effective, the precision required makes the primer route generally safer and easier for the average homeowner.
Repair Comparison: When to Choose Which Glue Type
Knowing the options is great, but choosing the right one for your repair job makes all the difference in longevity. Here is a quick guide based on project needs.
| Project Goal | Recommended Glue System | Ease for Beginner |
|---|---|---|
| Repairing a small crack in a plastic storage bin lid. | CA Glue with HDPE Primer/Activator. | Easy/Medium (Fastest Cure) |
| Attaching a bracket or fixture to a thick piece of HDPE sheeting. | Two-Part Structural Epoxy designed for Plastics. | Medium (Requires good clamping) |
| Repairing a major split in a water trough or pond liner (requires maximum flexibility and waterproofing). | Specialized Flexible Polyurethane Adhesive (if compatible). | Medium/Hard (Finding the right flexible formula is key) |
| Building a custom HDPE box or enclosure (welding desired). | Heat Welding (requires specialized equipment). | Hard (Not glue-based, but the strongest long-term solution) |
HDPE Gluing Mistakes to Avoid
Knowing what not to do can save you a trip back to the hardware store. As your woodworking mentor, I’ve seen these mistakes happen time and time again.
Mistake 1: Skipping the Scuff Sanding
If you skip the light abrasion (sanding), you are relying only on the primer’s chemical bond to a perfectly slick surface. You need that microscopic profile to increase the surface area for the bond to develop. Always scuff!
Mistake 2: Using Standard “Plastic Glue”
Most glues labeled “Plastic Glue” are formulated for ABS, PVC, or Polystyrene (PS). These are much easier to bond than HDPE. If the bottle doesn’t specifically mention Polyethylene or HDPE, it won’t work well.
Mistake 3: Contaminating the Surface Post-Cleaning
HDPE is a magnet for fingerprints and dust. Once you have cleaned the area with solvent, avoid touching the prepared mating surfaces with bare hands until the adhesive is applied. Use gloves if possible, or only handle the edges.
Mistake 4: Rushing the Cure Time
Especially with two-part epoxies, the strength develops slowly. Don’t put stress or load on the joint until the adhesive has reached its full advertised cure time (often 24 hours). A premature stress test is the fastest way to break the new, brittle bond.
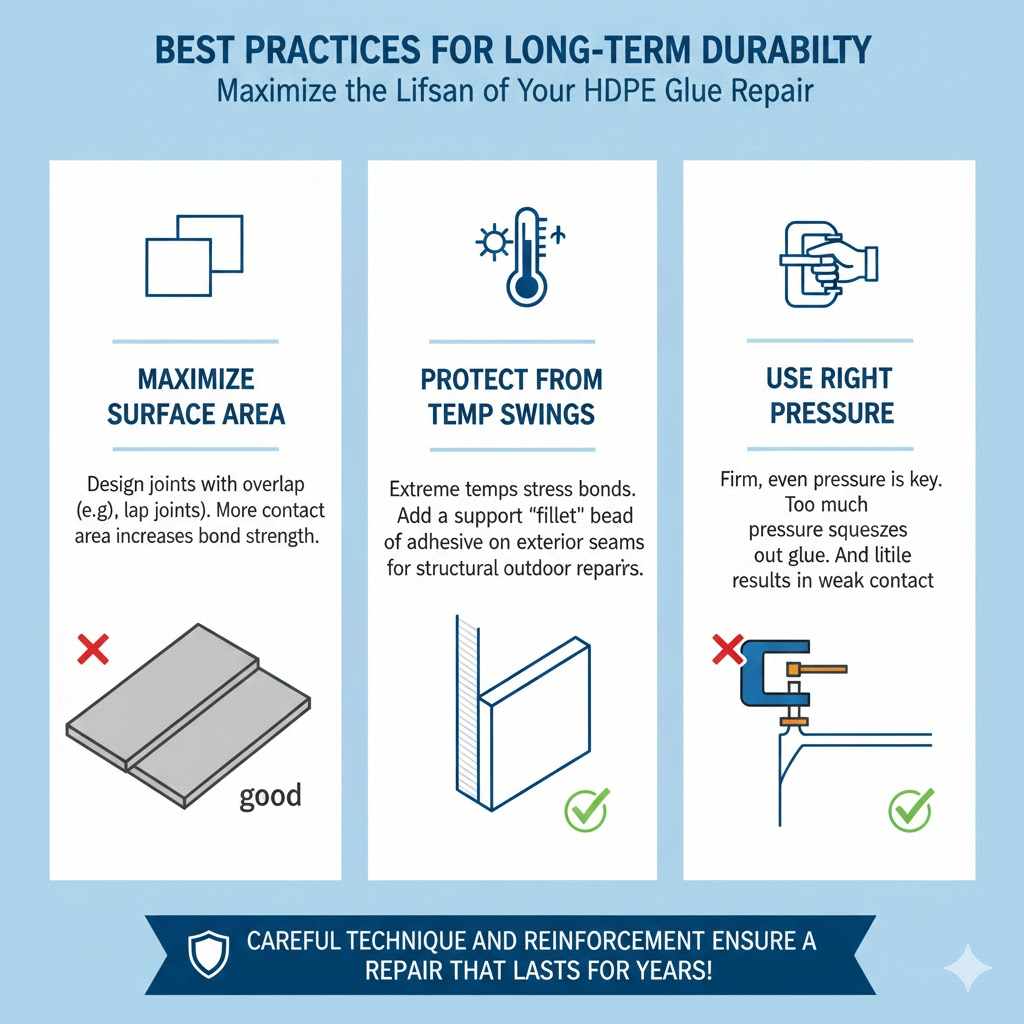
Best Practices for Long-Term Durability
You’ve successfully glued your HDPE! Now, how do we make sure that joint lasts five years and not just five days?
Maximize Surface Area in Joints
Whenever possible, design your repair or joinery to maximize contact. Instead of a simple butt joint (where two ends just touch), try to create a lap joint where one piece overlaps the other by at least an inch. More surface area means more area for the chemical bond to adhere to, multiplying the overall strength.
Protect from Extreme Temperature Swings
HDPE is often used outdoors, but extreme cold or rapid shifts in temperature can cause different materials to expand and contract at different rates, stressing the bond line. While the adhesive itself might be rated for temperature, large, thick bonds handle these swings better than thin seams. If the repair is structural outdoors, consider adding a support fillet of the same adhesive around the exterior seam.
Use the Right Clamp Pressure
This applies to both epoxy and CA glue systems. Too little pressure, and you won’t have enough contact. Too much pressure (especially with CA glue), and you squeeze out too much material, leaving no gap for the adhesive to fill the tiny microscopic space needed for a strong set. You want firm, even pressure—just enough to hold parts securely without visibly squeezing out the sides.
FAQ: Beginner Questions About Gluing HDPE
Q1: Can I use standard wood glue on HDPE plastic?
No. Wood glue relies on porous surfaces to soak in and cure. Since HDPE is non-porous and chemically inert, wood glue will not adhere strongly; it will just peel right off.
Q2: What is the easiest way for a beginner to glue HDPE?
The easiest and most reliable beginner method is using a dedicated plastic bonding kit. These usually consist of an HDPE-specific primer and a Cyanoacrylate (Super Glue) designed to work with that primer. Surface prep is key!
Q3: Do I really have to sand the plastic?
Yes, sanding (scuffing) is highly recommended. Even though a strong primer can bond to the slick surface, sanding breaks the highly uniform outer layer, giving the chemical bond a micro-texture to grip onto, greatly increasing the strength.
Q4: Will regular Super Glue (CA glue) work on HDPE alone?
Almost never. Standard Super Glue does not adhere well to Low Surface Energy plastics like HDPE unless you use the special plastic-specific primer/activator that comes packaged with them.
Q5: Can I glue HDPE to wood?
Yes, but you must treat both sides! Glue the wood side with a good general-purpose adhesive (like wood glue or epoxy). Then, treat and glue the HDPE side using the methods described above. Using a two-part epoxy designed for plastics is often the best bridge between the two materials.
Q6: What temperature range is safe for curing HDPE glue joints?
Most plastic bonding adhesives cure best at standard room temperature (around 68°F to 75°F or 20°C to 24°C). Avoid cold temperatures (<50°F/10°C) during curing, as this significantly weakens the final bond strength and cure time for almost all adhesives.
Conclusion: You Can Master HDPE Bonding
Seeing that slick, stubborn HDPE plastic used to cause headaches, but now you know the professional secrets to making it stick reliably. It’s not magic; it’s preparation and the right chemical match!
Remember the core philosophy: HDPE resists glues because it’s too slick (Low Surface Energy). Your job is to change that surface, either through the magic of a chemical primer or the physical energy of a controlled flame, before applying a purpose-built adhesive like a specialized two-part epoxy or primed CA glue.
Take your time with the cleaning and scuffing steps—that attention to detail will reward you with a bond that truly lasts. With these proven techniques, your next repair or custom HDPE project will go from a frustration to a satisfying success. Go ahead, tackle that project with confidence. You’ve got this!