Can You Install VTC on a Wood Subfloor A Simple Guide
Thinking about installing vinyl tile composite (VTC) flooring? A common question for homeowners is, Can You Install VTC on a Wood Subfloor? This can be a tricky topic, especially for people who are new to home improvement. Don’t worry, though; it’s definitely something you can figure out. This guide will make it easy by giving you a step-by-step approach. We’ll start with the basics, exploring everything you need to know to get the job done right. Let’s get started!
What You Need to Know About Wood Subfloors
Before you even think about laying down VTC, you need to assess your wood subfloor. The subfloor is the layer of wood that sits directly beneath your flooring. It serves as the base, providing support. A solid, level subfloor is essential for the longevity and appearance of your VTC. If your subfloor is damaged, uneven, or not prepared correctly, your new flooring won’t look or perform its best. Taking the time to properly inspect and prepare the wood subfloor is a good way to ensure a successful VTC installation.
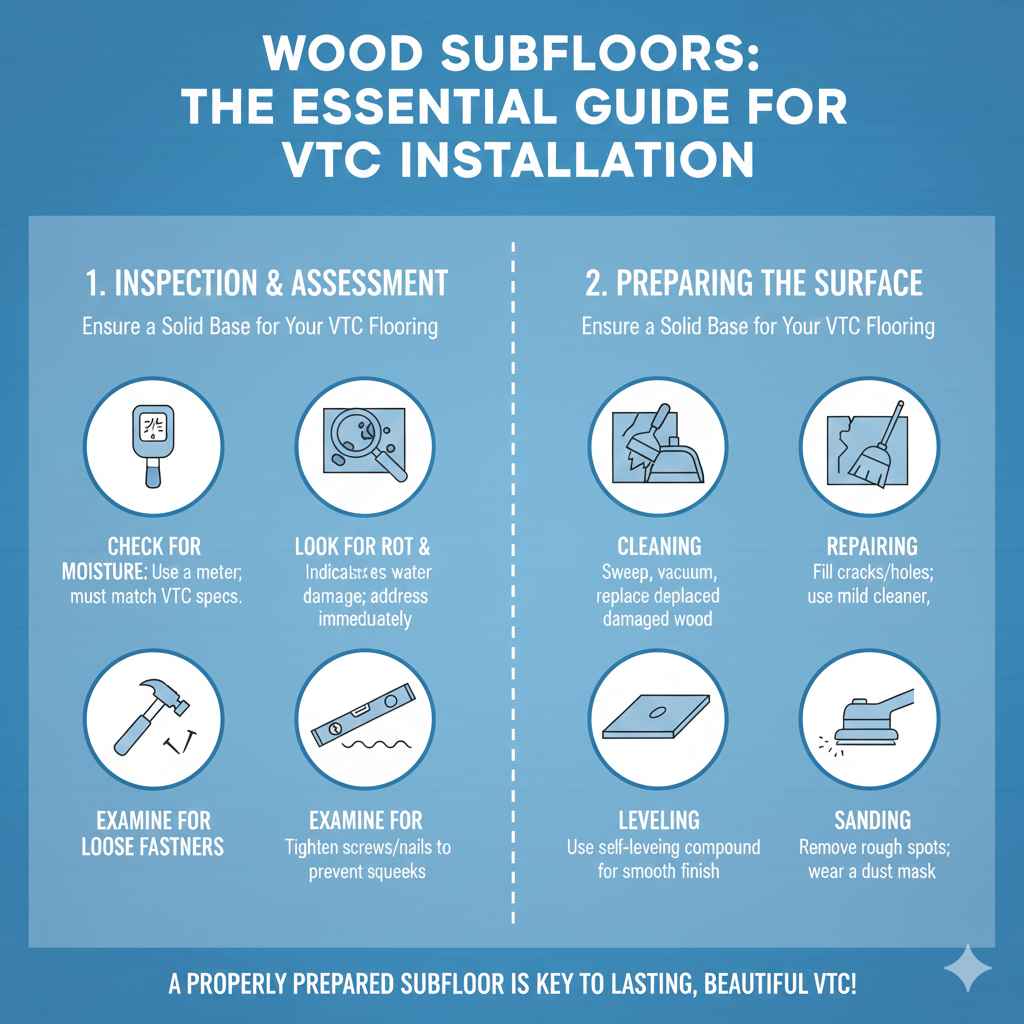
Inspection and Assessment
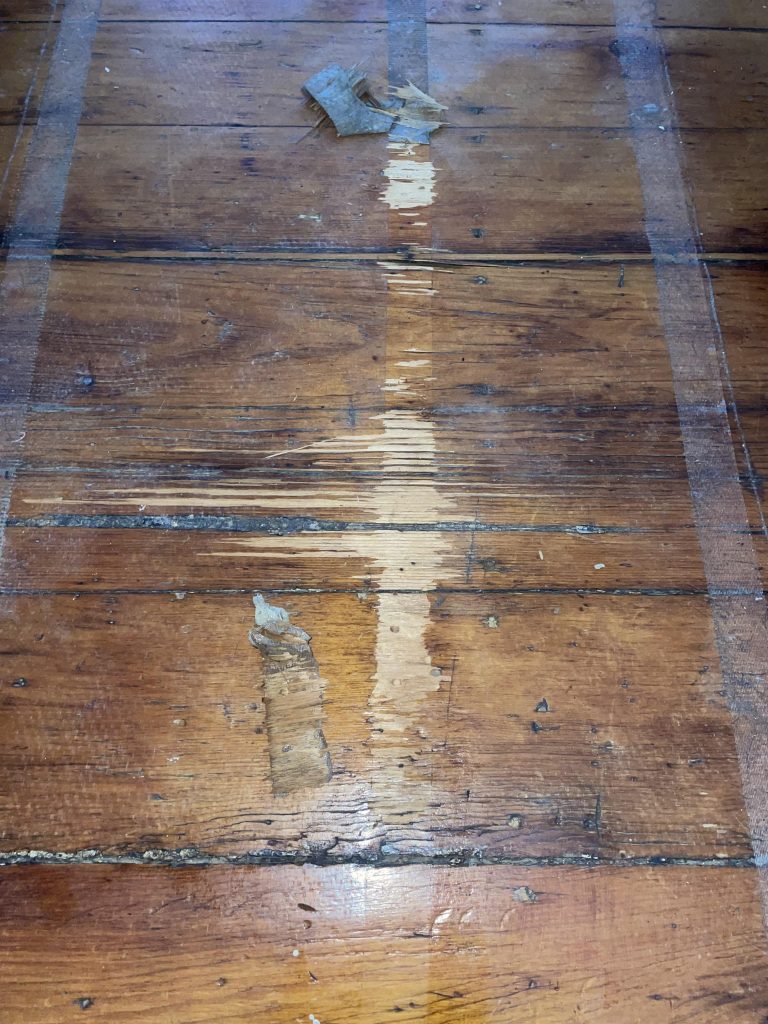
Begin by carefully inspecting the wood subfloor. Look for any signs of damage, such as rot, mold, or insect infestation. Also, check for any areas where the wood is warped, cupped, or has significant gaps. Use a level to identify any uneven spots or dips. If you find any of these issues, it’s crucial to address them before moving forward. Ignoring these problems can lead to more serious issues down the road. Addressing potential problems before the installation will also extend the lifetime of your new VTC flooring.
- Check for Moisture: Use a moisture meter to measure the moisture content of the wood subfloor. Excessive moisture can cause the VTC to warp or buckle. The subfloor’s moisture content should match the VTC manufacturer’s recommendations.
- Look for Rot and Mold: Inspect the subfloor for any signs of rot or mold. These issues indicate water damage and can compromise the structural integrity of the subfloor. Addressing these areas is important before installation.
- Identify High and Low Spots: Use a long level to identify any high or low spots. These inconsistencies can affect the appearance and performance of the VTC. They need to be corrected to create a level surface.
- Examine for Loose Screws or Nails: Check the subfloor for any loose screws or nails. These fasteners can cause the floor to squeak or move under pressure. Tightening or replacing these fasteners can help prevent future problems.
Preparing the Surface
After inspecting the subfloor, you’ll need to prepare the surface. This involves cleaning, repairing, and leveling the wood. This ensures that the VTC has a solid and even surface. The steps you take will make a difference in how well the VTC flooring performs. Preparation is key to getting great-looking flooring that lasts for a long time.
- Cleaning: Clean the subfloor to remove any dirt, dust, or debris. This can be done by sweeping, vacuuming, and wiping down the surface. Use a mild cleaner if necessary.
- Repairing: Repair any damage to the subfloor. Fill in any cracks or holes with wood filler. Replace any rotted or damaged sections of wood.
- Leveling: Level any uneven areas. Use a leveling compound or self-leveling underlayment to fill in dips and create a smooth, even surface.
- Sanding: Sand the subfloor to remove any rough spots or imperfections. This creates a smooth surface for the VTC. Always wear a dust mask when sanding.
The Role of Underlayment
Underlayment is a critical component of VTC installation on a wood subfloor. It acts as a buffer between the subfloor and the VTC, providing several advantages. Underlayment can improve the feel of the floor, absorb sound, and provide a layer of moisture protection. The right underlayment will increase the life and performance of your new floor. Understanding the different types available and their benefits can help you make a good decision for your project.
Different Types of Underlayment
There are different types of underlayment available, each offering unique features. The choice of underlayment depends on several factors, including the type of VTC you’re using, the condition of your subfloor, and your specific needs. Selecting the correct type of underlayment can improve the appearance and life of your new floor. Considering the differences between the options will help you make the right choice.
- Foam Underlayment: This is a common and affordable option. It provides cushioning and sound absorption. It’s good at masking minor subfloor imperfections.
- Rubber Underlayment: Rubber underlayment is more dense and provides excellent sound absorption. It’s a great choice for areas where noise reduction is important.
- Cork Underlayment: Cork underlayment is made from natural cork and is known for its excellent sound-dampening properties. It’s also eco-friendly.
- Felt Underlayment: Felt underlayment is made from recycled materials and provides cushioning and moisture protection. It’s a good choice for general use.
- Attached Underlayment: Some VTC products come with underlayment already attached. This simplifies the installation process and provides built-in cushioning and sound absorption.
Benefits of Using Underlayment
Using underlayment offers many advantages. From improved comfort to moisture protection, it increases the overall quality of your VTC flooring installation. Selecting the right underlayment can make the difference between a good job and a great one. The benefits can make your floors look better and last longer.
- Cushioning and Comfort: Underlayment provides a layer of cushioning that makes the floor more comfortable to walk on. This is especially good in areas where you spend a lot of time standing.
- Sound Absorption: Underlayment helps absorb sound, reducing noise transmission between floors. This is good if you want to make your home quieter.
- Moisture Protection: Underlayment can act as a moisture barrier, protecting the VTC from moisture coming up from the subfloor. This helps prevent warping or buckling.
- Improved Performance: Underlayment can help to even out minor imperfections in the subfloor, providing a smoother surface for the VTC. This helps with the performance and appearance of the flooring.
Installing VTC on a Wood Subfloor
Installing VTC on a wood subfloor requires careful planning and attention to detail. This process includes preparing the subfloor, installing the underlayment, and laying the VTC tiles. Taking your time and following the steps correctly will lead to a beautiful, long-lasting floor. Here’s a breakdown of the steps, ensuring that the installation is successful.
Step-by-Step Installation Guide
Follow this step-by-step guide to install VTC on a wood subfloor. Each step plays a role in the final result. Using each of these steps correctly will help you get an even, good-looking floor that lasts a long time. These steps will help you handle this project with confidence.
- Prepare the Subfloor: Thoroughly clean and prepare the wood subfloor as described earlier in this guide. Ensure that it is clean, level, and free of any debris.
- Install the Underlayment: If the VTC doesn’t have attached underlayment, install the separate underlayment according to the manufacturer’s directions. Overlap the seams to prevent moisture from seeping through.
- Plan the Layout: Plan the layout of your VTC tiles. Start by finding the center of the room and marking layout lines. Dry-lay a few rows of tiles to make sure you like the pattern.
- Apply Adhesive (if necessary): If the VTC is not click-together, apply the adhesive according to the manufacturer’s instructions. Use a notched trowel to spread the adhesive evenly.
- Lay the Tiles: Carefully begin laying the VTC tiles, starting from the center and working outwards. Follow the layout lines. Ensure that each tile is firmly pressed into place.
- Cut Tiles for Edges: Use a utility knife to cut tiles to fit around walls, pipes, and other obstacles. Make precise cuts to ensure a clean finish.
- Roll the Floor: Use a floor roller to ensure that the tiles are properly adhered to the subfloor. Roll in multiple directions to get a good bond.
- Allow for Settling: Let the adhesive set according to the manufacturer’s instructions, often for 24 hours. Avoid walking on the floor during this time.
Tools and Materials You’ll Need
Gathering the right tools and materials is important for a smooth VTC installation. Being prepared before you start will help the job go more efficiently. Knowing what you need will make the process easier and more enjoyable. These are the tools and supplies you need to complete the project successfully.
- VTC Flooring: Calculate the amount of flooring you will need, including extra for cuts and waste.
- Underlayment: Choose the appropriate underlayment for your needs.
- Measuring Tape: Used to measure the room and for accurate cutting.
- Utility Knife: Needed to cut the VTC tiles.
- Notched Trowel: Used to apply adhesive (if needed).
- Floor Roller: Used to ensure proper adhesion.
- Level: Used to check for an even surface.
- Moisture Meter: Used to measure the moisture content of the subfloor.
- Safety Glasses and Gloves: Protect yourself while working.
Troubleshooting Common Problems
Even with careful planning, things can sometimes go wrong. This section covers common problems that you may encounter during the installation of VTC on a wood subfloor. Understanding these problems and knowing how to solve them can save you time, effort, and frustration. Being able to fix these issues can prevent serious problems down the line.
Dealing with Uneven Subfloors
Uneven subfloors are a frequent problem. They can cause the VTC to look bad and not perform well. Whether it’s dips or bumps, fixing an uneven subfloor is a must. Knowing how to handle these issues will help you achieve a smooth, even surface. With the right techniques and materials, you can solve these problems and create a solid base for your VTC.
- Identifying the Issue: Use a level to find the high and low spots in your subfloor. Mark these areas so that you know where to focus your efforts.
- Minor Imperfections: For minor imperfections, you can often use a self-leveling compound. Apply the compound to low spots and allow it to dry completely before installing VTC.
- Major Unevenness: For major problems, you might need to sand down high spots. In cases of significant dips, it might be necessary to add a layer of plywood to create a level surface.
- Prevention: Ensure the subfloor is structurally sound. You might need to add screws to fasten the subfloor. This helps prevent future unevenness.
Addressing Moisture Issues
Moisture is a huge enemy to VTC. Too much moisture can cause many issues, from warping to mold growth. Managing moisture is a top priority when installing VTC on a wood subfloor. Taking action to prevent moisture issues will extend the life of your floor. Moisture control is important for the health of your home and the lifespan of your flooring.
- Moisture Testing: Before starting, measure the moisture content of the wood subfloor. This helps to determine whether or not there is too much moisture in the wood. The moisture level should be within the manufacturer’s recommended range.
- Addressing the Source: Find and fix the source of moisture. This might include leaks from pipes, roof damage, or issues with drainage. Repairing these problems is very important.
- Moisture Barriers: Use a moisture barrier. Certain underlayments or moisture barriers can act as a shield, preventing moisture from entering the VTC.
- Ventilation: Ensure good ventilation in the area to allow moisture to escape. Proper air circulation can prevent moisture buildup.
Frequently Asked Questions
Question: Can I install VTC directly over a wood subfloor?
Answer: It is generally recommended to use underlayment between the wood subfloor and VTC. Underlayment provides cushioning, sound absorption, and moisture protection. Without underlayment, the VTC could be more susceptible to damage and wear.
Question: What’s the best type of underlayment for a wood subfloor?
Answer: The best type of underlayment depends on your specific needs. Foam underlayment is an affordable option that offers cushioning. Rubber underlayment is great for noise reduction. Cork underlayment is an eco-friendly choice with good sound-dampening qualities. Felt underlayment provides cushioning and moisture protection.
Question: How do I measure the moisture content of a wood subfloor?
Answer: You can measure the moisture content of a wood subfloor using a moisture meter. This tool gives you a reading to see if the wood is dry enough for VTC installation. Make sure the moisture level matches the VTC manufacturer’s recommendations.
Question: What if my wood subfloor is not level?
Answer: If your wood subfloor is not level, you’ll need to address the unevenness before installing VTC. For minor imperfections, you can use a self-leveling compound. For major issues, consider sanding down high spots, or installing a layer of plywood.
Question: How long should I wait after installing VTC before putting furniture back?
Answer: It’s best to wait at least 24-48 hours after installing VTC before placing furniture. This allows the adhesive to cure completely and prevents the tiles from shifting. Follow the manufacturer’s instructions for the best results.
Final Thoughts
So, Can You Install VTC on a Wood Subfloor? The answer is a clear yes. With proper preparation and the right approach, you can create a beautiful and long-lasting floor. Starting with a solid understanding of your subfloor, choosing the right underlayment, and taking it one step at a time can help you get the job done right. Remember to inspect the subfloor, prep the surface, and install underlayment. These steps will make sure your VTC looks its best and lasts for years to come. With this guide, you have the knowledge and confidence to handle the project. Happy flooring!