Can You Stain Wood Paneling? How-To
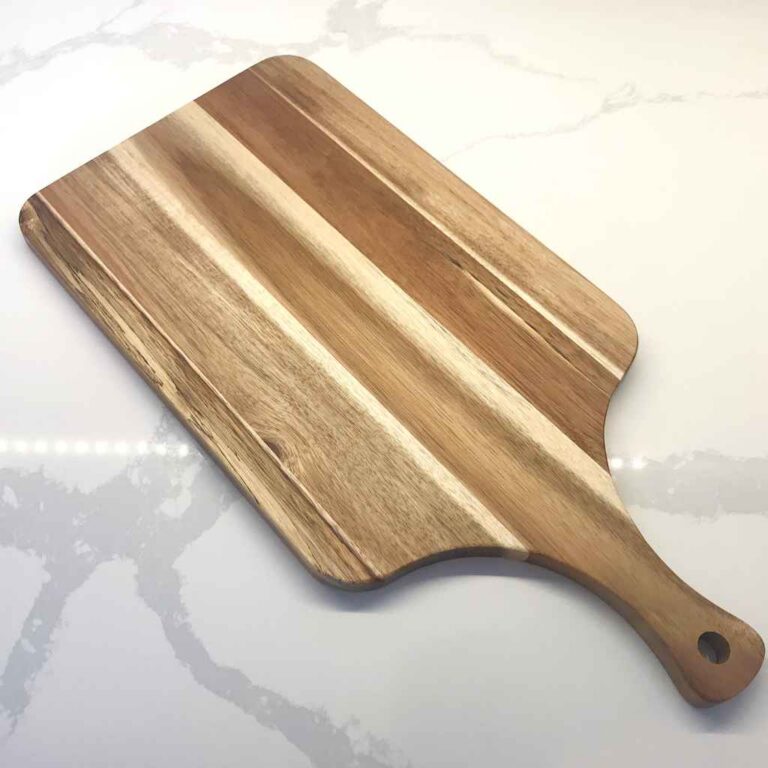
Yes, you can stain wood paneling by following a few simple steps. Wood paneling can be stained using a brush or rag, applying the stain in even strokes and wiping away any excess.
Choosing The Right Stain
Choosing the right stain for wood paneling can be a simple and transformative process. With the right techniques, you can easily stain your wood paneling, giving it a new and refreshed look that complements your overall decor.
Consider The Wood Species
Choosing the right stain for your wood paneling can make a world of difference in transforming the look and feel of your space. Before you dive into the world of stain colors, it’s crucial to consider the wood species you’re working with.
| Wood Species | Recommended Stain |
|---|---|
| Pine | Light stains work well to enhance the natural grain and give a warm finish. |
| Oak | Medium to dark stains can highlight the prominent grain and add richness to the paneling. |
| Maple | Light stains accentuate the natural beauty of the wood, while darker stains can add depth and elegance. |
| Cherry | Medium to dark stains complement the warm tones of cherry wood, enhancing its natural beauty. |
Decide On The Stain Color
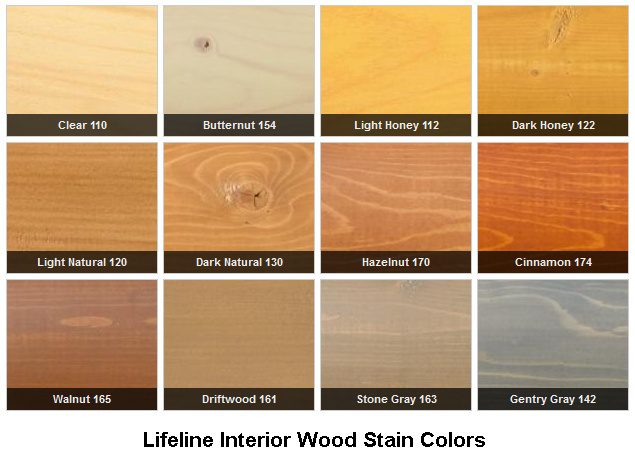
When it comes to choosing a stain color for your wood paneling, it’s essential to consider the overall aesthetic you want to achieve. The color you choose can greatly impact the mood and style of your space. Here are a few popular stain colors to consider:
- Light Oak: This classic choice provides a timeless, natural look.
- Dark Walnut: Ideal for adding drama and sophistication to any room.
- Golden Pecan: A warm, golden hue that can bring out the natural glow of the wood.
- Gray Wash: Perfect for creating a modern, rustic vibe.
- White Wash: A versatile option that can brighten up your space and give it a coastal feel.
Remember, the stain color you choose should harmonize with your existing decor and personal style preferences. Take the time to test different stain colors on a small area of your wood paneling to see how they look before committing to a larger application. This will help you ensure the perfect color match.

Preparing The Wood Paneling
Learn how to prepare wood paneling for staining with our step-by-step guide. Easily transform your outdated paneling into a stunning focal point in any room.
When it comes to staining wood paneling, proper preparation is key. Taking the time to clean, sand, and apply a wood conditioner will ensure that the stain adheres well and provides a beautiful finish. In this article, we will guide you through each step of the preparation process to help you achieve the best results.
Clean The Surface
Before you start staining, it is essential to clean the wood paneling thoroughly. Dust, dirt, and grime can prevent the stain from penetrating evenly and result in an uneven finish. Here’s what you need to do:
- Start by removing any furniture or decorations from the room to create a clear workspace.
- Use a dry cloth or duster to remove loose dust and debris from the surface of the wood paneling.
- Create a gentle cleaning solution by mixing warm water and a mild detergent.
- Dampen a soft cloth or sponge with the cleaning solution and wring out any excess liquid.
- Gently wipe the wood paneling in the direction of the grain, removing any dirt or stains.
- Rinse the cloth or sponge with clean water and wipe away any soapy residue.
- Allow the paneling to dry completely before moving on to the next step.
Sand The Paneling
Sanding is an essential step in preparing wood paneling for staining. It helps to smooth out any rough patches, removes any previous finishes, and allows the stain to penetrate the wood more effectively. Follow these guidelines for proper sanding:
- Start by selecting the appropriate sandpaper grit based on the condition of your wood paneling. A medium-grit sandpaper (100-150 grit) is generally suitable for most applications.
- Attach the sandpaper to a sanding block or an electric sander for easier and more consistent sanding.
- Sand the paneling in the direction of the wood grain, using long, smooth strokes.
- Focus on any rough or uneven areas, making sure to sand them down until they are smooth and level with the rest of the surface.
- Wipe away the sanding dust with a clean, dry cloth or vacuum it up using a soft brush attachment.
Apply A Wood Conditioner
To ensure an even and consistent stain application, it is advisable to apply a wood conditioner to the paneling before staining. Wood conditioner helps to seal the wood, preventing it from absorbing too much stain and resulting in blotchy or uneven coloration. Follow these steps to apply a wood conditioner:
- Using a brush or a clean cloth, apply the wood conditioner evenly over the entire surface of the paneling.
- Allow the conditioner to soak into the wood for the recommended time specified on the product label.
- Wipe away any excess conditioner with a clean cloth.
- Let the paneling dry completely before moving on to the staining process.
Applying The Stain
Learn the step-by-step process of staining wood paneling and transform your space with a rich and elegant finish. Follow our easy instructions to achieve professional results.
Gather The Necessary Tools
Before applying the stain to your wood paneling, it’s important to gather all the necessary tools. Having everything prepared beforehand will make the staining process smoother and more efficient. Here are the tools you will need:
- A high-quality wood stain of your choice
- A clean, lint-free cloth or sponge
- A small paintbrush or foam brush
- Painter’s tape or plastic sheeting to protect surrounding surfaces
- A stir stick to mix the stain
- Gloves to protect your hands
- Drop cloths or old newspapers to protect the floor
Make sure you have all these tools ready before moving on to the next step.
Apply The Stain
Now that you have gathered all the necessary tools, it’s time to apply the wood stain to your paneling. Follow these steps:
- Start by preparing the wood paneling. Ensure it is clean, dry, and free from dust or grease. You can use a mild wood cleaner or sandpaper to remove any existing finishes or imperfections.
- Protect the surrounding areas by using painter’s tape or plastic sheeting. This will prevent any accidental staining of adjacent surfaces.
- Mix the wood stain thoroughly using a stir stick. This will ensure an even distribution of color throughout the stain.
- Using a small paintbrush or foam brush, start applying the stain in smooth, even strokes. Work in small sections to ensure the stain does not dry too quickly.
- Let the stain sit on the wood paneling for the recommended amount of time specified on the product label. This allows the stain to penetrate and enhance the natural beauty of the wood.
- After the recommended time, check the color and richness of the stain. If you desire a darker shade, you can apply an additional coat. However, be cautious not to over-stain as it may lead to a blotchy appearance.
Wipe Off Excess Stain
Once the desired color is achieved, it’s important to wipe off any excess stain from the wood paneling. This step ensures a smooth, consistent finish. Follow these tips:
- Using a clean, lint-free cloth or sponge, gently wipe off the excess stain in the direction of the wood grain.
- Be thorough but gentle to avoid smearing or removing too much of the stain.
- Continue wiping until there is no more excess stain left on the surface of the wood paneling.
- Allow the stained wood paneling to dry completely before touching or placing any objects on it.
By following these steps and using the right tools, you can successfully apply wood stain to your paneling and achieve a beautiful, refreshed look for your space.
Perfecting The Finish
When it comes to staining wood paneling, achieving a flawless finish is the ultimate goal. After applying the stain, there are a few crucial steps to take in order to perfect the color and coverage. Follow these simple steps to ensure your stained wood paneling looks professional and polished.
Give The Stain Time To Dry
After applying the stain to your wood paneling, it is important to give it ample time to dry before moving on to the next step. This allows the stain to fully penetrate the wood and develop its true color. The drying time can vary depending on the type of stain you are using, so be sure to check the manufacturer’s instructions. Typically, the stain will be dry to the touch within a few hours, but it is recommended to wait at least 24 hours before proceeding.
Evaluate The Color And Coverage
Once the stain has dried, take a close look at the color and coverage. Evaluate whether the stain has achieved the desired hue and intensity. Keep in mind that different types of wood may absorb the stain differently, so the end result may vary. If the color is not as rich as you would like or if there are areas that appear blotchy or uneven, additional coats may be necessary.
Add Additional Coats (optional)
If you decide to add additional coats of stain to enhance the color or coverage, it is important to follow the same steps as before. Apply the stain evenly using a brush or cloth, allowing each coat to dry completely before adding another. Keep in mind that multiple coats may darken the color, so it’s crucial to test a small area first to ensure it matches your desired outcome.
Seal The Stained Paneling
Once you are satisfied with the color and coverage of your stained wood paneling, it’s time to seal it. Applying a sealant helps protect the wood from moisture, dirt, and other elements, while also enhancing the overall appearance. There are various sealants available, including polyurethane, varnish, or wax. Choose the option that best suits your preferences and carefully follow the manufacturer’s instructions for application.
By following these steps and taking the time to perfect the finish, you can ensure that your stained wood paneling looks stunning and professional.
Tips And Tricks
Learn how to effectively stain wood paneling with these helpful tips and tricks. Discover the step-by-step process to achieve a beautiful and professional-looking finish on your wood paneling. Say goodbye to outdated or dull paneling and give your space a fresh new look.
Work In Small Sections
To achieve an even and smooth stain application on wood paneling, it is recommended to work in small sections. This approach allows you to focus on each section and ensure that the stain is evenly spread. Start by dividing the paneling into manageable sections, such as a couple of feet wide or the width of a single panel. By applying the stain in small sections, you have better control over the application process and can avoid potential inconsistencies.
Practice On A Test Piece
Before diving into the staining process on your wood paneling, practicing on a test piece can save you time and potential mistakes. Find a scrap piece of the same type of wood and apply a small amount of stain on it to get a sense of how the color will turn out. This trial run allows you to experiment with different techniques and determine the desired stain intensity. It is crucial to ensure you are satisfied with the color and consistency before proceeding to stain the entire wood paneling.
Protect Surrounding Surfaces
Staining wood paneling can be a messy task, so it’s essential to protect the surrounding surfaces to prevent any accidental stains or damage. Cover the floor, furniture, and any adjacent walls with drop cloths or plastic sheets. This prevention step will help ensure that stray drips or splatters do not ruin other surfaces. Taking the time to protect your surroundings will save you from the hassle of cleaning up unwanted stains later.
Maintain A Consistent Stain Application
Consistency is key when it comes to staining wood paneling. To achieve a uniform appearance, consistently apply the stain following the grain of the wood. This technique helps to enhance the natural beauty of the wood and provides an even tone throughout the paneling. It’s important to avoid allowing the stain to pool or accumulate in any one area to prevent blotching or streaking. Applying thin and even coats will result in a professional-looking finish.
Clean Up Properly
After completing the staining process, proper cleanup is crucial to maintain the longevity of your wood paneling and the tools used. Start by wiping off any excess stain on the surface using a cloth or rag. Dispose of any used brushes or applicators according to the manufacturer’s instructions. Additionally, clean your brushes, rollers, or other tools thoroughly with an appropriate cleaning solution. Properly cleaning up ensures that your tools are ready for future use and prevents any unwanted staining on future projects.
Conclusion
Staining wood paneling is a simple yet effective way to transform its appearance. By following the necessary steps and using the right products, you can achieve a beautiful and durable finish. Whether you want to lighten or darken the paneling, staining offers a versatile solution.
Remember to prepare the surface properly, apply the stain evenly, and finish with a protective sealant for long-lasting results. Transform your space with the timeless beauty of stained wood paneling.