Cedar Wood Vs Pine? Proven & Essential Guide
Cedar wood vs pine? Cedar delivers outstanding rot and insect resistance for outdoor builds, making it great for decks and fences. Pine is more affordable and softer to work with, perfect for interior frames and lower-budget crafts, but performs poorly outdoors unless pressure-treated.
Welcome to the perfect place to clear things up! When you walk into a lumberyard, two friendly faces you often see staring back are softweights: Cedar and Pine. Choosing the right one feels overwhelming—will your project last? Can you even afford it? Don’t worry! As your woodworking mentor, I promise to break down every knot, cost, and use for Cedar wood vs Pine.
Picking the wrong wood can spoil a weekend project fast, creating frustration. We will look at what makes each unique, where they shine (and where they stumble), and how to confidently pick the perfect wood for whatever wonderful things you are planning to build. Ready to become wood-smart? Let’s dive in. First, we look at the basics.
Cedar Wood vs Pine: First Impressions and Core Differences
Have you ever heard that Cedar is the “premium choice” or that pine is “just cheap?” Well, like most sayings, it has some truth, but we need sharper definitions. Cedar and Pine are both wonderfully workable softwoods perfect for beginning DIY (Do-It-Yourself) projects. However, their natural characteristics—especially durability—create very different uses.
Think about it this way: You wouldn’t ask a soft sponge to clean scouring rust. Different tools for different jobs! Cedar naturally fights off nature’s worst stuff, while Pine focuses more on simple availability and ease of shaping.
What Makes Wood “Tough”? Inside Durability
When building anything—whether it is a new garden project plan or just shelving inside your garage—how long that material lasts against rain, sun, moisture, and bugs is critical. This comparison comes down to the natural things inside the wood grain.
When dealing with moisture, the main culprit for wood rot is wood decay fungus. Cedar wood contains powerful natural oils called extractives (especially Thujaplicin in Western Red Cedar). Since those oils are naturally ‘leaking’ out over time, they actively protect the wood from moisture-loving fungi and many chewing insects. This makes many cedar varieties naturally durable lumber when wet.
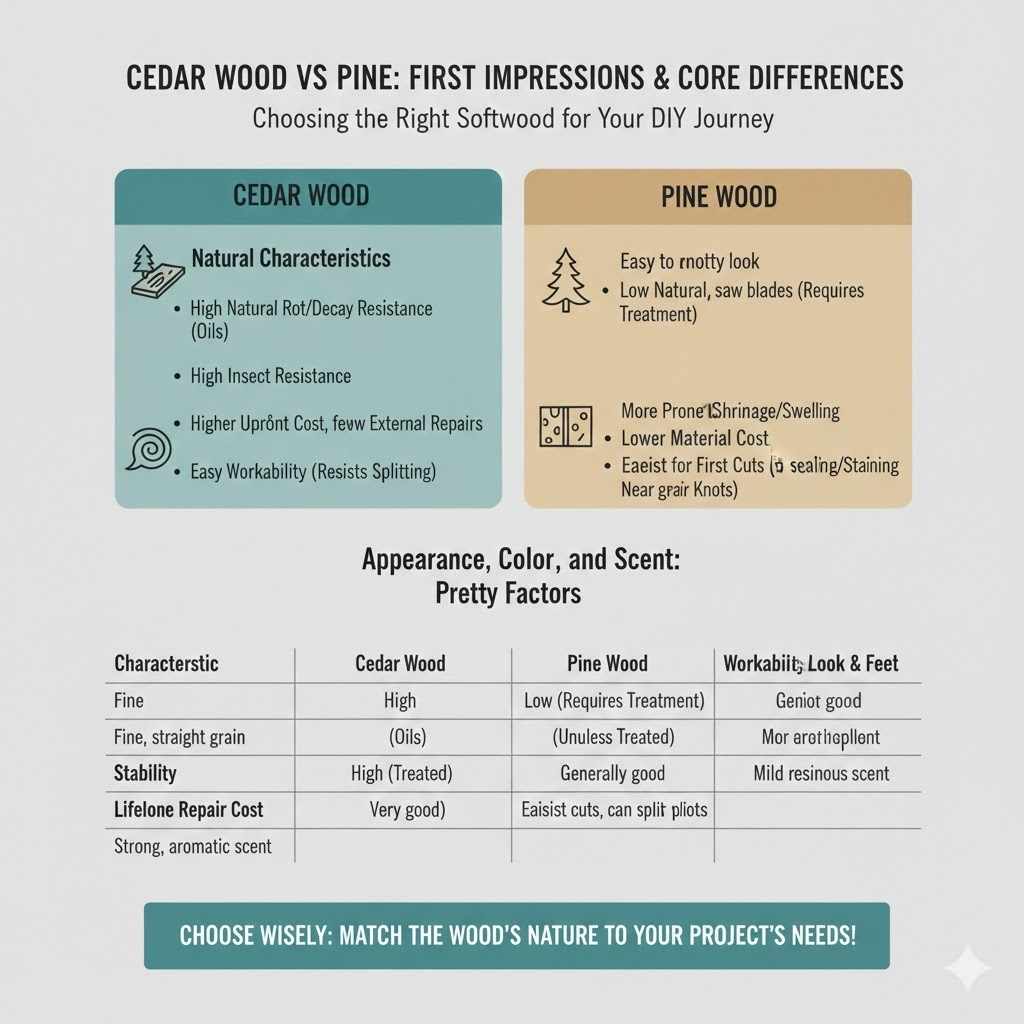
| Characteristic | Cedar Wood (e.g., Western Red Cedar) | Pine Wood (e.g., Southern Yellow Pine) |
|---|---|---|
| Natural Rot/Decay Resistance | High (Contains natural oils) | Low (Requires treatment for outdoor use) |
| Insect Resistance | High (Relies on those repellent oils) | High only when treated (e.g., Pressure Treated Pine) |
| Stability (Warping/Shrinking) | Very good, dimensional changes less noticeable | Generally good, but more prone to shrinkage/swelling with drastic humidity swings |
| Lifelong Repair Cost | Often higher upfront cost but fewer repairs needed externally | Lower first-time material cost, but yearly sealing/staining usually needed outside |
| Workability by Beginners | Easy, tends to be soft but resists splitting nicely near edges | Often the easiest for first cuts, but can split under sharp pressure if dense knots are present |
Appearance, Color, and Scent: Pretty Factors
When you are working on projects guests will see—like that new planter box or the siding of a nice backyard shed—looks matter just as much as longevity.
Cedar’s Look and Feel
You usually notice cedar first by its distinctive, wonderful scent—minty and crisp—a sure sign you are using premium wood. Cedar grain is tightly visible, often showing shades of rich reddish-brown to pale reddish-pink depending on the type and way it’s dried. It’s famous for its warmth.
- Grain: Fine, straight, and often more distinct texture mark than Pine.
- Color: Ranges from pale straw yellow inner stem to deep, rich reds and russets (aromatic sedar has a stronger red tone, while white cedar leans lighter).
- Scent: Strong aromatic compounds; very pleasant but sometimes triggers allergies like most botanical substances. This scent naturally deters things without chemical sprays you use on non-aromatic woods.
Pine’s Look and Feel
Pine is the standard, reliable look. It takes stain beautifully, but if you leave it clear, many species appear whitish to pale yellow. Pine knots are one of its defining visual characteristics. Beginners sometimes struggle as soft sap surrounding these knots doesn’t always absorb stain the same way lighter fibers do, leading to dark blotches initially (we call this ‘blotching’; sanding sealer fixes this!).
When we talk about raw, untreated pine used for construction framing, it likely won’t be the star of any exterior show because heat and water compromise its structure quickly by inviting pests or rot.
Exploring Types: Cedar vs. Pine Varieties
Here is another important place where these two timbers split off: there are many types under each generic heading! Knowing one means nothing about every variety.
Different Types of Cedar Used in DIY Projects
Most frequently, in North America, you commonly run into two major players:
-
- Western Red Cedar (WRC): The ‘OG’ outdoor wood. It’s light, beautiful color, and has fantastic stability. Ideal for siding, outdoor furniture, and raised garden beds where contact with soil is likely due to government forestry association guides confirming decay inhibitors that fight moisture. This wood commands a higher price block where available.
- Port Oxford Cedar: If it’s often locally sourced, focus on its strong preservative qualities for decking joists or shingles but double-check local grading standards.
A word of caution: Aromatic Red Cedar (sometimes sold cheaply labeled as ‘Cedar’) is primarily known for its scent, making lovely closet lining or chests, but it does not have the outdoor rot resistance that Western Red Cedar boasts. It’s great for smell, but not for resisting outdoor weather!
Different Types of Pine Used in DIY Projects
Pine is a huge category itself! The key difference for most builders is whether we are dealing with clear, aesthetic pine used only indoors, or species chosen specifically because they accept massive pressures for preservation treatments.
-
-
- SPF (Spruce-Pine-Fir): If you buy standard dimensional lumber (e.g., a 2×4) labeled clearly at the builder supply center, chances are good it is a mix of this—light, commonly costs the least, and perfect for framing walls inside your houses where the plumbing lines or insulation protect it.
- Southern Yellow Pine (SYP) & Ponderosa Pine: Stronger pines known for their structural strength or dense grain structure. SYP is often specified for decking components after it goes through pressure treating because it absorbs treatment chemicals very efficiently because of its open grain structure. For projects like workshop storage shelves bought from the big box store clear-side cut list, standard white or yellow pine works adequately indoors.
-
Important DIY Pro Tip: Anytime wood labeled as Pine states “Exterior Treated Pine,” you are getting a lumber species specifically robust enough to soak up industrial preservatives that keep pests at bay outdoors. Using untreated standard pine planks outdoors will almost certainly result in failure within 1–3 seasons here.
Cost Confrontation: Which Wood Sinks Your Budget?
Let’s talk cash! This decision often comes down to one thing folks worry about right at the material purchasing desk concerning cedar wood vs pine pricing. Preparation has an outsized impact.
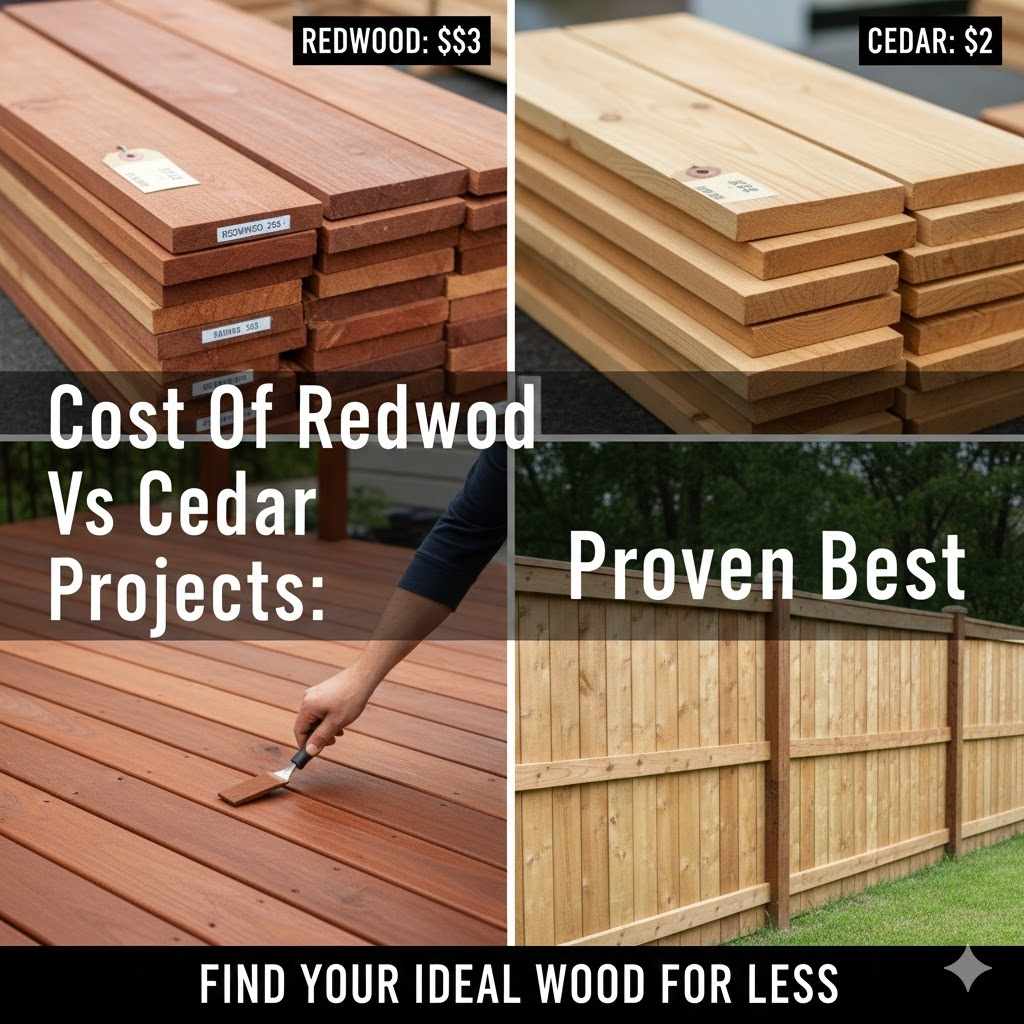
Generally speaking, a board of untreated cedar will cost significantly more than the exact same size and length of standard construction-grade lumber (untreated fast-growing pine or SPF components). Why is that?
-
-
- Demand & Growth: Cedar trees often take longer lines (years more) to mature fully than fast-growing pine species used for structural boards. Slow, slow growth translates into less available raw stock for immediate projects.
- Special Properties: Because cedar comes loaded with the bug- and mold-fighting chemicals—paid for by nature, not a machine in a treatment sump—buyers happily agree to pay premiums for that ready-made protection when seeking outdoor builds without sealing them every year.
-
Estimating Annual Costs of Ownership
While pine wood is cheaper today, you must ask yourself if you are willing to pay overtime in “sweat equity” or in sealing supplies yearly for the long term.
| Cost Factor | Cedar (Untreated Exterior) | Pine (Untreated Interior/Treated Exterior Components) |
|---|---|---|
| Upfront Material Cost (per board foot, estimated mean range) | High ($4.50 – $9.00+) | Low – Medium ($3.00 – $4.50 Rough, Treated Pine jumps higher) |
| Sealing/Finishing Required (Outdoor Application) | Almost Never required for preservation, only if finish tone change is needed. | Absolutely mandatory every 1-3 years. Requires sealer first, then exterior stain/paint layers. |
| Longevity without touch-up on outdoor deck | 15–25+ Years | 1–8 years maximum before deterioration/fungus forms |
| Labor/Time Cost (Over a 20-Year Span) | Low maintenance hours. Pick-up-a-tool frequency: Low. | Medium high maintenance hours spent sanding and resealing decks/planters approximately 5-10 times. |
Look folks, if you budget for a raised garden box that lasts an estimated 8 seasons using cheaper pine that every other year needs a good scrub down or sealing, that required staining wood sealer product and your personal time dollars start closing the cost gap dramatically compared to simply building once with cedar.
Workability Showcase: Tools and Techniques for Beginners
As your trustworthy workbench mate, I want you to finish a simple weekend project successfully without wrestling the lumber! This is where both Cedar and Pine treat DIY newbies really differently based on physical nature.
Working with Cedar Wood: Light & Fragrant
Cedar is wonderful; it slices through blades surprisingly easily, partially because its cells are open and partly due to relatively lower initial hardness, despite natural toughness.
Cedar Pros when Starting Out
-
-
- Cuts sweetly with basic hand saws or cheap jig features. Sanding creates a fine film of dust smells great; watch for that!
- Naturally resistant hardware issues if moisture protection around fasteners holds tight, because the tannins (or extractives) often don’t eat through soft metals over short periods (though corrosion is often slower in galvanized or coated finishes anyway). Good resources on protecting metal fasteners by coating them are often cited by organisations covering general deck building standards, like those referenced for outdoor materials on general US governmental construction maintenance best practices.
- Lightweight—ideal for ambitious projects done Solo!, such as pergolas beams or attic hatch covers.
-
Cedar Cons when Starting Out
-
-
- Needs gentle sanding. Over-sanding or using belts that approach the next grit level can actually shred your soft cedar fibers easily, blurring or blurring natural details in the grain patterns.
-
amp: Very high movement resistance to screws or glue adhesion. Clamping strength needs watching; too tight and the edge wood structure starts crushing, which feels like splitting near the ends when screwing.
Working with Pine Wood: Stronger Yet Squishier
Pine is often what you practice sawing on for learning. It moves more than cedar when freshly dry, meaning it might warp slightly even on delivery to your car top after a trip to supply store, and often possesses very distinctive thick ‘knots’. We need good technique here!
Tips for Cutting Clean Pine
-
-
- Watch the Knots: Knots are much denser harder spots in soft woodgrain. If your blade hits those hard centers inconsistently, your edge will chip or grab. Go slightly slower, or try to angle blade cuts to plow through the tightest section perpendicular to the grain (this is trickier than cross-splitting).
- Sanding Schedule Must Be Gradual: Always start with 80-grit only after drying if finishing rough-sawn wood. Move to 120, cap it at 150 maybe 180 for smooth furniture projects. If you try 220 with that porous pine, too often you are “burnishing it,” which prevents your stain from penetrating later on.
- Gluing Tips: Because much pine is soft, make sure you use plenty of even surface clamps when gluing panels together, distributing the force. Any pressure washer should immediately evacuate standing water buildup in recessed fasteners; Pine does not naturally repel trapped water loads nearly as well as oil-rich Cedar.
-
As a final encouragement mark: All dimensional softwood lumber, whether pine or cedar we use for beams destined for rain-heavy spots, does benefit from properly flashing roofing components, or ensuring proper weep-holes for runoff if we’re constructing an external planter unit using appropriate construction fasteners such as stainless steel decking screws per most reputable guides on structural wood preservation and longevity.
Project Showdown: Pinpointing Which Wood Goes Where
This is your definitive guide to making the practical choice based on project location. If you are looking to start building your new workbench in the stable climate of your attached shop—Pine reigns! If you are building a dock next to the water—don’t gamble anything but cedar or specialized, treated composites.
Top Projects Best Suited for CEDAR (Durability Focus)
If Mother Nature is planning on participating—and she usually is outdoors—Cedar saves you heartache. Its durability means minimal preventative application is needed.
-
-
-
- Outdoor Decking/Planter Surroundings: Superior resistance to soil contact, splash-back, and mildew buildup.
- Garden Bed Kits and Trellises: Naturally safe since less (or zero) added chemical finish is used near edible produce, promoting stronger gardening systems.
- Exterior Shiplap or Siding: Its natural oils help seal out moisture intrusion when properly overlapped—fewer issues with siding failure.
- Shingles/Roofing Materials: The lightweight rigidity offers superb aesthetic look too for aesthetic application results.
- Sauna Interior Paneling: Cedar’s low thermal change and nice scent release make it almost irreplaceable for this specialty market application.
-
-
Top Projects Best Suited for PINE (Budget & Interior Focus)
For maximum wallet safety, or anything protected from the rain by roof structures, Pine provides amazing cost-to-functional material ratio.
-
-
- Interior Stud Walls & Framing (Untreated SPF): It’s the absolute bedrock standard because it is cheap, straight, and holds fasteners reliably indoors under stable climate conditions found inside homes.
- Bedroom/Workshop Furniture for Indoor Only: Cheap workbench outfitting, internal shelf supports, custom under-bed storage where constant wetness isn’t accounted for in design.
- Children’s Indoor Play Structures: Softer edge if bumped accidentally indoors versus denser hardwood substitutes. Also, painting and custom cartooning usually happen readily on standard mill-bright pine.
- Paint Grade Trim and Baseboards (if selected properly and kiln-dried): Pine takes standard DIY water-thinned acrylic primer nicely and saves vast expense over moisture-set woods when you are applying a thick coat of decorator specified acrylic coating for durable surfaces.
-
Remember folks about construction material sourcing when planning structural builds near water: If you look deeply at treated Pine data, materials for in-ground burial or consistently near seawater lines historically require more technical rating assurance than simply grabbing wood that smells nice listed as untreated soft board used for simple construction projects. Look for certified grading marks regarding CCA or ACQ treatments if using Pine near potential constant moisture intrusion points.
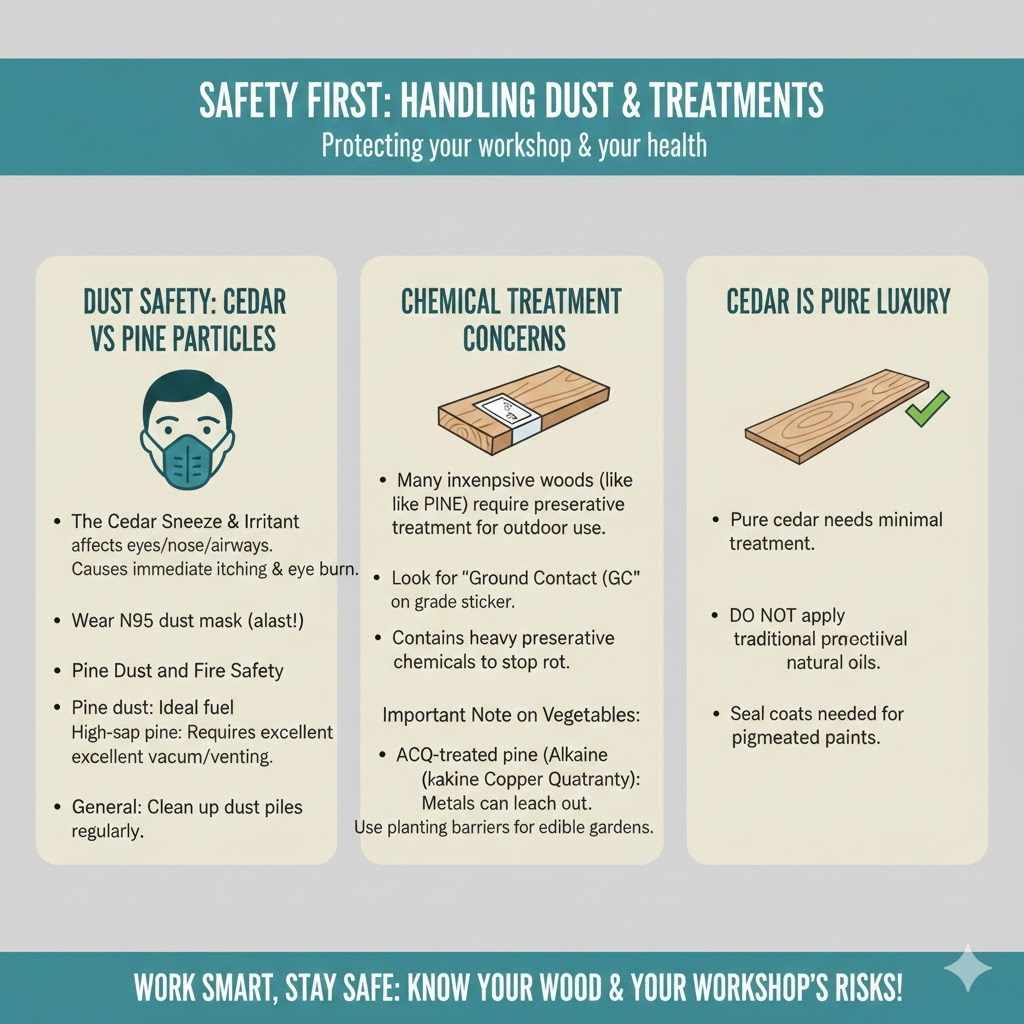
Safety First: Handling Dust and Treatments
Working in the weekend workshop environment demands awareness, friend. Both woods need safe handling, but their associated treatments post-milling are widely different, and dust is an inevitable nuisance to every hobbyist builder following OSHA recommendations regarding particulate control at source points; so ensuring respiratory gear usage while operating automated or energized tool features is key for all woodworking!
Dust Safety: Cedar Vs Pine Particles
-
-
-
- The Cedar Sneeze & Irritant Spot: Cedar dust strongly affects many makers’ eyes, noses, very badly. Inhaling oil-vapor dust during sanding often results in immediate, though usually short-lived, airway itching and eye burn even in small quantities as you rapidly finish that last small trim board perimeter piece without dedicated ventilation. Always wear, at minimum, a basic N95 dust mask (or two if operating large belt sanders or routine high-speed processes).
- Pine Dust and Fire Safety: While clean kiln-dried pine dust is an ideal fuel source—I mean, it burns incredibly well!—handling larger clouds in enclosed shops requires excellent vacuum system infrastructure! Pine species that have a high oil/sap content can dramatically decrease necessary venting space if you are cutting thousands of linear feet needed for home refit projects; be cautious.
- General Awareness: Always clean up those stray piles from the workshop floor regularly while sanding finishes or carving detail works; standing dust carries potential irritants inside workshop air layers.
-
-
Chemical Treatment Concerns (Mostly About Pine/Framework Substitutes):
Many inexpensive woods require, and are therefore given at the dealer, preservative treatment for outdoor duty.
-
-
-
- If you see Ground Contact (GC) written clearly on the grade sticker of your PINE materials, they contain a much heavier amount of preservative chemical to stop rot from things rotting directly due to wetness.
- Important Note on Vegetables:** Because many beginners set up their first garden beds with Pine 2x6s clearly only marked “ACQ treated” (Alkaline Copper Quaternary, a common successor structure to chemicals of old in North America: check safety standards relevant to your supply materials source here to check if they satisfy current governmental standards for chemical leaching amounts in surrounding growth areas) you must research appropriate planting barriers if creating edible-focused environments, as trace metals in industrial wood preservers do leach out moderately over very long, slow drainage years until environmental exposure degrades structural aspects.
- Cedar is Pure Luxury: Pure cedar needs treatments only if you intend your final seal coat to hold harsh pigmented paints. Do not* apply traditional preservative stamps or chemicals; it’s already protected.
-
-
FAQ Section: Simple Answers for New Woodworkers
It is totally okay to still have questions brewing—that is how we slow down the project long enough to ensure success first! Let’s get these FAQs sorted out clearly and quickly for you.
Q1: If I use inexpensive indoor pine for a raised herb garden outside, how fast will it fail?
A: Untreated pine exposes its soft cells (sapwood) to aggressive insect and mold action in moist surroundings. Estimate basic, non-sealed pine garden framing outside might slump noticeably and start decaying dramatically in around 2 to 4 seasons, depending on how humid where you live. Cedar will likely yield 4 times those potential structural time yields.
Q2: Can untreated cedar be combined physically in the same project fasteners structure with regular pressure-treated pine framing pieces within the interior shelter?
A: Yes, but it takes forethought on expensive metal. You should always try best practices to use stainless steel (marine grade for resistance purposes here) for ultimate connections, especially when two structurally-different materials—natural cedar and chemically permeated pressure cedar’s counterparts—connect near dissimilar chemical resistance thresholds between material lines around joint features; fasteners choice prevents galvanic corrosion.
Q3: Is cedar too soft for making shelves that hold heavy tools, like a big pantry or wall unit shelves holding paint cans?
A: Cedar can hold a tremendous amount of weight temporarily, but it sags or “creeps” more than hard pine derivatives eventually if the load is far concentrated across open spans—because of standard characteristics like lesser density attributes vs many commercially harder Pine formulations available only for heavy support roles via suppliers listing specific dense grades. For very heavy holding supports, stronger hardwoods or structural-grade treated pine is better for high load bearing lines internally throughout your shop space using supportive jointer mechanics.
Q4: Why does my pine project look blotchy after I applied wood stain evenly across the entire flat piece area?
A: This happens because knots absorb oil stains drastically quicker than non-knotty areas you notice—called blotching. This happens with softer pine species frequently because the sap surrounding grain near knots accepts colorants differently relative to adjacent material density. To control this next time, always first apply a clear sanding sealer to all pine pieces uniformly before applying your final color-pigmented wipe on coat layer. This acts as a leveler!
Q5: How much more noticeable are the final finishing costs when staining for decorative versus structural purpose in both choices?
A: Decorative staining on exterior cedar relies chiefly on penetrating oils like Tung oil to help nourish the essential internal repellents without covering them completely and is priced related specifically to quantity of material volume, being relatively cost stable structurally on an ounce-by-ounce basis until external degradation happens via UV exposure over line of play. Untreated interior pine cost rises rapidly when utilizing higher volumes of specialized products (clear sealant, multiple primer applications, final coat durability ratings factored in) needed solely not for structural performance but for highly durable interior aesthetic color saturation maintenance requirements.
Q6: Which wood causes less splintering when sawing across the tiny corner points?
A: Overall handling-wise, very dry Cedar tends to lead to fewer sharp splinter excursions when sanding right into very shallow curved or angled edges that need fine material finish polishing, as it shreds slightly more predictably toward a finer particle dust texture as we saw (unlike the rough edge often seen on harder-centered Pine sections). But always exercise extreme care regarding sharp projections against your soft skin irrespective of chosen material attributes.
Conclusion: Choosing Success For Your Workspace
There you have it—your straight guide to the excellent features of Cedar wood vs Pine. The great news is that, no matter you choose, you absolutely made great strides today avoiding that intimidating guesswork.
If your project sleeps outside beneath the sun, rain, or any snow threat throughout the passing seasons protecting either garden harvest structures or exterior aesthetic siding; commit to spending a little more, choosing Cedar upfront. You are buying proven, reliable nature’s bodyguard features—giving your project low-stress longevity guaranteed!
If, however, you are finishing up a safe inside shelving nook, framing that partition wall, or practicing that tricky bevel cut: save your dollars (and they add up!) reaching for great structural White or Yellow Pine options. Remember my one key rule reiterated multiple times: Pine must be bought treated for genuine exterior defense, using designated preservative woods; never gamble on clear appearance-grade Pine when moisture rules design. Keep practicing smoothly, measure twice always for your cuts, and enjoy the immensely satisfying fact that your finished project looks great and suits its specific needed weather role perfectly!