Creating a Farmhouse Wood Stove Top Cover: A Complete Guide for Your Kitchen
Hey there! Let’s talk about something that can transform your kitchen’s look and feel—a farmhouse wood stove top cover. I’ve spent countless hours in my workshop, sanding, staining, and piecing together projects that make a home feel warm and inviting. One of my favorite creations is the farmhouse wood stove top cover, sometimes called a noodle board. It’s not just a practical addition to your kitchen; it’s a statement piece that screams cozy, rustic charm. Whether you’re a woodworking newbie or a seasoned pro, I’m excited to share everything I’ve learned about crafting and using these covers.
This guide is packed with tips, tricks, and ideas to help you make one that’s perfect for your space. Let’s dive in and explore how this simple project can elevate your kitchen’s style and function.
What Is a Farmhouse Wood Stove Top Cover?
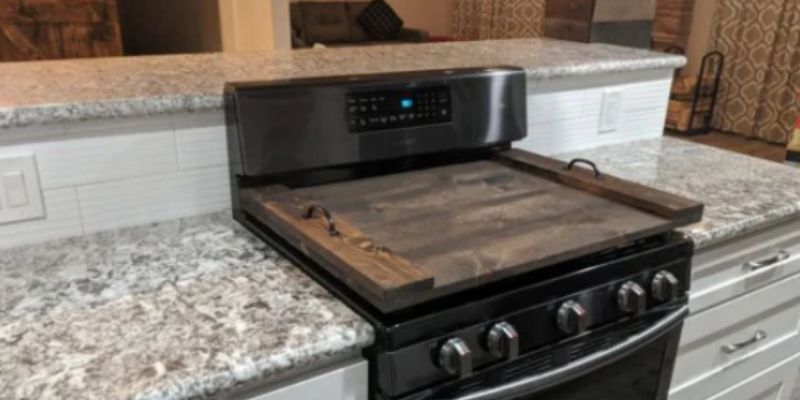
Picture this: your kitchen stove, when not in use, just sits there, taking up space and collecting dust. A farmhouse wood stove top cover changes that. It’s a flat, wooden board designed to sit on top of your stove when it’s cool, giving you extra counter space or a decorative surface. I first came across this idea when my wife complained about our small kitchen counters. We needed more room for prep work, and I wanted something that looked good too. That’s when I built my first stove top cover, and it was a game-changer.
These covers, often called noodle boards, have roots in farmhouse-style decor. They’re typically made from wood like pine, oak, or cedar, and they can be stained, painted, or left natural to match your kitchen’s vibe. They’re not just for looks, though—they’re practical too. You can use them as a serving tray, a prep station, or even a spot to display your favorite kitchen decor. But here’s the key: they’re only safe to use when the stove is off and completely cool. Safety first, always!
Why You Need a Farmhouse Wood Stove Top Cover
I’ll be honest—before I made my first stove top cover, I didn’t think I needed one. But once it was in place, I couldn’t imagine my kitchen without it. Here’s why you might want one too:
- Extra Counter Space: Kitchens, especially in older homes, can feel cramped. A stove top cover gives you a flat surface for chopping veggies, rolling dough, or setting out snacks for guests.
- Aesthetic Appeal: Farmhouse style is all about warmth and simplicity. A wooden cover adds that rustic touch, making your kitchen feel like the heart of the home.
- Versatility: Use it as a tray for serving drinks or as a base for a charcuterie board. I’ve even used mine to hold a few potted herbs for a mini kitchen garden.
- Protection: It keeps your stove clean from spills, crumbs, and dust when you’re not cooking.
I remember hosting a family gathering and using my cover as a serving station for appetizers. It not only saved space but also got so many compliments for its farmhouse charm. It’s one of those projects that’s as functional as it is beautiful.
Choosing the Right Wood for Your Stove Top Cover
Picking the right wood is where the fun begins. I’ve tried a few types, and each has its own personality. Here’s a breakdown of some popular choices to help you decide:
| Wood Type | Pros | Cons | Best For |
|---|---|---|---|
| Pine | Affordable, easy to work with, takes stain well | Soft, prone to dents and scratches | Budget-friendly projects, rustic look |
| Oak | Durable, strong, beautiful grain | More expensive, heavier | Long-lasting covers, premium aesthetic |
| Cedar | Naturally resistant to moisture, aromatic | Can be costly, softer than oak | Outdoor-inspired kitchens, unique scent |
| Maple | Hard, smooth finish, great for painting | Pricey, less rustic grain | Modern farmhouse styles, sleek designs |
| Reclaimed Wood | Eco-friendly, unique character | Requires extra prep, inconsistent sizes | Vintage or distressed looks |
I usually go with pine for its affordability and ease of use. It’s soft, so you have to be careful with heavy use, but it stains beautifully for that classic farmhouse vibe. If you want something sturdier, oak is a solid choice, though it’ll cost you more. For my last project, I used reclaimed barn wood, and the weathered look was perfect for a cozy, lived-in feel. Just make sure to sand it well to avoid splinters.
Tools and Materials You’ll Need
Before you start, let’s gather what you’ll need. I like to keep things simple, so you don’t need a fancy workshop to pull this off. Here’s what I use:
- Wood: Enough to cover your stove’s dimensions (measure first!).
- Measuring Tape: To get the size just right.
- Saw: A circular saw or miter saw works great.
- Sandpaper: Start with 80-grit for rough sanding, then 220-grit for a smooth finish.
- Wood Glue: For strong joints.
- Clamps: To hold pieces together while the glue dries.
- Screws or Nails: For extra stability.
- Stain or Paint: To match your kitchen’s style.
- Polyurethane: For a protective finish.
- Router (Optional): For adding decorative edges or juice grooves.
- Safety Gear: Gloves, goggles, and a dust mask.
I learned the hard way to always measure twice before cutting. My first cover was a half-inch too short because I rushed it. Take your time to measure your stove’s width, depth, and any raised edges to ensure a snug fit.
Step-by-Step Guide to Building Your Stove Top Cover
Let’s get to the good part—building it! I’ll walk you through the process I follow, based on my own trial and error. It’s straightforward, but attention to detail makes all the difference.
Step 1: Measure Your Stove
Grab your measuring tape and note the width and depth of your stove’s surface. Add an extra inch or two to each side for overhang if you want a tray-like look. My electric stove measures 30 inches wide by 20 inches deep, so I cut my boards to 32 inches by 22 inches for a slight overhang. If you have a gas stove, check with the manufacturer to ensure a cover is safe to use.
Step 2: Cut Your Wood
Using your saw, cut your wood to size. I typically use 1×4 or 1×6 pine boards and glue them edge-to-edge to create a wide panel. For a 30-inch-wide stove, you might need five 1×6 boards. Make sure your cuts are straight—use a guide if you’re new to sawing.
Step 3: Assemble the Boards
Lay your boards side by side and apply wood glue along the edges. Press them together tightly and use clamps to hold them in place. I let the glue dry for at least 24 hours. For extra strength, you can add small screws or nails across the seams, but glue alone is usually enough if you’re careful.
Step 4: Sand It Smooth
Sanding is where patience pays off. Start with 80-grit sandpaper to smooth out rough spots, then switch to 220-grit for a polished finish. I spend extra time on the edges to make them soft to the touch. A smooth surface not only looks better but also takes stain or paint more evenly.
Step 5: Add Decorative Touches (Optional)
Want to make it fancy? I sometimes use a router to add a juice groove—a shallow trench around the edges that’s decorative and catches spills. You can also round the edges for a softer look. For one project, I carved a simple “Home Sweet Home” into the corner, which added a personal touch.
Step 6: Stain or Paint
This is where your cover comes to life. I love a dark walnut stain for a rich, rustic feel, but you can choose any color to match your kitchen. Apply the stain with a cloth, following the grain, and let it dry completely. If you’re painting, use a primer first for better coverage. I’ve also seen beautiful distressed finishes using chalk paint and a bit of sanding.
Step 7: Seal It
To protect your cover from spills and scratches, apply a coat of polyurethane. I use a water-based poly for easier cleanup and a clear finish. Two or three thin coats, sanded lightly between each, will give you a durable surface. Let it cure for 48 hours before placing it on your stove.
Step 8: Add Handles (Optional)
For a tray-like cover, I screw on small cabinet handles to the sides. It makes it easy to lift and move. Just make sure they’re securely attached and don’t interfere with the cover sitting flat.
Customizing Your Stove Top Cover
One of the best parts about this project is making it your own. I’ve built a few covers over the years, and each one reflects the personality of the kitchen it’s in. Here are some ideas to inspire you:
- Engraved Designs: Carve initials, quotes, or simple patterns for a custom look.
- Color Pops: Paint it a bold color like navy or sage green for a modern twist.
- Distressed Finish: Sand edges after painting for a weathered, farmhouse vibe.
- Inlays: Add tile or metal inlays for a unique touch (though this is more advanced).
- Seasonal Decor: Swap out covers for holidays—think red and green for Christmas or pumpkins for fall.
For my sister’s kitchen, I made a cover with a whitewashed finish and stenciled “Gather” on it. It’s now the centerpiece of her family dinners. Get creative and think about what makes your kitchen feel like home.
Safety Tips for Using Your Stove Top Cover
I can’t stress this enough: safety is critical. Wood and heat don’t mix, so here are some rules I follow:
- Only place the cover on a stove that’s off and completely cool.
- Never use it on a gas stove unless the manufacturer approves.
- Keep flammable items like towels or oils away from the cover.
- Check for stability to ensure it won’t slide off.
I once left a cover on a stove that was still slightly warm, and it warped the wood. Lesson learned—always double-check the temperature.
Maintaining Your Farmhouse Wood Stove Top Cover
To keep your cover looking great, a little care goes a long way. I wipe mine down with a damp cloth and mild soap after use. Avoid soaking it, as water can damage the wood. If you notice scratches, a quick sanding and re-staining can refresh it. I reapply polyurethane every year or so to maintain the protective finish. Store it in a dry place when not in use to prevent warping.
Where to Place Your Stove Top Cover in Your Kitchen
Placement is key to making the most of your cover. I keep mine on the stove most of the time, but I’ve also used it as a tray on my dining table or a display surface on an island. If your kitchen is small, consider hanging it on a wall with hooks when not in use—it doubles as decor! Just make sure it’s easily accessible for when you need that extra counter space.
Cost of Building a Farmhouse Wood Stove Top Cover
One of the reasons I love this project is how budget-friendly it can be. Here’s a rough cost breakdown based on my experience:
| Item | Estimated Cost |
|---|---|
| Pine Boards (1×6, 6 ft) | $15–$25 |
| Wood Glue | $5 |
| Sandpaper | $5 |
| Stain/Paint | $10–$20 |
| Polyurethane | $10 |
| Handles (Optional) | $5–$10 |
| Total | $50–$75 |
Prices vary depending on wood type and where you shop. Reclaimed wood can lower costs if you have access to it. Compared to buying a custom cover (which can cost $100 or more), building your own is a steal.
Inspiring Ideas from My Projects
I’ve made several stove top covers, and each one teaches me something new. One of my favorites was a cedar cover with rope handles for a coastal farmhouse look. Another was a pine cover painted black with white stenciled herbs for a modern twist. I also built one for a friend using oak and added a chalkboard paint section for writing menus or notes. Experiment with finishes and details to make yours unique.
Conclusion
Building a farmhouse wood stove top cover has been one of the most rewarding projects in my woodworking journey. It’s more than just a piece of wood—it’s a way to add warmth, function, and personality to your kitchen. I love how something so simple can make such a big impact, whether it’s giving you extra space for holiday baking or showcasing your style with a custom design. From choosing the perfect wood to adding personal touches, this project is all about creativity and practicality.
I hope this guide inspires you to grab your tools and create a cover that makes your kitchen feel like home. Trust me, once you place it on your stove and see that farmhouse charm come to life, you’ll wonder why you didn’t make one sooner. So, what are you waiting for? Let’s get building!
Frequently Asked Questions
What is a farmhouse wood stove top cover used for?
It’s a wooden board placed over a cool stove to add counter space, protect the stove, or serve as a decorative tray. I use mine for prepping food or displaying decor when the stove’s not in use.
Is it safe to use a wood stove top cover on a gas stove?
Check with your stove’s manufacturer first. Gas stoves can have pilot lights or residual heat, so I only recommend using a cover on a cool, electric stove unless approved.
How do I clean my stove top cover?
I wipe mine with a damp cloth and mild soap. Avoid soaking it, and dry it thoroughly to prevent warping. A quick sanding can fix minor scratches.
Can I use my stove top cover as a cutting board?
It’s not ideal, especially if you used soft wood like pine. I add a juice groove for looks, but for heavy cutting, use a separate board to avoid damage.
How long does it take to build a stove top cover?
It depends on your skill level, but I can finish one in a weekend. Cutting and assembling take a few hours, plus drying time for glue, stain, and sealant.