
How to Make Lichtenberg Figures on Wood: The Lethal Voltage Risk
To make Lichtenberg figures on wood, you need high-voltage electricity and a conductive solution, which will create branching patterns.
⚠️ Serious Safety Warning
Fractal/Lichtenberg wood burning uses lethal voltages (typically 1,000–15,000V from a microwave, neon-sign, or oil-burner transformer). At least 33 people died attempting this at home between 2017 and 2022, most from accidental contact with electrodes, the electrolyte solution, or a live wire. Never touch the wood, electrodes, or solution while the power source is energized — fully disconnect and wait before adjusting anything. Work on a dry, non-conductive floor, never work alone, and keep others away from a live setup. The American Association of Woodturners bans promoting or demonstrating this technique at its events.
Source: peer-reviewed case reports on fractal wood burning injuries and fatalities (PMC/NCBI, National Library of Medicine)
Lichtenberg Figures: A Unique Woodworking Art
What Are Lichtenberg Figures?
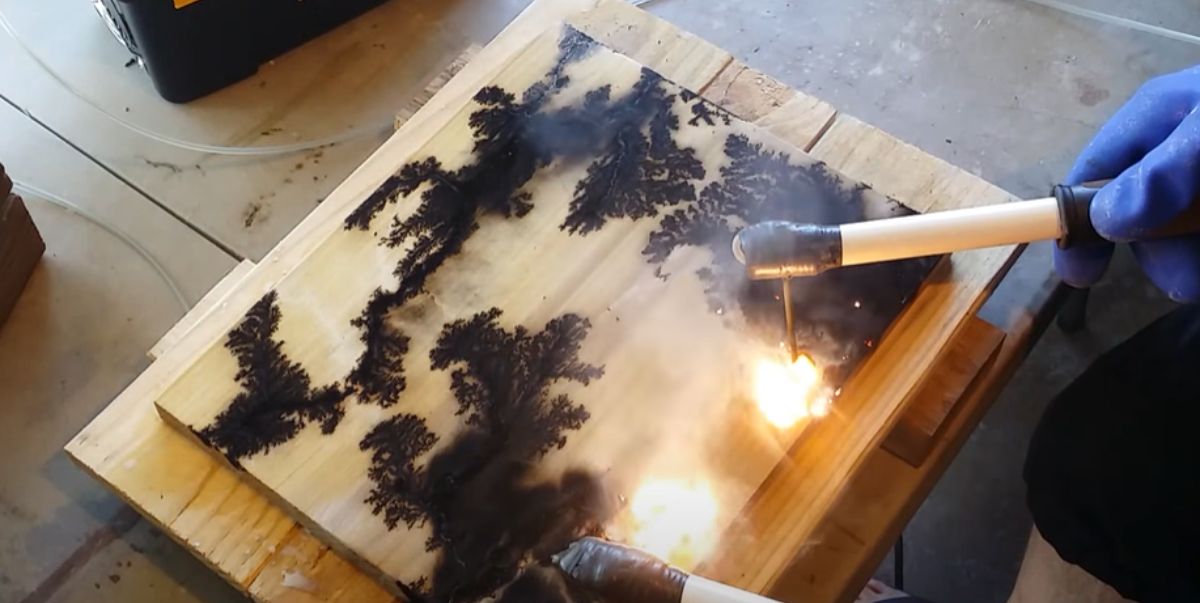
Lichtenberg Figures are intricate patterns created on wood using electricity. These mesmerizing branching patterns, resembling lightning bolts, are formed by electrical discharges that travel through the wood’s surface.
History Of Lichtenberg Figures
The history of Lichtenberg Figures dates back to the late 18th century. German physicist Georg Christoph Lichtenberg discovered these radiant patterns while experimenting with high-voltage discharges. His remarkable findings sparked interest among artists and craftsmen, leading to the technique being adopted as a unique form of woodworking art.
Woodworkers across the globe have embraced the challenge and artistry of creating Lichtenberg Figures. By harnessing the power of electricity, they can transform plain pieces of wood into stunning objets d’art with nature-inspired patterns that captivate the eye.

Understanding The Science Behind Lichtenberg Figures
Lichtenberg’s figures on wood involve using high-voltage electricity to create intricate patterns. This method involves carefully applying electrical discharges to specially prepared wood surfaces, producing striking and unique designs. Understanding the science behind Lichtenberg figures is crucial for ensuring safety and achieving desired results.
The Amazing Science Of Lichtenberg Figures
Creating beautiful patterns and intricate designs on wood through electrical discharge sounds like something out of a science fiction movie. But in reality, it’s a fascinating phenomenon known as Lichtenberg figures. Understanding the science behind these mesmerizing patterns can help you appreciate the artistry and complexity involved. In this article, we will explore the science behind Lichtenberg figures and discuss the electrical discharge in wood as well as the factors that affect their formation.
Electrical Discharge In Wood
When high-voltage electricity is passed through a piece of wood, it triggers a unique reaction that creates the captivating Lichtenberg figures. This process involves the movement of electrons, transforming the wood’s structure and leaving behind intricate patterns that resemble tree branches or lightning bolts.
To understand this phenomenon better, let’s break it down:
- Overview of Electrical Discharge in Wood: When electricity passes through wood, it ionizes the moisture present in the fibers, which leads to the formation of conductive paths. These paths allow the electric current to move freely, creating unique branching patterns on the wood’s surface.
- Electron Movement and the Creation of Patterns: The electricity flowing through the conductive paths causes electrons to move, leaving behind a trail of charge within the wood. This charge follows the path of least resistance, resulting in the intricate Lichtenberg pattern formation.
- Heat Generation: The electrical discharge also causes localized heating within the wood. This heat is a byproduct of the electrical energy, causing the wood to undergo physical changes and leaving behind distinctive burn marks.
Factors Affecting Lichtenberg Figure Formation
The formation of Lichtenberg figures is influenced by various factors. Let’s take a look at what affects the creation of these captivating patterns:
| Factors | Explanation |
|---|---|
| Wood Moisture Content | The moisture content of the wood plays a crucial role in the formation of Lichtenberg figures. Moist wood conducts electricity better, allowing for more intricate patterns. |
| Electricity Voltage and Duration | The voltage and duration of the electrical discharge determine the intensity of the patterns. Higher voltages and longer durations often result in more pronounced and complex Lichtenberg figures. |
| Wood Density and Grain Structure | The density and grain structure of the wood impact the path that the electrical current takes. Variations in these factors can produce unique patterns and shapes. |
| Distance Between Electrodes | The distance between the electrodes used for the electrical discharge affects the shape and size of the Lichtenberg figures. Increased spacing often leads to larger, more expansive patterns. |
By understanding the science behind Lichtenberg figures, you can delve deeper into this intriguing art form, experiment with different variables, and create your own mesmerizing woodwork with these captivating electrical patterns.
Safety Measures And Precautions
When working with Lichtenberg figures on wood burning, safety measures and precautions are of utmost importance. The process involves high-voltage electricity and can be hazardous if proper safety protocols are not followed. Below are the essential safety measures and precautions to consider for creating Lichtenberg figures wood:
Safety Gear For Lichtenberg Figure Crafting
Before embarking on creating Lichtenberg figures wood, it’s vital to ensure you have appropriate safety gear. This may include but is not limited to:
- Insulating gloves rated for high-voltage
- Safety goggles to protect eyes from potential sparks
- Protective clothing to minimize skin exposure to electricity
- Closed footwear to prevent electric shock
Safe Workspace Setup
Setting up a safe workspace is crucial for Lichtenberg figure crafting. The workspace should be well-ventilated and equipped with a fire extinguisher within reach. Additionally, ensure the working area is free from any flammable materials to mitigate the risk of fire. It is also advisable to work on a non-conductive surface to reduce the likelihood of electric shock.
Tools And Materials Required
When it comes to creating Lichtenberg figures on wood, having the right tools and materials is essential. These items will not only make the process easier but will also help ensure your safety while working with electricity. In this section, we will go over the essential tools for Lichtenberg figure creation and provide tips for choosing the right wood and preparing it for the process.
Essential Tools For Lichtenberg Figure Creation
Before you can start creating Lichtenberg figures on wood, you need to gather a few essential tools that will enable you to work with electricity safely. These tools include:
- A high-voltage power source: This could be a neon sign transformer or a microwave oven transformer.
- An electrical safety switch: This is crucial for your safety and should be connected between the power source and the wood.
- Electrodes: These are metal rods or wires that will be used to apply the electrical current to the wood. Copper electrodes are commonly used due to their conductivity.
- A voltage meter: This will help you measure the voltage and ensure that it is within a safe range.
- Protective gear: Working with electricity can be dangerous, so it’s important to wear safety goggles, gloves, and a lab coat to protect yourself.
Ensuring you have these essential tools will enable you to work with electricity safely and effectively to create Lichtenberg figures on wood.
Choosing The Right Wood And Preparation
Not all woods are suitable for creating Lichtenberg figures. You need to choose a wood species that has high moisture content, such as pine or poplar, as it conducts electricity better. Additionally, it’s important to prepare the wood properly before you start the process.
To prepare the wood for Lichtenberg figure creation, follow these steps:
- Remove the bark: Use a scraper or a chisel to remove the outer bark from the wood. This will ensure better contact between the electrodes and the wood.
- Sand the surface: Use sandpaper to smooth the wood’s surface. This will help create a better electrical connection and prevent arcing.
- Moisten the wood: Spray water on the wood to increase its moisture content. This will improve its conductivity and enhance the formation of Lichtenberg figures.
By choosing the right wood species and properly preparing the wood, you will increase the chances of creating stunning Lichtenberg figures.
Step-by-step Guide To Creating Lichtenberg Figures
Welcome to our step-by-step guide on how to create stunning Lichtenberg figures on wood! Lichtenberg figures, also known as “captured lightning,” are intricate and mesmerizing patterns that can be etched into wood using high-voltage electricity. In this guide, we will walk you through the process, from preparing the wood surface to executing the Lichtenberg figure technique to finishing and safety tips.
Preparing The Wood Surface
Before you begin creating your Lichtenberg figures, it is essential to properly prepare the wood surface. Follow these steps:
- Select a suitable piece of wood: Choose a smooth and dry piece of wood that is free from any cracks or defects. The type of wood you select will also affect the final result, so experiment with different wood varieties to achieve unique outcomes.
- Sand the wood: Use fine-grit sandpaper to sand the wood surface smoothly. This will ensure that the electricity can flow evenly across the wood, creating more consistent and defined patterns.
- Apply a finish (optional): If desired, apply a wood finish to enhance the overall appearance of the Lichtenberg figures. Be sure to let the finish dry completely before proceeding to the next step.
Executing The Lichtenberg Figure Technique
Now that you have prepared the wood surface, it’s time to execute the Lichtenberg figure technique. Follow these steps carefully:
- Ensure safety precautions: Before proceeding, make sure you are wearing appropriate safety gear, including rubber gloves, safety goggles, and protective clothing. Safety should always be a top priority when working with high-voltage electricity.
- Create the electrical setup: Set up a high-voltage transformer, usually used for neon signs, connected to two electrodes. Place the electrodes on the wood surface, ensuring that they are positioned at a safe distance from each other.
- Power up the transformer: Once the setup is complete, gradually increase the voltage to create the Lichtenberg figures. As the electricity flows between the electrodes, it will leave incredible patterns on the wood. Keep adjusting the voltage until you achieve the desired effect.
- Monitor the process: Pay close attention to the electrical discharges and the patterns forming on the wood. You can control the depth and intensity of the Lichtenberg figures by adjusting the voltage and the amount of time the electrodes remain in contact with the wood.
Finishing And Safety Tips
Once you have created your Lichtenberg figures, follow these finishing and safety tips:
- Clean the wood: Carefully remove any remaining debris or burnt marks from the wood using a soft brush or sandpaper.
- Apply a protective finish: To preserve the Lichtenberg figures and protect the wood, apply a clear polyurethane finish or another suitable protective coating. This will help to prevent moisture damage and ensure longevity.
- Store and display safely: Keep your Lichtenberg figure woodwork away from flammable materials and ensure it is displayed in a safe and secure location.
- Always prioritize safety: Remember to follow safety guidelines and precautions throughout the entire process to avoid any accidents or injuries. Never work on wood that is wet or damp, as this can increase the risk of electrical shocks.
Frequently Asked Questions Of How To Make Lichtenberg Figures Wood
How Do You Make Lichtenberg Figures In Wood?
To make Lichtenberg figures in wood, use electricity to create intricate branch-like patterns. Apply a conductive solution on the wood’s surface, connect it to a power source, and run a high-voltage electrical current through it. The electricity will carve unique patterns onto the wood, creating the Lichtenberg figures.
What Wood Works Best For Lichtenberg?
The best wood for Lichtenberg is usually hardwoods like maple, oak, or birch. They have dense fibers that hold the electrical current well and produce more distinct patterns.
What Liquid Do You Use For Lichtenberg Wood Burning?
The liquid used for Lichtenberg wood burning is a mixture of baking soda and water. This solution is applied to the wood surface to increase its conductivity for the electrical current. It creates distinctive burnt patterns on the wood.
Is Fractal Wood Burning Legal?
Fractal wood burning is legal in most places, but it’s important to check local regulations. Compliance with safety guidelines and environmental standards is crucial for practicing this art form. Remember to prioritize safety and obtain necessary permits if required in your area.
Conclusion
In crafting Lichtenberg figures on wood, the potential for sparking creativity is endless. With proper caution and technique, this captivating art form can be an exciting addition to your woodworking repertoire. Embracing the beauty of natural electricity offers a unique and mesmerizing way to showcase the wonders of the natural world.
Explore, experiment, and above all, enjoy the process.