Free Woodworking Plans for a Candy Cart: Build Your Own Sweet Sensation!
Looking for free woodworking plans for a candy cart? Check out these reliable sources for step-by-step instructions and diagrams to build your own candy cart.
Let’s delve into the world of woodworking and create a delightful addition to your home or business.
Getting Started: Free Woodworking Plans for a Candy Cart
Determine Your Design And Dimensions
Before you dive into crafting your own candy cart, it’s important to determine the specific design and dimensions you want for your project. This will help ensure that you have a clear vision in mind and can gather the necessary materials and tools accordingly.
Consider whether you prefer a traditional cart design or something more modern and unique. Take note of the space available for your candy cart, as this will impact the dimensions you choose. Some popular options include carts with wheels for easy mobility, while others prefer a stationary cart that can be set up in a fixed location.
Gather The Necessary Materials And Tools
Once you have a clear idea of your candy cart design and dimensions, it’s time to gather all the necessary materials and tools. Here’s a list of what you may need:
| Materials | Tools |
|
|
It’s important to have all the necessary materials and tools readily available before you begin the construction process. This will save you time and prevent any delays or interruptions in your project.
Prepare Your Workspace
Creating a candy cart requires a suitable workspace where you can comfortably work on the construction. Here are some tips to help you prepare your workspace:
- Clear any clutter or unnecessary items from the area.
- Ensure you have enough space to move around and maneuver your materials.
- If working indoors, protect the floor with a drop cloth or old sheets to catch any sawdust or spills.
- Set up a sturdy workbench or table to use as your main workspace.
- Keep your tools organized and easily accessible.
By setting up a clean and organized workspace, you’ll have a more efficient and enjoyable experience when constructing your candy cart.
Selecting The Wood
When it comes to building your very own candy cart, selecting the right type of wood is crucial. Not only does it determine the overall strength and durability of the cart, but it also plays a significant role in how aesthetically pleasing your creation will be. In this section, we’ll guide you through the process of choosing the right type of wood and calculating the amount you’ll need, ensuring you have all the necessary details to take on this woodworking project with confidence.
Choosing The Right Type Of Wood
The first step in selecting the right wood for your candy cart is understanding the different types available and their respective characteristics. Here are some common choices:
| Type of Wood | Characteristics |
|---|---|
| Hardwood | Known for its durability and strength, hardwood like oak or maple is an excellent choice for a sturdy candy cart. It also offers a beautiful, natural finish that can be easily stained or painted to match your desired aesthetic. |
| Plywood | Considered more affordable than hardwood, plywood consists of layers of thin wood glued together to create a strong and stable material. It’s available in various grades, allowing you to choose the thickness and quality that suits your needs. |
| MDF (Medium-Density Fiberboard) | MDF is a popular choice for indoor furniture and woodworking projects due to its smooth surface and easy workability. It’s an engineered wood made from compressed fibers, offering a uniform and consistent texture. |
When selecting the type of wood for your candy cart, consider factors such as budget, intended use, and personal preference. Bolder text Ensure you choose a wood that can withstand the weight of the cart, as well as any additional decorations or accessories you plan to attach to it.
Calculating The Amount Of Wood Needed
Once you’ve determined the type of wood you’ll be using for your candy cart, the next step is calculating the amount you’ll need. Having the right quantity of wood is essential for avoiding unnecessary trips to the hardware store or running out of materials midway through the project. Here’s a simple way to calculate:
- Start by sketching a detailed plan or blueprint of your candy cart design.
- Measure the dimensions of each component, including the top, sides, shelves, and any additional features like drawers or doors.
- Calculate the total area required for each component by multiplying its length by its width.
- Add up all the individual component areas to get the total wood area needed for your cart.
- Determine the thickness of the wood you plan to use and multiply it by the total wood area to calculate the volume of wood required.
Before purchasing the wood, it’s always a good idea to add a little extra to account for any mistakes or unforeseen changes that may occur during the construction process. It’s better to have a surplus than to fall short when you’re in the middle of building your candy cart.
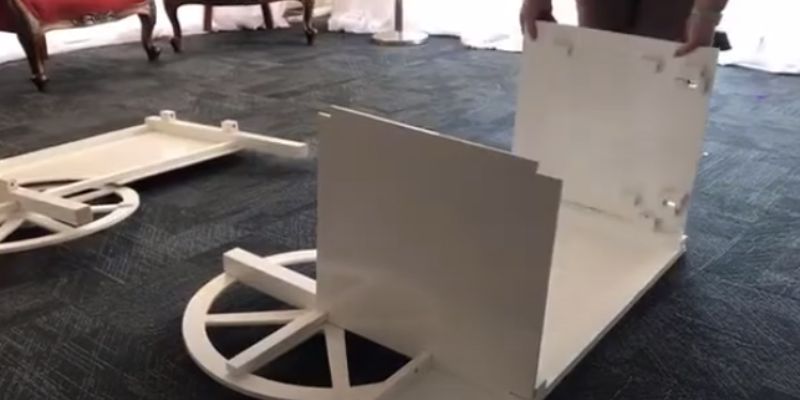
Creating The Cart Frame
Learn how to create a sturdy cart frame for your Candy Cart with these free woodworking plans. Build a durable and attractive frame that can support all your candy treats with ease.
In order to build a sturdy and functional candy cart, the first step is to create the cart frame. This is essentially the skeleton of the cart onto which all other components will be attached. In this section, we will guide you through the process of cutting the wood to size, assembling the frame, and securing the joints.
Cutting the Wood to Size
To begin, you will need to gather the necessary materials for the cart frame. This typically includes several pieces of lumber, such as 2x4s or 2x6s, depending on the desired dimensions of your cart. Measure and mark the appropriate lengths for the various frame components.
Next, using a saw or a miter saw, carefully cut the wood to the specified measurements. It’s important to ensure accurate cuts to ensure a sturdy and balanced frame. Take your time and double-check your measurements before making any cuts.
Assembling the Frame
Once you have all the wood pieces cut to size, it’s time to assemble the frame. Lay out the pieces according to your design plan, positioning them so that they fit together snugly. You may want to use clamps to hold the pieces in place during assembly.
Carefully align the pieces and use wood screws or nails to attach them together. It’s a good idea to pre-drill holes to prevent the wood from splitting. Make sure you have a solid connection at each joint to ensure the frame’s stability.
Securing the Joints
To reinforce the joints and ensure the cart frame’s longevity, it’s important to secure the joints properly. Depending on the type of joint you are working with, there are various methods you can use.
One common approach is to use wood glue in addition to screws or nails. Apply a generous amount of wood glue to the joint before attaching the pieces together. The glue will bond the wood fibers, making the joint stronger and more durable.
Another method is to use metal brackets or corner braces. These can be attached to the inside corners of the frame and provide additional support and stability.
Remember to sand any rough edges or splinters on the frame to create a smooth and polished finish. This will not only enhance the aesthetic appeal but also prevent any accidental injuries.
By following these steps, you will be able to create a solid and robust cart frame for your candy cart. Once the frame is complete, you can move on to adding the remaining components and putting your personal touch on the finished product. Stay tuned for our next section on how to construct the cart sides and shelves.
TABLE 1:
Materials needed for the Cart Frame
| Lumber (2x4s or 2x6s) |
| Wood screws or nails |
| Wood glue |
| Metal brackets or corner braces |
| Sandpaper |
Note: It is essential to refer to the specific woodworking plans you are using for accurate measurements and design details.
Building The Cart Structure
One of the most important aspects of creating a candy cart is building a sturdy and functional structure. This will not only provide a solid foundation for your cart but also ensure that it can withstand the weight of the candy and withstand the rigors of transportation. In this section, we will discuss step-by-step instructions on how to build the cart structure, including adding shelves and storage compartments, and attaching wheels and handles.
Adding Shelves And Storage Compartments
When it comes to a candy cart, having ample storage space is crucial. You need to ensure that there is enough room to store all your candy containers, utensils, and other necessary supplies. To achieve this, you can add shelves and storage compartments to your cart. Here’s how:
- Start by measuring the dimensions of your cart frame. This will help you determine the size of the shelves and storage compartments you need.
- Using these measurements, cut pieces of plywood or any other suitable material for the shelves. Make sure they fit snugly within the frame.
- Attach the shelves using screws or nails. Ensure they are level and securely fastened to provide stability.
- To create storage compartments, cut additional pieces of plywood that will act as dividers within the cart. Attach them between the shelves to create separate compartments for different items.
- Consider adding sliding or hinged doors to the storage compartments for easy access and to keep the items secure while transporting the cart.
Attaching Wheels And Handles
Having wheels and handles on your candy cart is essential for easy mobility and maneuverability. This will allow you to transport the cart from one location to another without any hassle. Here’s how to attach wheels and handles:
- Choose durable and sturdy wheels that can support the weight of your cart and move smoothly on various surfaces. Make sure to select wheels with a locking mechanism to prevent accidental movement when the cart is stationary.
- Position the wheels at the four corners of the cart frame. Mark the wheel placement and drill holes for screw or bolt insertion.
- Attach the wheels securely using screws or bolts, ensuring they are aligned and firmly in place.
- Next, install handles on the sides of the cart for easy pushing and pulling. Choose handles that are comfortable to grip and provide a good amount of leverage.
- Measure and mark the handle placement on the cart frame. Drill holes and attach the handles using screws or bolts.
By following these steps, you can successfully build the cart structure for your candy cart. Adding shelves and storage compartments will help you organize your candy and supplies while attaching wheels and handles will ensure easy transportation. In the next section, we will discuss the finishing touches and customization options for your candy cart.
Customizing Your Cart
Looking for free woodworking plans to customize your candy cart? Check out our collection of DIY designs that will help you create a one-of-a-kind cart for your sweet treats.
Adding Decorative Elements
Once you have built your candy cart using the free woodworking plans, it’s time to make it truly unique and eye-catching. Adding decorative elements not only enhances the overall appearance of the cart but also allows you to incorporate your personal style and creativity. There are numerous options to consider when customizing your cart with decorative elements.
- Ornamental Hardware: Consider adding ornamental hinges, handles, or knobs to give your candy cart an elegant and vintage touch. Selecting hardware that complements the design of your cart will add a cohesive look.
- Embellishments: Explore decorative accents like scrollwork, carved patterns, or decorative moldings that can be attached to the wood surfaces of the cart. These embellishments can transform a simple cart into a stunning centerpiece.
- Personal Touch: Add your own unique flair by incorporating personalized elements such as monograms, names, or carved initials. This will not only make the cart stand out but also lend a personal touch to your candy display.
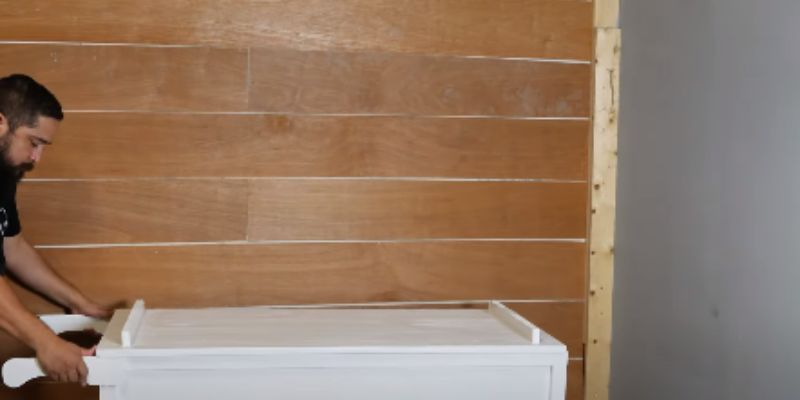
Painting Or Staining The Wood
To truly make your candy cart a visual delight, consider painting or staining the wood in vibrant or rich hues. This step allows you to match the cart with your overall theme or color scheme. Additionally, painting or staining the wood helps protect it from the elements and gives it a polished look. Here are a few suggestions to ensure the best results:
- Selecting Colors: Choose colors that not only appeal to the eye but also complement the candies you plan to display. For a classic look, rich tones like cherry red, deep brown, or black can be chosen. For a more playful vibe, consider bright pastels like pink, blue, or green.
- Paint vs. Stain: Decide whether you want to paint or stain the wood based on the desired outcome. Painting offers a wider range of color options and allows you to cover the natural grain of the wood. On the other hand, staining showcases the natural beauty of the wood while enhancing its natural grain patterns.
Applying A Protective Finish
After adding decorative elements and applying paint or stain, it is crucial to apply a protective finish to safeguard the wood from wear, tear, and moisture. A protective finish not only extends the lifespan of your candy cart but also keeps it looking beautiful for years to come. Follow these steps to ensure proper application of a protective finish:
- Clean and Prepare: Before applying the finish, make sure the wood surface is clean and free of any dust or debris. Sand the wood lightly to create a smooth surface for the finish to adhere to.
- Choose the Right Finish: There are various options available for protective finishes, such as polyurethane, varnish, lacquer, or wax. Consider the level of protection you require based on where the cart will be placed and the kind of exposure it will face.
- Apply the Finish: Follow the manufacturer’s instructions for application. Use a brush or a clean cloth to evenly apply the finish to all exposed wood surfaces. Allow it to dry completely between coats, and apply multiple coats for maximum protection.
Installing Functional Features
When it comes to setting up a candy cart, installing functional features is essential to create an eye-catching and practical design. By incorporating various elements into your candy cart, you can elevate the overall look and make it more user-friendly. In this section, we will discuss three important functional features that will take your candy cart to the next level: mounting a canopy or roof, incorporating lighting options, and including display racks.
Mounting A Canopy Or Roof
To protect the candies and treats from the scorching sun or unpredictable weather, it is crucial to mount a canopy or roof on your candy cart. This not only ensures the durability of your products but also adds an attractive touch to the overall appearance.
To install a canopy or roof, follow these simple steps:
- Measure the dimensions of your candy cart’s top surface.
- Select a suitable material, such as durable fabric, that matches the aesthetic of your cart.
- Cut the fabric to fit the measurements and sew any necessary seams.
- Secure the fabric using clamps, brackets, or adhesive to ensure it stays in place.
- Test the durability and stability of the canopy or roof before using your candy cart.
Incorporating Lighting Options
Good lighting is not only visually appealing but also draws attention to your mouthwatering treats. By incorporating lighting options into your candy cart, you can create an inviting atmosphere, especially during evening events or in dimly lit areas.
Here are a few lighting ideas for your candy cart:
- LED string lights wrapped around the edges of the cart.
- Spotlights directed towards the display area to highlight the candies.
- Under-cabinet lights installed underneath the display racks for a more prominent glow.
Including Display Racks
Display racks are crucial for showcasing your delectable treats and maximizing the use of the available space. By incorporating well-designed display racks, you can make your candy cart more functional and visually appealing.
Here are a few tips for including display racks:
- Choose racks that complement the overall aesthetic of your candy cart.
- Consider the size and layout of your candies when selecting the type and arrangement of the racks.
- Ensure that the racks are sturdy and securely mounted on the cart to prevent any accidents.
- Opt for adjustable racks to accommodate different sizes and quantities of candies.
Adding The Final Touches
Once you’ve built your candy cart using the free woodworking plans, it’s time to add those final touches that will truly transform it into a delightful focal point. These last steps are crucial in personalizing and fine-tuning your candy cart to make it stand out and function smoothly. Consider incorporating these ideas to add personality, enhance organization, and ensure stability.
Personalizing With Signage
One of the most effective ways to make your candy cart uniquely yours is by personalizing it with signage. A well-designed sign not only adds charm but also attracts attention from potential customers. Whether you prefer a classic vintage-style sign or a more modern look, the possibilities are endless. Consider these tips for designing your signage:
- Choose a font and color scheme that aligns with the overall theme of your candy cart. Bold and easily readable fonts work best.
- Add your business name or a catchy phrase that reflects the irresistible treats you offer.
- Include eye-catching visuals such as graphics or candy-related illustrations.
- Ensure the signage is prominently displayed, making it easily visible to passersby.
Accessorizing With Bins And Jars
Accessorizing your candy cart with bins and jars is not only visually appealing but also functional. The right containers to display and store your goodies can elevate the overall presentation and organization of your cart. Consider the following tips for selecting and arranging bins and jars:
- Choose transparent containers to showcase the vibrant colors and textures of your candy.
- Ensure the containers are food-safe and easy to clean.
- Arrange the bins and jars in a logical and visually appealing way, grouping similar candies together.
- Label each container to help customers identify their favorite treats easily.
- Regularly restock the bins and jars to maintain an enticing display.
Ensuring Cart Stability
Stability is vital to ensure the safety of both your candy and your customers. Imagine the disappointment if your cart were to tip over while someone was reaching for their favorite sweet treat. To prevent any accidents and ensure your candy cart remains steady, consider these measures:
- Verify that all joints and connections are secure before loading the cart with candies.
- Choose sturdy and durable materials for construction, paying extra attention to the wheels.
- Place heavier items at the bottom of the cart to lower the center of gravity, providing better stability.
- Consider adding additional support, such as braces or corner brackets, to reinforce weak areas.
- Regularly inspect the structural integrity of the cart and perform any necessary maintenance or repairs.
Safety Precautions
When embarking on a project like building a candy cart, it is important to prioritize safety. Woodworking can be enjoyable, but it also involves using tools and equipment that can pose risks if not handled properly. By taking the necessary precautions, we can ensure a safe and accident-free woodworking experience. In this section, we will go over some essential safety measures that every woodworker should follow during the construction of a candy cart.
Using Protective Gear
Protective gear is crucial in any woodworking project, as it shields us from potential injuries. Make sure to wear the following protective equipment:
- Safety goggles: These protect your eyes from flying wood chips and debris.
- Hearing protection: Woodworking can generate loud noises, so wearing ear protection is vital for safeguarding your hearing.
- Dust mask or respirator: Woodworking often involves sawing and sanding, which release fine particles into the air. A dust mask or respirator will protect your respiratory system from inhaling harmful substances.
- Work gloves: Wearing work gloves provides an extra layer of protection against sharp edges, splinters, and potential cuts.
Working In A Well-ventilated Area
Proper ventilation is important while working with wood. Sawdust and fumes from paints or finishes can be harmful if inhaled. When constructing your candy cart, ensure that you are working in a well-ventilated area, such as a workshop with open windows or a garage with good airflow. This will help dissipate any airborne particles or fumes and maintain a healthier work environment.
Handling Tools And Equipment Safely
Woodworking involves a variety of tools and equipment, and it’s crucial to handle them with care. Here are a few safety guidelines to follow:
- Read and understand the manufacturer’s instructions before using any tool.
- Maintain tools and equipment in good working condition, keeping them sharp and well-maintained.
- Always use the appropriate tool for the job. Using the wrong tool can lead to accidents or damage to the material.
- When not in use, store tools properly, keeping them away from children and ensuring they are not a tripping hazard.
- Use clamps or appropriate holding devices to secure the material in place, providing stability and minimizing the risk of accidents.
By following these safety precautions, you can ensure a secure woodworking experience as you construct your very own candy cart. Remember, taking the time to prioritize safety not only protects you from potential accidents but also allows you to enjoy the process of creating something beautiful and functional.
Frequently Asked Questions Of Free Woodworking Plans For A Candy Cart
What Materials Are Needed To Build A Candy Cart?
To build a candy cart, you will need materials such as plywood, screws, hinges, wheels, paint, and decorative items like stickers or ribbons. Don’t forget to gather essential tools like a saw, drill, and sandpaper for a smooth finish.
Is It Difficult To Build A Candy Cart From Scratch?
Building a candy cart from scratch can be a fun and rewarding DIY project. While it might require basic woodworking skills, with detailed plans and step-by-step instructions, even beginners can successfully build their own candy cart. Just take your time, follow the instructions carefully, and enjoy the process!
Can The Candy Cart Plans Be Customized To A Specific Size?
Absolutely! The candy cart plans are versatile and can be easily customized to fit your specific needs. Whether you want a small cart for personal use or a larger one for events, simply adjust the measurements provided in the plans to create a custom-sized candy cart that suits your requirements.
Conclusion
Incorporating these free woodworking plans for a candy cart into your projects will add a touch of sweetness to any occasion. From the careful selection of materials to the meticulous construction process, this DIY project is both enjoyable and practical.
By following these detailed instructions, you can create a charming and functional candy cart that will be the centerpiece of any event. Get ready to impress your guests with this unique and delightful addition to your woodworking repertoire.