How to Adjust Miter Saw: Mastering Precision Cuts
To adjust a miter saw, you need to follow these steps: loosen the bevel or miter adjustment knob, align the blade at the desired angle, and tighten the knob to secure the angle in place.
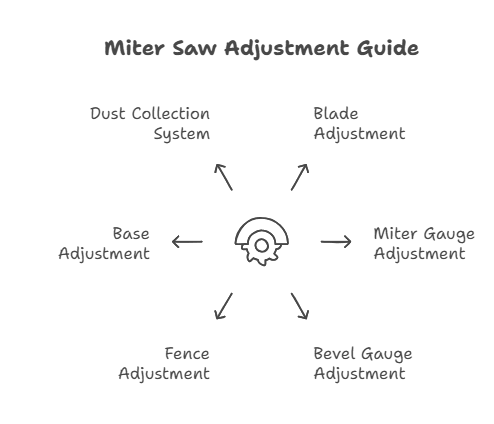
Anatomy Of A Miter Saw: Parts And Functions
The anatomy of a miter saw is comprised of various parts and functions that work together for precise cuts. To adjust a miter saw, ensure the blade is perfectly aligned, adjust the bevel angle and miter angle, and secure the desired setting for accurate and efficient woodworking tasks.
A miter saw is a versatile power tool that allows you to make accurate crosscuts and angled cuts in various materials. To fully understand how to adjust a miter saw, it’s important to familiarize yourself with its different parts and their associated functions.
In this section, we will delve into the anatomy of a miter saw, exploring each component and its role in ensuring precise cuts.
Blade:
- The blade plays a central role in any miter saw. It is a circular disc with sharp teeth that cuts through the material.
- The size of the blade can vary, but most miter saws use blades ranging from 8 to 12 inches in diameter.
- Ensure the blade is sharp and suitable for the material you are cutting to achieve clean and accurate cuts.
Miter Gauge:
- The miter gauge is an essential part of a miter saw as it enables you to make angled cuts accurately.
- It consists of a pivoting arm and a gauge with angle markings that allow you to set precise angles for your cuts.
- The miter gauge should be easily adjustable, allowing you to lock it securely at the desired angle.
Bevel Gauge:
- The bevel gauge on a miter saw allows you to make bevel cuts, which involve tilting the blade to a specific angle.
- It is typically located on the back of the saw head and can be adjusted to tilt the blade either left or right.
- The bevel gauge should have clear angle markings and be easy to lock in position.
Fence:
- The fence serves as a guide for the material you are cutting, ensuring straight and accurate cuts.
- It is a vertical component located at the back of the saw, parallel to the blade.
- The fence should be adjustable to accommodate different material widths and heights.
Base:
- The base or table is where you place the material being cut. It provides stability and support throughout the cutting process.
- The base should be flat, sturdy, and wide enough to accommodate your workpieces securely.
- Ensure the base is aligned perpendicular to the blade for precise 90-degree cuts.
Dust Collection System:
- Miter saws generate a significant amount of sawdust during operation, which can hinder visibility and contribute to a messy workspace.
- A dust collection system helps to control and capture the sawdust, keeping your work area clean and improving visibility.
- The dust collection system should be efficient and integrated into the miter saw, or you can connect a separate vacuum system for optimal dust extraction.
Understanding the different parts and functions of a miter saw is crucial for adjusting and utilizing this powerful tool effectively. Now that you are familiar with the anatomy of a miter saw , let’s move on to the next section and explore how to adjust the various components for precise and accurate cuts.

Credit: m.youtube.com
Types Of Miter Saw: Which One Is Right For You
Learn how to adjust your miter saw to ensure precise cuts every time. Discover the different types of miter saws available and find the right one for your needs.
Alright, let’s dive into the world of miter saws! With so many options to choose from, it’s essential to understand the different types of miter saws available and determine which one suits your needs best. Whether you’re a DIY enthusiast or a professional carpenter, finding the right miter saw can significantly improve your woodworking projects.
Let’s explore the various miter saw types below:
Standard Miter Saw:
- A standard miter saw is the most basic and traditional type.
- It is designed to make straight crosscuts and simple angle cuts for projects like picture frames.
- Best for projects that don’t require complicated bevel or compound cuts.
- Offers the advantage of being lightweight and portable.
- Perfect for beginners or those with simpler cutting needs.
Compound Miter Saw:
- Compound miter saws are versatile and ideal for projects that require both miter and bevel cuts.
- They can tilt in one direction, allowing you to make bevel cuts in addition to miter cuts.
- Perfect for making crown molding or cutting bevels on boards.
- Suitable for professionals and advanced DIYers who need more flexibility in their cuts.
Sliding Compound Miter Saw:
- Sliding compound miter saws combine the features of a compound miter saw with a sliding arm.
- The sliding arm allows the blade to move forward and backward, increasing the cutting capacity.
- Perfect for cutting wider boards or larger trim pieces.
- Offers more versatility for complex woodworking projects.
- Ideal for professionals who require a wider cutting range.
Dual Bevel Sliding Compound Miter Saw:
- Dual bevel sliding compound miter saws offer the ultimate versatility in making bevel cuts.
- Unlike the compound miter saw, it can tilt in both left and right directions, allowing you to make bevel cuts from both sides.
- The sliding arm further enhances the cutting capacity, enabling you to tackle larger projects.
- Best for professional woodworkers or those who frequently work with intricate angles and bevels.
Remember, the right miter saw for you depends on the complexity and size of your projects, as well as your skill level and budget. Evaluate your needs carefully and choose a miter saw that will empower you to create remarkable woodworking wonders.
Now that you’re familiar with the different types of miter saws, it’s time to get your hands on the perfect tool for your next woodworking adventure!
Safety First: Precautions Before Adjusting Your Miter Saw
Before adjusting your miter saw, it is crucial to prioritize safety. Follow these precautions to ensure a smooth and secure adjustment process.
Working with a miter saw requires precision and caution to ensure safe and accurate cuts. Before you dive into adjusting your miter saw, it’s crucial to prioritize safety. By following these precautions, you can protect yourself and those around you from potential accidents or injuries.
Eye And Ear Protection:
- Wear safety glasses or goggles to shield your eyes from flying debris, wood chips, and dust.
- Use ear protection such as earplugs or earmuffs to guard against the loud noise generated by the miter saw.
Proper Clothing:
- Avoid loose-fitting garments that can get caught in the moving parts of the saw. Opt for well-fitted clothing to minimize the risk of accidents.
- Wear gloves to enhance your grip and protect your hands from cuts or splinters.
Secure Workpiece:
- Before making any adjustments, ensure that the workpiece is securely fastened. Unstable or loose materials can lead to inaccurate cuts or dangerous kickbacks.
- Use clamps or other stabilizing tools to firmly hold the workpiece in place.
Stable Work Area:
- Set up your miter saw on a stable and level surface. This prevents wobbling or tipping during operation.
- Clear clutter and obstructions from the work area to maintain a safe working environment.
Familiarize Yourself With The Manual:
- Take the time to carefully read and understand the manufacturer’s manual that accompanies your miter saw.
- Refer to the manual for specific instructions on adjusting and operating your particular miter saw model.
Remember, safety should always be your top priority when using power tools like a miter saw. By adhering to these precautions, you can minimize the risk of accidents and ensure a safer working experience.
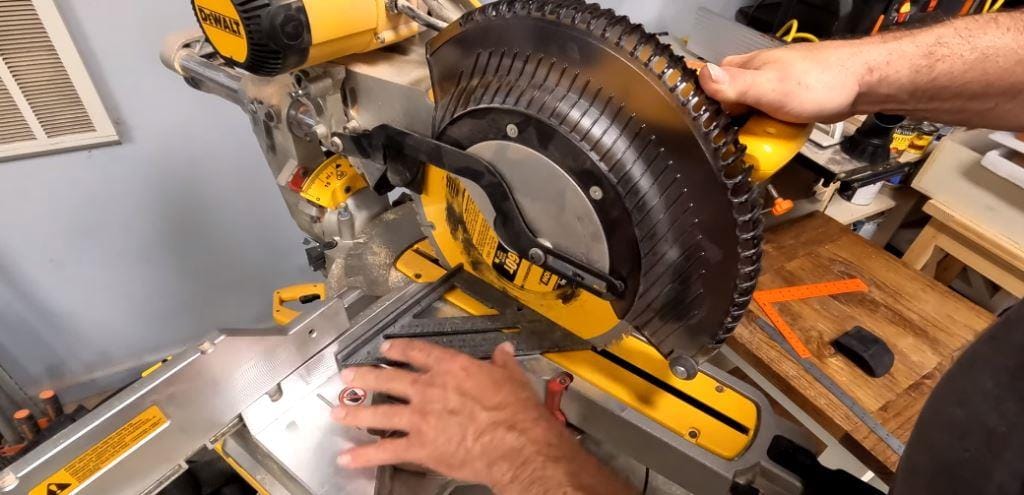
Checking The Blade And The Table For Alignment
When adjusting a miter saw, it’s crucial to check the alignment of both the blade and the table. This ensures precise and accurate cuts, enhancing the overall performance of the saw. Proper alignment leads to better woodworking results.
Blade Alignment:
Blade alignment is crucial for accurate and safe cutting with a miter saw. Here’s how you can check the alignment of the blade:
- Visual Inspection: Examine the blade for any visible signs of damage such as warping or bending. Ensure there are no missing or broken teeth on the blade.
- Squaring the Blade: To check if the blade is square to the miter saw’s table, follow these steps:
- Unplug the miter saw for safety purposes.
- Using a square, place it against the fence and the blade. The square should be flush against both surfaces.
- Adjust the blade if necessary, using the manufacturer’s instructions, until the blade is perfectly aligned with the square.
- Blade Runout: Blade runout refers to the amount of side-to-side movement in the blade. To check for blade runout:
- Securely mount the blade on the miter saw.
- Use a dial indicator to measure the runout by touching the blade at various points while manually rotating it.
- If the runout exceeds the manufacturer’s specifications, it may be necessary to replace the blade or have it professionally serviced.
Table Alignment:
Ensuring that the miter saw’s table is properly aligned is equally important. Follow these steps to check the table alignment:
- Miter Gauge Alignment: The miter gauge on the table should be perpendicular to the saw blade. Here’s how you can verify its alignment:
- Place a perfectly square piece of wood against the miter gauge.
- Adjust the miter gauge until it is flush with the square piece of wood.
- Tighten any adjustment screws or knobs to secure the miter gauge in place.
- Fence Alignment: The fence on the miter saw table should be parallel to the saw blade. To check the fence alignment:
- Place a straight edge, such as a level, against the fence.
- Adjust the fence until it is parallel to the straight edge.
- Tighten any adjustment screws or knobs to lock the fence in position.
- Table Extension Alignment: If your miter saw has table extensions, ensure they are aligned properly with the main table. Here’s how you can check the alignment:
- Place a straight edge across the main table and the extension.
- Adjust the extension until it is flush with the main table.
- Secure the extension in place using any adjustment mechanisms provided.
By regularly checking and adjusting the blade and table alignment of your miter saw, you can maintain accuracy and safety during your woodworking projects. Remember to consult your miter saw’s user manual for specific instructions on adjusting the alignment settings.
Verifying The Accuracy Of The Miter And Bevel Gauges
Ensure the accuracy of your miter and bevel gauges by following these simple steps to adjust your miter saw. With careful calibration, you can achieve precise cuts and enhance your woodworking projects.
To ensure precise and accurate cuts with your miter saw, it is crucial to verify the alignment of both the miter and bevel gauges. These two components play a vital role in achieving the desired angles and bevels for your woodworking projects.
Here’s how you can check them:
Checking The Miter Gauge:
- Align the miter gauge at 0 degrees: Position the miter saw blade at a right angle (90 degrees) to the saw’s base. Align the miter gauge indicator to the 0-degree mark. It’s essential to verify this starting point for accurate angle adjustments.
- Testing miter angles: Set the miter gauge at various angles, such as 45 degrees or 30 degrees, and make test cuts on scrap wood. Use a protractor or a dedicated angle measuring tool to ensure the accuracy of your cuts. Compare the cut angle to the intended angle to determine if any adjustments are required.
- Fine-tuning the miter gauge: If the miter gauge is not aligned accurately, make adjustments by referring to your miter saw’s instruction manual. There are usually adjustment screws or knobs that allow you to fine-tune the miter angles. Taking the time to ensure precise alignment will result in clean and precise cuts.
Verifying The Bevel Gauge:
- Align the bevel gauge at 0 degrees: Adjust the bevel gauge to 0 degrees by aligning it with the saw table or base. Make sure it is perfectly parallel to the surface.
- Testing bevel angles: Set the bevel gauge to different angles and make test cuts. Measure the actual cut angle using a bevel gauge or protractor. Compare the measured angle to the intended angle. This step will help identify any discrepancies and allow you to make necessary adjustments.
- Calibrating the bevel gauge: If the bevel gauge is misaligned, consult your miter saw’s manual for specific instructions on calibration. Some saws have adjustment mechanisms that allow you to fine-tune the bevel angles. By making these adjustments, you can ensure accurate bevel cuts for your projects.
Remember, verifying the accuracy of your miter and bevel gauges is essential before starting any woodworking project. This simple yet crucial step will save you from inaccuracies and ensure precise cuts each time.
Calibrating The Miter Angle
Discover how to easily adjust the miter angle of your saw with these simple steps. Achieve precise cuts and improve the accuracy of your woodworking projects.
Understanding Miter Angle Adjustments:
A miter saw is a handy tool that allows you to make precise angled cuts on various materials such as wood, plastic, or even metal. To achieve accurate cuts, it is crucial to calibrate the miter angle, which refers to the angle at which the saw blade tilts to the left or right.
Understanding how to adjust the miter angle correctly is essential for achieving clean and precise cuts. Below, we’ll explore the process of calibrating the miter angle step by step.
Fine-Tuning The Miter Angle:
To adjust the miter angle on your miter saw, follow these steps:
- Check the miter angle indicator: Begin by examining the miter angle indicator on your miter saw. This indicator provides a visual representation of the current angle setting. It might be a digital display or a series of marks and numbers.
- Loosen the bevel lock: The bevel lock is typically located at the rear of the miter saw. It secures the bevel angle in place. Loosen the lock to allow for adjustments to the miter angle.
- Set the desired angle: Determine the angle at which you want to cut your material. Adjust the miter angle by either rotating the miter gauge or moving the saw blade to the desired position. Keep an eye on the miter angle indicator to ensure accuracy.
- Test the angle: After setting the desired miter angle, test it by making a test cut on a scrap piece of material. Examine the resulting cut to ensure it meets your expectations. If adjustments are necessary, go back to step 3 and fine-tune the angle accordingly.
- Lock the miter angle in place: Once you achieve the desired miter angle, lock it in place by tightening the bevel lock. This ensures that the angle remains stable throughout your cutting tasks.
Remember, precise miter angle adjustments are crucial for achieving accurate and clean cuts. Take your time to understand and familiarize yourself with your miter saw’s specific features and controls. With practice, you’ll become adept at calibrating the miter angle, allowing for flawless angled cuts on your materials.
Adjusting The Bevel Angle
Adjusting the bevel angle of your miter saw is crucial for precise cuts. Learn how to effortlessly adjust the bevel angle for accurate woodworking projects.
Understanding bevel angle adjustments:
- A miter saw is a versatile tool that allows you to make precise angled cuts in wood, plastic, and other materials. One important adjustment you can make on a miter saw is the bevel angle. The bevel angle refers to the tilt of the saw blade in relation to the base of the saw.
- By adjusting the bevel angle, you can create beveled edges, chamfers, or angled cuts for miters or compound miters. It is a crucial aspect of using a miter saw effectively and achieving accurate results.
- Properly understanding bevel angle adjustments will enable you to tackle a wide range of cutting tasks with ease and precision. Let’s dive deeper into this adjustment and learn how to fine-tune the bevel angle for your desired cuts.
Fine-tuning the bevel angle:
- Align the bevel scale: First, ensure that the bevel scale on your miter saw is properly aligned and calibrated. This scale helps you determine the bevel angle accurately. Refer to your saw’s user manual for instructions on how to calibrate the scale if necessary.
- Loosen the bevel lock: Most miter saws have a bevel lock knob or lever that secures the bevel angle in place. Loosen this lock to allow adjustments to the bevel angle.
- Set the desired bevel angle: Look for the bevel angle adjustment handle or knob on your miter saw. Rotate this handle to adjust the bevel angle to your desired measurement. The scale on the miter saw will help you determine the exact angle.
- Secure the bevel angle: Once you have set the desired bevel angle, tighten the bevel lock knob or lever to secure the angle in place. Make sure it is tight enough to prevent any movement during cutting.
- Check the angle: To ensure accuracy, use a bevel square or a protractor to double-check the bevel angle. Place the measurement tool against the saw blade and the base of the miter saw to confirm that the angle matches your desired cut.
- Make test cuts: Before working on your actual project, it’s recommended to make test cuts on scrap material to ensure the bevel angle is set correctly and produces the desired results. This will minimize any errors or inconsistencies in your final work.
- Fine-tune if needed: If the test cuts indicate that the bevel angle needs adjustment, repeat the steps above to make any necessary tweaks. It may take a few attempts to achieve the perfect bevel angle for your specific cutting requirements.
- Clean and maintain: Regularly clean the bevel angle adjustment components, such as the lock knob, to ensure smooth operation. Follow the manufacturer’s guidelines for maintenance and lubrication to keep your miter saw in optimal condition.
Remember, adjusting the bevel angle on a miter saw requires precision and attention to detail. Take your time to set the angle accurately before starting any cuts. By mastering this adjustment, you’ll be able to tackle a wider variety of projects and achieve professional-looking results.
Fine-Tuning The Fence For Accurate Cuts
Achieve precise cuts with your miter saw by fine-tuning the fence. Make accurate adjustments for a flawless woodworking experience.
Aligning The Fence:
To achieve precise and accurate cuts with your miter saw, it is essential to properly align the fence. The fence is the vertical surface that supports the material you are cutting. By aligning it correctly, you ensure that your workpiece stays in place and maintains a consistent angle throughout the cutting process.
Here are the steps to align the fence:
- Check for any visible gaps or misalignments between the fence and the saw base.
- Tighten or loosen the fence bolts or screws as needed to align it perfectly with the base.
- Use a square to verify the alignment. Place the square against the fence and the saw base, ensuring they form a 90-degree angle.
- Adjust the fence until it is perfectly square with the saw base, making sure to tighten the bolts or screws firmly.
Now that you have aligned the fence, let’s move on to adjusting the fence angle for accurate cuts.
Adjusting The Fence Angle:
To make precise angled cuts, you need to adjust the miter saw’s fence angle. This adjustment allows you to cut material at specific angles, such as 45 degrees or 60 degrees. Follow these steps to adjust the fence angle:
- Locate the fence angle adjustment mechanism on your miter saw. It can typically be found at the back of the saw near the fence.
- Loosen the angle lock knob or lever to unlock the fence.
- Use the angle scale or gauge provided on your miter saw to set the desired angle. Alternatively, you can use a protractor to measure the angle precisely.
- Once you have set the desired angle, tighten the angle lock knob or lever to secure the fence in place.
- To ensure accuracy, double-check the angle by placing a square against the fence and the saw base to confirm that they form the intended angle.
Remember, adjusting the fence angle may require some trial and error to achieve the desired result. Take your time and make small adjustments until you obtain the perfect angle.
With the fence properly aligned and the angle adjusted, you can now make accurate cuts with your miter saw. Remember to take necessary safety precautions and follow the manufacturer’s instructions for optimal results.
Creating Miters And Bevels With Precision
Adjusting a miter saw for precise miters and bevels is essential for accurate cuts. Learn the steps to achieve perfect angles and improve your woodworking skills.
Techniques For Achieving Precise Miters:
Creating precise miters with a miter saw requires careful attention to detail and proper technique. Here are some tips to ensure accurate miter cuts:
- Use a miter gauge or miter sled: Attach a miter gauge or sled to the miter saw’s fence to guide the workpiece. This provides stability and helps maintain consistent angles.
- Set the correct angle: Use the angle adjustment on the miter saw to set the desired angle for the miter cut. Take accurate measurements and be precise in your angle adjustments.
- Secure the workpiece firmly: Make sure the workpiece is clamped securely to avoid any movement during the cutting process. This ensures clean and accurate miter cuts.
- Practice test cuts: Before making the final cuts on your actual workpiece, it’s a good idea to make test cuts on scrap wood. This allows you to fine-tune your technique and ensure accurate results.
Techniques For Achieving Precise Bevels:
When it comes to creating precise bevels with a miter saw, attention to detail is crucial. Follow these techniques to achieve accurate bevel cuts:
- Adjust the bevel angle: Use the bevel adjustment on the miter saw to set the desired angle for the bevel cut. Take accurate measurements and carefully adjust the bevel angle to achieve precision.
- Use a bevel gauge: A bevel gauge helps determine the exact angle of the bevel cut. It can be used to verify the accuracy of the bevel adjustment on the miter saw.
- Check the workpiece alignment: Ensure that the workpiece is aligned properly with the saw’s fence and table. This prevents any inconsistencies or errors in the bevel cuts.
- Make a practice cut: Similar to the miter cuts, it’s beneficial to make a practice cut on scrap wood before working on the actual project. This allows you to refine your technique and achieve precise bevel cuts.
By implementing these techniques, you can create miters and bevels with precision using a miter saw. Practice, attention to detail, and proper adjustment of angles are key to achieving accurate and professional results.
Making Compound Cuts For Complex Projects
Learn how to adjust your miter saw for making compound cuts in complex projects. Our step-by-step guide will help you achieve precise angles and flawless results for your woodworking tasks.
Understanding Compound Cuts
Compound cuts are essential for complex woodworking projects where angles need to be cut in two planes simultaneously. It involves tilting the miter saw’s blade and rotating it to create intricate corners and joints. This technique is commonly used for crown molding, picture frames, and other decorative elements.
Understanding the fundamentals of compound cuts is crucial to achieve precise and professional results.
Tips For Making Compound Cuts Accurately:
- Choose the appropriate miter saw: Ensure that your miter saw has the capability to make compound cuts. Select a model with a bevel adjustment feature and a rotating table that allows the blade to be tilted and rotated smoothly.
- Measure and mark accurately: Use a combination square or a protractor to measure and mark the angles required for your compound cut. Precision in marking ensures accuracy in cutting.
- Secure the workpiece properly: Use clamps or a vice to secure the workpiece tightly, preventing any movement during cutting. This ensures safer and more precise cuts.
- Set the bevel angle: Adjust the bevel angle on your miter saw to the specified angle required for the compound cut. Double-check the angle using a bevel gauge to ensure accuracy.
- Set the miter angle: Determine the miter angle according to the project’s specifications. This angle controls the rotation of the workpiece. Carefully align the angle on the miter saw’s gauge and lock it securely.
- Perform test cuts: Before cutting the actual workpiece, make practice cuts on scrap material. This allows you to fine-tune the angles and assess the accuracy of your setup before committing to the final cuts.
- Take safety precautions: Always prioritize your safety. Wear protective goggles, gloves, and ear protection. Keep your hands clear of the blade and follow all manufacturer’s safety guidelines.
- Maintain a steady cutting motion: Ensure a smooth and controlled cutting motion by maintaining a steady pace. Avoid rushing or applying excessive force, as this can lead to inaccuracies in the cut.
- Check and adjust as needed: Regularly check the accuracy of your cuts using a combination square or precision measuring tools. If adjustments are necessary, recalibrate the angles and repeat the cutting process.
- Practice and refine your technique: Compound cutting requires practice to master. Take the time to refine your technique and experiment with different angles and materials to improve your proficiency.
Remember, making compound cuts accurately requires patience, precision, and practice. By understanding the principles involved and following these tips, you’ll be able to achieve intricate and flawless compound cuts for even the most complex woodworking projects.
Enhancing Accuracy With Accessories And Jigs
Enhance the accuracy of your miter saw with the right accessories and jigs. Learn how to adjust your saw for precise cuts and improved results. Improve your woodworking projects with these helpful tips and techniques.
When it comes to using a miter saw, accuracy is crucial for achieving precise cuts. Thankfully, there are several accessories and jigs available that can help enhance the accuracy of your miter saw cuts. In this section, we will explore two such tools: the miter sled and stop blocks.
Using A Miter Sled
A miter sled is a useful accessory that can greatly enhance the accuracy of your miter saw cuts. Here’s how you can make the most of it:
- Align the miter sled: Ensure that the miter sled is properly aligned with the miter saw blade. This will help ensure that your cuts are square and precise.
- Secure your workpiece: Place your workpiece against the miter sled’s fence and secure it firmly using clamps. This will prevent any movement and ensure consistent cuts.
- Utilize the miter gauge: Take advantage of the miter gauge on the miter sled to make angled cuts. Adjust the gauge according to your desired angle, and then push the sled through the saw in a slow and controlled manner.
- Maintain proper technique: Always keep your hands clear of the blade and keep a firm grip on the miter sled’s handle. Additionally, employ a smooth, steady motion when sliding the sled through the saw to avoid any jerky movements that could impact the accuracy of your cuts.
Using a miter sled is a simple yet effective way to achieve precise and accurate cuts with your miter saw. It provides stability and control, ensuring that your cuts are consistent and professional-looking.
Utilizing Stop Blocks
Stop blocks are another essential accessory that can significantly improve the accuracy of your miter saw cuts. Here’s how you can make the most of them:
- Select the appropriate stop block: Consider the length of your workpiece and choose a stop block that matches its dimensions. This will enable you to make consistent cuts with ease.
- Position the stop block: Place the stop block on the miter saw’s table, ensuring it is aligned with the miter saw blade. This will act as a guide for achieving accurate and repeatable cuts.
- Secure the stop block: Use clamps or screws to firmly secure the stop block in place. This will prevent any movement during the cutting process, ensuring consistent results.
- Measure from the blade: To determine the exact position of your workpiece against the stop block, measure from the saw blade instead of the stop block itself. This eliminates the possibility of any measurement errors caused by blade thickness.
- Make your cuts: Once the stop block and workpiece are properly positioned, proceed with making your cuts. Ensure that your workpiece is snug against the stop block and use a smooth, controlled motion to slide it through the saw.
By utilizing stop blocks, you can achieve precise and accurate cuts consistently. They provide a reliable reference point, giving you the confidence to cut with precision.
With the help of accessories like a miter sled and stop blocks, you can greatly enhance the accuracy of your miter saw cuts. Whether you are working on intricate woodworking projects or performing simple DIY tasks, these tools will help you achieve professional results each time.
So, embrace these accessories and enjoy the satisfaction of precise cuts with your miter saw!
Mitigating Blade Wobble
Mitigating blade wobble can be accomplished by adjusting the miter saw. Follow these steps to ensure proper alignment and minimize any issues with blade stability. Simplify your cutting tasks with precise adjustments for a smooth and accurate woodworking experience.
It can be frustrating when you’re in the middle of a woodworking project and your miter saw starts producing less than perfect cuts due to blade wobble. Fortunately, there are techniques you can use to address this issue and ensure smooth and accurate cuts.
In this section, we will explore the causes of blade wobble and various approaches to mitigating it.
Causes Of Blade Wobble:
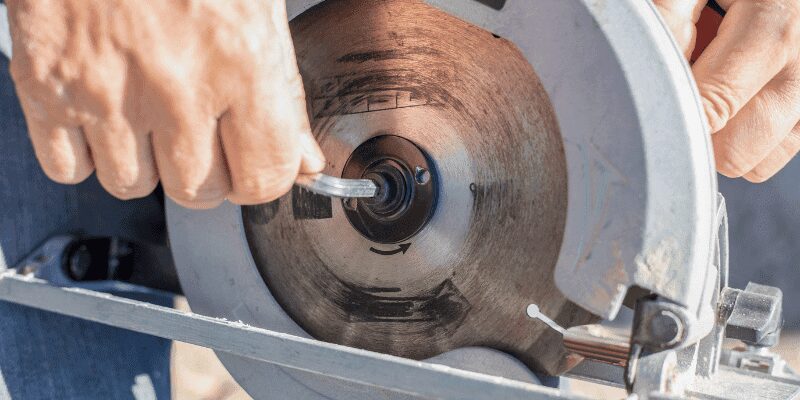
- Loose arbor nut: A loose arbor nut can lead to blade wobble. Make sure to check if the nut securing the blade is tightly fastened.
- Dull or damaged blade: A blade that is no longer sharp or has chips or missing teeth can cause wobbling. Consider replacing or sharpening the blade if necessary.
- Bent blade or arbor: If either the blade or the arbor is bent, it can cause the blade to wobble. Inspect both components for any signs of damage and replace them if needed.
- Unevenly mounted blade: If the blade is not properly mounted or is not sitting flush against the arbor, it can result in wobble. Ensure that the blade is securely and evenly mounted.
Techniques For Addressing Blade Wobble:
- Tightening the arbor nut: If the arbor nut is loose, use a wrench to tighten it securely. This simple step can often solve the blade wobble issue.
- Changing the blade: If you notice dullness, chips, or missing teeth on the blade, it’s time for a replacement. Install a new, sharp blade to reduce or eliminate blade wobble.
- Straightening or replacing the blade or arbor: If you find that the blade or the arbor is bent, you can try straightening them using appropriate tools. However, if the damage is severe, it’s best to replace the affected component for optimal performance.
- Ensuring proper blade installation: Take the time to carefully install the blade, making sure it is mounted securely and evenly. Double-check that the blade sits flush against the arbor for optimal stability.
- Maintaining a clean workspace: Sawdust and debris can interfere with the smooth operation of the saw and contribute to blade wobble. Regularly clean the work area and keep the saw free of any buildup.
By understanding the causes of blade wobble and implementing the appropriate techniques, you can effectively address and mitigate this issue, ensuring accurate cuts and enhancing your woodworking experience. Remember to always prioritize safety when working with power tools and follow the manufacturer’s instructions.
Happy woodworking!
Correcting Misalignments And Inaccurate Cuts
Learn how to adjust your miter saw for accurate cuts and correct any misalignments. These simple steps will ensure precise and professional results every time.
Identifying Misalignments
- Inspect the miter saw blade alignment: Make sure the blade is parallel to the miter saw’s fence and the table.
- Check the miter saw’s bevel angle: Ensure that the bevel angle indicator matches the actual angle of the cut.
- Examine the saw arm: Verify that it moves smoothly and without any interruptions.
- Assess the miter saw’s laser guide: Make sure the laser guide projects a straight line that aligns with the blade.
- Test the accuracy of cuts: Measure and compare the lengths of cuts to ensure they are precise.
Steps To Correct Misalignments
Adjusting blade alignment:
- Loosen the bolts or screws holding the blade and fence in place.
- Use an adjustable square or a combination square to verify the alignment by placing it against the blade and fence.
- Adjust the position of the blade or fence as needed to achieve a parallel alignment.
- Tighten the bolts or screws securely but avoid overtightening.
Aligning the bevel angle:
- Locate the bevel angle adjustment knob or lever on your miter saw.
- Set the bevel angle indicator to the desired angle using a protractor or angle gauge as a reference.
- Make test cuts to ensure the accuracy of the adjustments.
- Fine-tune the bevel angle if necessary.
Fixing saw arm issues:
- Inspect the arm for any obstacles or foreign objects that may hinder its movement.
- Lubricate the arm’s pivot points, hinges, or rails to ensure smooth operation.
- Clean the arm and remove any buildup or debris that could affect its performance.
- Check for loose or damaged parts and replace or tighten them as needed.
Calibrating the laser guide:
- Align the laser guide projection with the edge of a straight board or a laser calibration tool.
- Adjust the laser guide position or angle using the laser adjustment screws or knobs, if available.
- Test the accuracy of the laser guide by making test cuts and comparing the results with the laser line.
Verifying accuracy of cuts:
- Measure the length of the cut with a tape measure or a ruler.
- Compare the measured length with the desired length.
- Recalibrate if necessary by repeating the previous steps until accurate cuts are achieved.
By following these steps, you can identify and correct misalignments in your miter saw, ensuring accurate and precise cuts for your woodworking projects. Regular maintenance and periodic checks will help maintain the performance of your miter saw over time.
Ensuring Consistent And Repeatable Cuts
Learn how to adjust your miter saw to ensure consistent and repeatable cuts with precision. Expert tips and step-by-step instructions to help you achieve accurate angles and perfect cuts every time. Perfect for DIY enthusiasts and professional woodworkers alike.
To get perfect cuts every time you use your miter saw, it’s essential to ensure consistent and repeatable settings. By maintaining the accuracy of your saw and following a few tips, you can achieve precise and reliable cuts for your woodworking projects.
Here’s how:
Maintaining Saw Accuracy Over Time:
- Regularly calibrate your miter saw to maintain its accuracy
- Check and adjust the bevel angle and miter angle to ensure they are perfectly aligned
- Inspect the fence and ensure it is square to the blade
- Clean the saw blade and ensure it is sharp and in good condition
- Keep the saw in a stable and level position to prevent any misalignment
- Lubricate the moving parts of the saw for smooth operation
Tips For Achieving Consistent Cuts:
- Use a high-quality blade suitable for the material you’re cutting
- Securely clamp your workpiece to prevent any movement during cutting
- Make a test cut on scrap material to verify your settings before cutting the actual piece
- Utilize a stop block or a miter saw stop system to ensure consistent lengths for repetitive cuts
- Maintain a proper cutting speed and avoid rushing through the cutting process
- Apply even and consistent pressure while cutting to avoid blade deflection
- Double-check your measurements and angles before making any cuts
By following these tips and keeping your miter saw well-maintained, you can achieve consistent and repeatable cuts for your woodworking projects. Take the time to calibrate your saw and verify your settings before every cut to ensure precision and accuracy.
With practice, you’ll master the art of using a miter saw for flawless woodworking results.
Practicing And Refining Your Skills
Practicing and refining your skills in adjusting a miter saw is crucial for accurate and precise cuts. Mastering the art of adjusting the saw’s angles, bevels, and miters will improve the quality of your woodworking projects. Regular practice and attention to detail will enhance your overall performance with this essential tool.
Importance Of Practice
Practicing and refining your skills with a miter saw is crucial to becoming proficient in using this powerful tool. Whether you’re a beginner or an experienced user, continuous practice allows you to develop the precision cutting skills necessary to achieve accurate and quality results.
By dedicating time to practice, you can improve your ability to make precise cuts, enhance your overall control over the saw, and increase your confidence in handling different materials.
Tips For Improving Precision Cutting Skills
To enhance your precision cutting skills with a miter saw, consider applying the following tips:
- Maintain a stable workspace: Ensure that your work area is clean, organized, and free of any potential hazards. This creates a stable environment that promotes accurate cutting.
- Use appropriate safety gear: Always wear safety glasses, ear protection, and a dust mask to safeguard yourself from potential hazards and minimize distractions during cutting.
- Familiarize yourself with the saw’s features: Take the time to thoroughly understand your miter saw’s features, such as bevel controls and angle adjustments. This knowledge enables you to make precise adjustments that align with your specific cutting needs.
- Choose the right blade: Selecting the appropriate blade for your specific material and cutting task is essential. Different blades are designed for various materials, yielding optimal results and preventing damage to both the material and the saw.
- Measure and mark accurately: Accurate measurements and markings are key to achieving precise cuts. Use a reliable measuring tool, such as a tape measure or a combination square, to ensure precise measurements before making any cuts.
- Practice cutting techniques: Experiment with different cutting techniques, such as crosscuts, miters, and bevels, to improve your overall versatility with the miter saw. This practice helps you become familiar with the intricacies of each technique, allowing for smoother and more precise cuts.
- Start with scrap wood: Before tackling your main project, practice on scrap wood to develop your cutting skills and gain confidence. This allows you to adjust the saw’s settings, refine your technique, and make any necessary corrections without the fear of damaging your desired material.
- Maintain proper body positioning: Position yourself correctly in relation to the saw and the material. Stand in a stable stance with your feet shoulder-width apart and maintain a comfortable grip on the saw to ensure optimal control and stability during cutting.
- Regularly clean and maintain your saw: Keep your miter saw clean and well-maintained by regularly removing dust and debris. Lubricate the moving parts as per the manufacturer’s instructions to ensure smooth operation and prolong the lifespan of your saw.
- Seek guidance and learn from experts: Don’t hesitate to seek advice and guidance from experienced woodworkers or professionals who excel in using miter saws. They can provide valuable insights, tips, and techniques that can significantly enhance your cutting skills.
Remember, honing your skills with a miter saw requires continuous practice and patience. By incorporating these tips into your routine, you’ll gradually improve your precision cutting abilities and master the art of using a miter saw effectively.
Maintenance And Care For Your Miter Saw
Learn how to adjust your miter saw for optimal performance and accuracy. Proper maintenance and care are essential to keeping your saw in top condition, ensuring precise and smooth cuts every time. Follow these steps to fine-tune your miter saw for a professional finish on your projects.
Proper maintenance and care are crucial for keeping your miter saw in optimal working condition. By following these steps, you can ensure the longevity and efficiency of your tool. Let’s delve into the essential aspects of maintaining and caring for your miter saw:
Cleaning The Saw
A clean miter saw not only enhances its performance but also improves its lifespan. Here’s how to clean your saw effectively:
- Remove dust and debris: After every use, remove any dust or debris that may have accumulated on the table, blade guard, and other parts. Use a brush or compressed air to get rid of the debris from hard-to-reach areas.
- Wipe the surface: Use a clean, lint-free cloth to wipe the surface of your miter saw. This helps remove any residual dust or dirt that the brush might leave behind.
- Lubricate the moving parts: Regularly lubricate the moving parts of your saw, such as the pivot points and the blade tilt mechanism. This ensures smooth operation and prevents excessive wear and tear.
Regular Blade Maintenance
The blade is the heart of your miter saw, and proper maintenance is essential for its longevity and cutting performance. Consider the following tips for maintaining your miter saw blade:
- Check for damage: Before each use, inspect the blade for any signs of damage, such as chips, missing carbide teeth, or excessive wear. Replace the blade if needed to ensure clean and precise cuts.
- Clean the blade: Remove any pitch or resin buildup on the blade using a blade cleaning solution or a mixture of water and dish soap. Gently scrub the blade with a soft brush, then rinse and dry thoroughly.
- Sharpen the blade: Over time, the blade may become dull. To maintain optimal cutting performance, sharpen the blade regularly using a blade sharpener or take it to a professional blade sharpening service.
- Store the blade properly: When not in use, store the blade in a dry, clean, and safe location. Consider using a blade cover to protect it from dust and accidental damage.
Regular maintenance and care for your miter saw will ensure its continued performance and longevity. By cleaning the saw and properly maintaining the blade, you can enjoy precise and efficient cuts for years to come.
Exploring Advanced Features And Techniques
Discover the art of adjusting miter saws with our comprehensive guide. Unleash the full potential of your tool by exploring advanced features and techniques for precision woodworking.
If you’re looking to take your miter saw skills to the next level, it’s time to explore the advanced features and techniques available to you. The miter saw is a versatile tool that can do much more than basic angle cuts.
In this section, we’ll delve into additional functions and settings of the miter saw, as well as advanced techniques for fine-tuning cuts. Let’s dive in!
Additional Functions And Settings Of The Miter Saw:
- Laser guide: Many miter saws come equipped with a laser guide that projects a beam onto the workpiece, providing a visual reference for precise cuts. This feature is especially helpful for cutting angles accurately.
- Bevel adjustments: Apart from the standard miter adjustment, some miter saws also enable bevel adjustments. With this feature, you can tilt the blade to create beveled edges or make compound cuts.
- Dual bevel capability: Advanced miter saws offer dual bevel capability, allowing you to tilt the blade in both directions (left and right). This feature is particularly beneficial for making complex compound cuts without the need to flip your workpiece.
- Sliding function: Sliding miter saws have a sliding arm that extends horizontally, providing additional cutting capacity. This feature is suitable for cutting wider boards or crown molding.
Advanced Techniques For Fine-Tuning Cuts:
- Scribing: To achieve a more precise fit, consider using the scribing technique. Place a scrap piece of wood flush against the workpiece and mark the exact position of the blade onto the scrap. This method helps ensure accurate positioning of the workpiece during the cut.
- Back-cutting: When working with delicate materials prone to tear-out, such as veneer or laminates, back-cutting can help minimize damage. Start the cut from the backside of the material, reducing tear-out and achieving cleaner edges.
- Clamping and securing: Stability is crucial when making accurate cuts. Use clamps or other methods to secure your workpiece firmly in place. This way, you’ll minimize the risk of it moving during the cutting process.
- Test cuts and adjustments: Before making the final cut, it’s always a good practice to do test cuts. This allows you to make any necessary adjustments to the angle or bevel before committing to the final piece. It’s better to double-check and ensure perfection.
By exploring these additional functions and settings, as well as implementing advanced techniques, you can elevate your miter saw skills and achieve more precise and professional-looking cuts. Experiment, practice, and fine-tune your techniques to master the full potential of your miter saw.
Happy cutting!
Frequently Asked Questions On How To Adjust Miter Saw
How Do You Change The Angle On A Miter Saw?
To change the angle on a miter saw, adjust the bevel and tilt knobs according to your desired measurement.
How Do You Set A Miter Saw To A 45 Degree Angle?
To set a miter saw to a 45-degree angle, adjust the angle indicator on the saw’s base.
How Do You Align A Miter Saw?
To align a miter saw, follow these steps:
1. Loosen the adjustment screws or bolts on the saw.
2. Use a square to check if the blade is perpendicular to the table or fence.
3. Make adjustments by tightening or loosening the screws until the blade is perfectly aligned.
4. Test the alignment by cutting a scrap piece of wood. Remember to always wear safety goggles and follow the manufacturer’s instructions.
Why Are My Miter Cuts Uneven?
Miter cuts may be uneven due to inaccurate measurements or improper alignment of the saw blade.
Conclusion
To sum up, adjusting a miter saw can seem like a daunting task, but with the right steps and precautions, it becomes more manageable and efficient. Remember to carefully follow the manufacturer’s instructions and prioritize safety throughout the process. Start by checking the alignment of the saw blade and making any necessary adjustments.
Then, ensure the saw is properly positioned for accurate and precise cuts. Don’t forget to maintain the saw’s cleanliness and regularly monitor its calibration. By taking these steps, you can achieve optimal performance from your miter saw and enhance the quality of your woodworking projects.
So, whether you’re a professional carpenter or a DIY enthusiast, mastering the art of adjusting a miter saw will undoubtedly elevate your skills to the next level. Happy sawing!