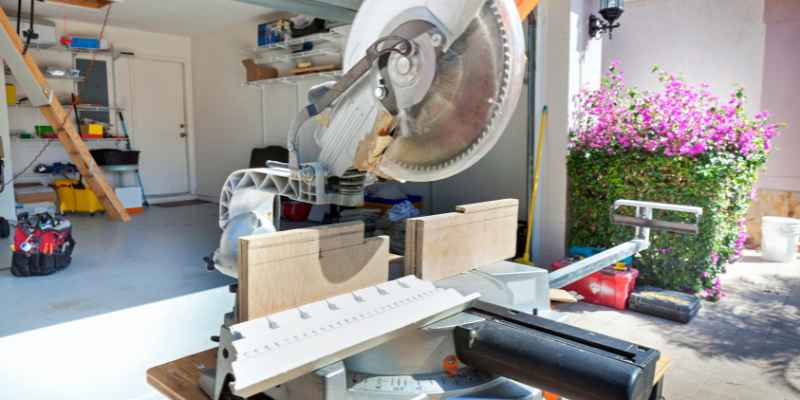
How to Adjust Ryobi Miter Saw
If you need to adjust the Ryobi miter saw, it’s a pretty straightforward process. First, you’ll want to make sure that the saw is unplugged. Then, you’ll need to loosen the bevel adjustment knob.
This is located on the front of the saw, near the blade. Once that’s loosened, you can tilt the edge to your desired Angle. To tighten the blade back into place, turn the bevel adjustment knob clockwise until it’s snug.
IS YOUR MITRE SAW NOT CUTTING STRAIGHT?
- Unplug your Ryobi miter saw from the power source.
- Locate the bevel adjustment knob on the front of the saw, and turn it to loosen the blade
- Place the saw on a level surface, and align the blade with whatever you’re trying to cut.
- Once the blade is lined up, tighten the bevel adjustment knob to lock it.
- Plug in your saw, and make your cut!
Ryobi Miter Saw Manual
If you’re looking for information on your Ryobi miter saw, you’ve come to the right place. In this blog post, we’ll provide detailed instructions on how to find and use your Ryobi miter saw manual. First, let’s start with where to find your manual.
If you purchased your Ryobi miter saw new, it should have come with a manual in the box. If you can’t find that manual, don’t worry – you can also download a copy from the Ryobi website. Head to www.ryobitools.com and select “Support” from the top menu.
Then, under “Product Manuals & Resources,” enter your model number in the search box and hit “Enter.” Your model number is usually on a plate or sticker on the tool itself. Now that you have your manual let’s review some of the basics of using your Ryobi miter saw.
First, be sure to read all of the safety information before operating your saw. Next, identify which side of the blade is facing up – this is important because you’ll need to line up your workpiece accordingly before making any cuts. To do this, hold down the power button and tilt the blade until it’s in position – there will be an indicator on the baseplate showing which way is up when adequately aligned.
Once you’ve got your workpiece lined up, it’s time to start cutting! For most cuts, you’ll want to use the fence as a guide – align it with where you want your cutline to be and then make sure that your workpiece is flush against it before cutting (if not, your piece may not end up being cut evenly).
Ryobi Miter Saw 7-1/4 Manual
Regarding manual miter saws, the Ryobi 7-1/4 inch model is one of the best on the market. This particular saw is designed for precise cuts and is straightforward to use. Even if you’ve never used a miter saw before, you should be able to figure out how to use this one without any problems.
One of the things that makes this miter saw so great is its adjustable settings. You can easily adjust the blade angle and depth, which means that you can make whatever kind of cut you need. Whether you’re cutting baseboards or trim, this saw will do a great job.
Another feature that makes this miter saw stand out is its laser guide. This guide makes it easy to know where to make your cut and helps ensure that your cuts are perfectly straight. If you want perfect results every time, this is the saw for you.
The Ryobi 7-1/4 inch manual miter saw is an excellent tool for precision cuts. It’s easy to use and has some great features that make it worth the price tag. If you’re looking for a new miter saw, then this is one that you should consider buying.
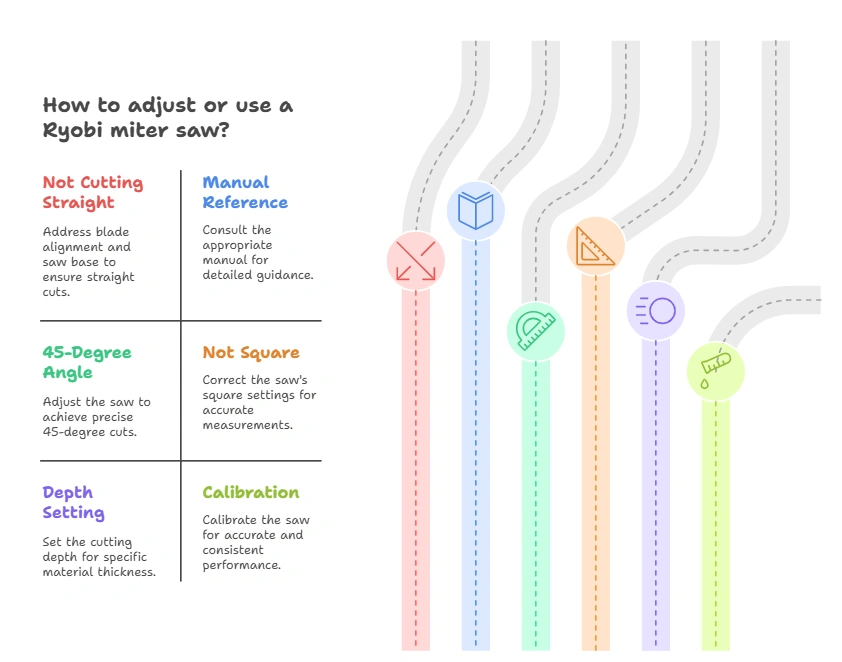
How to Adjust Miter Saw to 45-Degree Angle
Miter saws are one of the most versatile tools in a woodworker’s arsenal. They can be used for making cuts at various angles, but perhaps the most common use for a miter saw is cutting at a 45-degree angle. If you’re new to using a miter saw, or if you’ve never had to adjust your miter saw to cut at a 45-degree angle before, don’t worry – it’s relatively easy!
This blog post will walk you through adjusting your miter saw to cut at a 45-degree angle. First, locate the handle on your miter saw that controls the blade tilt. On most miter saws, this handle will be found on the front of the machine, towards the right side.
Once you’ve found the handle, rotate it clockwise until the blade tilts to approximately a 45-degree angle. Next, find the knob or lever that controls the blade height adjustment and lower the edge until it barely protrudes from underneath the fence. The reason why it’s essential only to have the edge protrude slightly because we want to make sure that there is as little chance as possible for a kickback when we start making our cut.
Now that everything is set up correctly, we can finally start making our cut! Place your workpiece against the fence and align it with where you want your cut line to be. Then, hold down on both handles of your miter saw (the main handle and trigger handle) and slowly pull back on the main handle while guiding your workpiece through the blade.
Remember to keep steady pressure on both handles throughout the cutting process – if you let go of either handle prematurely, it could result in kickback and serious injury. And there you have it – those are all the steps needed to adjust your miter properly saw so that it cuts at a 45-degree angle! If you still feel uneasy about making this cut or run into trouble, don’t hesitate to ask someone more experienced for help or guidance.
Ryobi Miter Saw How to Use
If you’re looking to make precise cuts, a miter saw is a tool for the job. Ryobi’s miter saws are designed for professionals and DIYers alike. In this article, we’ll show you how to use a Ryobi miter saw so that you can get the most out of your investment.
The first step is to set up your work area. You’ll want to ensure that you have a sturdy table or workbench to support the weight of the saw and your material. You’ll also want to clear away any clutter to have a clean, safe working space.
Next, it’s time to select the right blade for your project. Ryobi offers blades specifically designed for different materials and applications. For example, if you’re cutting wood, you’ll want to use a knife with more teeth than cutting metal.
Once you’ve selected the right blade, install it correctly following the manufacturer’s instructions. Now it’s time to power up your Ryobi miter saw by plugging it into an outlet and flipping on the switch. Before making any cuts, adjust the fence so it’s parallel to the blade.
This will ensure accuracy as you cut. When you’re ready to start cutting, slowly lower the blade into your material while keeping firm pressure on the handlebars. When using power tools, exercise caution and keep your fingers away from moving parts!
Ryobi Miter Saw Not Square
If your Ryobi miter saw is not cutting square, there are a few things you can check to see what the problem might be. First, check the blade to ensure it is installed correctly and that the teeth face the right direction. Next, check the fence to see if it is parallel to the edge.
If it is not, adjust it until it is. Finally, check the miter gauge to see if it is set at 0 degrees. If it is not, change it until it is.
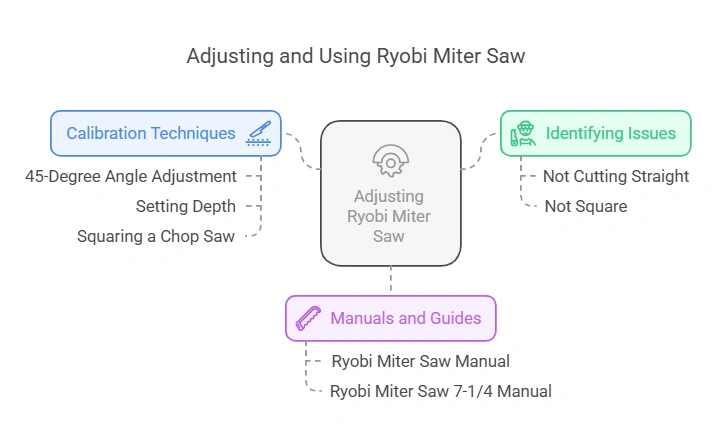
How Do You Calibrate a Ryobi Chop Saw?
If you’re looking to calibrate your Ryobi chop, saw, you must ensure that it’s properly positioned. The saw’s blade should be lined up with the cutting line on the workpiece. Once you’ve confirmed that the edge is in the correct position, you can begin adjusting the fence.
To adjust the fence, start by loosening the screws that hold it in place. Once the screws are loose, you can move the wall until it’s lined up with the blade. Once you’ve got the wall where you want it, tighten down the screws and double-check that everything is still lined up correctly.
Once your saw is calibrated correctly, you’ll be able to make precise cuts with ease!
How Do You Set the Depth on a Ryobi Miter Saw?
Most Ryobi miter saws come with a depth stop that can be adjusted to control the maximum depth of cut. First, loosen the knob or nut that holds it in place to adjust the depth stop. Then, turn the visit to the desired position and retighten the knob or nut.
To set the depth of cut on the actual saw, first, ensure that the blade is at its lowest point. Then, adjust the blade height lever until the edge is at the desired cutting depth.
How Do You Square a Ryobi Chop Saw?
When squaring a Ryobi chop saw, it’s essential to use a level and square. First, ensure the blade is at a 90-degree angle to the work surface. Then, adjust the fence so it’s flush with the back of the blade.
Finally, use a protractor or other measurement tool to check that the blade is perpendicular to the work surface. If everything looks good, you’re ready to start cutting!.
How Do You Adjust a Miter Saw for Accurate Cuts?
Miter saws are one of the most versatile tools in a woodworker’s arsenal. They can be used for various tasks, from cutting crown molding to trimming doorways. It is essential to adjust your miter properly to make accurate cuts.
There are three main adjustments that you can make on most miter saws: the bevel Angle, the miter angle, and the blade depth. The bevel Angle is the Angle of the blade relative to the horizontal plane. To adjust this, loosen the bevel adjustment knob and rotate the edge to your desired setting.
The miter angle is the Angle of the blade relative to the vertical plane. This is adjusted by loosening the miter adjustment knob and swiveling the blade to your desired setting. Finally, you can adjust the depth of the cut by moving the edge up or down using the depth adjustment lever.
By making these simple adjustments, you can ensure that your miter saw will make accurate cuts every time!
Conclusion
If you’ve ever had to adjust your Ryobi miter saw, you know it can be a pain. But with this handy guide, you’ll be changing your miter saw like a pro in no time! First, loosen the blade lock knob and tilt the blade to the desired Angle.
Then, use the bevel adjustment knob to fine-tune the Angle of the blade. Finally, tighten the blade lock knob, and you’re all set!