
How to Cut Slots into Wood: Router, Table Saw or Chisel Methods
To cut slots into wood, use a router or a dado blade on a table saw.
Choosing The Right Tools
When cutting slots into wood, it’s crucial to choose the right tools for the job. Look for a sturdy, sharp router or specialized saw to ensure precise and clean cuts without splintering the wood. The right tools will make your woodworking projects smoother and more professional-looking.
Selecting The Proper Saw
When it comes to cutting slots into wood, choosing the right tools is essential for achieving clean and precise results. The first tool you’ll need to consider is the saw.
There are different types of saws available in the market, each designed for specific tasks. To determine the ideal saw for cutting slots into wood, assess the depth and width of the slot required, as well as the type of wood you’ll be working with.
A circular saw is a versatile option that can handle various slot-cutting tasks. With its spinning blade, it can cut through wood quickly and efficiently. For smaller slots or finer woodworking projects, a coping saw or a jigsaw may be more suitable. These saws allow for greater control and precision when cutting intricate designs or curves.
Remember to consider the ergonomics of the saw as well. A comfortable grip and a lightweight design can make a significant difference when working on prolonged slots cutting projects.
Understanding The Different Cutting Blades
Equally important to the selection of the saw itself is understanding the different cutting blades available. Various cutting blades are designed to make specific types of cuts and must be carefully chosen for the desired slot.
The two primary types of blades used for slot cutting in wood are regular tooth blades and dado blades. Regular tooth blades are commonly used for making standard-width slots and come in different sizes, allowing you to adjust the width as needed.
On the other hand, dado blades are specifically designed for producing wider slots or grooves, commonly used in joinery or building cabinets. This type of blade consists of multiple blades set together, enabling you to adjust the width of the slot by adding or removing blade chippers.
It’s vital to ensure that the blade you choose matches the cutting requirements of your intended slot. Using the wrong blade can result in rough edges, inaccurate cuts, or potential safety hazards.
By selecting the proper saw and understanding the different cutting blades available, you’ll be better equipped to cut slots into wood with precision and efficiency. Remember to consider the specific requirements of your woodworking project and choose the tools that will best meet your needs.
Preparing The Wood And Work Area
Before you start cutting slots into wood, it is crucial to properly prepare both the wood and your work area. By following these steps, you can ensure accurate measurements, a secure work environment, and most importantly, your safety.
Measuring And Marking The Slot Location
Measuring and marking the slot location is the first step in preparing the wood for cutting. By doing this accurately, you can guarantee that the slots will be in the right position and alignment. To measure and mark the slot location:
- Using a ruler or tape measure, measure the desired length and width of the slot.
- Mark these measurements on the wood using a pencil or a marker.
- Ensure that the marks are visible and distinguishable.
Note: Double-checking your measurements is crucial to avoiding mistakes during the cutting process.
Securing The Wood And Ensuring Safety
Securing the wood and ensuring safety should be your top priority before making any cuts. These steps will help you create a stable work environment and reduce the risk of accidents:
- Place the wood on a stable surface, such as a workbench or sawhorse.
- Ensure that the wood is firmly secured using clamps or a vise, preventing it from moving during cutting.
- Wear appropriate safety gear, including safety glasses or goggles, gloves, and ear protection.
- Position yourself in a comfortable and safe position, allowing for proper control of the cutting tools.
Note: Safety should always be your top priority, and taking these precautions will minimize the risk of accidents or injuries.
Now that you have prepared the wood and work area, you are ready to move on to the next steps of cutting slots into wood. Stay tuned for the upcoming sections in this series on how to cut slots effectively and efficiently.
Mastering The Cutting Technique
Starting The Cut And Maintaining Control
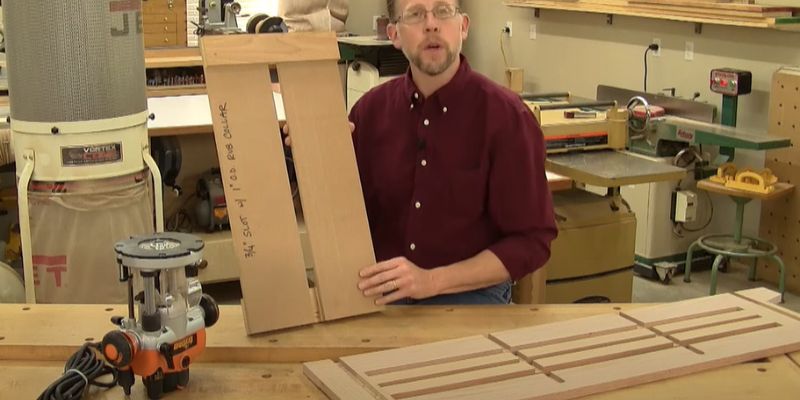
When starting the cut, position the wood against the guide fence of the saw. Ensure that the blade is aligned with the mark you have made on the wood. As you begin, apply steady pressure to the wood and keep it firmly against the fence. Maintain control by using both hands to guide the wood through the saw, keeping a firm grip at all times.
Making Precise And Clean Cuts
For precise and clean cuts, it is essential to use sharp blades and to set the depth of the blade correctly. Ensure that the feed rate is steady and consistent. Avoid rushing the cut, as that may result in splintering or uneven edges. Additionally, using clamps or hold-downs can help to secure the wood and prevent any movement during the cutting process.

Credit: theartoflutherie.com
Exploring Advanced Slot-Cutting Methods
Cutting slots into wood can be a challenging task, but with the right techniques, you can achieve precise and professional results. In this article, we will explore two advanced slot-cutting methods: Dado and Groove Cutting Techniques and Using a Router for Slot Cutting.
Dado And Groove Cutting Techniques
Dado and groove cuts are commonly used in woodworking projects to create slots for joinery or to accommodate shelves and panels. These techniques involve removing a channel of wood along the grain.
In dado cutting, a dado blade or a table saw is used to make a wide, flat-bottomed cut across the grain. This technique creates a slot with straight edges, which is ideal for fitting shelves or panels.
Groove cutting, on the other hand, involves making a narrower cut along the grain. This technique is commonly used for creating joints or channels for tongue and groove boards. The width and depth of the groove can vary depending on the project requirements.
When using dado and groove cutting techniques, it is important to use precise measurements and make multiple passes with the cutting tool to achieve the desired depth and width of the slot.
Using Router For Slot Cutting
The router is a versatile tool that can be used for various woodworking tasks, including slot cutting. Using a router allows for more flexibility in terms of slot width and depth. There are several methods to cut slots using a router:
- Straight Slot Cutting: This method involves using a straight router bit to create a straight slot along the wood grain. It is commonly used for creating slots for joinery or decorative purposes.
- Template Routing: When a specific slot shape or pattern is required, template routing is the preferred method. This involves using a template guide and a pattern to guide the router along the desired path.
- Plunge Cutting: Plunge cutting is used when a slot needs to be cut in the middle of a piece of wood. The router is plunged into the wood to create the desired slot depth.
When using a router for slot cutting, it is important to secure the wood piece properly and use a guide or fence to ensure straight and accurate cuts.
Applying Finishing Touches
Once you have successfully cut slots into wood, it’s time to give your project the finishing touches. This is an essential step to ensure the slots are smooth, polished, and ready for use. A smooth finish not only enhances the overall appearance but also makes the slots more functional and durable.
Sanding And Smoothing The Slots
Sanding is a crucial step in preparing the slots for finishing. It helps to remove any rough edges, splinters, or imperfections. By sanding the slots, you create a smooth surface that is more comfortable to touch and reduces the risk of snagging or splintering.
To sand the slots, you will need sandpaper with fine grit. Begin by wrapping the sandpaper around a small block of wood or using a sanding sponge. This provides better control and ensures an even sanding surface. Gently sand the edges and surfaces of the slots using circular or back-and-forth motions. Be sure to sand both the interior and exterior of the slots.
Once you have sanded the slots, use a clean cloth or brush to remove any dust or debris. This will prepare the slots for the next step, applying the finish.
Selecting The Right Finish For Wood Slots
Selecting the appropriate finish is crucial to protect the wood and enhance its natural beauty. There are various options available, including oils, varnishes, and lacquers. Each type of finish has its own characteristics, so choose one that suits your desired look and level of durability.
| Finish Type | Description |
|---|---|
| Oil-based finishes | These finishes penetrate the wood, providing a natural and warm look. They offer good moisture resistance and can be easily reapplied if needed. |
| Water-based finishes | These finishes are quick-drying and have low odor. They provide a clear and durable finish while being environmentally friendly. |
| Varnishes | Varnishes offer a glossy and protective finish. They are typically more durable and resistant to scratches and stains. |
| Lacquers | Lacquers create a smooth and durable finish. They are excellent for highlighting the natural grain of the wood. |
Consider the characteristics of your wood and the purpose of the slots when choosing a finish. If you want to preserve the natural wood color, choose a clear finish. If you prefer a darker or tinted finish, opt for a stain or tinted varnish. Apply the finish according to the manufacturer’s instructions, ensuring an even coat on the entire surface of the slots.
In conclusion, sanding and selecting the right finish is imperative in achieving well-crafted and polished wood slots. Remember that proper sanding ensures a smooth and snag-free surface while selecting the right finish protects the wood and enhances its appearance. The choice of finish ultimately depends on personal preference and the desired level of durability. By following these steps, you can add a professional touch to your woodworking project!
Credit: theartoflutherie.com
Frequently Asked Questions For How To Cut Slots Into Wood
What Is The Best Tool To Cut Slots In Wood?
The best tool for cutting slots in wood is a router. It is easy to use and provides precise and clean cuts.
Which Hand Tool Is Most Suitable For Cutting A Slot In A Piece Of Wood?
The most suitable hand tool for cutting slots in wood is a router. It is easy to use and provides precise and clean cuts.
How Do You Cut A Slot In A Wooden Beam?
To cut a slot in a wooden beam, measure and mark the slot location. Use a router or chisel to cut the slot to the desired depth and width. Ensure accuracy and precision for a proper fit. Use safety goggles and follow all safety protocols.
How Do You Drill A Slotted Hole In Wood?
To drill a slotted hole in wood, follow these steps:
1. Mark the desired position of the slot with a pencil.
2. Use a drill bit slightly larger than the width of the slot.
3. Drill a series of closely spaced holes along the slot line.
4. Connect the holes with a chisel, removing excess wood.
5. Sand the edges for a smooth finish.
Conclusion
To sum up, cutting slots into wood requires precision and the right tools. By following the steps outlined in this guide, you can achieve clean and professional-looking results. Whether you’re a beginner or a seasoned woodworker, mastering this technique will enhance your DIY projects and woodworking skills.
Get ready to elevate your craftsmanship with these expert tips.