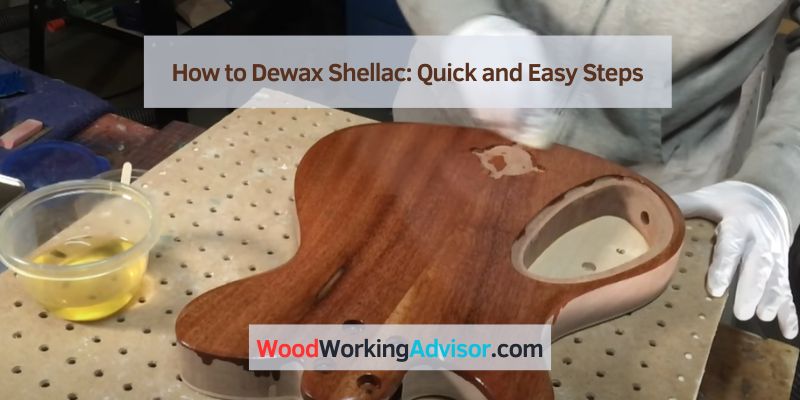
How to Dewax Shellac: Quick and Easy Steps
To dewax shellac, use a commercial wax remover and gently scrub the surface with a soft cloth. Shellac is a popular finish used in woodworking projects to provide a glossy and protective layer.
Over time, shellac can become covered in wax, making it difficult to work with or apply additional coatings. In order to remove this wax build-up, it is important to use a commercial wax remover and take care not to damage the underlying shellac.
By following a few simple steps, you can easily dewax shellac and restore its natural beauty. We will discuss the process of dewaxing shellac and provide some helpful tips to ensure a successful outcome.
Why Dewaxing Shellac Is Important
Dewaxing shellac is a crucial step in preserving its quality and preparing it for further use. Shellac, a natural resin secreted by lac insects, is widely used as a versatile finish for woodwork, furniture, and even certain food items. However, shellac often contains impurities such as wax, dirt, and other debris that can hinder its effectiveness. By removing these contaminants through the process of dewaxing, you can ensure that your shellac maintains its clarity, durability, and adhesive properties. In this article, we will explore the importance of dewaxing shellac, focusing on preserving its quality and preparing it for further use.
Preserving The Quality Of Shellac
When using shellac as a finish or coating, it is essential to preserve its quality to achieve optimal results. One of the primary reasons for dewaxing shellac is to remove any unwanted substances that can impact its performance. Wax, in particular, poses a significant challenge as it can cause the shellac to become cloudy, streaky, or even repel subsequent layers of finish. By eliminating the wax content from shellac, you can enhance its transparency and ensure a consistent, smooth application.
Dewaxing shellac also plays a vital role in preventing adhesion issues. When shellac contains impurities, it may fail to bond properly with the surface it is applied to, resulting in a weak, unreliable finish. Removing wax and other contaminants promotes better adhesion, allowing the shellac to create a durable and long-lasting bond with the substrate. This is especially crucial when using shellac as a protective coating for woodwork or furniture, as it helps safeguard against everyday wear and tear.
Preparing Shellac For Further Use
Another key benefit of dewaxing shellac is preparing it for subsequent use. Shellac that has not undergone dewaxing can be challenging to work with and may lead to undesirable outcomes. When applying shellac over pre-existing finishes, the presence of wax can cause issues such as fisheyeing, where the shellac forms small craters or ripples on the surface. Dewaxing the shellac ensures a clean base for any additional coatings, allowing for smoother and more professional results.
Furthermore, dewaxing shellac makes it easier to mix and manipulate the finish according to your specific requirements. Whether you need to thin the shellac, add colorants, or incorporate other additives, the absence of wax allows for better blending and control. This ensures that the shellac can be customized to suit various projects and achieve the desired finish.
In conclusion, dewaxing shellac is essential for both preserving its quality and preparing it for further use. By removing impurities such as wax, you can maintain the clarity, durability, and adhesion properties of shellac, ensuring a professional finish. Additionally, dewaxing facilitates smoother application and enables better control over the finish’s customization. Whether you are a woodworking enthusiast or a professional contractor, dewaxing shellac is a critical step to achieving superior results and unlocking the full potential of this versatile natural resin.
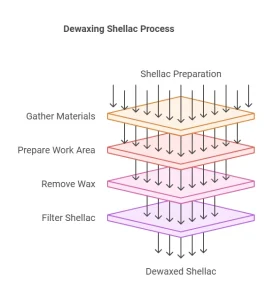
Step-by-step Guide To Dewaxing Shellac
If you’re looking to restore or refinish a piece of furniture coated with shellac, it’s essential to start with a clean and wax-free surface. Dewaxing shellac is an important step in the process, as it ensures better adhesion and a high-quality finish. In this guide, we’ll take you through the four simple steps to dewax shellac, ensuring your furniture restoration project is a success.
Step 1: Gather The Necessary Materials
To dewax shellac, you’ll need the following materials:
- A container
- A fine-mesh strainer
- Lacquer thinner or denatured alcohol
- Lint-free cloths or rags
- Protective gloves
- Eye protection
Step 2: Prepare The Work Area
Before you start dewaxing shellac, it’s crucial to prepare your work area:
- Ensure you have sufficient ventilation by opening windows or using fans.
- Place a drop cloth or old newspapers on your workspace to catch any spills or drips.
- Wear protective gloves and eye protection to safeguard yourself from any potential hazards.
Step 3: Remove The Wax
Now let’s move on to the actual dewaxing process:
- Take your container and pour in a sufficient amount of lacquer thinner or denatured alcohol.
- Dampen a lint-free cloth or rag with the solvent, ensuring it’s not dripping wet.
- Gently rub the cloth over the shellac-coated surface in circular motions to dissolve the wax.
- Repeat the process until the cloth remains clean, indicating that the wax has been effectively removed.
- Use a fresh cloth dampened with clean solvent to wipe off any residue.
Step 4: Filtering The Shellac
After dewaxing, you may want to filter the shellac to ensure a smooth and debris-free finish:
- Place a fine-mesh strainer over a clean container.
- Pour the shellac through the strainer, capturing any impurities and wax particles.
- Discard the trapped debris and transfer the filtered shellac into a suitable storage container.
With these four simple steps, you’ve successfully dewaxed your shellac and prepared it for your furniture restoration project. Now you can proceed with the next stages, such as applying stains or varnishes, knowing that you’ve created the ideal surface for a seamless finish.
Tips And Precautions
When it comes to dewaxing shellac, there are a few important tips and precautions to keep in mind. By following these guidelines, you can ensure a safe and effective dewaxing process. In this article, we will explore three essential aspects of this process: the use of proper safety equipment, the avoidance of excess heat, and the correct storage of dewaxed shellac.
Use Proper Safety Equipment
Before you begin dewaxing shellac, make sure you have the necessary safety equipment on hand. Personal protective gear, such as gloves and safety goggles, should be worn to protect your skin and eyes from any potential hazards. Additionally, consider using a respirator or mask to prevent the inhalation of harmful fumes or dust particles.
Using appropriate safety equipment not only safeguards your well-being but also ensures that the dewaxing process is carried out efficiently. By taking these precautions, you minimize the risk of accidents and promote a safer working environment.
Avoid Excess Heat
Excessive heat can compromise the quality of shellac and hinder the dewaxing process. When applying heat for dewaxing, it is crucial to use caution and avoid overheating the shellac. High temperatures can cause the shellac to become brittle or discolored, rendering it unsuitable for use.
To prevent this from happening, it is recommended to use low to moderate heat sources, such as a heat gun or a hairdryer on a low setting. This controlled application of heat helps to ensure that the shellac remains in good condition while effectively removing any wax present.
Store Dewaxed Shellac Properly
After dewaxing, it is essential to store the shellac properly to maintain its quality and extend its shelf life. Improper storage can result in the shellac becoming contaminated or deteriorating over time. To avoid this, consider the following storage guidelines:
- Store dewaxed shellac in a sealed, airtight container to prevent moisture absorption and preserve its integrity.
- Keep the container in a cool, dry place away from direct sunlight, as exposure to heat and light can degrade the shellac.
- Label the container with the date of dewaxing to help you keep track of its freshness.
- Store the container upright to avoid leakage or spillage.
By following these storage tips, you can ensure that your dewaxed shellac remains in optimal condition for future use.
Frequently Asked Questions For How To Dewax Shellac
How Do You Remove Wax From Shellac?
Carefully remove wax from shellac by applying a mixture of warm water and mild dish soap. Gently scrub the affected area using a soft cloth or sponge. Rinse with clean water and dry thoroughly. Avoid using harsh chemicals or abrasive materials to prevent damage to the shellac finish.
How Do You Know If Shellac Is Dewaxed?
Shellac is dewaxed when it undergoes a process called dewaxing.
What Is The Best Way To Dissolve Shellac?
The best way to dissolve shellac is by using denatured alcohol.
Is Sanding Sealer Dewaxed Shellac?
Yes, sanding sealer is a type of dewaxed shellac. It is used to seal the wood surface before applying the final finish.
Conclusion
To summarize, dewaxing shellac is a simple yet important process to maintain the quality and appearance of your furniture or woodwork. By following the steps mentioned in this blog post, you can effectively remove wax buildup and restore the natural beauty of shellac finishes.
Remember to exercise caution and use the appropriate tools and techniques for the best results. Keep your furniture looking its best with regular dewaxing and enjoy its longevity and aesthetic appeal for years to come.