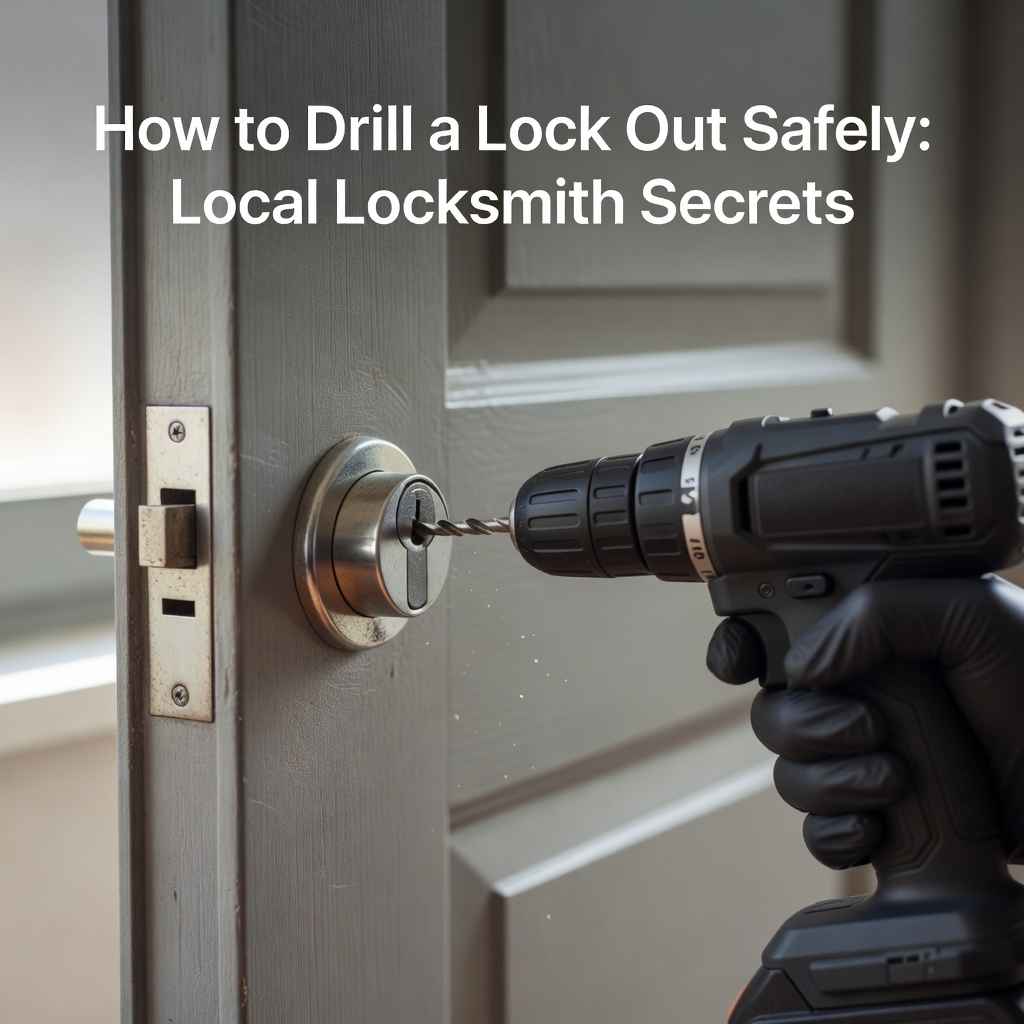
How to Drill a Lock Out Safely: Local Locksmith Secrets
Getting locked out can be super frustrating. You might wonder if you can handle it yourself, especially if you’re looking into How to Drill a Lock Out Safely: Local Locksmith Secrets. It can seem like a big, scary task for someone who’s never done it before.
Lots of people get worried about damaging the lock or hurting themselves. But don’t sweat it! We’re going to walk you through this in a really simple way.
Get ready for easy steps that will make sense.
Safely Drilling a Lock Out Key Steps
Learning how to drill a lock out safely is a skill many people hope they never need, but knowing it can bring peace of mind. This section covers the essential first steps and what you need to get started. We will break down the process into easy-to-follow actions, ensuring you understand each part before you begin.
It’s all about being prepared and knowing what tools will help you get the job done right without causing extra trouble.
Understanding the Lock and Your Goal
Before you even think about drilling, it’s super important to know what kind of lock you are dealing with. Different locks have different parts inside. Some are simpler, while others are more complex.
Knowing your lock helps you pick the right way to drill and know where to aim. The main goal when drilling a lock for a lockout is to destroy the pins or the cylinder itself. This makes the lock unable to hold itself shut.
It’s not about being destructive; it’s about getting through a tough spot.
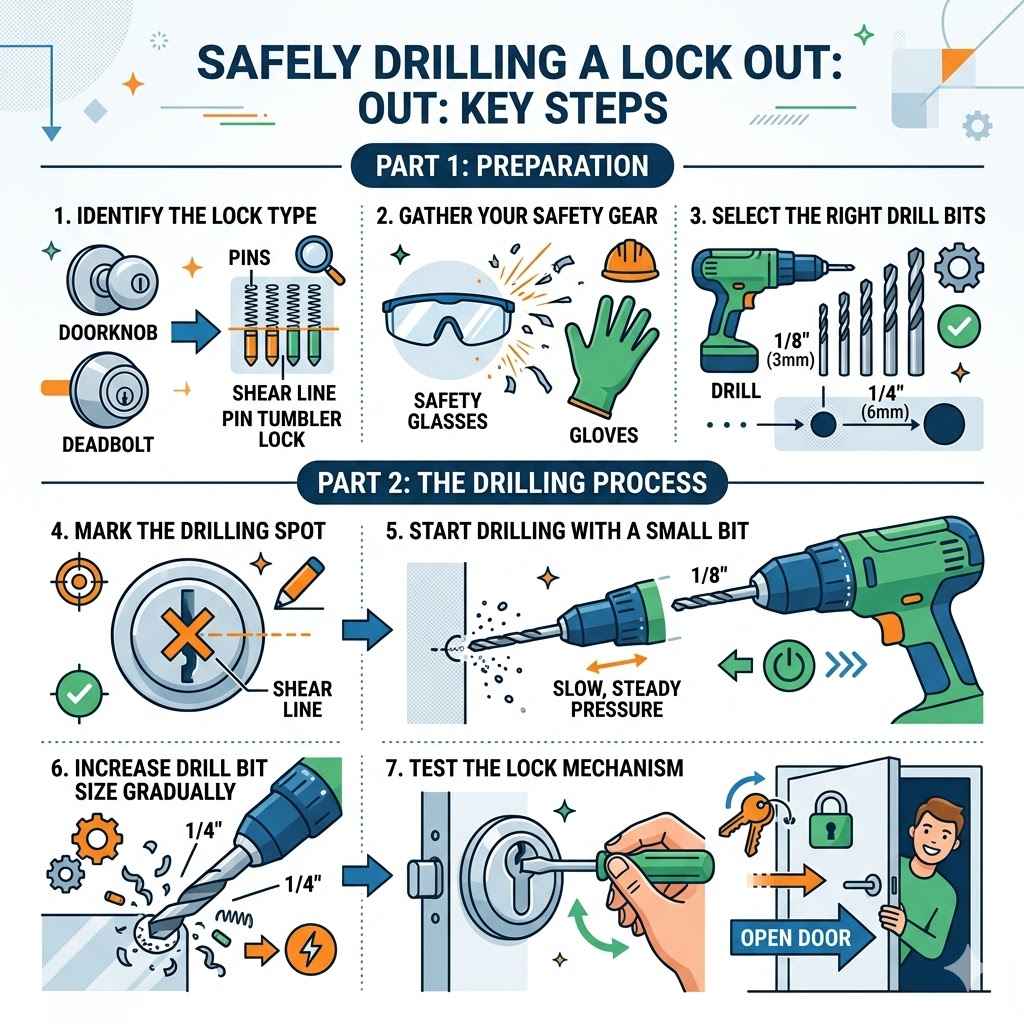
- Identify the Lock Type: This means looking at the lock. Is it a simple doorknob lock, a deadbolt, or something else? Most common household locks are pin tumbler locks. These are the ones most people are likely to drill.
Knowing the type helps you guess what’s inside. For a pin tumbler lock, there are small pins and springs. When the right key is in, these pins line up perfectly.
Drilling aims to mess up this alignment permanently. This is a key piece of knowledge. It guides your entire approach.
- Gather Your Safety Gear: Drilling can create metal shavings. These can get in your eyes. You will need safety glasses. Gloves are also a good idea to protect your hands from sharp edges and heat.
Safety gear isn’t just a suggestion; it’s a must. Think of it like wearing a seatbelt. It’s there to protect you if something unexpected happens.
Flying metal bits are no joke. They can cause serious eye injury. Always put your safety first.
- Select the Right Drill Bits: You will need a drill, of course. For most locks, a set of metal drill bits is best. Start with smaller bits and move to larger ones. A common size to aim for is around 1/4 inch or 6mm to get through the cylinder.
Choosing the correct drill bit size is vital. Too small, and you won’t do enough damage. Too big, and you might damage more than needed.
Local locksmiths often use specific bits designed for lock work. For DIYers, a standard set of metal bits will work if used with care. The idea is to destroy the internal workings, like the pins and springs.
The Drilling Process Step-by-Step
Now we get to the actual drilling. This part requires a steady hand and a clear plan. We will go through each step so you can follow along easily.
Remember to be patient. Rushing can lead to mistakes. This is where the magic happens, turning a locked door into an open one.
- Mark the Drilling Spot: For a standard pin tumbler lock, you want to drill through the shear line. This is where the plug (the part the key goes into) meets the housing of the lock. On the exterior of the lock, this is usually right where the keyway meets the cylinder body. A marker can help you aim.
Aiming is critical. If you miss the shear line, you might just make a hole without opening the lock. This makes the job harder.
Locksmiths know precisely where to drill. For you, a visible mark helps keep your drill bit on target. Think of it as a bullseye for your drill.
- Start Drilling with a Small Bit: Begin with a small drill bit, maybe 1/8 inch or 3mm. Drill slowly and steadily into the marked spot. Apply gentle pressure. You are trying to make a pilot hole.
Starting small is a smart move. It lets you get a feel for the material. It also prepares the hole for a larger bit.
You’ll feel resistance as you hit metal pins or the cylinder. This is normal. Keep drilling straight.
- Increase Drill Bit Size Gradually: Once you have a good pilot hole, switch to a larger drill bit. For many common locks, a 1/4 inch (6mm) bit is often effective. Continue drilling, increasing pressure slightly if needed, but always maintain control. You are aiming to destroy the pins and springs within the cylinder.
This step is where the lock starts to give way. As the larger bit spins, it chews through the internal components. You might hear grinding sounds.
This is the lock’s guts being destroyed. Keep the drill running smoothly. You are trying to break the pin stacks apart so the cylinder can turn.
- Test the Lock Mechanism: After drilling through the cylinder, try to turn the lock with a screwdriver or a flathead bit. If you drilled correctly, the lock should now be able to turn freely, allowing you to open the door. You may need to wiggle it a bit.
If the lock doesn’t turn easily, you might need to drill a little more or try a slightly larger bit. Sometimes, fragments of pins can jam the mechanism. Gently tapping the lock cylinder might help dislodge them.
Patience is key here. The goal is a free-spinning cylinder.
Locksmith Secrets for How to Drill a Lock Out Safely
Local locksmiths have tricks and techniques that make drilling locks safer and more effective. They do this day in and day out, so they know what works best. Learning some of these secrets can make your own attempt much smoother.
These tips are based on years of experience and understanding lock mechanics. They help avoid common mistakes and ensure the job gets done correctly.
Tools and Techniques Locksmiths Use
Professional locksmiths have specialized tools. These aren’t always available to the average person, but understanding them gives insight. They often use electric drills with variable speeds.
This allows for more control. They also use special bits that are designed to cut through hardened steel pins quickly and efficiently.
- Variable Speed Drills: Locksmiths prefer drills where they can control the speed. A slower speed gives more control when starting. A faster speed can help when drilling through tougher parts. This precision is what prevents damage to the door itself.
The ability to change speed is a big deal. Starting slow prevents the drill bit from wandering. Once you’re into the metal, a good speed helps cut through the pins and springs without overheating the bit.
It’s a balance that takes practice to master.
- Drill Bit Selection and Lubrication: Beyond standard bits, locksmiths might use stepped bits or specialized lock-picking bits designed for destructive entry. They also often use cutting fluid or oil. This helps keep the drill bit cool. It also makes drilling smoother and extends the life of the bit.
Lubrication is often overlooked by DIYers. It’s a small thing that makes a big difference. It prevents the bit from getting too hot, which can dull it quickly.
It also helps clear away metal shavings. This makes the drilling process much cleaner and more efficient.
- Targeting Specific Pins: Some locksmiths have techniques to target specific pins. For instance, they might drill multiple small holes to destroy the pin stack more effectively. This requires a deep knowledge of lock construction.
This advanced technique is about precision. Instead of one big hole, they might create a series of smaller ones. This ensures that all the pins are compromised.
It’s like having a surgical approach to lock drilling.
Avoiding Common Pitfalls
When you’re learning How to Drill a Lock Out Safely: Local Locksmith Secrets, knowing what not to do is as important as knowing what to do. Many DIY attempts go wrong because people make simple mistakes. These mistakes can lead to more damage or an inability to open the lock.
- Drilling Too Deep or Too Far Sideways: If you drill too far past the shear line or off to the side, you might damage the door frame or the latch mechanism. This can make repairs costly. Always aim for the sweet spot.
This is a classic beginner mistake. It’s easy to get carried away with the drill. When you go too far, you’re not just damaging the lock anymore.
You could be facing a repair bill for your door or frame. Keep your drill straight and focused.
- Using the Wrong Tools for the Job: Trying to use a flimsy drill or dull bits will make the job much harder. It can also be dangerous. Always use tools that are up to the task.
Cheap or old tools can let you down. They might break, slip, or not cut effectively. This wastes your time and can be unsafe.
Invest in decent tools, or borrow them if possible. The right tool makes all the difference.
- Not Understanding the Lock’s Mechanism: Some locks are designed to resist drilling. Trying to drill a high-security lock without the proper knowledge and tools can be futile and damage the lock beyond repair, making it harder for a locksmith to fix.
Not all locks are created equal. Some have hardened pins or internal shields that make them very hard to drill. If you’re not sure if your lock is a standard one, it might be better to call a professional.
This saves you a lot of trouble and potential cost.
When to Call a Professional Locksmith
Even with the best intentions and guidance, sometimes the situation calls for an expert. Knowing when to step back and call a professional is a sign of good judgment. Locksmiths have the experience, tools, and knowledge to handle even the trickiest lockouts quickly and efficiently.
They can often get you back inside without any damage.
Signs You Need a Locksmith
There are certain situations where trying to DIY a lock out is just not the best idea. If you encounter any of these, it’s time to pick up the phone.
- High-Security Locks: If you have a lock that is advertised as high-security, pick-resistant, or drill-resistant, attempting to drill it yourself is likely to be unsuccessful. These locks have special internal components designed to thwart such attacks. A locksmith will have specialized tools and techniques for these.
These locks are built tough. They are made to resist common methods of forced entry, including drilling. Trying to force it could just waste your time and damage the lock further, making it harder for even a pro to deal with later.
- Complex Lock Types: Beyond standard pin tumblers, there are other lock types like wafer locks, dimple locks, or electronic locks. Drilling might not be the correct method for these, or it could cause irreparable damage.
Different locks need different solutions. A simple drilling method won’t work on every lock. For example, electronic locks have no pins to drill.
A locksmith can identify the lock type and use the appropriate method for entry.
- Damage to the Door or Frame: If the lockout situation has already caused some damage to your door or frame, it’s best to let a professional assess the situation. They can often open the lock while minimizing further damage and can advise on repairs.
When there’s already existing damage, you don’t want to make it worse. A locksmith can often work around existing issues. They can also tell you if repairs are needed and help you get them done.
Benefits of Hiring a Local Locksmith
Calling a local locksmith offers several advantages. They are nearby, which means faster response times, especially in an emergency. They are also licensed and insured, providing peace of mind.
Locksmiths have the right tools for the job, ensuring it’s done efficiently and correctly.
- Speed and Efficiency: Locksmiths are trained to open locks quickly. They can usually assess the situation and get you back inside in a short amount of time. This is especially important if you are in a hurry or in a bad situation.
Time is often critical when locked out. A locksmith can save you valuable time. They know the most efficient ways to handle the situation.
This means less waiting and less stress for you.
- Damage-Free Entry (Usually): A skilled locksmith will try to open your lock without causing any damage. They use non-destructive methods whenever possible. This saves you the cost and hassle of replacing the lock or door.
The primary goal of a good locksmith is to get you in without breaking anything. They have the skills to pick locks or bypass them without drilling unless absolutely necessary. This preserves your existing hardware.
- Expertise and Professionalism: Locksmiths are professionals. They understand lock mechanisms completely. They are also typically bonded and insured, offering a layer of security and trust.
You are entrusting your security to them. Professionals are trained and certified. This means they follow ethical practices and have the skills to do the job right.
It’s a guarantee of quality service.
How to Drill a Lock Out Safely Local Locksmith Secrets for Beginners
For beginners who are facing a lockout and considering destructive entry, this section focuses on making the process as safe and straightforward as possible. We combine the basic steps with some of the simpler secrets locksmiths use to ensure a successful outcome. The key is preparation and following instructions carefully.
This guide aims to empower you with the knowledge to handle a lockout situation effectively, should you choose to do it yourself.
Preparation Is Key
Before you even pick up a drill, take a moment to prepare. This is where many DIY attempts go wrong. A few simple checks can save you a lot of trouble.
- Assess Your Environment: Make sure you have enough space to work. Ensure there’s good lighting. If you are drilling outdoors, try to find a spot that is somewhat sheltered from wind.
Working in a cluttered or poorly lit area increases the risk of error. Wind can blow metal shavings everywhere. Taking a moment to set up your workspace properly is a crucial first step.
It makes the entire process much smoother.
- Double-Check Lock Type and Your Tools: Before you start drilling, take another look at the lock. Confirm it’s a type that can be drilled. Make sure your drill is fully charged or plugged in, and your chosen drill bits are ready and sharp.
Reconfirming the lock type is important. Sometimes, what looks like a standard lock might have hidden complexities. Having all your tools ready and in good working order prevents interruptions and potential frustration later on.
Executing the Drill with Confidence
With preparation complete, you can now proceed with the drilling. Remember to stay calm and follow the steps we’ve outlined. Confidence comes from knowing you’ve done your homework.
- Drill Slowly and Steadily: Do not rush the drilling process. Maintain a consistent speed and even pressure. This helps you stay on target and prevents the drill bit from catching or breaking.
Patience is your best friend here. Forcing the drill can cause it to slip, damaging the lock or the surrounding door. Slow and steady wins the race, ensuring you hit the critical points of the lock cylinder.
- Listen and Feel for Changes: As you drill, pay attention to the sounds and the feel of the drill. You’ll notice changes in resistance as you break through different parts of the lock. These cues can tell you if you are on the right track.
Your senses are valuable tools. A change in sound or a sudden decrease in resistance can mean you’ve broken through the pins or the cylinder wall. These are signs you are making progress.
Learn to interpret them.
The Aftermath and Lock Replacement
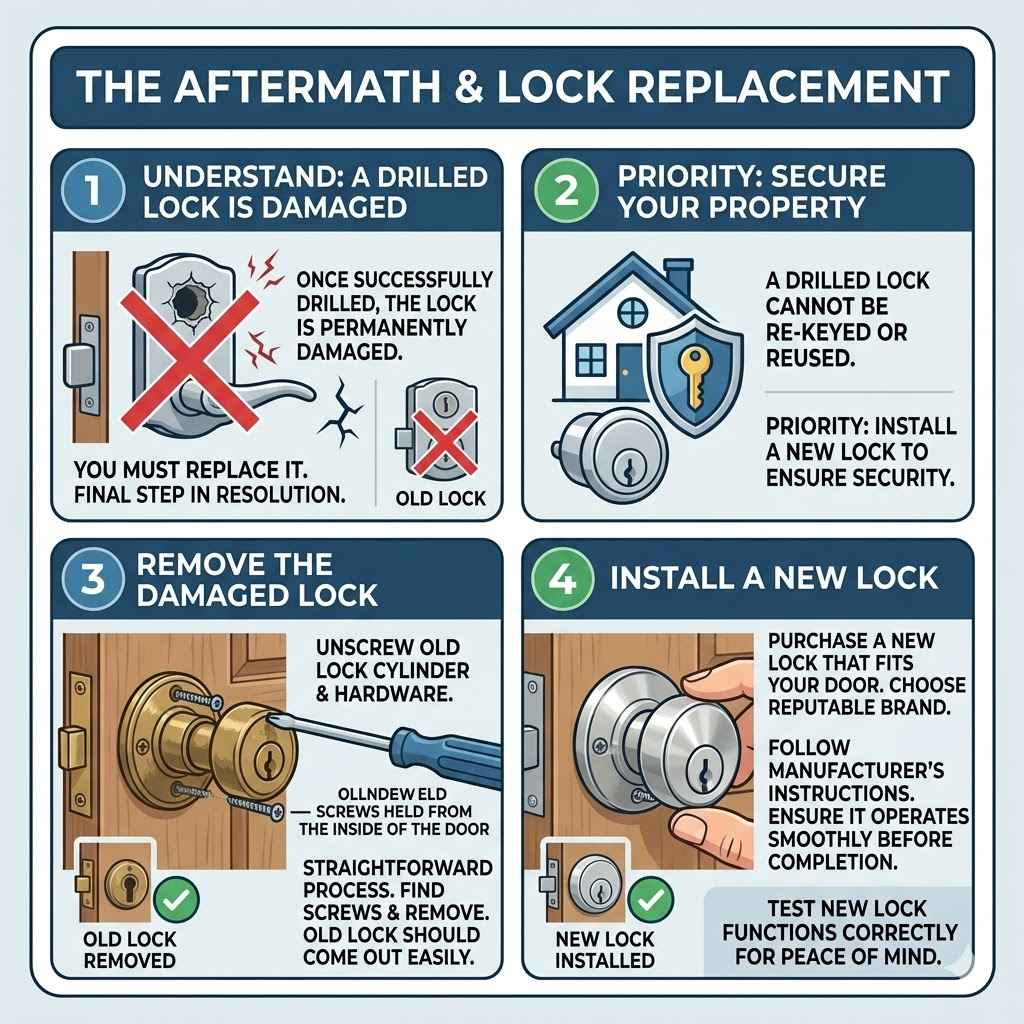
Once you have successfully drilled open a lock, it’s important to understand that the lock is now permanently damaged. You will need to replace it. This section briefly touches on what to do next.
It’s the final step in the lockout resolution process.
Securing Your Property
After gaining access, your priority is to secure your property. A drilled lock cannot be re-keyed or reused. You will need to install a new lock.
- Remove the Damaged Lock: You will need to unscrew the old lock cylinder and any associated hardware. Most locks are held in place by screws from the inside of the door.
Taking out the damaged lock is a straightforward process. You’ll typically find screws that hold the cylinder in place. Once these are removed, the old lock should come out easily.
- Install a New Lock: Purchase a new lock that fits your door. Follow the manufacturer’s instructions for installation. Ensure it operates smoothly before you consider your task complete.
Getting a new, working lock is essential for security. Choose a reputable brand and follow the installation guide carefully. Testing the new lock ensures it functions correctly, providing you with peace of mind.
Frequently Asked Questions
Question: Can I really drill a lock myself?
Answer: For standard pin tumbler locks, yes, it is possible to drill them yourself if you are careful and follow the right steps. However, it requires the correct tools, safety gear, and a steady hand. For high-security locks, it’s usually best to call a professional.
Question: What kind of drill bits do I need to drill a lock?
Answer: You will need a power drill and a set of metal drill bits. It’s best to start with a smaller bit (around 1/8 inch or 3mm) and gradually increase the size to about 1/4 inch (6mm) to destroy the pins within the lock cylinder.
Question: How do I know where to drill the lock?
Answer: For most common locks, you want to drill through the shear line, which is the point where the plug (where the key goes) meets the outer housing of the lock. Aim for the area just above the keyway.
Question: Will drilling a lock damage my door?
Answer: If you drill precisely and carefully, you should only damage the lock cylinder itself. However, if you are not careful, you could potentially damage the door or the frame. Always use safety glasses.
Question: How long does it take to drill a lock?
Answer: For someone experienced, it might take just a few minutes. For a beginner, it could take 15-30 minutes or even longer, depending on the lock type, the tools used, and how careful you are being.
Summary
Learning How to Drill a Lock Out Safely: Local Locksmith Secrets gives you options in a tough spot. Remember to always prioritize safety. Use the right tools and know when to call a pro.
Replacing the lock afterward is the final step to securing your home.