How to Drill Out a Screw: Bit Size, Technique & Stripped Head Guide
Yes, you can drill out a screw to remove it — and it works reliably when the head is stripped, the screw is rusted solid, or the shank has snapped flush with the surface. The technique varies by situation: a stripped head requires a cobalt HSS bit 1–2 sizes smaller than the screw diameter plus a center punch; a rusted screw benefits from a 15–30 minute penetrating oil soak first; a left-hand drill bit often backs the screw out on its own before you reach the shank. This guide covers drill bit selection by screw type, the 7-step process, and what to do when the drill bit wanders or overheats.
Quick Answer
To drill out a screw: (1) center punch the screw head; (2) drill a pilot hole with a cobalt HSS bit 1–2 sizes smaller than the screw diameter at low speed; (3) drill with a larger bit until the head shears off; (4) grab the remaining shank with locking pliers and unscrew. For rusted screws, apply penetrating oil and wait 15–30 minutes first. Left-hand drill bits often remove the screw before you hit the shank.
When Should You Consider Drilling Through a Screw?
Before we grab our drills, let’s talk about when this method is your best bet. Sometimes, the simplest solutions are right there in front of us, but other times, we need a more robust approach. Drilling through a screw isn’t usually the first method to try, but it’s incredibly effective when others have failed.
Stripped Screw Heads
This is probably the most common reason you’d consider drilling. When the slots or the cross shapes in the screw head are so damaged that a screwdriver can’t get a grip, it’s effectively useless. Trying to force a screwdriver can make the stripping even worse. Drilling it out is a direct way to overcome the lack of grip.
Rusted or Corroded Screws
Exposure to moisture or harsh environments can cause screws to rust or corrode. This can essentially weld them in place, making them impossible to turn. The rust expands, binding the screw threads to the material. Drilling cuts through this binding and removes the screw material.
Broken Screw Heads
If the screw head snaps off entirely, leaving the shaft embedded in the material, you can’t use any standard driver. Drilling is a common solution to remove the remaining shank. Often, you’ll drill into the center of the shaft to either weaken it for removal, or to allow for an extraction tool to bite into it.
Screws Driven Too Deeply or Incorrectly
Sometimes, a screw might be countersunk too far, or driven at an angle, making it difficult to access or remove. In some cases, drilling can be a way to compromise the screw’s integrity enough to break it free, or to remove the head entirely if it’s preventing you from working on the surface.
When Other Removal Methods Have Failed
You’ve likely tried a screw extractor, penetrating oil like WD-40, or maybe even a rubber band trick to get more grip. If none of those worked, drilling becomes the next logical, albeit more involved, step. It’s the fallback for really stubborn fasteners.
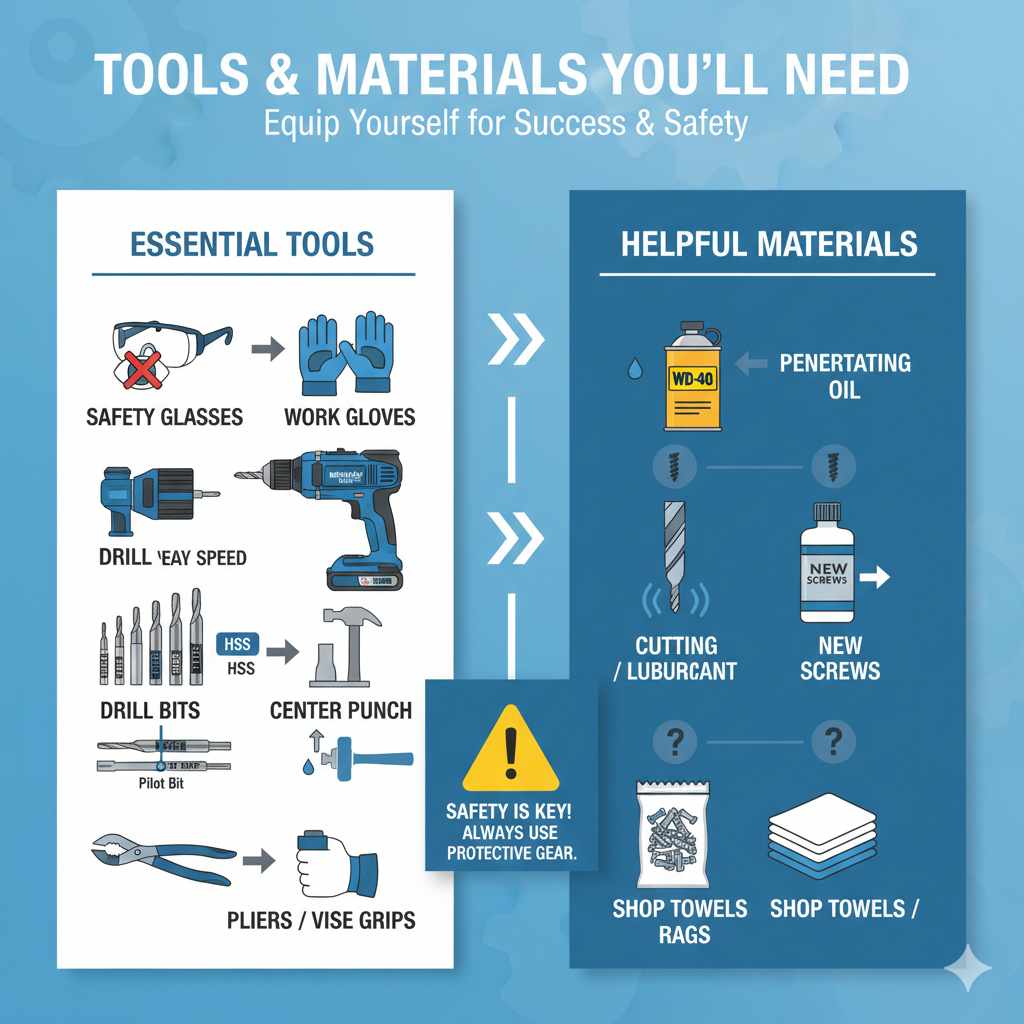
Tools and Materials You’ll Need
Having the right gear can make all the difference. Don’t worry if you don’t have everything; I’ll explain why each item is helpful. For this task, safety is key, so always use protective gear!
Essential Tools:
- Safety Glasses: Absolutely non-negotiable. Flying metal fragments are a real danger.
- Work Gloves: To protect your hands from sharp edges and a hot drill bit.
- Drill: A corded drill offers more consistent power, but a good cordless drill will also work. Variable speed is very helpful here.
- Drill Bits: You’ll need a set of metal drill bits. It’s best to start with a smaller pilot bit and have a larger bit ready. High-speed steel (HSS) bits are generally recommended for metal.
- Center Punch: This tool helps create a small indentation so your drill bit doesn’t wander.
- Hammer: To use with the center punch.
- Pliers or Vise Grips: In case you can remove pieces of the screw as you drill.
Helpful (But Not Always Necessary) Materials:
- Penetrating Oil: Such as WD-40 or a dedicated rust penetrant. This can help loosen a corroded screw before you start drilling.
- Cutting Fluid or Lubricant: To keep your drill bit and the screw cool, which prolongs the life of your drill bit and makes drilling easier, especially with harder metals.
- New Screws: You’ll need replacements for the one you’re removing.
- Shop Towels or Rags: For cleanup.
What Drill Bit Size to Use When Drilling Out a Screw
Choosing the right drill bit size is the most critical decision when drilling out a screw. Start with a pilot bit 1–2 sizes smaller than the screw’s core diameter, then switch to a head-removal bit that matches the screw head diameter — drilling just deep enough to shear the head, not through the shank.
| Screw Size | Pilot Bit (first pass) | Head-removal Bit | Bit Material |
|---|---|---|---|
| #6 (3.5mm) | 1/16″ (1.6mm) | 7/64″ (2.8mm) | HSS or cobalt |
| #8 (4mm) | 5/64″ (2mm) | 9/64″ (3.6mm) | HSS or cobalt |
| #10 (4.8mm) | 3/32″ (2.4mm) | 11/64″ (4.4mm) | Cobalt recommended |
| #12 (5.5mm) | 7/64″ (2.8mm) | 3/16″ (4.8mm) | Cobalt required |
| 1/4″ lag screw | 1/8″ (3.2mm) | 7/32″ (5.6mm) | Cobalt required |
Rusted or seized steel screws: Always use cobalt bits (M35 or M42 grade). Rusted steel is significantly harder due to scale formation — standard HSS bits dull after one or two attempts. Apply cutting oil and drill at the lowest speed setting to prevent overheating.
★ Recommended product
Cobalt Drill Bit Set for Metal Screws
M35 cobalt drill bits stay sharp through rusted and seized steel screws. A 29-piece set covers every screw size from #4 through 1/2″ lag. The 135-degree split-point tip self-centers without a pilot hole on softer screws.
Check price on AmazonAs an Amazon Associate we earn from qualifying purchases.
Step-by-Step Guide: How to Drill Through a Screw
Now, let’s get down to business. This process requires a steady hand and a bit of patience. We’re going to drill down the center of the screw, effectively destroying it to get it out of the way. Remember to work slowly and carefully.
Step 1: Assess the Situation and Prepare Your Workspace
Clear the area around the screw. Make sure you have good lighting. If the screw is in wood, try to protect the surrounding material from accidental damage by the drill bit. If it’s in metal, ensure the surface is clean and stable.
Safety First: Put on your safety glasses and gloves. If you’re working with a particularly stubborn or large screw, consider a face shield.
Step 2: Loosen the Screw (If Possible)
Before you commit to drilling, give it one last try with other methods. Apply penetrating oil generously to the screw head and threads. Let it sit for at least 15-30 minutes, or even longer for very rusted screws. A few gentle taps with a hammer on the screwdriver handle (when trying to remove it) can sometimes help the oil seep in and break the bond.
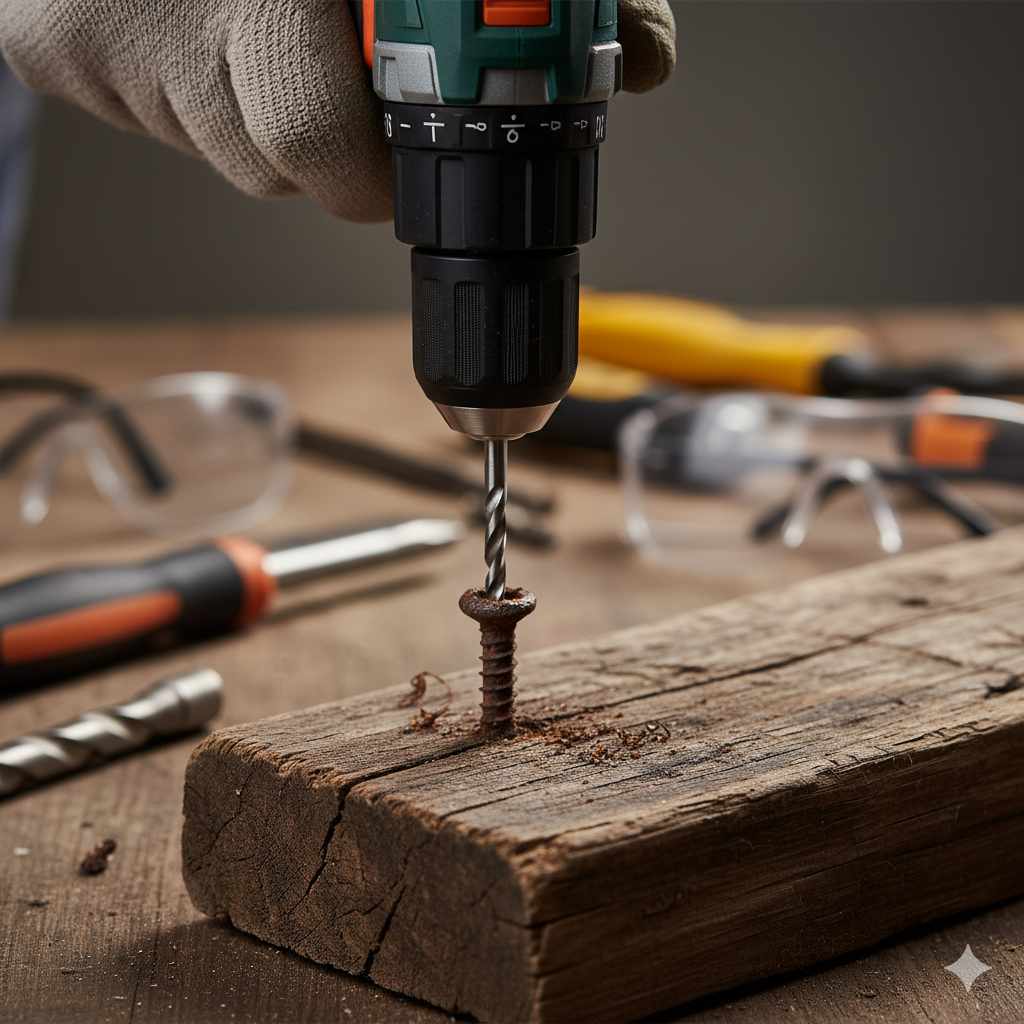
Step 3: Mark the Center of the Screw
This is a critical step for success. You need to drill directly down the center of the screw. Use a center punch to create a small indentation on the exact center of the screw head (or what’s left of it). Place the sharp point of the center punch on the screw’s center and strike the other end firmly with a hammer. This dimple will guide your drill bit and prevent it from skating off.
If the screw head is completely gone, you’ll need to visually find the absolute center of the remaining screw shank. This requires a bit more finesse.
Step 4: Select and Prepare Your Drill Bit(s)
You’ll likely need two sizes of metal drill bits: a smaller one for a pilot hole and a larger one to essentially obliterate the screw.
- Pilot Drill Bit: Start with a small bit, typically 1/8 inch (3mm) or 3/32 inch (2.4mm), depending on the screw size. This cleans out the center and ensures the larger bit has a good starting point.
- Main Drill Bit: This bit should be large enough to go through the entire length of the screw shank or at least wide enough to weaken it significantly and remove the head. For many common wood screws that have failed, a bit close to the diameter of the screw’s shank (excluding threads) is often suitable, or even slightly larger if you want to ensure the head separates. For a screw with a 1/4 inch shank, you might use a 1/4 inch or even 5/16 inch drill bit.
Ensure your drill bits are sharp and designed for metal.
Step 5: Drill the Pilot Hole
Insert the smaller drill bit into your drill. Set your drill to a slow speed and a low torque setting if your drill has one. Place the tip of the drill bit into the indentation you made with the center punch. Apply firm, steady pressure and drill slowly into the screw.
Tip: Apply a drop of cutting fluid or even some oil onto the drill bit and screw head as you drill. This acts as a lubricant and coolant. It will reduce friction, prevent the bit from overheating, and make drilling much smoother. For wood applications, you might use a light machine oil or even a bit of dish soap mixed with water, but for metal-on-metal, a dedicated cutting fluid is best. You can find readily available cutting fluids from reputable brands like WD-40 or specific metalworking suppliers online.
Drill straight down the center until you’ve gone through the head and into the shank a reasonable depth, or the depth of the screw. If the screw is very long, you might not need to drill all the way through. The goal is to compromise its structure or remove the head.
Step 6: Drill with the Larger Bit
Now, switch to your larger drill bit. Again, use a slow speed and steady pressure. Align the bit with the pilot hole you’ve already created. Drill straight down through the screw. The goal here is either to:
- Remove the Screw Head: Drill just deep enough to sever the head from the shank. Once the head is off, you can often remove the material it was holding the piece to, and then grip the remaining shank with pliers or vise grips to unscrew it.
- Drill Through the Entire Screw: If you can’t grip the shank or the screw is particularly small, you might drill all the way through the shank, effectively destroying the screw and leaving holes where it once was. You may need to use progressively larger bits if the screw is made of very hard steel.
Continue drilling until the screw is fully compromised or removed. You might feel the drill bit suddenly break through the material on the other side, or the screw might just disintegrate. Be prepared for this and pull back the drill gently.
Step 7: Clear Remaining Debris and Remove the Screw (or Shank)
Once you’ve drilled through the screw, use pliers or vise grips to grab any remaining pieces of the screw head or shank and pull them out. If you drilled through the entire screw, you might be left with just a hole. You may need to pick out small metal fragments from the hole with a pick or tweezers.
Clean the area thoroughly. Compressed air is great for blowing away metal shavings. Inspect the hole for any damage and assess if you can now use a replacement screw of proper size—you might need to drill a new pilot hole nearby or use a slightly larger screw.
Alternative Methods When Drilling Fails or Isn’t Ideal
Drilling is a powerful technique, but it’s not your only option. Sometimes a screw is simply too hard, or you want to preserve the material more carefully. Here are a few other methods that might help.
Using Screw Extractors (Easy Outs)
These are specialized tools designed to bite into damaged screw heads or broken screw shanks. They work by having a reverse thread. You drill a pilot hole (often smaller than for destructive drilling), then insert the extractor and turn it counter-clockwise. As you turn, it bites deeper for more grip. Many DIYers find these very effective, and they are generally less destructive than drilling the entire screw. For the best results and to prevent extractor breakage—which can be harder to remove than the original screw!, follow the manufacturer’s instructions carefully. For tips on how to use screw extractors, resources like the U.S. Consumer Product Safety Commission (CPSC) often have guides on tool usage in their safety publications, though specific tool guides are more common from manufacturers.
Left-Handed Drill Bits
These drill bits are designed to cut in reverse (counter-clockwise). As you drill into the screw, the bit’s counter-clockwise rotation can sometimes catch the edge of the screw and back it out. They are particularly useful for removing stubborn, seized fasteners. They essentially combine the drilling and extraction step in one go. If you’re serious about DIY and encounter seized screws regularly, investing in a set of left-handed drill bits can be a wise decision.
Cutting a New Slot
If the screw head is mostly intact but stripped, you can sometimes use a rotary tool (like a Dremel) with a cutting wheel to carefully cut a new, deeper slot across the head. This gives your screwdriver a fresh edge to grip. Be precise with this, as it’s easy to damage the surrounding material. Once the new slot is cut, use a flathead screwdriver and a bit of force and leverage to remove the screw.
Grinding the Head Off
If you only need to remove the material the screw is holding down, you can sometimes use an angle grinder or rotary tool to simply grind the screw head flat. Once the head is gone, the material can be lifted off, and the remaining screw shank can be dealt with later (often by gripping it with vise grips and backing it out).
★ Recommended product
Screw Extractor Set with Left-Hand Drill Bits
Combined screw extractor and left-hand drill bit kit: the left-hand bits often back out the screw during drilling, while the extractors handle cases where you need to bite into the shank. Covers broken bolts and screws from #4 through 1/2″.
Check price on AmazonAs an Amazon Associate we earn from qualifying purchases.
Troubleshooting Common Problems
Even with the best intentions, things can go sideways. Here are a few common issues and how to solve them:
The Drill Bit is Getting Too Hot
This is a sign of excessive friction. Ensure you are using cutting fluid or lubricant. Drill in short bursts, allowing the bit and the screw to cool down between attempts. Make sure you’re using a slow drill speed. If the bit is dull, it will generate more heat. Sharpen or replace it.
The Drill Bit is Wandering Off-Center
This highlights the importance of the center punch. Ensure you made a good, deep indentation. If it’s still wandering, try a slightly smaller pilot bit first. You can also try to brace the drill bit with the center punch lightly as you start to drill the pilot hole – this requires extreme care and steadiness.
The Screw is Made of Very Hard Steel
Some modern screws, especially those used in construction or automotive applications, are made of hardened steel that can be tough to drill. You might need to use very sharp, high-quality cobalt drill bits. If you’re really struggling, you might need to experiment with progressively larger bits, or consider a different removal method like impact extractors.
You Accidentally Drilled Off-Center or Damaged Surrounding Material
If you go off course, don’t panic. Assess the damage. If you’ve slightly widened the hole in the material but the screw is out, you might be able to fill the hole with wood filler or epoxy and then drill a new pilot hole, or use a slightly larger screw. For wood, large repairs can be managed with wood filler, dowels, or even by cutting out a section and epoxying in a new piece of wood. Always aim for the neatest repair possible to maintain the integrity and appearance of your project.
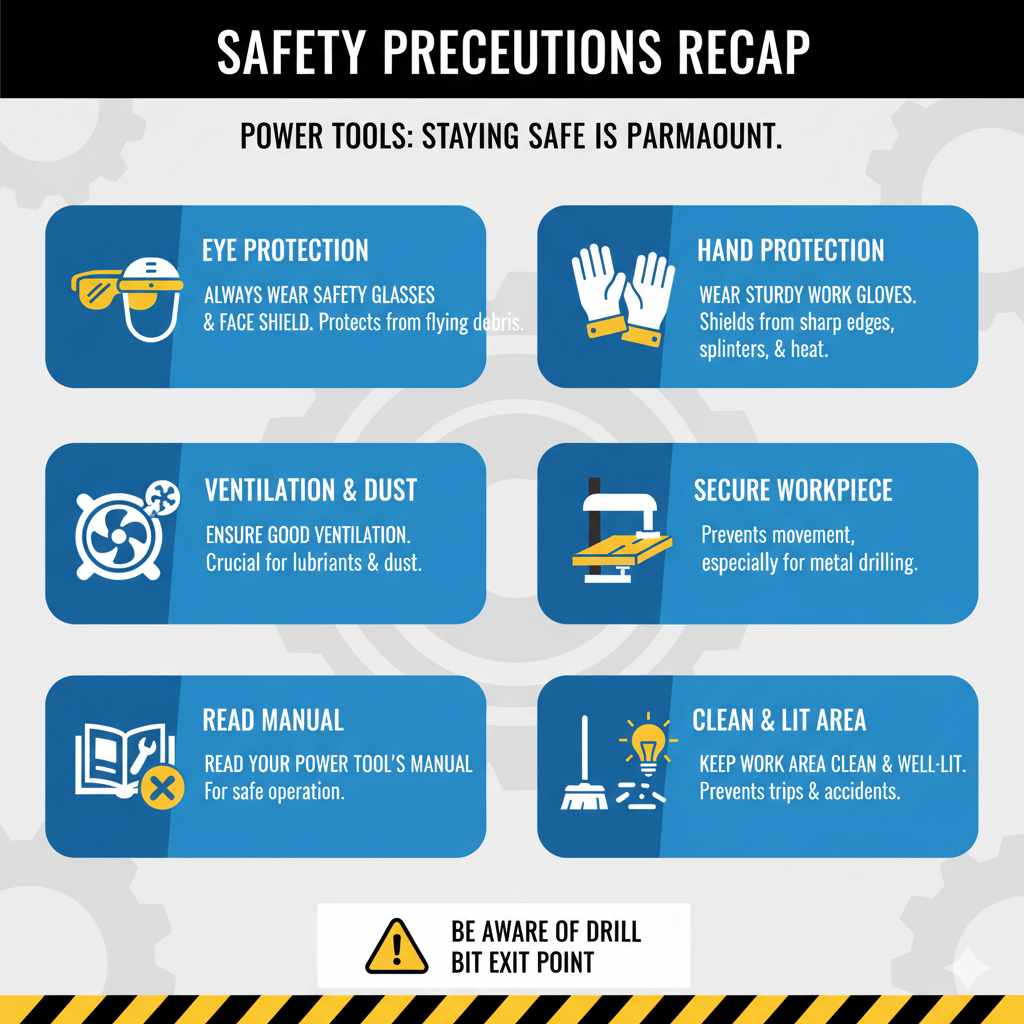
Safety Precautions Recap
I can’t stress this enough: safety is paramount when using power tools. Even simple tasks can become dangerous if you’re not careful.
- Always wear safety glasses to protect your eyes from flying debris. A face shield offers even more protection.
- Wear sturdy work gloves to protect your hands from sharp edges, splinters, and potential heat from friction.
- Ensure good ventilation, especially if using lubricants or dealing with dust.
- Secure your workpiece if necessary, especially if drilling into metal.
- Read your power tool’s manual for safe operation instructions.
- Keep your work area clean and well-lit to prevent trips and accidents.
- Be aware of where the drill bit will exit, especially when drilling through material.
Frequently Asked Questions (FAQ)
Can I use a regular drill bit for metal screws?
Yes, but it’s best to use drill bits specifically designed for metal, often called High-Speed Steel (HSS) bits. They are hardened to withstand the heat and abrasion of drilling metal. For very hard screws, cobalt bits are even better.
What happens if I break a drill bit inside the screw?
This can be a real problem. If the drill bit breaks off flush with the screw or material, you’ll need specialized tools to remove it, such as diamond-tipped drill bits to grind it out, or small chisels and picks. It’s best to avoid this by using sharp bits, not forcing the drill, and using lubricant.
Do I need a special drill for this?
No, a standard corded or good quality cordless drill is sufficient. A variable speed drill is very helpful, as is a drill with a clutch to prevent over-tightening bits or stripping softer materials. A hammer drill is not necessary and can be too aggressive.
How deep do I need to drill?
It depends on your goal. If you’re removing just the head, drill until the head is severed from the shank. If you’re drilling through the entire screw, drill until the bit passes completely through.
What if the material around the screw is delicate, like soft wood or plastic?
You’ll need to be extra careful. Use the lowest drill speed possible, apply very gentle pressure, and consider using tape to mask and protect the surface around the screw. A drill press can offer more precision and stability if available, allowing for a more controlled depth.
Is it better to drill from the top of the screw or into the side?
Always drill from the top, centered on the screw head or shank. Drilling into the side is very difficult to control and rarely effective for removal.