How to Fix Scratches on LVP Flooring: Quick DIY Solutions
To fix scratches on LVP flooring, gently abrade the floor with a Scotch-Brite pad, then apply paste wax. For a more in-depth repair, consider using a stain pen or scratch concealer to minimize the scratches effectively.
These methods help restore the appearance of your LVP flooring and maintain its durability over time. Additionally, you can find specific repair kits available online or at home improvement stores that are designed to address scratches on luxury vinyl plank flooring.
By following these steps, you can easily fix scratches on your LVP flooring and keep it looking new for longer.
Introduction To Lvp Flooring
Learn how to fix scratches on LVP flooring with these simple steps: gently abrade the floor, apply paste wax, and use a stain pen for a seamless finish. You can also opt for scratch concealer for a quick and effective solution.
LVP (Luxury Vinyl Plank) flooring is a popular choice for many homeowners due to its durability, affordability, and aesthetic appeal. It mimics the look of real wood or stone but is much easier to maintain. LVP is resistant to scratches, dents, and water damage, making it ideal for high-traffic areas in homes.
Benefits Of Lvp
- Durability: Resistant to scratches, dents, and water damage.
- Affordability: Provides a luxurious look at a fraction of the cost of real wood or stone.
- Low Maintenance: Easy to clean and maintain, requiring minimal effort.
- Versatility: Available in a wide range of styles, colors, and patterns to suit any decor.
Common Causes Of Scratches
- Heavy Furniture: Dragging heavy furniture across the floor can cause scratches.
- Pet Claws: Pets with sharp claws can leave scratches on the LVP surface.
- Abrasive Materials: Sand, dirt, or debris can scratch the flooring if not cleaned promptly.
- Improper Cleaning: Using harsh chemicals or rough cleaning tools can damage the LVP.

Assessing The Damage
To address scratches on LVP flooring, gently abrade the floor over the scratches with a Scotch-Brite pad, then apply paste wax or a stain pen for light scratches. For deeper scratches, sand the area and apply scratch concealer. Consider using products like Vinyl Scratch Remover or a Floor Repair Kit for effective solutions.
Identifying Scratch Types
Before you can fix scratches on your LVP flooring, it’s important to first identify the type of scratch you’re dealing with. This will help determine the appropriate repair method and ensure the best possible outcome. Here are some common types of scratches you might encounter:
- Light Surface Scratches: These are shallow scratches that only affect the top layer of the flooring. They are typically not very noticeable and can be easily repaired.
- Deep Scratches: Deep scratches penetrate through the top layer of the flooring and may expose the underlying material. These scratches are more challenging to repair and may require professional assistance.
- Scuff Marks: Scuff marks are not technically scratches, but they can still mar the appearance of your LVP flooring. They are typically caused by friction from shoes or furniture and can be easily removed.
When To Call A Professional
While many scratches on LVP flooring can be repaired on your own, there are certain situations where it’s best to seek professional help. Here are some instances where you should consider calling a professional:
- Extensive Damage: If your LVP flooring has extensive or deep scratches that cover a large area, it’s best to consult a professional. They have the expertise and tools to effectively repair and restore your flooring.
- Unfamiliar with DIY Repairs: If you’re not confident in your DIY skills or have never repaired scratches on LVP flooring before, it’s advisable to seek professional assistance. They can ensure the job is done correctly and minimize the risk of further damage.
- Time Constraints: If you’re short on time or simply prefer to have the scratches professionally repaired, hiring a professional can save you time and effort. They can quickly assess the damage and provide an efficient solution.
Assessing the damage on your LVP flooring is the first step towards restoring its pristine appearance. By identifying the type of scratches and knowing when to call a professional, you can effectively address the damage and prolong the lifespan of your flooring.
Preparation Steps
Before fixing scratches on LVP flooring, it’s important to prepare the affected area to ensure a successful repair. The preparation steps involve cleaning the affected area and gathering necessary tools for the repair process.
Cleaning The Affected Area
Start by thoroughly cleaning the area where the scratches are located. Use a mild detergent and warm water to remove any dirt, dust, or debris from the affected area. Wipe the area dry with a clean, dry cloth to ensure it’s completely clean and free from any residues that could interfere with the repair process.
Gathering Necessary Tools
Next, gather the necessary tools and materials for fixing the scratches on your LVP flooring. These may include:
- Scratch Repair Kit: Look for a high-quality scratch repair kit designed specifically for LVP flooring.
- Scotch-Brite Pad: Use a gentle Scotch-Brite pad to abrade the floor over the scratches.
- Paste Wax: Apply paste wax to help fill in the scratches and restore the floor’s appearance.
- Stain Pen: A stain pen can be used to color-match the scratches with the surrounding floor.
By cleaning the affected area and gathering the necessary tools, you’ll be well-prepared to effectively fix the scratches on your LVP flooring.
Diy Scratch Removal Techniques
Scratches on LVP flooring can be a nuisance, but with the right DIY techniques, you can effectively remove them and restore the beauty of your floors. Whether you’re dealing with light surface scratches or deeper ones, there are various methods you can use to fix the imperfections and maintain the pristine appearance of your luxury vinyl plank flooring.
Light Scratch Solutions
For light scratches on LVP flooring, consider the following DIY solutions:
- Scotch-Brite Pad: Gently abrade the floor over the scratches with a Scotch-Brite pad to buff out the minor imperfections.
- Paste Wax: Apply paste wax to the scratched area and buff it to restore the shine and minimize the visibility of the scratches.
- Stain Pen: Use a stain pen that matches the color of your LVP flooring to fill in and conceal the light scratches.
Dealing With Deep Scratches
If your LVP flooring has deeper scratches, consider the following techniques to address them:
- Sanding: Carefully sand the scratched area to level the surface and prepare it for the application of scratch concealer.
- Apply Scratch Concealer: Use a quality scratch concealer specifically designed for LVP flooring to fill in and camouflage the deep scratches, restoring the seamless appearance of the floor.
- Applying Stain and Paste Wax: If the scratches are particularly deep, you may also need to apply a matching stain and paste wax to fully restore the affected area.
Products To The Rescue
To fix scratches on LVP flooring, consider using products such as WearMax Scratch Concealer, VinylFix Repair Kit, or Rejuvenate All Floors Restorer to fill in the scratches and restore the shine without the need for sanding. Another option is the XFCA Floor Repair Kit, which includes a heat pen for DIY touch-ups.
These products offer affordable and effective solutions to keep your flooring looking its best.
Scratch Concealers And Fillers
Scratch Concealers: These products effectively cover scratches on LVP flooring.
Fillers: They help fill in deeper scratches, restoring the floor’s smooth appearance.
Sealants And Coatings
Sealants: Sealants protect the floor from future damage and prevent scratches.
Coatings: Coatings add an extra layer of protection, enhancing the durability of your LVP flooring.
Practical Application Tips
If you’re wondering how to fix scratches on LVP flooring, there are a few practical application tips you can follow. Firstly, gently abrade the floor over the scratches with a Scotch-Brite pad. Then, apply paste wax or a stain pen to conceal the scratches.
Practical Application Tips:
When it comes to fixing scratches on LVP flooring, there are practical application tips that can help you achieve the desired results. Two effective methods are applying putty and wax. Here’s how to do it:
Applying Putty:
1. Start by cleaning the scratched area with a damp cloth and letting it dry completely.
2. Apply a small amount of putty to the scratched area using a putty knife. Be sure to fill the scratch completely.
3. Let the putty dry for the recommended time on the packaging.
4. Once the putty is dry, sand it lightly with a fine-grit sandpaper to level it with the surrounding flooring.
5. Clean the area again with a damp cloth and let it dry completely.
Applying Wax:
1. Clean the scratched area with a damp cloth and let it dry completely.
2. Apply a small amount of wax to the scratched area using a soft cloth. Be sure to fill the scratch completely.
3. Let the wax dry for the recommended time on the packaging.
4. Once the wax is dry, buff it with a clean, dry cloth to smooth it out and blend it with the surrounding flooring.
5. Clean the area again with a damp cloth and let it dry completely.
Finishing Touches:
To further improve the appearance of the repaired area, you can take these finishing touches:
– Apply a flooring polish or restorer to the entire floor to create a uniform shine.
– Use a felt pad under furniture to prevent future scratches.
– Place doormats at entryways to reduce dirt and debris that can cause scratches.
By following these practical application tips, you can fix scratches on your LVP flooring and restore its appearance.
Preventive Measures
Preventing scratches on your LVP flooring is essential to maintain its beauty and longevity. By implementing some preventive measures, you can minimize the risk of scratches and keep your floors looking pristine for years to come.
Regular Maintenance Tips
Regularly sweeping or vacuuming your LVP flooring can help remove abrasive debris that may cause scratches. Using a soft-bristled broom or a vacuum with a brush attachment is recommended to prevent any potential damage from occurring during cleaning.
Additionally, placing doormats at entryways can help prevent dirt, gravel, and other abrasive materials from being tracked onto the LVP flooring, reducing the risk of scratches caused by these particles.
Protective Accessories
Utilizing protective accessories such as felt pads or furniture coasters under heavy furniture legs can prevent them from scratching the LVP flooring. These accessories create a buffer between the furniture and the floor, reducing the likelihood of scratches caused by movement or weight.
Furthermore, consider using area rugs or runners in high-traffic areas to provide an extra layer of protection for the LVP flooring. This can help minimize wear and tear, reducing the risk of scratches in these frequently used spaces.
When To Replace Instead Of Repair
If your LVP flooring has extensive damage that cannot be effectively repaired, it may be time to consider replacement. Knowing when it’s more practical to replace the flooring rather than attempting repairs can save you time and money in the long run. Let’s explore the signs of irreparable damage and the cost-benefit analysis to help you make an informed decision.
Signs Of Irreparable Damage
When assessing your LVP flooring for irreparable damage, look for deep gouges or scratches that have penetrated the wear layer and exposed the core material. Additionally, large areas of warping or delamination indicate significant damage that may not be salvageable through simple repairs.
If you notice water damage or mold growth beneath the flooring, it’s crucial to address the underlying issue and consider replacing the affected areas to prevent further structural damage.
Cost-benefit Analysis
Before deciding whether to repair or replace your LVP flooring, it’s essential to conduct a cost-benefit analysis. Consider the overall condition of the flooring, the extent of the damage, and the cost of replacement versus repair.
Factor in the long-term durability and appearance of the repaired flooring compared to a new installation. If the repairs will only provide a temporary solution and the flooring is nearing the end of its lifespan, investing in replacement may be the more cost-effective choice in the long run.
Final Thoughts
To fix scratches on LVP flooring, gently abrade the floor with a Scotch-Brite pad, then apply paste wax or a stain pen. For deep scratches, consider using a wax filler stick after cleaning the area. These methods can help restore your flooring’s appearance and protect it from further damage.
Review Of Methods
If you have scratches on your LVP flooring, there are several methods you can try to fix them. One popular method is using a scratch concealer or remover, such as the WearMax Scratch Concealer or Vinyl Scratch Remover. Another option is to use a floor repair kit, such as the VinylFix or XFCA Floor Repair Kit. Additionally, you can try filling in the scratches with a floor restorer and polish, like the Rejuvenate All Floors Restorer.
Maintaining Lvp Flooring Long-term
While fixing scratches is important, it’s also essential to maintain your LVP flooring long-term to prevent future damage. Here are some tips to keep your LVP flooring looking its best:
- Regularly sweep or vacuum to remove dirt and debris
- Wipe up spills and stains immediately
- Use furniture pads to prevent scratches from moving furniture
- Avoid using harsh cleaning products or abrasive tools
By following these tips, you can help extend the life of your LVP flooring and prevent the need for frequent repairs.
Fixing scratches on LVP flooring can be a frustrating task, but with the right tools and techniques, it’s possible to restore your flooring’s appearance. Whether you choose to use a scratch concealer, floor repair kit, or restorer, be sure to follow the manufacturer’s instructions carefully. And remember, proper maintenance can go a long way in preventing scratches and other types of damage to your LVP flooring.
Frequently Asked Questions
How To Get Scratches Out Of Luxury Vinyl Plank Flooring?
To remove scratches from luxury vinyl plank flooring, follow these steps:
1. Gently abrade the scratches with a Scotch-Brite pad.
2. Apply paste wax to the scratched area.
3. Use a stain pen to match the color of the flooring.
4. Wipe off any excess wax or stain.
5. Repeat the process if necessary. Remember to clean the floor before starting and handle the materials with care.
How To Fix Deep Scratches On Laminate Flooring?
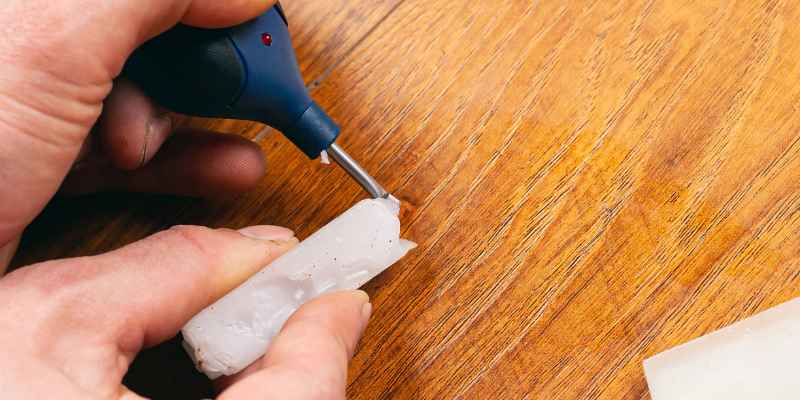
To fix deep scratches on laminate flooring, you can use wax filler sticks. First, clean the floor and warm the wax to make it pliable. Apply it to the damaged area and remove any excess with a knife once it has solidified.
Clean the area again when the wax is dry. You can also use a vinyl flooring putty that matches the floor color to repair gouges. Clean and vacuum the gap, let it dry overnight, apply putty using the nozzle, remove excess with a plastic putty knife, and wipe clean with a damp cloth.
How Do You Repair Gouges In Vinyl Plank Flooring?
To repair gouges in vinyl plank flooring, choose matching putty, clean the gap, apply putty with a nozzle, remove excess with a plastic knife, and wipe clean.
Does Lvp Flooring Scratch Easily?
LVP flooring is resistant to scratches but not scratch-proof. It can scratch with sharp objects.
Conclusion
Fixing scratches on LVP flooring is a simple task that can be done by anyone with the right tools and techniques. From using scratch concealer and repair kits to applying paste wax and stain pens, there are various methods to choose from.
It’s essential to clean the surface properly and match the repair material to the color of the floor. By following the tips and tricks mentioned you can restore the shine and beauty of your LVP flooring in no time.