
How to Make Lichtenberg Figures: The Lethal Voltage Risk First
To make Lichtenberg figures, you can use a high-voltage power source to create a path through an insulating material, such as wood or acrylic. By placing conductive material on the surface and passing the high voltage through it, you will witness the formation of intricate branching patterns known as Lichtenberg figures.
⚠️ Serious Safety Warning
Fractal/Lichtenberg wood burning uses lethal voltages (typically 1,000–15,000V from a microwave or neon-sign transformer). At least 33 people died attempting this at home between 2017 and 2022, most from accidental contact with electrodes, the electrolyte solution, or a loose wire while the transformer was still live. Never touch the wood, electrodes, or solution while the power source is energized — fully disconnect the power, then wait, before adjusting anything. Work on a dry, non-conductive floor, never work alone, and never let anyone else near the setup while it’s live.
Source: peer-reviewed case reports on fractal wood burning injuries and fatalities (PMC/NCBI, National Library of Medicine)
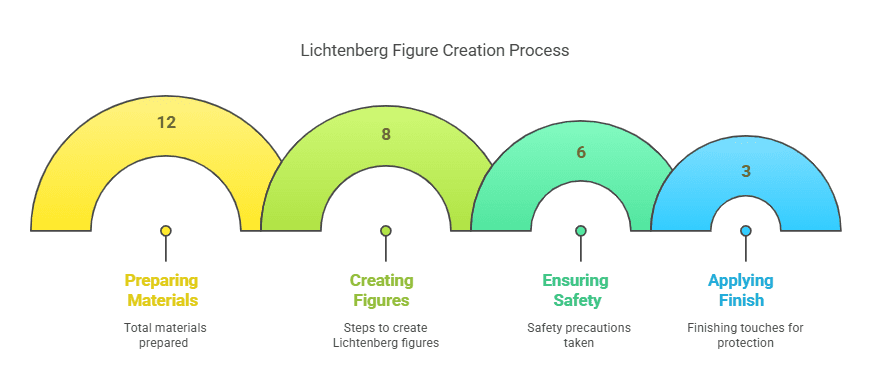
Preparing Materials For Making Lichtenberg Figures
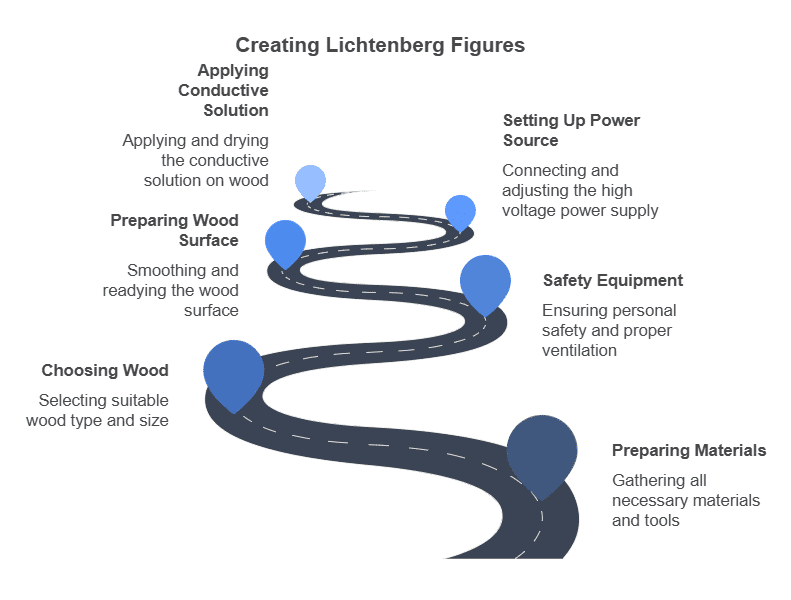
To create captivating Lichtenberg figures, one must first gather the necessary materials. This comprehensive guide explores the step-by-step process to prepare the required items for making these mesmerizing electrical patterns, ensuring a successful and rewarding experience.
Choosing The Right Wood And Size
When it comes to creating Lichtenberg Figures, selecting the right wood is crucial. Here are some points to consider when choosing wood and determining the appropriate size:
Wood selection:
- Tight-grained woods like basswood, birch, cherry, and maple produce the finest, most detailed branching patterns because the grain doesn’t interrupt the current path.
- Looser-grained woods like oak or ash still work, but the pattern tends to look less fine and hair-like — the grain itself has more influence on where the current travels.
Size considerations:
- Pick a piece of wood that is large enough to accommodate the Lichtenberg Figure pattern you have in mind.
- Ensure the wood is thick enough to withstand the electrical current without damaging or burning through the material.
- Smaller sizes are ideal for beginners, as they are easier to manage and produce more manageable patterns.
Gathering The Necessary Safety Equipment
Prior to starting your Lichtenberg Figures project, it is essential to gather the required safety equipment. This will ensure your safety throughout the process. Here’s what you need:
Safety equipment checklist:
- Rubber gloves: Protect your hands from electrical shocks while working with high voltage.
- Safety goggles: Safeguard your eyes from potential debris or sparks.
- Face mask: Prevent inhalation of any fumes or dust particles generated during the process.
- Apron or protective clothing: Shield yourself from any accidental spills or stains.
- Fire extinguisher: Have one nearby as a precautionary measure in case of any fire-related accidents.
Preparing The Wood Surface
Before proceeding with creating Lichtenberg Figures, it is crucial to properly prepare the wood surface. Follow these steps for optimal results:
Sanding:
- Start by sanding the wood surface to achieve a smooth and even texture.
- Remove any existing varnish, paint, or resin to ensure proper electrical conduction.
Drying:
- Allow the wood to completely dry after sanding to remove any moisture that may impede the formation of Lichtenberg Figures.
- This step is especially important if the wood has been freshly cut or treated.
Sealing:
- Apply a wood sealer or epoxy resin to enhance the conductivity and protect the wood during the electrical process.
- Ensure that the sealer is completely dry before proceeding to avoid any adverse effects.
By following these steps and taking the necessary safety precautions, you’ll be well on your way to creating stunning Lichtenberg Figures on your chosen wood surface. Remember to always prioritize safety and enjoy the artistic journey!
Choosing The Right Wood And Size
Choosing the right wood and size plays a crucial role in creating stunning Lichtenberg Figures. The conductive solution painted onto the surface does most of the work carrying the current — the wood itself mainly needs to be dry (moisture content below 20%, which is also a fire-safety requirement, not just a quality one) and tight-grained for the finest detail. Consider these factors for exceptional results.
Selecting A Suitable Wood Type For Lichtenberg Figures
When it comes to creating beautiful Lichtenberg Figures, choosing the right wood is essential. Different wood types can produce varying patterns and colors, so it’s crucial to select a suitable one for your desired outcome. Here are some factors to consider when selecting the wood:
- Wood characteristics: Tight-grained species like basswood, birch, maple, and cherry produce the finest, most hair-like branching detail. Open-grained woods like oak or ash still burn a pattern, just a less refined one, since the current follows the grain more than the fractal path.
- Hardwood vs. Softwood: Grain tightness matters more than hardwood-vs-softwood classification. Basswood (a softwood-adjacent hardwood) and maple or cherry (true hardwoods) are all popular precisely because they’re tight-grained, not because of their density alone.
- Local availability: Consider the accessibility of different wood types in your area. Choosing locally available woods can be cost-effective and environmentally sustainable.
- Personal preference: Ultimately, the choice of wood comes down to personal preference. Experiment with different species to find the one that aligns with your aesthetic taste.
Understanding The Importance Of Wood Moisture Content
Wood moisture content plays a vital role in achieving successful Lichtenberg Figures. Here’s why it is important:
- Avoiding dangerous outcomes: Moisture content is crucial to prevent the wood from catching fire during the Lichtenberg process. Dry wood with a moisture content below 20% is generally recommended to minimize the risk of combustion.
- Enhancing the pattern: Wood with the right moisture content allows for better penetration of the electrical current, resulting in more defined and visually appealing patterns.
- Moisture meters: Use a moisture meter to accurately measure the moisture content of the wood before proceeding. This will help ensure optimal results and minimize any potential safety hazards.
Determining The Size And Thickness Of The Wood
When it comes to creating Lichtenberg Figures, the size and thickness of the wood can greatly impact the outcome. Consider the following factors:
- Workspace limitations: Assess the available workspace and equipment for generating Lichtenberg Figures. Choose wood sizes and thicknesses that fit comfortably within these constraints.
- Intended use: Determine the final purpose of the Lichtenberg Figure. Will it be a standalone artwork or incorporated into a larger project? This consideration will guide the appropriate size and thickness selection.
- Stability: Thicker and more substantial pieces of wood are generally more stable during the Lichtenberg process. They are less prone to warping or cracking due to the electrical current.
- Flexibility: If you desire flexibility in your Lichtenberg Figures, thinner and smaller pieces of wood may be preferable. They can be maneuvered easily for different artistic effects.
- Experimentation: Don’t be afraid to experiment with various sizes and thicknesses to discover unique and captivating results. Each piece of wood has its own potential for creating distinctive Lichtenberg Figures.
By considering the suitable wood type, understanding the importance of wood moisture content, and determining the right size and thickness, you can embark on your journey to creating mesmerizing Lichtenberg Figures. Remember to prioritize safety precautions and let your creativity flourish.
Gathering The Necessary Safety Equipment
To create Lichtenberg figures, it is essential to gather the necessary safety equipment. This ensures a safe and enjoyable experience while working with high voltage and electricity.
Before embarking on the exciting journey of creating Lichtenberg figures, it is crucial to prioritize your personal safety. This involves gathering the necessary safety equipment to ensure a secure and enjoyable experience. Let’s explore the essential elements that will help you carry out this fascinating artistic process with peace of mind.
Ensuring Personal Safety With Protective Clothing
To avoid any potential hazards, make sure to don the appropriate protective clothing. This will help safeguard yourself against any unforeseen accidents. Here are some key items of clothing to consider:
- Gloves: Wear insulated rubber gloves to protect your hands from electrical shocks.
- Long-sleeved shirt and pants: Opt for clothing that covers the entire length of your arms and legs to minimize the risk of injuries caused by electrical discharges.
- Closed-toe shoes: Select sturdy shoes that cover your feet entirely to protect against potential electrical mishaps.
Choosing The Appropriate Safety Tools And Equipment
To ensure maximum safety during the process of creating Lichtenberg figures, it is crucial to choose the right safety tools and equipment. Here are some essential items you should have:
- Safety goggles: Protect your eyes from any flying debris or accidental discharges by wearing safety goggles.
- Fire extinguisher: Keep a fire extinguisher nearby in case of emergency. This will help you quickly extinguish any unforeseen flames.
- Grounding system: Implement a solid grounding system to redirect electrical charges, minimizing the risk of shocks or electrocution.
- Insulated work table: Use an insulated work table to prevent electrical conductivity and potential accidents.
Understanding The Importance Of Proper Ventilation
Lastly, it is vital to have proper ventilation in your workspace to ensure a safe environment. Adequate ventilation will prevent the accumulation of potentially harmful fumes and maintain a breathable atmosphere. Consider the following points:
- Workspace location: Choose a well-ventilated area, such as a garage or workshop, to carry out your Lichtenberg figure creation process.
- Exhaust fan: Install an exhaust fan or open windows to allow for proper air circulation and the removal of any hazardous fumes emitted during the process.
- Respirator mask: Wear a respirator mask to protect yourself from inhaling harmful fumes, especially if you’re working with chemical solutions.
By gathering the necessary safety equipment, ensuring personal protective clothing, choosing appropriate tools, and maintaining proper ventilation, you are adequately prepared for the fantastic journey of creating Lichtenberg figures. Remember, your safety should always be the top priority as you delve into this captivating art form.
Happy creating!
Preparing The Wood Surface
To create stunning Lichtenberg Figures on wood, it is vital to properly prepare the wood surface. Sanding the wood, removing any impurities, and applying a wood conditioner will ensure a smooth and flawless result.
Before you can create stunning Lichtenberg figures on wood, it is essential to prepare the wood surface properly. This involves the following steps:
- Sanding the wood to create a smooth surface: Start by sanding the surface of the wood to eliminate any roughness or imperfections. This will help ensure that the electricity used in the Lichtenberg figure creation process flows smoothly and evenly. Use sandpaper with a grit of around 180-220 for this initial sanding. Sand the entire surface of the wood in even strokes until it feels smooth to the touch.
- Applying a wood sealer to enhance conductivity: To enhance the conductivity of the wood, it is beneficial to apply a wood sealer. A wood sealer helps to seal the pores of the wood, providing a smooth surface for the electrical current to flow through. Choose a conductive wood sealer specifically designed for Lichtenberg figure creation. Apply the sealer according to the manufacturer’s instructions, ensuring an even and complete coverage.
- Ensuring the wood is free from dust and debris: Before proceeding with the Lichtenberg figure creation process, it is crucial to ensure that the wood surface is free from any dust or debris. Use a clean cloth or compressed air to remove any particles that may interfere with the electrical current. Avoid using water or liquid cleaners to prevent damage to the wood.
By following these steps to prepare the wood surface, you will create an optimal foundation for the mesmerizing Lichtenberg figures that will grace your woodworking project. With a smooth and well-prepared surface, you’re ready to move on to the next phase of the process.
Creating The Lichtenberg Figure
Discover the art of creating Lichtenberg Figures with this step-by-step guide. Learn how to make captivating designs using high voltage electricity on various mediums.
If you’re fascinated by intricate patterns of lightning branching across surfaces, you’ll be thrilled to learn how to create your own Lichtenberg Figure. This mesmerizing artwork is achieved through a process known as electrical discharge. Let’s dive into the step-by-step process of bringing these captivating patterns to life.
Setting Up The High Voltage Power Source:
- Ensure your safety by wearing protective gear such as gloves, goggles, and an apron.
- Find a suitable high voltage power source, such as a neon sign transformer or a microwave oven transformer.
- Follow all safety precautions and guidelines provided by the manufacturer for proper electrical connections.
- Connect the power source to a variac, which allows you to control the output voltage.
- Gradually increase the voltage to the desired level, readying it for the creation of Lichtenberg Figures.
Applying The Conductive Solution To The Wood:
- Choose a piece of wood with an appealing grain and smooth surface to enhance the visual impact of the Lichtenberg Figure.
- Create a conductive solution by mixing water with salt or baking soda, ensuring it forms a conductive liquid.
- Apply the conductive solution evenly onto the wood surface, using a brush or spray bottle.
- Allow the wood to dry completely before continuing to the next step.
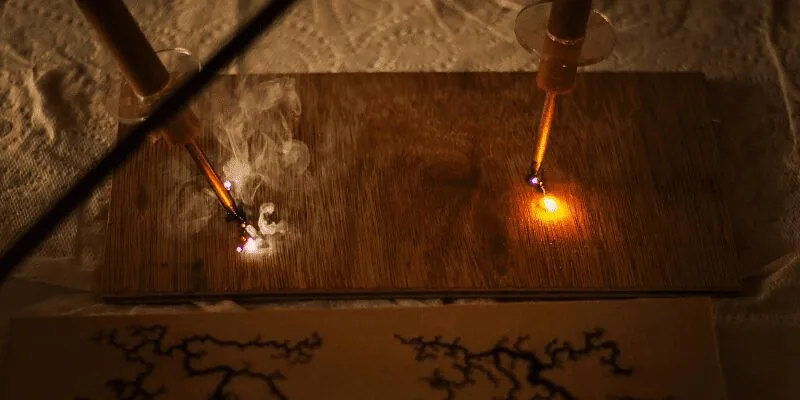
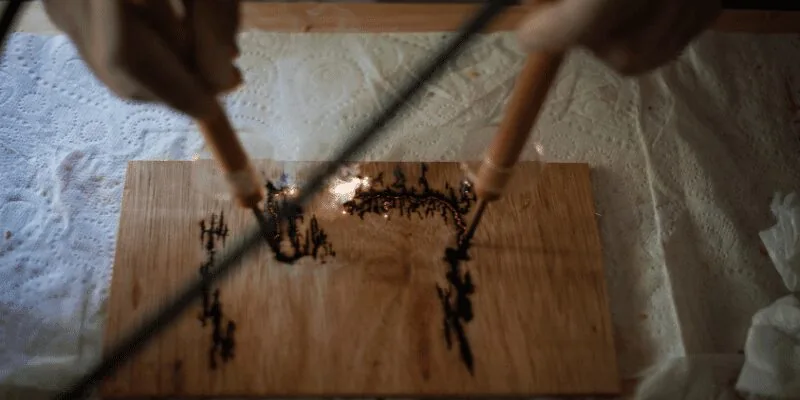
Creating The Lichtenberg Figure Through Electrical Discharge:
- Place the wood on an insulated, non-conductive surface (rubber or dry plastic), on a dry floor, away from anything metal.
- With the power source fully unplugged, position both electrodes on the conductive solution where you want the pattern to start and end. Never place or adjust an electrode while the transformer is plugged in.
- Step back to a safe distance, confirm no one else is touching the wood or setup, and only then energize the power source — ideally through a foot pedal or remote switch so your hands stay away from the circuit entirely.
- Watch the current travel through the conductive solution, leaving intricate branching patterns behind. Never reach toward the wood while the power is on.
- Fully de-energize and unplug the power source before touching the wood again to check progress or reposition anything.
- Once you’re satisfied with the Lichtenberg Figure, confirm the power source is unplugged and discharged before handling the wood, and let it dry completely.
By following these steps, you can unlock the magical world of Lichtenberg Figures and create stunning electrical artwork. Remember to prioritize safety at all times, embrace experimentation, and let your creativity flow. With practice, you’ll become proficient in harnessing electrical discharge to produce awe-inspiring patterns on wood surfaces.
Let the beauty of Lichtenberg Figures illuminate your artistic journey!
Setting Up The High Voltage Power Source
Learn how to set up a high voltage power source for creating mesmerizing Lichtenberg Figures. Uncover the secrets to crafting unique and captivating designs that will leave you in awe.
If you’re interested in creating mesmerizing Lichtenberg Figures, it’s crucial to set up a high voltage power source correctly. This step is essential to ensure safety and achieve optimal results. Let’s dive into the key components, connecting methods, and maneuvering voltage and pulse settings for an unforgettable experience.
Understanding The Components Of A High Voltage Power Supply:
To establish a high voltage power supply successfully, you’ll need to familiarize yourself with its various components. Here’s an overview to get you started:
- Transformer: This device converts the standard 120V AC power from your electrical outlet into the required high voltage needed for creating Lichtenberg Figures.
- Capacitor: Acting as an energy storage unit, the capacitor plays a vital role in delivering powerful electrical discharges. It accumulates charge and releases it when triggered, contributing to the creation of intricate patterns.
- Resistor: Incorporating a resistor into your high voltage power supply serves as a safety measure. It limits the current flowing through the circuit, protecting both you and the equipment from potential damage.
- Switch and Safety Fuse: These components provide control and protection. The switch allows you to turn the power supply on and off, while the safety fuse safeguards against excessive current flow.
Connecting The Power Supply To The Wood Using Electrode Probes:
Once you’re familiar with the power supply’s components, it’s time to connect it to the wood using electrode probes. The following steps outline the process:
- Prepare the wood: Start by securing the wood piece you want to create Lichtenberg Figures on. Ensure it’s clean, dry, and free from any impurities or coatings that may interfere with electrical conductivity.
- Position the electrode probes: Carefully attach the electrode probes to the desired locations on the wood surface. You can experiment with different arrangements to achieve unique patterns. Keep in mind that optimal spacing between the probes is essential for even discharges.
- Secure the probes: Make sure the electrode probes are securely fixed to the wood. This ensures stability during the process and prevents accidental movement or detachment, which can disrupt the creation of Lichtenberg Figures.
- Connect the probes to the power supply: Attach the electrode probes to the corresponding output terminals of the power supply. Ensure a solid connection, avoiding any loose or weak linkages.
Adjusting The Voltage And Pulse Settings For Optimal Results:
To achieve stunning Lichtenberg Figures, adjusting the voltage and pulse settings is crucial. Here’s a step-by-step guide to help you optimize these settings:
- Start with lower voltage: Begin by setting the power supply to a lower voltage setting. This allows you to observe the initial patterns and make any necessary adjustments before moving to higher voltage ranges.
- Gradually increase the voltage: Slowly raise the voltage to observe the effects on the wood surface. Take note of the changes in the patterns and adjust accordingly.
- Experiment with pulse settings: Alongside voltage adjustments, experimenting with pulse settings can greatly impact the results. Try varying pulse durations to achieve different intensities and intricacies in your Lichtenberg Figures.
- Monitor and fine-tune: Continuously monitor the effects of your adjustments while fine-tuning both the voltage and pulse settings. This iterative process allows you to refine the results and uncover the perfect combination for your desired outcome.
Remember, the process of setting up a high voltage power source is crucial in creating awe-inspiring Lichtenberg Figures. By understanding the power supply’s components, connecting the probes effectively, and optimizing voltage and pulse settings, you’ll be well on your way to creating stunning electrical patterns on wood.
So, let your creativity flow and experience the captivating beauty of Lichtenberg Figures firsthand.

Applying The Conductive Solution To The Wood
To create captivating Lichtenberg Figures, apply the conductive solution directly onto the wood surface. This technique brings out the mesmerizing electrical patterns, making for an intriguing artistic masterpiece.
Choosing The Right Conductive Solution For Lichtenberg Figures
When it comes to creating Lichtenberg Figures on wood, choosing the right conductive solution is crucial. The conductive solution is responsible for facilitating the flow of electrical current through the wood and creating those captivating patterns. Here are some factors to consider when selecting your conductive solution:
- Safety: Prioritize a solution that is safe to use and non-toxic. This ensures both your safety and the safety of the environment.
- Conductivity: Look for a solution that has good electrical conductivity. This will ensure a smooth and even flow of electricity throughout the wood, resulting in beautiful and intricate patterns.
- Visibility: Opt for a solution that is easy to see on the wood surface. This will allow you to gauge the application and coverage, ensuring a consistent and uniform result.
- Accessibility: Consider the availability and accessibility of the solution. It’s best to choose a solution that is readily available in your local area or can be easily ordered online.
Applying The Solution Evenly To The Wood Surface
Now that you have chosen the right conductive solution, it’s time to apply it to the wood surface. Applying the solution evenly is essential to ensure that the electrical current spreads uniformly, creating stunning Lichtenberg Figures. Here are some tips for applying the solution evenly:
- Start with a clean surface: Before applying the solution, make sure the wood surface is clean and free from any debris, dust, or dirt. This will ensure proper adhesion and distribution of the conductive solution.
- Use a brush or sponge: Dip a brush or sponge into the conductive solution and apply it evenly across the wood surface. Avoid excessive dripping or pooling of the solution to prevent uneven patterns.
- Work in small sections: Divide the wood surface into manageable sections and apply the solution one section at a time. This helps maintain control and ensures even coverage.
- Brush strokes or gentle dabbing: Use either gentle brush strokes or dabbing motions to apply the solution. Find a technique that works best for you, ensuring consistent coverage without disturbing the wood grain.
- Take your time: Applying the solution evenly requires patience and attention to detail. Take your time to ensure that every section of the wood surface receives a uniform coating of the conductive solution.
Allowing The Solution To Dry Before Proceeding
After applying the conductive solution, it’s important to let it dry completely before proceeding to the next steps of creating Lichtenberg Figures. Allowing the solution to dry ensures a stable and uniform surface for the electrical discharge. Here’s why you should let it dry:
- Avoid interference: Wet conductive solution can interfere with the electrical current and disturb the desired patterns. Allowing it to dry completely eliminates this potential interference.
- Stability: Drying the solution adds stability to the wood and enhances the likelihood of achieving clear and well-defined Lichtenberg Figures.
- Prevent smudging: Wet solution can easily smear or smudge, affecting the final outcome of your artwork. By giving it enough time to dry, you minimize the risk of accidental smudging.
- Time required: The drying time may vary depending on the type of conductive solution used. Always refer to the manufacturer’s instructions for recommended drying time.
- Quality control: Prior to proceeding, double-check the dryness of the solution. Touch it lightly with a clean finger to ensure that it is no longer tacky or wet to the touch.
Remember, patience is key during the drying process. Taking the extra time to allow the solution to dry completely will help you achieve the best possible results in creating your Lichtenberg Figures.
Creating The Lichtenberg Figure Through Electrical Discharge
Learn how to create captivating Lichtenberg Figures by harnessing electrical discharge. Discover step-by-step techniques and safety measures to bring these mesmerizing patterns to life.
Have you ever wondered how those mesmerizing Lichtenberg Figures are created on wooden surfaces? It’s all about harnessing the power of electrical discharge! By safely operating a high voltage power supply and applying controlled electrical discharges to the wood surface, you can observe the formation of intricate Lichtenberg Figures.
Safely Operating The High Voltage Power Supply:
- Prioritize safety measures: Make sure to always wear protective clothing and equipment, such as gloves and goggles, when working with high voltage power supplies.
- Use insulated tools: Ensure that all tools used are insulated to prevent electrocution and minimize the risk of accidents.
- Connect to a grounded power source: Connect your high voltage power supply to a properly grounded power source to avoid electrical hazards.
- Test the connections: Before initiating the electrical discharge, double-check all connections to ensure they are secure and in proper working order.
- Regular maintenance: Periodically inspect and maintain the high voltage power supply to ensure its functionality and safety.
Applying Controlled Electrical Discharges To The Wood Surface:
- Prepare the wood: Start by selecting a suitable piece of wood and sanding it to create a smooth surface for the electrical discharges to occur evenly.
- Apply a conductive solution: To enhance the electrical conductivity, brush or spray a conductive solution onto the wood surface. This can be a mixture of water and a conductive material like baking soda.
- Electrodes placement: Attach the electrodes of the high voltage power supply to specific points on the wood surface. Experiment with different placements to achieve the desired patterns.
- Gradually increase voltage: Begin the electrical discharge at a low voltage and gradually increase it to observe the formation of the Lichtenberg Figures. Monitor the process carefully.
- Timing and intensity: Adjust the intensity and duration of the electrical discharge to control the complexity and intricacy of the Lichtenberg Figures.
- Safety precautions: Always maintain a safe distance from the electrical discharge to avoid any accidental contact with the high voltage and adhere to safety guidelines.
Observing the formation of intricate Lichtenberg Figures:
- Witness the beauty: As the controlled electrical discharges take place, observe the fascinating emergence of intricate patterns and branched lightning-like figures on the wood surface.
- Capture the moment: Document the creation process by taking photographs or making videos to share the captivating transformation with others.
- Experimentation and creativity: Discover new techniques and patterns by experimenting with different wood types, electrical discharge intensities, and electrode placements.
- Secondary effects: Understand that Lichtenberg Figures can alter the wood’s color, creating unique and artistic end results.
- Safety first: Remember to prioritize safety at all times during the creation and observation of Lichtenberg Figures.
Now that you have a better understanding of how to create Lichtenberg Figures through electrical discharge, it’s time to embark on your own artistic journey. Let the mesmerizing beauty of these intricate patterns captivate your imagination and inspire your creative endeavors!
Ensuring Safety And Finishing Touches
Discover how to create stunning Lichtenberg Figures while ensuring safety and adding the finishing touches. Uncover the step-by-step process and techniques to achieve mesmerizing patterns while keeping it safe.
It’s crucial to prioritize safety when experimenting with Lichtenberg figures, as they involve high voltage electricity. By following proper precautions and implementing finishing touches, you can ensure both your safety and the preservation of your beautiful Lichtenberg figure. Let’s dive into the essential steps to achieve this:
Removing Excess Conductive Solution:
- Gently pat the wooden surface with a lint-free cloth to remove any excess conductive solution.
- Use a soft brush or sponge to softly scrub the surface, eliminating any remaining solution.
- Wipe the wood down with a clean cloth to ensure it is completely dry before proceeding to the next step.
Applying A Clear Finish To Protect The Lichtenberg Figure:
- Select a clear finish that is appropriate for wood, such as polyurethane or lacquer.
- Apply the finish in thin, even coats using a brush or cloth, following the manufacturer’s instructions.
- Allow each coat to dry completely before applying the next one. This will help create a smooth, glossy surface that protects the Lichtenberg figure from moisture and dust.
Safety Precautions And Proper Disposal Of Materials:
- Always wear protective gear, including gloves and safety goggles, when working with electricity and chemicals.
- Ensure you are familiar with the proper use and handling of high voltage equipment to minimize the risk of electric shock or other injury.
- Store any leftover conductive solution and chemicals in clearly labeled, sealed containers and dispose of them responsibly according to local regulations.
- Clean up your workspace thoroughly, removing any debris and disposing of it properly.
By following these safety precautions and finishing touches, you can create stunning Lichtenberg figures while keeping yourself and your surroundings safe. Implementing these steps ensures not only a beautiful outcome but also peace of mind knowing that you have taken all necessary precautions.
Happy experimenting!
Removing Excess Conductive Solution
To remove excess conductive solution when creating Lichtenberg figures, gently wipe away the excess using a dry cloth or paper towel. This ensures a clean and precise design without any unwanted residue.
Wiping Off The Excess Solution Using A Clean Cloth:
After you have created your Lichtenberg figures by applying the conductive solution to the wood, it is important to remove any excess solution to ensure a clean and polished finish. Here are the steps to follow:
- Take a clean cloth and gently wipe the surface of the wood to remove any excess conductive solution.
- Make sure to cover the entire surface area, paying extra attention to the areas where the solution may have pooled or gathered.
- Use gentle, circular motions while wiping to avoid damaging the wood or disturbing the patterns created by the electrical discharge.
- Continue wiping until the cloth comes away clean and there is no residue left on the wood.
Ensuring The Wood Surface Is Dry Before Proceeding:
After wiping off the excess conductive solution, it is crucial to allow the wood surface to dry completely before moving on to the next steps. Here’s how to ensure the wood is dry:
- Leave the wood in a well-ventilated area to air dry naturally. This will reduce the risk of any moisture affecting the next stages of the process.
- Avoid using any artificial heat sources, such as hairdryers or heaters, to speed up the drying process. This can cause the wood to warp or crack.
- Depending on the size and thickness of the wood, drying times may vary. It is recommended to give it at least 24 hours to dry thoroughly.
- To check if the wood is dry, touch the surface with your fingertips. If it feels cool or damp, it still needs more time to dry.
Removing Any Remaining Residue With A Suitable Cleaner:
Even after wiping off the excess conductive solution, there might still be some residue left on the wood surface. To ensure a pristine finish, follow these steps to remove any remaining residue:
- Choose a suitable cleaner that is safe for use on wood, such as a mild soap or wood cleaner.
- Dilute the cleaner according to the instructions provided, if necessary.
- Apply the cleaner to a clean cloth or sponge, and gently rub the surface of the wood in circular motions.
- Pay attention to areas where residue may be more stubborn, such as grooves or crevices.
- Wipe away the cleaner with a separate, damp cloth to remove any traces of cleaner from the wood.
- Allow the wood to air dry thoroughly before proceeding to the next steps.
Remember, these steps ensure the best results when creating Lichtenberg figures on wood. By following these instructions, you’ll be on your way to achieving stunning electrical burn patterns while maintaining the integrity of the wood surface. Happy experimenting!
Applying A Clear Finish To Protect The Lichtenberg Figure
To protect the Lichtenberg Figure, apply a clear finish that acts as a barrier against damage or fading. This essential step ensures the longevity of the unique electrical wood-burning art.
Preserving the beauty and intricate patterns of a Lichtenberg Figure is crucial to ensure its longevity and enhance its overall appearance. By applying a clear finish, you can protect the wood and design from potential damage while adding a polished touch to your creation.
Here’s how you can choose the right finish and apply it evenly:
Choosing The Right Finish For Preserving The Wood And Design
To effectively preserve the wood and enhance the design of your Lichtenberg Figure, selecting the appropriate finish is key. Consider the following options:
- Polyurethane: This durable and versatile finish provides excellent protection against moisture, UV rays, and wear. Choose either oil-based or water-based polyurethane based on your personal preference.
- Shellac: If you’re aiming for a natural and warm appearance, shellac is a great choice. It offers good protection against water damage and is relatively easy to apply.
- Lacquer: Ideal for achieving a glossy and smooth finish, lacquer provides excellent water and chemical resistance. However, it may require more advanced application techniques.
- Varnish: Offering both protection and a slight amber tint, varnish can be an excellent choice for preserving the wood’s natural beauty while adding a layer of durability.
- Danish oil: This penetrating finish not only protects the wood but also enhances its natural grain and color. Danish oil is easy to apply and provides a warm, natural appearance.
Remember to consider factors such as the intended use of the Lichtenberg Figure, your personal preferences, and the specific characteristics of the wood you’re working with before making a decision.
Applying The Finish Evenly Using A Brush Or Spray Method
Once you’ve chosen the right finish, it’s essential to apply it evenly to achieve a smooth and professional-looking result. Here are two common methods for applying a clear finish:
- Brush method: Using a high-quality brush, start by applying the finish in the direction of the wood grain. Ensure that your brush strokes are even and smooth, avoiding excessive buildup or drips. Work in small sections, gradually covering the entire Lichtenberg Figure. Pay attention to any intricate details, making sure the finish reaches all the crevices. Allow it to dry according to the manufacturer’s instructions before applying additional coats if desired.
- Spray method: If you prefer a more efficient and faster approach, consider using a spray gun or aerosol canister for applying the finish. Make sure to work in a well-ventilated area and cover surrounding surfaces to avoid overspray. Apply thin and even coats, keeping the nozzle at a consistent distance from the surface of the wood. Allow the finish to dry adequately between applications, and remember to clean the sprayer or canister thoroughly afterward.
Allowing The Finish To Dry Completely Before Handling The Wood
After you’ve applied the clear finish, it’s crucial to exercise patience and allow it to dry completely before handling your woodwork. Follow these steps to ensure the finish sets properly:
- Check the specific drying time indicated on the finish product’s label. This time may vary depending on the type of finish and environmental conditions.
- Place the Lichtenberg Figure on a clean and level surface, free from dust or debris.
- Avoid touching the finish or placing any objects on top of it while it’s drying.
- Provide adequate ventilation in the drying area to facilitate the drying process.
- If you’re unsure whether the finish is completely dry, wait an additional day or two to avoid compromising the final result.
By allowing the finish to dry thoroughly, you’ll ensure proper adhesion and prevent any smudging or damage to the Lichtenberg Figure.
Now that you understand the importance of applying a clear finish to protect your creation, it’s time to choose the right finish, apply it like a pro, and let it dry completely. Doing so will not only preserve the beauty of your Lichtenberg Figure but also ensure its longevity for years to come.
Safety Precautions And Proper Disposal Of Materials
Learn how to safely create stunning Lichtenberg Figures while ensuring proper disposal of materials. Follow these easy steps to create beautiful patterns while prioritizing safety and environmental responsibility.
Lichtenberg figures are fascinating and beautiful electrical patterns that can be created by passing high voltage electricity through a conductive solution. However, it is essential to prioritize safety while working with such high voltage and potentially hazardous materials. In this section, we will outline the necessary precautions to ensure your safety and the proper disposal of materials used in making Lichtenberg figures.
Storing The High Voltage Power Supply Safely:
- High voltage power supply units are potentially dangerous and should be stored and handled with care to prevent accidents or electrical mishaps.
- Ensure that the power supply unit is stored in a dry and well-ventilated area away from flammable materials, water sources, and potential hazards.
- Keep the power supply in a secure and sturdy location, preventing it from falling, being knocked over, or causing any potential harm.
- Store the power supply away from the reach of children or unauthorized individuals to prevent accidents.
Disposing Of Leftover Conductive Solution Responsibly:
- After creating Lichtenberg figures, dispose of the leftover conductive solution in an environmentally-friendly manner.
- Do not pour the solution down the drain or toilet, as it may contain potentially harmful substances.
- Instead, collect the solution in a designated container and check if there are any local disposal guidelines specific to the chemicals used. Follow those guidelines accordingly.
- If unsure about proper disposal methods, consider contacting your local waste management authorities for assistance or information.
Following Safety Guidelines For Working With Electricity:
- Always wear personal protective equipment (PPE), including gloves and safety goggles, before working with high voltage electricity and conductive solutions.
- Ensure that the workspace is clean and organized, free from potential tripping hazards or clutter that could interfere with safe operations.
- Regularly inspect all electrical equipment and cables for any signs of damage or wear. If any issues are noticed, promptly repair or replace the equipment.
- Never touch any high voltage components or conductive surfaces while the power is on, as it can lead to severe electric shocks.
- When not in use, disconnect the power supply and store it in a safe location to prevent accidental activation or misuse.
Remember, prioritizing safety is crucial when engaging in any activity involving electricity. By following these precautions and ensuring proper disposal of materials, you can safely enjoy creating Lichtenberg figures while minimizing the risks associated with high voltage electricity.
Frequently Asked Questions For How To Make Lichtenberg Figures
What Voltage Is Needed For Lichtenberg?
Most fractal wood burning setups use 1,000 to 15,000 volts from a microwave oven transformer or neon sign transformer. Neon sign transformers run at the higher end of that range but are generally considered safer and produce more detailed patterns than microwave transformers. Regardless of voltage, this is lethal-range electricity — treat every setup as capable of killing on contact.
What Is The Best Electrolyte For Lichtenberg Burning?
The best electrolyte for Lichtenberg burning is a solution of baking soda and water.
What’S The Best Liquid To Use For Fractal Burning?
The best liquid for fractal burning is usually a mix of denatured alcohol and distilled water.
Can You Use A Car Battery For Fractal Burning?
No, car batteries are not suitable for fractal burning due to their voltage and amperage limitations.
Conclusion
Creating Lichtenberg figures is an exciting and artistic endeavor that allows you to harness the power of electricity to produce captivating patterns. By following the steps outlined in this blog post, you can safely and successfully create these unique creations on your own.
Remember to always prioritize safety by wearing protective gear and working in a well-ventilated area. Experiment with different materials, voltage levels, and design ideas to create your own signature Lichtenberg figures. Whether you choose wood, acrylic, or any other suitable material, the possibilities are endless.
With patience, practice, and a keen eye for detail, you can master this electrifying art form and showcase your stunning Lichtenberg figures to the world. Start creating today and let your imagination run wild!