How to Fix Peeling Wood Finish: Quick and Effective Solutions
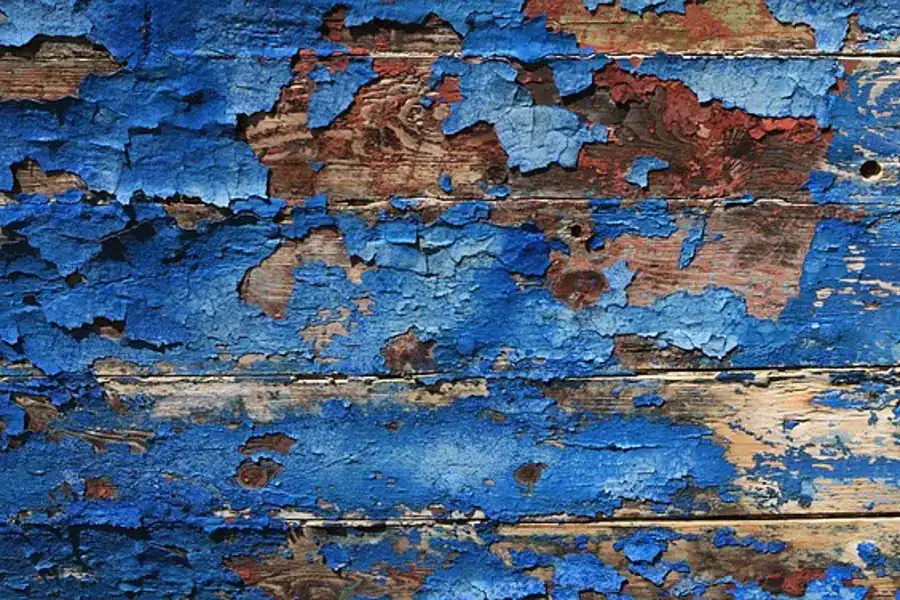
To fix peeling wood finish, sand the affected area and apply a fresh coat of finish. A peeling wood finish can be frustrating and unsightly.
Whether it’s on furniture, cabinets, or door frames, peeling can make your wood surfaces look worn and neglected. Fortunately, fixing this issue is relatively straightforward. By following a few simple steps, you can restore the beauty and protection of your wood finishes.
This article will guide you through the process of fixing peeling wood finish, allowing you to bring new life to your cherished wood items. From sanding to applying a fresh coat of finish, we will explore the necessary steps in detail to help you achieve a successful outcome. So, let’s get started and learn how to fix peeling wood finish.
Identifying The Cause Of Peeling Wood Finish
Wondering how to fix peeling wood finish? Start by identifying the cause, which could range from moisture damage to poor surface preparation. Once you’ve determined the root issue, you can take the necessary steps to repair and restore your wood finish.
When it comes to peeling wood finish, it is crucial to determine the underlying cause to effectively fix the problem. Identifying the cause will help you address the issue and prevent it from happening in the future. Let’s dive into some common causes of peeling wood finish and how to identify them:
Common Causes Of Peeling Wood Finish:
- Moisture damage: Excessive moisture can penetrate the wood and cause the finish to peel. Look for signs of water damage, such as dark spots or discoloration, and assess the condition of the wood.
- Improper surface preparation: Failing to properly prepare the wood surface before applying the finish can lead to adhesion issues. Inspect the surface for any roughness, dust, or debris that may have hindered proper adhesion.
- Incompatible products: Using incompatible products or mixing finishes that are not meant to be combined can result in peeling. Check for any inconsistencies in the types of finish applied and ensure compatibility.
- UV exposure: Prolonged exposure to sunlight can cause the finish to deteriorate and peel. Assess the extent of sun damage by examining the wood for color fading or discoloration.
Assessing The Extent Of The Damage:
- Take a close look at the peeling areas to determine the extent of the damage. This will help you decide whether a simple touch-up or a complete refinishing is necessary.
- Check if the peeling is limited to specific spots or if it affects a larger area. This will help you understand the scope of the problem and plan accordingly.
- Evaluate the condition of the wood beneath the peeling finish. Look for signs of decay, rot, or other structural issues that may require additional repairs.
Understanding The Type Of Wood And Finish Used:
- Identify the type of wood used in your project. Different woods have varying characteristics and may require specific approaches to fix the peeling finish.
- Determine the type of finish that was originally applied. Whether it’s varnish, lacquer, shellac, or paint, knowing the specific finish will guide you in finding appropriate solutions and products.
- Consider the age of the wood and the finish. Older finishes may require more delicate handling to avoid causing further damage.
By understanding the common causes of peeling wood finish, assessing the extent of the damage, and knowing the type of wood and finish used, you will be better equipped to tackle the issue effectively. Remember to take your time, follow proper techniques, and seek professional advice if needed.
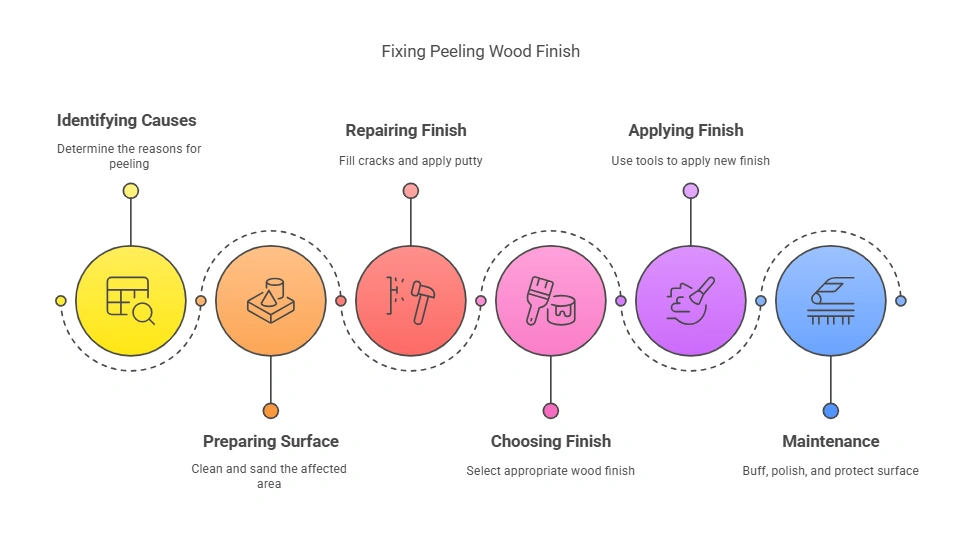
Preparing The Wood Surface For Repair
When fixing a peeling wood finish, it is essential to prepare the wood surface properly by sanding it down, removing any old finish, and cleaning it thoroughly. This ensures a smooth and even surface for the repair process, resulting in a long-lasting and professional-looking finish.
Peeling wood finish can be a frustrating issue to deal with, but fear not, as there are steps you can take to fix it. In this section, we will focus on preparing the wood surface for repair. By following these steps, you will be well on your way to restoring the beauty and integrity of your wood finish.
Let’s get started!
Cleaning The Affected Area:
- Begin by removing any loose pieces of the peeling finish. Gently scrape them off using a putty knife or a similar tool.
- Next, use a mild detergent or wood cleaner to clean the surface of the affected area. This will help remove any dirt, grime, or grease that may be present.
- Use a soft-bristle brush or sponge to gently scrub the area, paying close attention to any crevices or intricate details.
- Rinse the area thoroughly with clean water and allow it to dry completely before moving on to the next step.
Sanding The Peeling Finish:
- Start by sanding the affected area with a medium-grit sandpaper. This will help smooth out any rough edges and remove any remaining bits of the peeling finish.
- Be sure to sand in the direction of the wood grain to prevent any further damage to the surface.
- Once the peeling finish has been adequately sanded down, switch to a fine-grit sandpaper to achieve a smoother finish.
- After sanding, carefully wipe away any dust or debris using a clean cloth or tack cloth.
Removing Any Existing Coatings Or Sealants:
- If there are any existing coatings or sealants on the wood surface, it is essential to remove them before proceeding with the repair.
- Depending on the type of coating or sealant, you may need to use a chemical stripper or paint remover. Follow the manufacturer’s instructions carefully and ensure proper ventilation in the area.
- Apply the stripper or remover to the affected area using a brush or sponge, making sure to cover the entire surface evenly.
- Allow the product to penetrate the coating or sealant for the recommended amount of time. Then, use a scraping tool to gently remove the loosened material.
- Repeat the process if necessary until all coatings or sealants have been completely removed.
By following these steps to prepare the wood surface, you are setting the foundation for a successful repair of your peeling wood finish. Cleaning the affected area, sanding the peeling finish, and removing any existing coatings or sealants will help ensure that the subsequent repair work is effective and long-lasting.
In the next section, we will dive into the actual repair process. Stay tuned!
Repairing The Peeling Wood Finish
Learn how to fix peeling wood finish with these easy tips and tricks. Restore the beauty of your wooden furniture by addressing the problem head-on and ensuring a long-lasting solution.
If you’ve noticed that the wood finish on your furniture or any wooden surface is peeling, don’t worry. There are ways to fix this issue and restore the appearance of your wood. Below, we’ll discuss a few methods for repairing a peeling wood finish in a step-by-step manner.
Filling In Cracks And Gaps
To start the repair process, you’ll need to fill in any cracks or gaps in the wood. This will ensure a smooth and even surface to work with. Here’s how you can do it:
- Inspect the wood surface for any cracks or gaps.
- Clean the area using a mild detergent and a soft cloth.
- Apply wood filler or putty into the cracks and gaps.
- Use a putty knife to smooth out the filler, ensuring it is level with the wood surface.
- Allow the filler to dry completely before moving on to the next step.
Applying Wood Putty Or Filler
Wood putty or filler is an essential part of fixing a peeling wood finish. It helps to fill in any imperfections and provides a solid base for the repair. Here’s how you can apply wood putty or filler:
- Choose a high-quality wood putty or filler that matches the color of your wood.
- Apply a small amount of putty or filler onto a putty knife or a flexible scraper.
- Press the putty or filler into the repaired areas, ensuring it fills the cracks and gaps completely.
- Smooth the putty or filler using the putty knife or scraper, removing any excess material.
- Allow the putty or filler to dry according to the manufacturer’s instructions.
Sanding The Repaired Area Smooth
Once the wood putty or filler has dried, it’s time to sand the repaired area to achieve a smooth finish. Follow these steps:
- Start by using a fine-grit sandpaper (around 220 grit) and sand the repaired area gently in a circular motion.
- Gradually increase the grit of sandpaper, moving to a medium-grit (around 320 grit) and then a fine-grit (around 400 grit).
- Continue sanding until the repaired area feels smooth to the touch and blends seamlessly with the surrounding wood.
- Be cautious not to sand too much, as it may damage the surrounding finish.
- Wipe away any sanding residue with a clean, damp cloth.
By following these steps, you can effectively repair a peeling wood finish and restore the beauty of your wooden furniture or other surfaces. Remember to take your time and be patient throughout the process for the best results.
Choosing The Right Finish For Wood
Choosing the right finish for wood is crucial when it comes to fixing peeling wood finish. By following the correct guidelines and using the appropriate techniques, you can restore the beauty and durability of your wood surface.
Understanding Different Types Of Wood Finishes
Wood finishes are essential for protecting and enhancing the beauty of wooden surfaces. There is a wide range of finishes available, each with its own characteristics and application methods. Before embarking on any wood repair project, it is crucial to understand the different types of wood finishes and their attributes.
Here are some key points to keep in mind:
- Varnish: A popular choice for both interior and exterior applications, varnish provides excellent protection against moisture, UV rays, and general wear and tear. It dries to a hard, durable finish and is available in various sheens, from glossy to matte.
- Lacquer: Known for its fast-drying properties, lacquer offers a smooth, high-gloss finish. It provides good resistance to water and chemicals but may not be as durable as other finishes. Lacquer is typically sprayed on and requires proper ventilation.
- Shellac: This natural finish is derived from the secretions of the lac bug. It dries quickly, producing a warm, amber-toned finish. Shellac is often used as a sealer or as a traditional French polish, providing moderate protection for indoor applications.
- Oil-based polyurethane: Ideal for interior wood surfaces, oil-based polyurethane provides a tough and durable finish. It enhances the natural grain of the wood and is available in different sheens. However, it may take longer to dry compared to water-based alternatives.
- Water-based polyurethane: Offering similar benefits to oil-based polyurethane, water-based varieties have the advantage of quick drying times, low odor, and easy cleanup with water. They are suitable for interior applications and provide good resistance to yellowing over time.
Selecting The Appropriate Finish For The Project
When choosing a wood finish, it is crucial to consider the specific requirements of the project and the intended use of the surface. Here are some factors to keep in mind:
- Application method: Consider whether the finish needs to be brushed, sprayed, or wiped on. Certain finishes, such as lacquer, are typically sprayed on, while others can be applied with a brush or cloth.
- Durability: Assess the level of protection required based on the surface’s exposure to moisture, sunlight, and general wear. For high-traffic areas, opt for a more durable finish like varnish or polyurethane.
- Desired appearance: Different finishes can enhance or alter the natural color and grain of wood. Consider whether you want a glossy, satin, or matte finish to complement your overall aesthetic.
- Maintenance: Some finishes may require regular maintenance, such as reapplication or touch-ups. Take into account the long-term care and maintenance needed for the chosen finish.
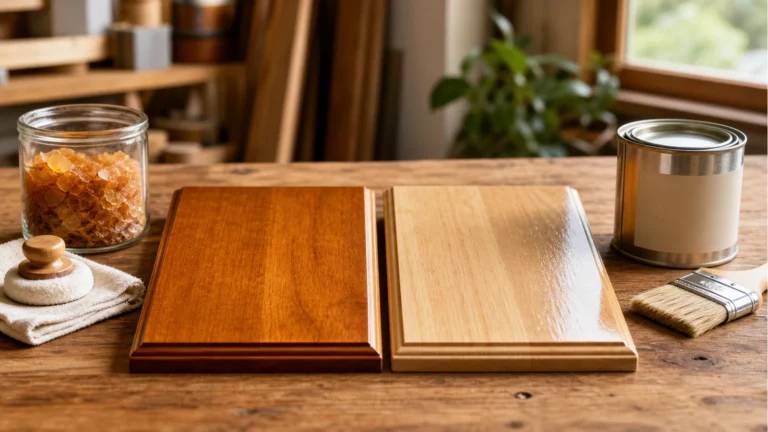
Matching The Existing Finish For A Seamless Repair
Matching the existing finish is crucial when repairing peeling wood. Achieving a seamless repair involves carefully assessing the current finish and replicating it as closely as possible. Here are some steps to ensure a successful match:
- Clean and prepare the surface: Remove any dirt, grime, or flaking finish using a gentle cleaner and sanding if necessary. This will provide a clean base for the new finish.
- Identify the existing finish: Determine the type of finish already present, such as varnish or polyurethane. Note the sheen level and any unique characteristics.
- Test and compare: Test the selected finish on a small inconspicuous area to ensure it matches the existing finish. Adjust the color, sheen, or application method as needed until you achieve a suitable match.
- Apply the new finish: Following the manufacturer’s instructions, carefully apply the new finish to the repaired area. Feather the edges to blend it seamlessly with the existing finish.
By understanding the different types of wood finishes, selecting the appropriate one for your project, and matching the existing finish, you can successfully fix peeling wood and restore the beauty of your wooden surfaces. Remember to always follow the manufacturer’s instructions and take your time to achieve the best results.
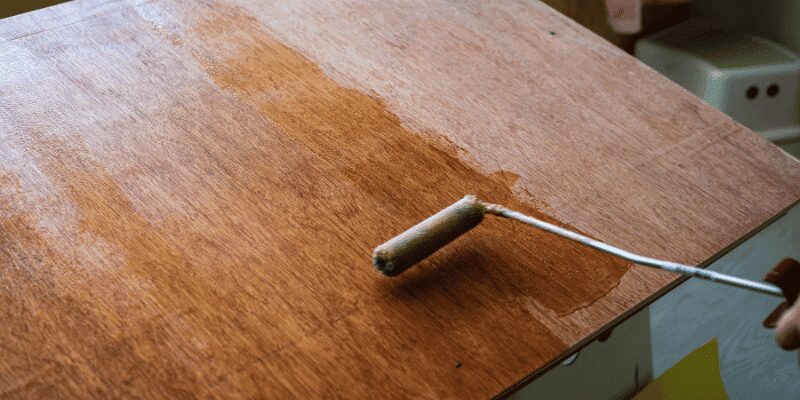
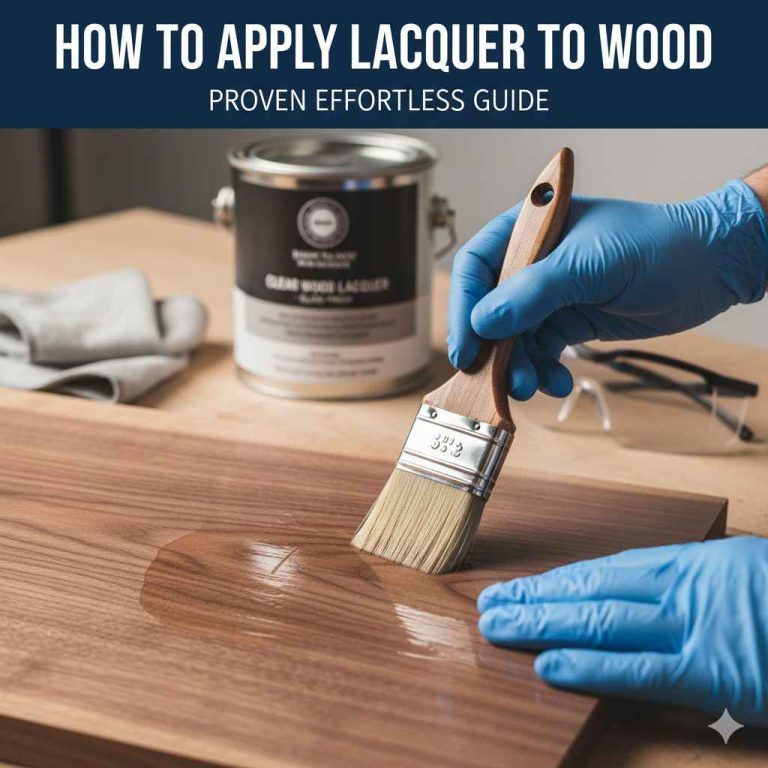
Applying The New Finish
Looking to fix a peeling wood finish? Learn how to apply a new finish with these simple steps. Give your wooden furniture a refreshed look and protect it from further damage.
Properly Preparing The Wood For Application:
- Start by removing the old peeling finish using a paint scraper or sandpaper. This will ensure a smooth surface for the new finish.
- Clean the wood surface thoroughly by wiping it down with a damp cloth to remove any dust or debris. This will help the new finish adhere better.
- If there are any deep scratches or gouges on the wood, fill them in with wood filler and let it dry completely before proceeding.
- Sand the wood surface lightly with fine-grit sandpaper to smooth out any rough areas. Be sure to sand in the direction of the wood grain to avoid creating new scratches.
- Clean the wood again to remove any sanding residue. Use a tack cloth or a damp cloth followed by a dry cloth to ensure a clean work surface.
Applying The Finish Using The Appropriate Tools And Techniques:
- Choose the right type of finish for your wood project. Options include polyurethane, varnish, or lacquer. Consider the desired outcome and the type of wood you are working with.
- Use a high-quality brush or a sprayer to apply the finish evenly onto the wood surface. Apply thin coats rather than one thick coat to prevent drips and uneven drying.
- Follow the manufacturer’s instructions regarding the application method, drying time, and number of coats recommended for optimal results.
- Work in a well-ventilated area to ensure proper air circulation and avoid the buildup of fumes from the finish.
- Maintain a consistent application technique and stroke direction throughout the entire project for a professional-looking finish.
Allowing Sufficient Drying And Curing Time:
- After applying the finish, allow it to dry undisturbed for the recommended drying time specified by the manufacturer. Avoid touching or moving the piece until it is completely dry.
- The drying time can vary depending on the type of finish and environmental conditions. Ensure that the wood is placed in a well-ventilated area with controlled temperature and humidity levels.
- Once the finish is dry, it is important to allow it to cure properly before subjecting the wood to regular use or exposing it to moisture. Curing time can range from a few days to a few weeks, so be patient.
- During the curing process, avoid placing any objects on the finished wood or exposing it to excessive heat or humidity. This will help prevent damage to the finish and ensure its longevity.
- Regularly inspect the finished wood surface to ensure that the new finish is fully dried and cured. If necessary, apply additional coats or touch-ups to achieve the desired level of protection and appearance.
With proper preparation, application, and drying/curing time, you can restore and enhance the look of your wood surfaces, fixing any peeling wood finish issues. Take your time, follow the steps carefully, and soon you’ll enjoy the beauty and durability of a professionally finished wood project.
Finishing Touches And Maintenance
Maintaining and repairing peeling wood finishes is essential to preserve the beauty of your furniture. Learn how to fix this issue with some straightforward techniques and give your wood surfaces the perfect finishing touches they need.
Once you have successfully fixed the peeling wood finish, it’s crucial to give it the finishing touches and perform regular maintenance to prevent future issues. This section will guide you through the necessary steps to achieve a polished appearance and keep your wood protected.
Buffing And Polishing The Refinished Surface
To achieve a smooth and polished look on your refinished wood surface, follow these steps:
- Step 1: Start by ensuring the surface is clean and free from any dust or debris.
- Step 2: Use a soft cloth or buffing pad to apply a specialized wood wax or polish. This will help restore shine and add a protective layer.
- Step 3: Gently rub the wax or polish onto the wood surface in circular motions, working on small sections at a time.
- Step 4: Once the entire surface has been buffed and polished, allow it to dry according to the product’s instructions.
- Step 5: Finally, use a clean cloth to buff the surface, bringing out the natural luster of the wood.
Protecting The Wood With A Sealant Or Topcoat
To ensure the longevity of your wood finish, it is essential to protect it with a sealant or topcoat. Follow these steps to apply a protective layer:
- Step 1: Choose a high-quality sealant or topcoat suitable for your wood type. This will depend on factors such as indoor or outdoor use, level of exposure to sunlight, and desired durability.
- Step 2: Before application, ensure the surface is clean, dry, and free from any previous finishes or debris.
- Step 3: Use a brush or a clean cloth to apply a thin, even layer of the sealant or topcoat. Work in the direction of the wood grain for a smooth and consistent application.
- Step 4: Allow the first coat to dry completely, following the manufacturer’s instructions. Apply subsequent coats as recommended, typically 2-3 coats for optimal protection.
- Step 5: Once the final coat has dried, gently sand the surface with fine-grit sandpaper to remove any imperfections or bubbles. Wipe away any dust before proceeding to additional maintenance.
Regular Maintenance To Prevent Future Peeling
To keep your wood finish looking its best and prevent future peeling, consider implementing the following maintenance practices:
- Clean the surface regularly: Use a soft, damp cloth to remove dust and dirt from the wood surface. Avoid using harsh chemicals or abrasive cleaners that can damage the finish.
- Avoid excessive moisture: Wipe up any spills or water immediately to prevent the wood from absorbing moisture, which can lead to peeling or warping.
- Protect from direct sunlight: UV rays can damage the wood finish over time. Install blinds or curtains to shield the wood from excessive sunlight exposure.
- Monitor humidity levels: Extreme humidity can cause wood to expand or contract, leading to cracking or peeling. Keep the humidity levels in your home within a recommended range.
- Perform touch-ups when necessary: If you notice any signs of peeling or damage, address it promptly by touching up the affected areas. This will help maintain the overall integrity of the wood finish.
By following these finishing touches and maintenance tips, you can ensure that your wood finish remains beautiful and intact for years to come. Remember to prioritize regular care to extend the lifespan of your wood and enjoy its natural beauty.
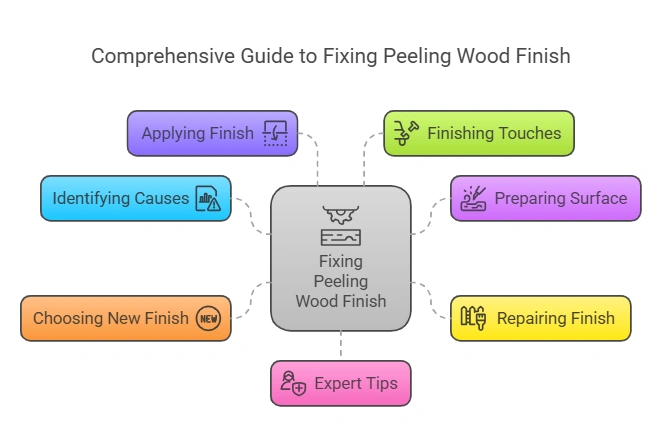
Expert Tips For Preventing Wood Finish Peeling
Preventing wood finish peeling is essential for maintaining the beauty of your furniture. Here are expert tips to fix peeling wood finish and keep it looking flawless for longer.
Wood finishes are a beautiful addition to any piece of furniture or wooden surface. They enhance the natural grain and protect the wood from damage. However, peeling wood finishes can be an eyesore and compromise the durability of the wood.
To prevent this issue from occurring, follow these expert tips:
Avoiding Common Mistakes During Application:
- Ensure the wood surface is clean and free from dust or debris before applying the finish.
- Sand the wood surface properly to remove any imperfections and create a smooth base for the finish.
- Use high-quality brushes or applicators to apply the finish uniformly.
- Avoid applying the finish in direct sunlight or extreme temperatures, as this can affect the adhesion and drying process.
- Follow the manufacturer’s instructions for the recommended drying time between coats.
Maintaining Proper Humidity Levels:
- Wood is susceptible to moisture changes, which can cause the finish to peel. Maintain a stable humidity level in the area where the wood is located.
- Use a humidifier or dehumidifier to regulate humidity levels, especially during dry or humid seasons.
- Avoid placing the wood near vents or in areas with high moisture, such as bathrooms or kitchens.
Applying Regular Coats Of Finish For Protection:
- Apply multiple thin coats of finish rather than one thick coat. Thinner coats allow for better absorption and adhesion.
- Sand lightly between each coat to create a smooth and even surface for the next application.
- Prioritize regular maintenance by reapplying a fresh coat of finish every few years or as recommended by the manufacturer.
- Regularly inspect the wood surface for any signs of wear or damage. Address any issues promptly to prevent further peeling.
By following these expert tips, you can prolong the lifespan of your wood finish and prevent unsightly peeling. Remember to pay attention to your application techniques, maintain proper humidity levels, and apply regular coats of finish for optimal protection. With these preventive measures, your wood finish will remain intact, ensuring the beauty and longevity of your wooden surfaces and furniture.
Frequently Asked Questions (Faqs)
Looking to fix a peeling wood finish? Find easy solutions and expert tips to restore your wood surfaces and bring back their natural beauty. Say goodbye to peeling paint and hello to smooth and durable finishes.
Can I Fix The Peeling Wood Finish Without Stripping The Entire Surface?
Fixing a peeling wood finish doesn’t always mean you have to strip the entire surface. There are alternative methods that can help you repair the peeling areas without going through the time-consuming process of stripping the entire finish. Here are a few options to consider:
- Sanding and patching: Start by sanding the peeling areas lightly to remove any loose paint or varnish. Then, apply a wood patching compound to fill in any cracks or gaps. Once the patch is dry, sand it smooth and blend it with the surrounding wood surface.
- Touch-up products: You can also use touch-up products specifically designed for wood finishes. These products usually come in the form of markers, pens, or fill sticks that match different wood tones. Simply apply the touch-up product to the peeling areas and blend it in with a soft cloth.
- Refinishing specific sections: If the peeling is limited to certain sections, you can opt to refinish only those areas. Sand the affected areas, remove any loose finish, and then reapply a new coat of stain or varnish to match the existing finish.
Remember, the effectiveness of these methods may vary depending on the extent of the peeling and the condition of the wood. It’s always a good idea to test these solutions on a small, inconspicuous area first to ensure a satisfactory result.
How Long Does It Take For The New Finish To Dry Completely?
The drying time of a new wood finish depends on several factors, including the type of finish used, the environmental conditions, and the thickness of the application. Here are some general guidelines for common wood finishes:
- Water-based finishes: Water-based finishes typically dry faster compared to oil-based finishes. In optimal conditions, such as low humidity and good ventilation, water-based finishes may dry to the touch within 1-2 hours. However, it’s important to note that complete curing can take up to a few weeks.
- Oil-based finishes: Oil-based finishes generally require more time to dry compared to water-based finishes. Depending on the conditions, oil-based finishes can take 6-8 hours to dry to the touch. Curing and hardening usually require several days to a couple of weeks.
- Polyurethane finishes: Polyurethane finishes, whether water-based or oil-based, typically have a drying time of 24-48 hours. However, it’s recommended to wait at least 72 hours before subjecting the surface to heavy use or applying additional coats.
Keep in mind that adverse environmental conditions, such as high humidity or low temperatures, can prolong the drying time. It’s crucial to follow the manufacturer’s instructions and allow ample drying and curing time to ensure a durable and long-lasting wood finish.
What If The Repaired Area Doesn’T Match The Rest Of The Wood?
It can be frustrating when the repaired area doesn’t blend seamlessly with the rest of the wood. However, there are a few steps you can take to address this issue and ensure a more harmonious finish:
- Stain matching: If the repaired area is noticeably lighter or darker than the surrounding wood, consider using a stain to help match the colors. Choose a stain that closely matches the original shade and apply it to both the repaired area and the surrounding wood. This can help create a more consistent appearance.
- Blending techniques: In addition to staining, employing blending techniques can help minimize the contrast between the repaired area and the rest of the wood. Feathering the edges of the repair with fine sandpaper and applying additional coats of finish to the entire surface can help blend the colors and textures.
- Aging and patina: Over time, wood naturally darkens and develops a patina. If the repaired area is visibly different, you can try accelerating the aging process by exposing it to natural elements, such as sunlight or moisture. This can help the repaired area gradually blend in with the rest of the wood.
It’s important to have realistic expectations, as achieving a perfect match can be challenging, especially if the wood has aged or the original finish has changed over time. Remember, minor color variations often add character to the wood, enhancing its natural beauty.
By following these tips and experimenting with different techniques, you can significantly improve the appearance of the repaired area and achieve a more harmonious wood finish.
Frequently Asked Questions For How To Fix Peeling Wood Finish
How Do You Fix Peeling Varnish On Wood?
To fix peeling varnish on wood, gently sand the affected area, clean the surface, and apply a new coat of varnish evenly.
How Do You Fix Peeling Fake Wood Finish?
To fix peeling fake wood finish:
1. Sand the peeling area gently.
2. Apply wood filler and smooth it out.
3. Sand the filled area until it’s even.
4. Apply a new coat of paint or varnish to restore the finish.
How Do You Restore A Wood Finish?
To restore a wood finish, follow these steps:
1. Clean the wood surface with a gentle cleanser to remove dirt and grime.
2. Use fine-grit sandpaper to smooth any rough areas and remove old finish.
3. Apply a new coat of wood finish, such as varnish or polyurethane, using a brush or cloth.
4. Allow the finish to dry completely before reapplying additional coats, if needed.
How Do You Repair A Damaged Wood Furniture Finish?
To repair a damaged wood furniture finish, gently sand the damaged area. Clean it thoroughly and apply a matching stain or paint.
Conclusion
Fixing peeling wood finish doesn’t have to be a daunting task. By following these steps, you can restore your wood surfaces to their former glory. Begin by assessing the damage and identifying the cause of the peeling. Then, adequately prepare the surface by cleaning and sanding it.
Apply a suitable primer and paint or stain to ensure long-lasting results. Regular maintenance and protection, such as applying a topcoat or sealant, can also help prevent future peeling issues. Remember to choose high-quality materials and tools, as they will make a significant difference in the overall outcome.
With some patience and attention to detail, you can successfully fix peeling wood finishes and enjoy beautifully restored furniture and surfaces. So, roll up your sleeves, gather your supplies, and get ready to make your wood finishes look as good as new.