How to Repair Cedar Shake Roof: Expert Tips and Techniques
Repairing a cedar shake roof can seem daunting. But with the right steps, it’s manageable.
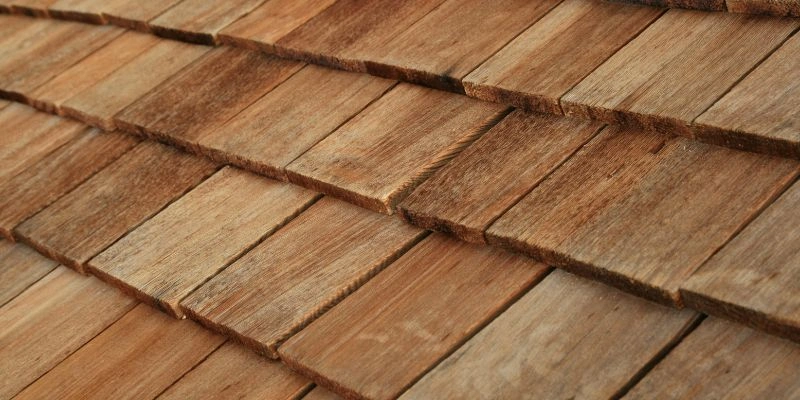
Cedar shake roofs are beautiful and durable, but they do need regular maintenance. Over time, weather and wear can cause damage. This can lead to leaks and other issues. Knowing how to repair your roof can save you time and money.
In this guide, we’ll walk you through the process. You’ll learn the tools and techniques needed. By the end, you’ll feel confident in tackling roof repairs. Stay tuned for detailed, easy-to-follow instructions. Let’s keep your roof in great shape!
Introduction To Cedar Shake Roofs
Cedar shake roofs are not just beautiful; they’re also a symbol of durability and classic charm. These roofs, made from natural wood, have been protecting homes for centuries. But what makes them so special? And why do homeowners often choose cedar shakes over other roofing materials? Let’s dive in and explore the world of cedar shake roofs.
Benefits Of Cedar Shake Roofs
Cedar shake roofs offer a variety of benefits that make them a popular choice among homeowners:
- Durability: Cedar wood is naturally resistant to elements like strong winds and heavy rains. It can last up to 30 years with proper care.
- Insulation: Cedar shakes provide excellent insulation. They help keep your home cool in the summer and warm in the winter, which can lead to lower energy bills.
- Aesthetic Appeal: The natural look of cedar shakes adds a rustic charm that many homeowners love. Over time, the wood ages gracefully, developing a unique patina.
- Eco-Friendly: Cedar is a renewable resource. It’s a great choice for those who are environmentally conscious.
Common Issues With Cedar Shake Roofs
While cedar shake roofs are robust, they are not without their challenges. Here are some common issues that homeowners might face:
- Moisture Damage: Cedar shakes can absorb water, leading to mold, mildew, and rot. Regular maintenance is key to preventing moisture buildup.
- Insect Infestation: Termites and other pests can be attracted to wood. Treating the roof with insect repellents can help.
- Splitting and Cracking: With time, cedar shakes can become brittle and crack. This is more common in areas with extreme weather conditions.
- Maintenance: Unlike some other roofing materials, cedar shakes require regular upkeep to maintain their appearance and functionality.
Despite these issues, many homeowners find that the benefits far outweigh the challenges. With proper care and attention, a cedar shake roof can be a long-lasting and beautiful addition to any home.
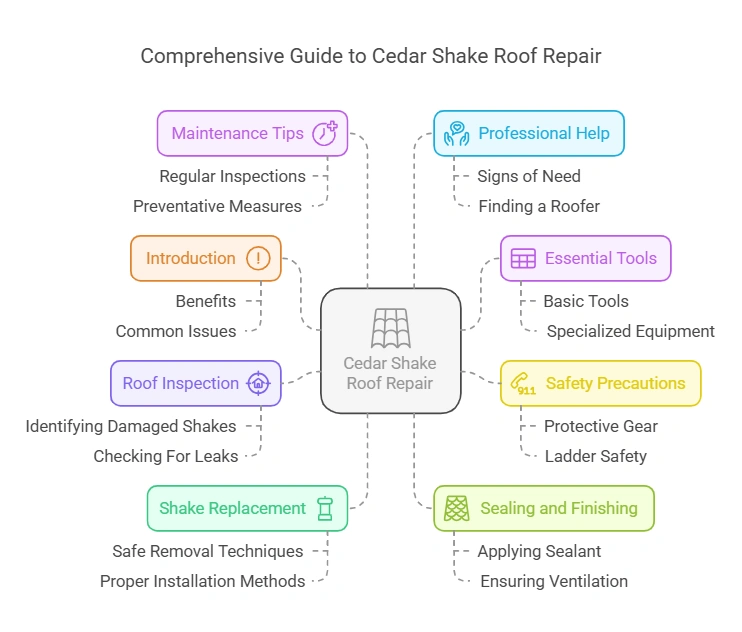
Essential Tools And Materials
Repairing a cedar shake roof might seem like a daunting task, but with the right tools and materials, it can be a manageable and even enjoyable project. In this section, we’ll cover the essential tools and materials you need to get the job done efficiently and effectively. Let’s get started!
Basic Tools Needed
First, let’s talk about the basic tools you’ll need. These are items that are essential for any roof repair job and will help you tackle your cedar shake roof with confidence.
- Hammer: A claw hammer is perfect for removing old nails and driving in new ones.
- Utility Knife: For cutting and trimming shakes to the right size.
- Pry Bar: This will help you remove damaged shakes without damaging the surrounding area.
- Measuring Tape: Accurate measurements are crucial for a proper fit.
- Chalk Line: To mark straight lines for cutting and aligning shakes.
- Work Gloves: Protect your hands from splinters and rough materials.
- Safety Goggles: Essential to protect your eyes from debris and dust.
Specialized Equipment
In addition to the basic tools, there are a few specialized pieces of equipment that can make your job easier and more efficient.
- Roofing Nails: These are designed to hold shakes securely in place. Make sure they are the right length for your roof.
- Replacement Shakes: You’ll need new cedar shakes to replace the damaged ones. Make sure they match the size and style of your existing roof.
- Roofing Sealant: This helps to waterproof and protect the roof from leaks.
- Step Ladder: A sturdy ladder is essential for reaching your roof safely.
- Roofing Harness: Safety first! A harness can prevent falls and ensure you work safely.
Having the right tools and materials on hand is half the battle when it comes to repairing your cedar shake roof. With this list, you’ll be well-prepared to tackle the job and keep your roof in tip-top shape. So, roll up your sleeves, gather your tools, and let’s get to work!
Safety Precautions
Repairing a cedar shake roof isn’t just about having the right tools and materials. Ensuring your safety while performing the repair is paramount. It can be easy to overlook basic safety precautions in the excitement of getting your roof back in shape, but trust me, it’s worth taking a few extra moments to protect yourself. In this section, we’ll walk through essential safety measures you should consider before you start climbing and hammering away. Let’s dive right in!
Personal Protective Gear
Before you start repairing your cedar shake roof, make sure you have the appropriate personal protective gear. This isn’t just about looking the part; it’s about staying safe.
- Helmet: To protect your head from falling debris.
- Gloves: To shield your hands from splinters and sharp tools.
- Non-slip Boots: Essential for maintaining good grip on the roof.
- Safety Glasses: To protect your eyes from dust and flying particles.
Imagine getting a splinter in your hand or dust in your eyes while balancing on your roof—certainly not a fun scenario. Take a moment to suit up properly, and you’ll thank yourself later.
Ladder Safety
Now, let’s talk about how to safely use a ladder. Improper ladder use can lead to accidents, and no one wants that. Follow these tips to ensure you stay safe:
- Inspect Your Ladder: Before using it, check for any damage or instability.
- Set it on Stable Ground: Make sure the base is on even and solid ground to prevent slipping.
- Secure the Ladder: If possible, have someone hold the base while you climb.
- Three Points of Contact: Always maintain three points of contact (two hands and one foot, or two feet and one hand) with the ladder.
- Don’t Overreach: Move the ladder instead of overreaching, which can cause you to lose balance.
Many people have horror stories about ladder accidents that could have been easily avoided with these simple steps. Don’t become one of those statistics! Take the time to set up your ladder correctly and climb safely.
These safety precautions might seem like common sense, but they are often the first things to be ignored in the haste of getting the job done. Remember, no roof repair is worth risking your health. So, gear up and follow these ladder safety tips to ensure you get the job done without any hiccups!
Inspecting The Roof
Before diving into the actual repair work, it’s crucial to inspect your cedar shake roof. A thorough inspection helps you identify the areas that need attention and ensures you don’t miss any hidden issues. Let’s break down the inspection process into simple steps to make it easy for you.
Identifying Damaged Shakes
The first step in inspecting your roof is to identify the damaged shakes. Walk around your house and look for shakes that are cracked, split, curled, or missing. Damaged shakes can be easy to spot if you know what you’re looking for. Here’s a quick guide:
- Cracked or Split Shakes: Look for visible cracks or splits. These are often caused by weather changes.
- Curling Shakes: Shakes that are curling upwards or downwards can indicate aging or moisture issues.
- Missing Shakes: Gaps in your roof can be a sign that shakes have fallen off or been blown away by strong winds.
Take your time and inspect every section of your roof. Keep a notebook or your phone handy to jot down the areas that need repair. This way, you won’t forget any spots when you start the actual repair work.
Checking For Leaks
Once you’ve identified the damaged shakes, the next step is to check for leaks. Leaks can cause significant damage if not addressed promptly. Here’s how you can check for leaks:
- Inspect the Attic: Head up to your attic during or after a rainstorm. Look for wet spots, water stains, or mold on the underside of the roof deck. These are clear indicators of leaks.
- Examine Ceilings: Inside your home, check the ceilings directly below your roof for any water stains or discoloration. This can be a sign that water is seeping through your roof.
- Check Around Chimneys and Vents: Leaks often occur around chimneys, vents, and other roof penetrations. Make sure these areas are properly sealed and look for any signs of water intrusion.
Finding leaks early can save you a lot of trouble and expense down the road. So, be thorough in your inspection and address any issues immediately.
By taking the time to inspect your roof carefully, you’re setting yourself up for a successful repair job. Remember, a little effort now can prevent bigger problems in the future. Stay tuned for our next section where we’ll guide you through the repair process step by step!
Removing Damaged Shakes
Cedar shake roofs are known for their beauty and durability. Over time, some shakes may get damaged by weather or aging. Removing these damaged shakes is a necessary step before any repair. This process ensures the roof stays strong and looks good.
Safe Removal Techniques
First, gather the right tools. You will need a pry bar, a hammer, and a utility knife. Safety gear is also important. Wear gloves and safety goggles to protect yourself.
Start by locating the damaged shake. Use the pry bar to lift the shake gently. Be careful not to damage the surrounding shakes. Once the shake is loose, use the hammer to remove any nails. If the shake is broken, cut it into smaller pieces with the utility knife.
Handling Debris
After removing the damaged shake, you will have some debris. Clean the area to avoid any hazards. Collect all broken pieces and nails in a bucket. This keeps the workspace tidy and safe.
Dispose of the debris properly. Check your local guidelines for disposing of construction waste. This helps keep the environment clean.
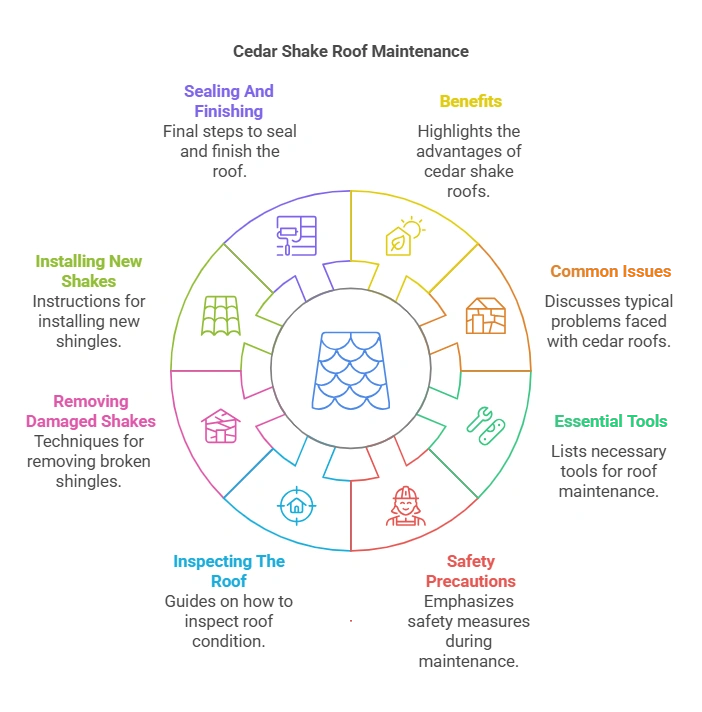
Installing New Shakes
Repairing a cedar shake roof can seem like a daunting task. But, with the right guidance, you can do it effectively. Installing new shakes is a crucial step in the repair process. This section will guide you through the steps of choosing and installing replacement shakes properly.
Choosing Replacement Shakes
Before installing, select high-quality shakes. Look for durable, resilient cedar shakes. Opt for shakes that match your existing roof. This ensures a consistent look and proper fit. Avoid damaged or low-quality shakes. They won’t last long and might cause further issues.
Proper Installation Methods
Start by removing the damaged shakes. Use a hammer and pry bar for this task. Be careful not to damage surrounding shakes. Next, measure the space for the new shake. Cut the replacement shake to fit, if needed. Leave a small gap for expansion and contraction.
Secure the new shake with galvanized nails. Use two nails per shake, placing them about 1 inch from the edge. Ensure the nails are flush but not overdriven. Overdriven nails can split the wood. Finally, check the new shakes for stability. Ensure they lie flat and secure.
Sealing And Finishing
Repairing a cedar shake roof is not just about fixing the damage, it’s also about sealing and finishing. This important step helps protect the wood from water and the elements. Imagine spending hours repairing your roof, only for it to be ruined by the next rainstorm. Not a pleasant thought, right? Let’s dive into the steps of sealing and finishing to ensure your roof is as good as new.
Applying Sealant
Applying sealant is like putting a protective shield over your cedar shakes. It helps keep water out, which is vital since water can cause rot and damage. Here’s a simple guide:
- Choose the right sealant: Look for a sealant that is specifically made for cedar. It should be water-resistant and UV-protective.
- Clean the surface: Before applying the sealant, make sure the cedar shakes are clean and dry. A dirty surface won’t hold the sealant well.
- Apply the sealant: Use a brush or sprayer to apply an even coat of sealant. Make sure to cover all areas, including the edges.
- Let it dry: Allow the sealant to dry completely. This might take a few hours, so check the manufacturer’s instructions.
Ensuring Proper Ventilation
Proper ventilation is crucial for a cedar shake roof. Without it, moisture can build up under the shakes and cause problems. Think of it like a breath of fresh air for your roof.
- Inspect the attic: Make sure your attic has enough vents. This helps air circulate and keeps moisture levels down.
- Check the eaves: Ensure there are vents in the eaves. These allow air to flow in and out, reducing moisture buildup.
- Install ridge vents: If your roof doesn’t have ridge vents, consider installing them. They are great for letting hot air escape from the attic.
By following these steps, you can keep your cedar shake roof in top shape. Sealing and finishing might seem like extra work, but it’s worth it. After all, a well-maintained roof means peace of mind and fewer repairs down the road. Remember, a stitch in time saves nine!
Maintenance Tips
Maintaining a cedar shake roof extends its lifespan and ensures its durability. Regular maintenance helps prevent costly repairs and keeps your roof looking its best. Here are some essential tips to maintain your cedar shake roof effectively.
Regular Inspections
Inspect your cedar shake roof at least twice a year. Look for damaged or missing shingles. Check for signs of mold, mildew, and moss. Early detection prevents small issues from becoming major problems. Pay attention to the roof’s overall condition. Inspect after severe weather events for any immediate damage.
Preventative Measures
Keep your roof clean to prevent damage. Remove debris like leaves and branches regularly. Trim overhanging tree branches to reduce shade and debris. Ensure proper ventilation to prevent moisture buildup. Apply a wood preservative to protect the shakes from moisture and UV rays. This helps maintain the wood’s natural beauty.
When To Call A Professional
So, you’ve noticed a few issues with your cedar shake roof. Maybe there are a few missing shakes, or perhaps you’ve spotted some leaks after a heavy rain. While some minor repairs can be tackled on your own, there comes a time when calling in a professional is the best option. But how do you know when it’s time to bring in the experts? Let’s dive into some telltale signs and tips on finding a qualified roofer.
Signs You Need Expert Help
Even if you’re a DIY enthusiast, certain signs indicate that it’s time to call in a professional. Here are some of the key indicators:
- Persistent Leaks: If you have water dripping inside your home, this is a clear sign that your roof needs expert attention. Water damage can lead to mold and structural issues.
- Extensive Damage: If more than a few shakes are missing or damaged, it’s best to have a professional assess the situation. Large areas of damage can weaken the roof’s integrity.
- Age of the Roof: Cedar shake roofs typically last about 30-40 years. If your roof is nearing this age, it’s wise to have it inspected by a professional.
- Visible Rot: If you notice areas of the roof that appear to be rotting, it’s crucial to get this addressed immediately. Rot can spread quickly and compromise the entire roof.
Finding A Qualified Roofer
Once you’ve determined that you need professional help, the next step is finding the right roofer. Here are some tips to guide you:
- Check Credentials: Ensure the roofer is licensed and insured. This protects you in case of any accidents or damage during the repair process.
- Read Reviews: Look for online reviews and testimonials. A roofer with positive feedback from previous clients is likely to provide quality service.
- Ask for Recommendations: Word of mouth is powerful. Ask friends, family, or neighbors if they can recommend a good roofer.
- Get Multiple Quotes: Don’t settle for the first quote you receive. Compare prices and services from a few different roofers to ensure you’re getting a fair deal.
- Experience with Cedar Shakes: Cedar shake roofs require specific knowledge and skills. Make sure the roofer has experience working with this type of material.
Remember, your roof is a critical part of your home. It protects you and your belongings from the elements. So, when in doubt, it’s always better to call in a professional. After all, peace of mind is priceless, right?
| Criteria | Importance | Notes |
|---|---|---|
| License and Insurance | High | Ensures protection during repairs |
| Reviews and Testimonials | Medium | Provides insight into previous work |
| Experience with Cedar Shakes | High | Specialized knowledge needed |
Frequently Asked Questions
Can You Repair A Cedar Shake Roof?
Yes, you can repair a cedar shake roof. Replace damaged shakes, fix leaks, and maintain it regularly for longevity.
What Is The Life Expectancy Of A Cedar Shake Roof?
A cedar shake roof typically lasts 30 to 50 years. Proper maintenance can extend its lifespan even further. Regular inspections and timely repairs are crucial to achieving maximum durability.
How Much Does It Cost To Repair A Cedar Shake Roof?
Repairing a cedar shake roof costs between $500 and $3,000. The price varies based on damage extent and labor rates.
What Is The Best Treatment For A Cedar Shake Roof?
The best treatment for a cedar shake roof is regular cleaning, applying a wood preservative, and sealing. This prevents moss growth, decay, and UV damage.
Conclusion
Repairing a cedar shake roof is manageable with the right steps. Inspect regularly for damage. Replace broken shakes promptly. Use quality materials for repairs. Maintain proper ventilation to extend roof life. Regular maintenance helps prevent costly issues. With patience, your cedar roof can last many years.
Follow these tips to keep your roof in good shape. Happy repairing!