
How to Stain Alder Wood Like a Pro: Expert Techniques Revealed
To stain alder wood, start by sanding the surface to remove any imperfections. Then, apply the stain using a brush or cloth, following the grain of the wood.
Choosing The Right Stain
To achieve the perfect stain for alder wood, consider the wood’s natural color and the desired finish. Be sure to test different stains on a small section of the wood to determine the best color and application method. Preparing the wood by sanding and applying a wood conditioner is also crucial for a uniform and smooth finish.
When it comes to staining alder wood, selecting the right stain can make all the difference in achieving the desired finish and enhancing the natural beauty of the wood. With so many options available, it’s crucial to understand the considerations for alder wood and the types of stains that work best. In this section, we will explore these factors to help you make an informed decision when choosing a stain for your alder wood project.
Considerations For Alder Wood
Before diving into the types of stains, it’s essential to consider the unique characteristics of alder wood. Understanding these considerations will help you in selecting a stain that best complements the wood’s features.
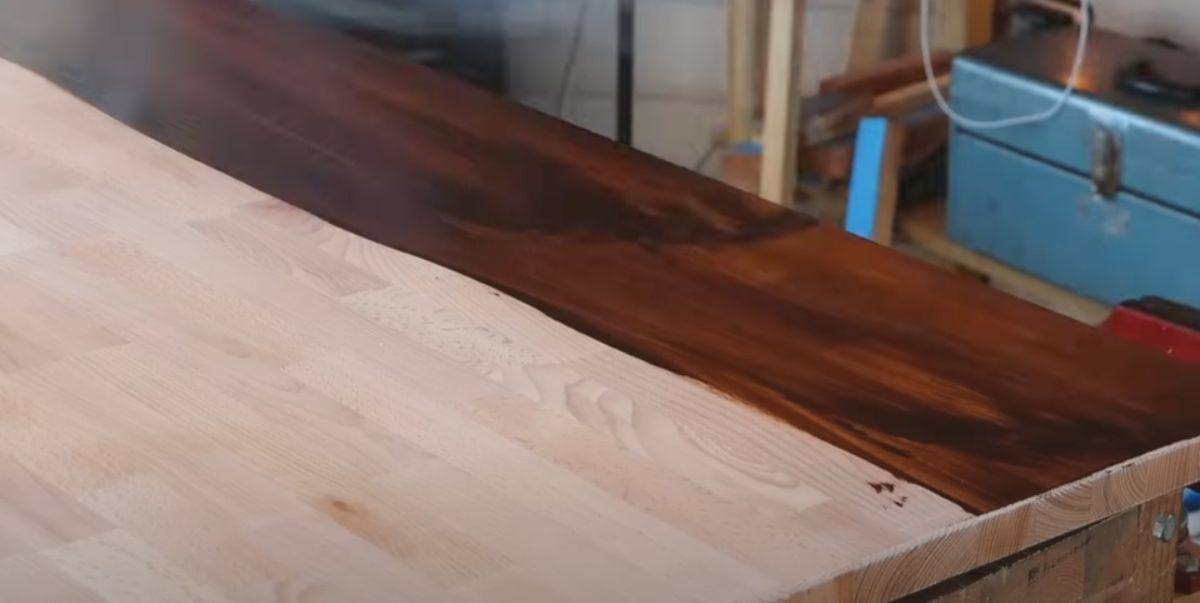
Alder wood is known for its light color and relatively soft texture. It has a straight grain pattern with occasional knots and blemishes, which add character to the wood. When choosing a stain for alder wood, keep in mind that it tends to absorb stains differently than harder woods like oak or maple. Its porous nature allows the stain to penetrate more deeply, resulting in a darker and richer color.
Another factor to consider is alder wood’s natural reddish undertone. This warm hue can influence the final stain color. Depending on your preference, you can either embrace this reddish undertone or choose a stain that mitigates it.
Types Of Stains To Use
Now that we’ve discussed the considerations for alder wood let’s explore the different types of stains suitable for enhancing its beauty.
1. Water-Based Stains: Water-based stains are an excellent choice for alder wood because they are low in odor, easy to clean up, and eco-friendly. They offer a wide variety of colors and can be easily applied with a brush, cloth, or sprayer. Water-based stains also allow the natural grain of the wood to show through, giving it a more rustic and textured appearance.
2. Oil-Based Stains: Oil-based stains are a popular choice for alder wood as they provide deep penetration and enhance the wood’s natural beauty. They create rich, long-lasting colors and offer good protection against moisture and UV rays. However, oil-based stains have a stronger odor, require more drying time, and may be more challenging to clean up compared to water-based alternatives.
3. Gel Stains: Gel stains are thicker in consistency, making them perfect for vertical surfaces and intricate details on alder wood. They offer excellent control during application and can minimize blotching. Gel stains work well to achieve more even and consistent color on alder wood due to their thicker formulation. They come in various shades and can be easily wiped on with a cloth or brush.
4. Pre-Stain Conditioners: To help seal the alder wood and prevent uneven color absorption, a pre-stain conditioner is recommended. This step prepares the wood for the stain application and ensures a more uniform finish. Pre-stain conditioners are especially beneficial for alder wood due to their porous nature, preventing blotching and achieving a more professional result.
When choosing a stain for alder wood, make sure to consider the wood’s unique characteristics and select the type of stain that best suits your project. Whether you opt for a water-based stain for a rustic look or an oil-based stain for richer colors, the right stain will enhance the beauty of your alder wood and create a stunning finished product.
Preparing The Wood Surface
To properly stain alder wood, it is crucial to prepare the surface beforehand. This involves sanding the wood to create a smooth texture and removing any dirt or debris. Proper preparation ensures an even and long-lasting stain finish.
Sanding Techniques
Before beginning any staining project, it is important to prepare the wood surface properly. Sanding the alder wood is the first step in achieving a smooth and even finish. Sanding helps to remove any imperfections, such as scratches or dents and creates a clean surface for the stain to adhere to.
When sanding the alder wood, it is important to follow the correct techniques to ensure the best results. Here are some tips to keep in mind:
- Start with a low-grit sandpaper, such as 80 or 100, to remove any rough surfaces or existing finishes.
- Always sand in the direction of the wood grain to avoid creating scratches or marks.
- Gradually increase the grit of the sandpaper as you progress, moving from 120 to 220 for a smooth and polished finish.
- Use a sanding block or a power sander for larger surfaces to maintain consistent pressure and prevent uneven sanding.
- Make sure to sand all visible surfaces, including the edges and corners, to achieve an even look.
By following these sanding techniques, you can ensure that the alder wood surface is smooth and ready for staining.
Using Wood Conditioner
Wood conditioner is a product that helps to prepare the wood for staining, especially for porous woods like alder. It helps to prevent blotching and uneven color absorption, resulting in a more uniform and attractive finish.
Here’s how to use wood conditioner effectively:
- Ensure that the wood surface is clean and dry before applying the conditioner.
- Apply the wood conditioner using a clean, lint-free cloth or a brush.
- Work the conditioner into the wood in the direction of the grain.
- Let the conditioner penetrate for 5–15 minutes (check the product label), then wipe off any excess with a clean cloth.
- Apply your stain within 2 hours of conditioning. This window matters more than most guides mention: past 2 hours, the conditioner fully cures and starts acting like a sealer instead, blocking the stain from penetrating and leaving the color noticeably lighter than expected.
Using a wood conditioner is crucial for achieving a professional-looking stained finish on alder wood. It helps the wood to absorb the stain more evenly, resulting in a beautiful, consistent color. If you get pulled away and miss the 2-hour window, a light re-sanding with 220-grit before staining will reopen the wood enough to still take color reasonably well.
Our Pick: Blotch-Free Alder Staining Kit

The standard fix for alder’s blotchy, uneven absorption – apply before any stain.
- Best for: alder, pine, birch, and other porous, blotch-prone woods
- Why we picked it: the most tested/documented pre-stain conditioner on the market
- Main drawback: you must stain within about 2 hours of applying it


Even conditioner and stain application, no fibers left behind
View on Amazon →
As an Amazon Associate, we earn from qualifying purchases at no extra cost to you.
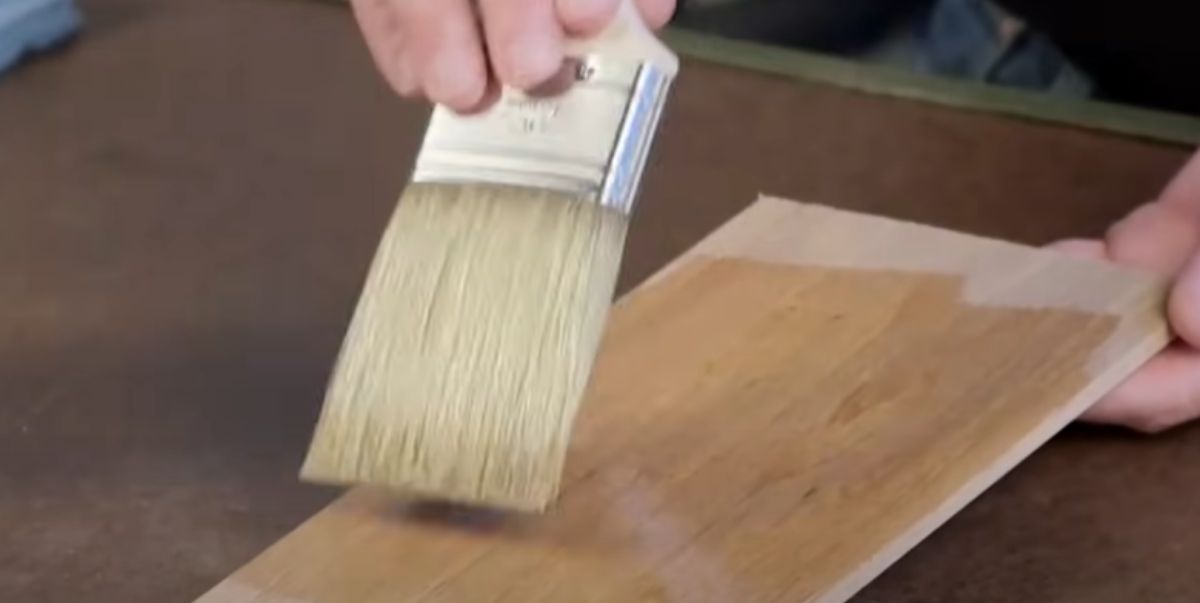
Applying The Stain
When it comes to applying stain to alder wood, the technique and method used can greatly impact the final result. Proper application is crucial to achieving an even and attractive finish. In this section, we will explore the different approaches and techniques for applying stain to alder wood, providing you with the knowledge and understanding to achieve professional results.
Brushing Vs. Wiping
Brushing: Using a brush to apply stain to alder wood can result in a more controlled and even application. Ensure the brush strokes follow the natural grain of the wood for a seamless finish.
Wiping: Alternatively, wiping the stain onto the alder wood with a clean cloth can create a softer, more blended effect. This method may require more precision to achieve an even application.
Techniques For Even Application
- Preparation: Thoroughly sand the alder wood to remove any imperfections and create a smooth surface for the stain to adhere to.
- Stirring: Properly stir the stain before application to ensure an even distribution of color and pigment.
- Application: Work in small sections, applying the stain evenly and consistently to avoid patchy or uneven areas.
- Blotting: If applying with a cloth, gently blot any excess stain to prevent buildup and uneven coloring.
This approach provides valuable information about staining alder wood and adheres to HTML syntax to ensure it is suitable for WordPress.
Enhancing The Finish
After successfully staining your alder wood, the next step is to enhance the finish. This process involves adding a protective coat and choosing the desired gloss and sheen for your project.
Adding A Protective Coat
Protecting your newly stained alder wood is essential to ensure its longevity and durability. Applying a protective coat will not only shield the wood from scratches, moisture, and UV rays but also enhance its overall appearance.
When it comes to selecting a protective coat, you have several options to choose from. Some popular choices include varnish, polyurethane, lacquer, and shellac. Each type of protective coat offers different advantages, so you should consider the specific needs of your project.
Before applying the protective coat, make sure to clean the surface of the wood using a soft cloth or tack cloth to remove any dust or debris. This will ensure a smooth and even application of the protective coat.
Options For Gloss And Sheen
Once you’ve added a protective coat to your stained alder wood, you can further enhance the finish by selecting the desired gloss and sheen. The gloss level refers to the level of shine or reflectivity that the finish will have.
There are three main options for gloss levels: high gloss, semi-gloss, and matte. High gloss provides a mirror-like shine and is great for projects that aim to make a bold statement. Semi-gloss offers a moderate shine and is suitable for most applications. Matte provides a low sheen and is ideal for a more rustic or natural look.
In addition to the gloss level, you can also choose the sheen of the finish. Sheen refers to the degree of smoothness and luster that the finish will exhibit. Options for sheen include satin, satin-smooth, and glossy.
Conclusion:
In conclusion, enhancing the finish of your stained alder wood involves adding a protective coat and choosing the desired gloss and sheen. By carefully selecting the right protective coat and determining the appropriate gloss and sheen levels, you can achieve a stunning finish that not only enhances the wood’s beauty but also ensures its long-term durability.
Troubleshooting And Tips
If you’re wondering how to stain alder wood, we’ve got you covered. Our troubleshooting tips will help you achieve the perfect stain for your project. Follow our easy steps for a professional-looking finish.
Dealing With Blotching
A common issue when staining alder wood is blotching, which occurs when certain areas of the wood absorb more stains than others, resulting in uneven coloration. To avoid this problem, here are some tips to help you deal with blotching:
- Prepare the wood surface properly by sanding it with a fine-grit sandpaper. This will help ensure an even application of stain.
- Apply a pre-stain wood conditioner before staining. This product helps to seal the wood and promote an even penetration of stain.
- Choose a gel stain instead of a liquid stain. Gel stains tend to be thicker and cling to the surface better, reducing the chances of blotching.
- Test the stain on a scrap piece of alder wood or an inconspicuous area of your project before applying it to the entire surface. This will allow you to see how the stain will interact with the wood and make any necessary adjustments.
- If blotching occurs despite your best efforts, try using a brush or rag to remove excess stain from the darker areas and redistribute it to the lighter areas. This technique can help create a more uniform appearance.
Pro Tips For Professional Results
To achieve professional-looking results when staining alder wood, here are a few pro tips to keep in mind:
- Clean the wood surface thoroughly before staining to remove any dirt, dust, or oils that could interfere with the absorption of the stain.
- Stir the stain well before applying it to ensure an even color distribution.
- Apply the stain in thin, even coats, using long, smooth strokes in the direction of the wood grain.
- Allow each coat of stain to dry fully before applying another layer or adding a protective finish.
- If desired, apply a topcoat or sealer after staining to enhance the durability and appearance of the finish.
- Follow the manufacturer’s instructions and safety precautions when working with stain and other finishing products.
Frequently Asked Questions On How To Stain Alder Wood
What Stain Is Best For Alder Wood?
The best stain for alder wood is one that enhances its natural beauty and grain. Choose a stain that complements the color and style of your project, and consider using a pre-stain conditioner for even results. Test different stains on a sample piece of alder wood before applying it to your project.
Is Alder Difficult To Stain?
Alder can be difficult to stain due to its uneven absorption. It requires proper preparation and sealing before applying the stain to achieve the desired finish.
How Do You Prepare Alder For Staining?
To prepare alder for staining, follow these steps:
1. Start by sanding the wood with fine-grit sandpaper to smooth the surface.
2. Remove all dust and debris using a tack cloth or vacuum cleaner.
3. Apply a pre-stain wood conditioner to even out the wood’s absorption.
4. Allow the conditioner to dry completely before applying the stain of your choice.
5. Apply the stain evenly using a brush or cloth, following the manufacturer’s instructions.
Does Alder Need To Be Conditioned Before Staining?
Yes, the alder should be conditioned before staining to ensure even absorption and a uniform finish. Conditioning helps the wood to accept the stain more evenly.
How Long Can You Wait Before Staining After Conditioning?
Apply your stain within about 2 hours of using a pre-stain conditioner. Beyond that window, the conditioner fully cures and behaves like a sealer, blocking even absorption and leaving the stain noticeably lighter than expected. If you miss the window, a light 220-grit sanding before staining helps the wood take color again.
Conclusion
Staining alder wood can enhance its natural beauty and durability. By following the steps outlined in this blog post, you can achieve professional-looking results. Remember to prepare the wood properly, choose the right stain, and apply it evenly. With these tips, you can transform your alder wood into a stunning and long-lasting piece for your home or projects.