
How to Master the Art of Using a Table Saw: Expert Tips and Tricks
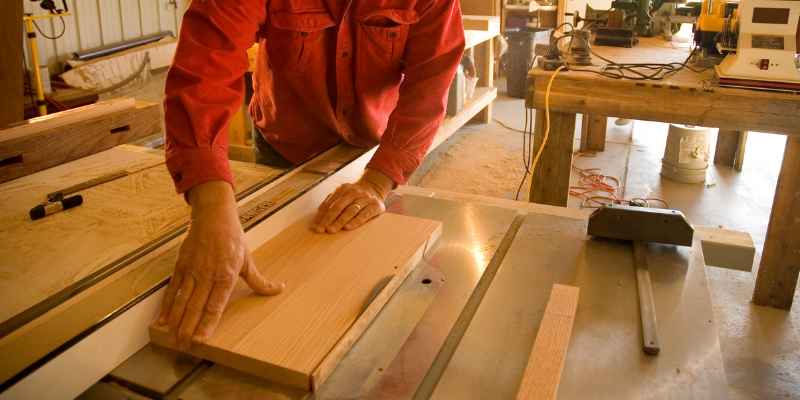
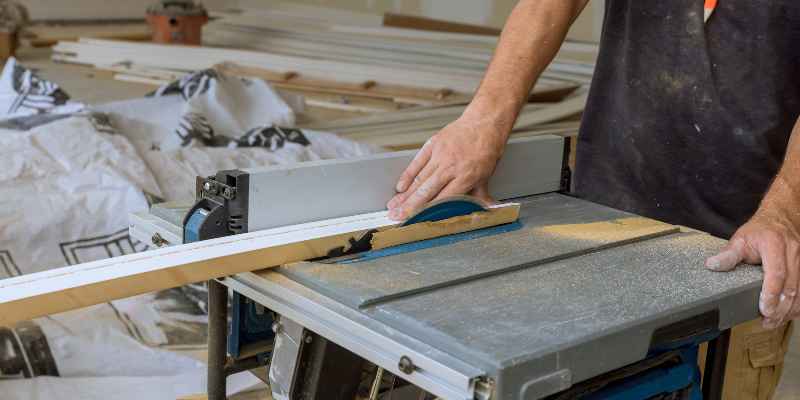
To use a table saw, adjust the blade height and fence, position the material to be cut, turn on the saw, and slowly push the material through the blade while maintaining a firm grip. When it comes to using a table saw, there are a few essential steps you need to follow for safety and accuracy.
By adjusting the blade height and fence, positioning your material correctly, and maintaining a firm grip as you push it through the blade, you can ensure precise cuts. Table saws are versatile and powerful tools, commonly used in woodworking projects.
Whether you’re a professional or a DIY enthusiast, understanding how to use a table saw properly is crucial for achieving the desired results. We will guide you through the step-by-step process of using a table saw effectively. Read on to learn more.
Table Saw Basics And Safety Precautions
A table saw is a powerful tool that can make woodworking projects much easier and efficient. However, it is essential to understand the basics and safety precautions before operating one. In this article, we will cover the table saw basics and provide valuable insights into using it safely.
Importance Of Learning How To Safely Use A Table Saw
Learning how to safely use a table saw is crucial to protect yourself from potential injuries and accidents. The powerful motor and sharp blades of a table saw can cause severe harm if not operated correctly. By acquiring the necessary knowledge and skills, you can minimize the risks and ensure a safe woodworking experience.
Essential Safety Gear And Precautions To Take Before Operating A Table Saw
Before using a table saw, it is essential to have the right safety gear and follow certain precautions to prevent accidents. Here are some must-have safety gear and precautions:
- Protective eyewear to shield your eyes from flying debris
- Earplugs or earmuffs to reduce the noise level
- A dust mask or respirator to protect your lungs from sawdust
- A sturdy workbench or table to ensure stability
- Push sticks or push blocks to keep your hands safely away from the blade while pushing the wood through
- Inspect the saw before each use to ensure it is in proper working condition, with no loose parts or damaged components
- Ensure the blade is properly aligned and secured to avoid kickbacks or blade-related accidents
- Adjust the blade height to the appropriate depth, allowing only a small portion of the blade to protrude above the workpiece
- Keep the work area clean and organized to avoid tripping hazards and ensure a clutter-free workspace
- Maintain proper body positioning and posture while operating the table saw, standing to the side and not directly in line with the blade
- Never wear loose clothing or jewelry that could get caught in the spinning blade
By implementing these safety precautions and wearing the necessary gear, you significantly reduce the risk of accidents and injuries when using a table saw. Safety should always be a top priority to ensure a productive and incident-free woodworking experience.
Understanding The Parts Of A Table Saw
Discover the essential components of a table saw to gain a better understanding of how to effectively utilize this powerful tool.
A table saw is a versatile tool that every woodworker should have in their arsenal. But before you start using a table saw, it’s important to have a clear understanding of its different parts and how they contribute to the overall functionality of the machine. In this section, we will provide an overview of the various components of a table saw and explain how each part plays a crucial role in ensuring its smooth operation.
Overview Of The Different Components Of A Table Saw
A table saw consists of several key parts that work together to enable precise and efficient cutting. Here’s a breakdown of the main components you’ll find on a typical table saw:
1. The Blade: The blade is the heart of a table saw. It is responsible for cutting through different materials, and its type and size can vary depending on the specific cutting needs.
2. The Arbor: The arbor is the shaft on which the blade is mounted. It spins at high speeds to deliver the cutting action.
3. The Tabletop: The tabletop is a flat surface where the workpiece lies during cutting. It provides stability and support for accurate cuts.
4. The Fence: The fence is an essential component that helps you make precise straight cuts. It acts as a guide for the material, ensuring it stays in line with the blade.
5. The Miter Gauge: The miter gauge is a tool that allows you to make angled cuts or crosscuts. It slides in a slot on the tabletop and can be adjusted to various angles for versatile cutting options.
6. The Rip Fence: The rip fence is used for making parallel cuts. It is adjustable and ensures consistent cuts by keeping the workpiece at a fixed distance from the blade.
7. The Blade Guard and Anti-Kickback Pawls: These safety features protect the user from potential hazards. The blade guard covers the blade, while the anti-kickback pawls prevent the workpiece from being thrown back.
8. The Power Switch: The power switch enables you to turn the table saw on and off easily. It should be located in a convenient and accessible location for quick operation.
How Each Part Contributes To The Overall Functionality Of The Machine
Each part of a table saw performs a specific role in ensuring the smooth operation and accuracy of the machine:
– The blade, when properly aligned and selected, delivers clean and precise cuts through various materials.
– The arbor securely holds the blade in place, allowing it to spin at high speeds without wobbling.
– The tabletop provides a stable and level surface for the workpiece, ensuring accurate cuts and reducing the risk of accidents.
– The fence acts as a guide, keeping the material in line with the blade for straight and consistent cuts.
– The miter gauge allows for angled cuts or crosscuts, expanding the versatility of the table saw.
– The rip fence ensures parallel cuts by maintaining a fixed distance between the blade and the workpiece.
– The blade guard and anti-kickback pawls enhance safety by minimizing the risk of accidents and injuries.
– The power switch offers convenient control over the operation of the table saw, allowing for quick and easy start/stop functionality.
Understanding each part of a table saw and how it contributes to the overall functionality is crucial for safe and efficient operation. With this knowledge, you’ll be well-equipped to make accurate cuts and maximize the potential of your table saw.
Proper Set Up And Calibration
Proper set up and calibration of your table saw are crucial for achieving accurate and precise cuts. By correctly aligning the blade and fence, you can ensure your saw will perform at its best and minimize the risk of accidents. In this step-by-step guide, we will walk you through the process of setting up and calibrating your table saw. Follow these instructions closely for optimal results.
Step-by-step Guide For Setting Up And Calibrating A Table Saw
Follow these steps to properly set up and calibrate your table saw:
- Check the table saw surface: Before setting up your table saw, ensure that the surface is clean and level. This will provide a stable foundation for accurate cuts.
- Install the blade: Select the appropriate blade for your cutting needs and install it securely onto the saw arbor, following the manufacturer’s instructions. Make sure the blade is properly aligned.
- Align the blade parallel to the miter slots: Use a combination square or a specialized alignment tool to check if the blade is parallel to the miter slots. Adjust the tilt and angle of the blade as needed to achieve perfect alignment.
- Align the rip fence: Position the rip fence parallel to the blade. Use a measuring tape or a specialized alignment tool to ensure equal distances between the fence and the blade at the front and back ends. Adjust the fence as necessary until it is perfectly aligned.
- Calibrate the miter gauge: Place the miter gauge into the miter slot and check if it slides smoothly and accurately. If needed, adjust the miter gauge to eliminate any play or wobbling.
- Check the blade height and bevel angle: Double-check that the blade height and bevel angle are set correctly for the desired cutting depth and angle. Make any necessary adjustments using the saw’s adjustment mechanisms.
- Test the calibration: Before starting any project, it’s essential to test the calibration of your table saw. Rip and crosscut some scrap wood pieces and measure the accuracy of the cuts. If adjustments are needed, repeat the alignment and calibration steps above.
Tips For Achieving Accurate And Precise Cuts
Follow these tips to ensure accurate and precise cuts on your table saw:
- Use a sharp blade: A dull blade can cause tear-out and imprecise cuts. Keep your blades sharp and replace them when necessary.
- Secure your workpiece: Always use clamps, push sticks, or other appropriate tools to secure your workpiece firmly. This will prevent it from moving and reduce the risk of accidents.
- Make small adjustments: When making fine adjustments to the blade height or fence alignment, make small incremental changes to achieve the desired result gradually.
- Use a featherboard: A featherboard is a helpful tool that applies pressure against your workpiece, keeping it firmly against the fence or miter gauge. This helps prevent kickback and enhances the accuracy of your cuts.
- Measure twice, cut once: Before making any cuts, double-check all measurements to ensure accuracy. Take your time and be meticulous with your measurements to minimize mistakes.
- Wear safety gear: Always prioritize safety when using a table saw. Wear safety glasses, ear protection, and appropriate clothing to protect yourself from potential hazards.
Basic Techniques For Using A Table Saw
Learn the basic techniques for effectively using a table saw in this informative subheading. Discover how to safely operate a table saw and maximize its potential for your woodworking projects.
Basic Techniques For Using A Table Saw
When it comes to using a table saw, it’s essential to master a few basic techniques that will allow you to make precise and accurate cuts. Whether you need to create crosscuts, rip cuts, or bevel cuts, understanding these fundamental techniques is crucial for any woodworking project. In this section, we will introduce you to these essential techniques and provide you with some tips and tricks for achieving clean and smooth cuts.
Introduction To Crosscuts
Crosscuts are perpendicular cuts made across the grain of the wood. They are commonly used to shorten boards or create smaller pieces for a project. To make a crosscut using a table saw, follow these steps:
- Measure and mark the desired length on your workpiece.
- Set the fence parallel to the blade, ensuring it is at the correct distance from the blade.
- Position the workpiece against the fence, holding it firmly with one hand.
- Turn on the table saw and slowly push the workpiece forward, guiding it through the blade.
- Keep your fingers away from the blade and use a push stick to maintain a safe distance.
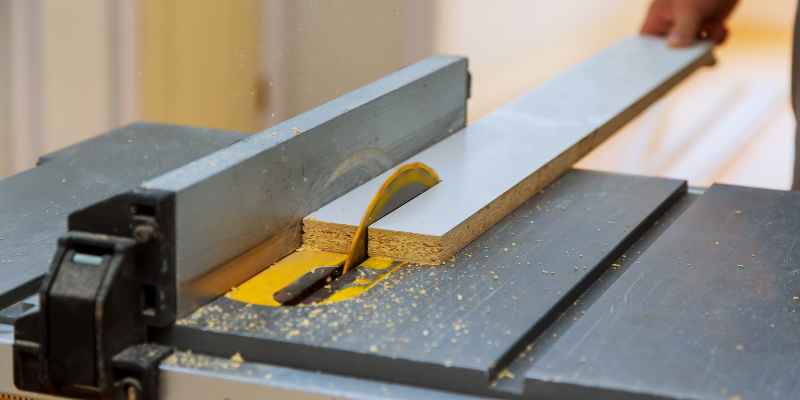
Introduction To Rip Cuts
Rip cuts involve cutting a workpiece parallel to the grain. These cuts are ideal for creating long, narrow pieces of wood. To perform a rip cut on a table saw, follow these steps:
- Set the table saw’s fence at the desired distance from the blade, ensuring it runs parallel to the blade.
- Place the workpiece against the fence, with the portion to be cut hanging off the edge of the table.
- Turn on the table saw and push the workpiece forward, guiding it along the fence and through the blade.
- Always use a push stick to maintain a safe distance between your fingers and the blade.
Introduction To Bevel Cuts
Bevel cuts involve tilting the blade to make angled cuts on the workpiece. These cuts can add interesting design elements to your woodworking projects. Here’s how to make bevel cuts on a table saw:
- Set the angle of the blade to the desired bevel angle.
- Adjust the fence to the correct distance from the blade, ensuring it is parallel to the blade.
- Position the workpiece against the fence and guide it through the blade, maintaining a firm grip.
- Exercise caution when making bevel cuts, as they can be more challenging and require extra attention.
Tips And Tricks For Clean And Smooth Cuts
To achieve clean and smooth cuts on a table saw, consider the following tips and tricks:
- Ensure the blade is sharp and in good condition before starting any cutting tasks.
- Use a zero-clearance insert to minimize tear-out and support the workpiece near the blade.
- Make sure the blade is aligned properly with the fence and parallel to the miter slots.
- Measure twice and cut once to avoid mistakes and waste material.
- Use a push stick or push block to maintain a safe distance from the blade while providing proper control.
- Consider using a featherboard or hold-down clamp to keep the workpiece firmly against the fence and table.
Advanced Techniques And Projects With A Table Saw
Discover advanced techniques and exciting projects to enhance your skills with a table saw. Unleash your creativity and master the art of using a table saw with this comprehensive guide.
When it comes to woodworking with a table saw, there are many advanced techniques and projects that can be accomplished. These techniques, such as dado cuts, miter cuts, and joinery, allow you to take your woodworking skills to the next level. By mastering these techniques and tackling more complex projects, you’ll be able to create stunning pieces that showcase your craftsmanship and attention to detail. In this section, we’ll explore these advanced techniques and provide examples of woodworking projects that can be completed using a table saw.
Exploring more complex techniques like dado cuts, miter cuts, and joinery
Dado cuts:
Dado cuts are commonly used in woodworking to create grooves or channels. These cuts are often used to join pieces of wood together or to create slots for shelves or panels. One of the advantages of using a table saw for dado cuts is the precision it offers. To make a dado cut, you’ll need a dado blade set, which consists of two outer blades and a series of chippers that fit in between. By adjusting the width of the chippers, you can customize the width of the groove or channel to fit your specific needs. This technique is particularly useful for building bookcases, cabinets, or drawers.
Miter cuts:
Miter cuts are angled cuts made at the ends of two pieces of wood, allowing them to fit together seamlessly at a specific angle. This technique is commonly used in projects such as picture frames, window casings, or trim work. With a table saw, you can easily set the desired angle using the miter gauge or a miter sled. By making precise miter cuts, you’ll be able to achieve tight and clean joints, enhancing the overall appearance of your project.
Joinery:
Joinery refers to the process of connecting two or more pieces of wood together to create a sturdy and durable structure. There are various types of joinery techniques that can be accomplished using a table saw, including butt joints, rabbet joints, dado joints, and dovetail joints. Each type of joinery has its own unique characteristics and strengths. By mastering these joinery techniques, you’ll have the flexibility to create intricate and elegant woodworking projects, such as furniture pieces or decorative boxes.
Examples of woodworking projects that can be accomplished using a table saw
Using a table saw opens up a world of possibilities for woodworking projects. Here are a few examples of projects that can be completed using advanced techniques with a table saw:
1. Building a farmhouse dining table:
With dado cuts and careful joinery, you can create a beautiful farmhouse dining table. The dado cuts can be used to create the tabletop’s breadboard ends, while joinery techniques can be employed to assemble the legs and apron. The result is a sturdy and stylish centerpiece for your dining room.
2. Crafting a jewelry box:
By utilizing miter cuts and precise joinery, you can construct an intricate jewelry box. The miter cuts will allow you to create perfectly fitting corners, while the joinery techniques can be used to hold the box together securely. This woodworking project will not only provide practical storage for your jewelry but also serve as an elegant decorative piece.
3. Constructing a bookshelf:
Dado cuts are essential for creating adjustable shelves in a bookshelf. By using the table saw to make precise dado cuts in the sides of the bookshelf, you can easily slide the shelves in and out to accommodate different book sizes. This project showcases the versatility of a table saw and provides a practical solution for organizing your book collection.
Conclusion:
By exploring advanced techniques like dado cuts, miter cuts, and joinery, you can unlock a whole new level of woodworking with a table saw. These techniques allow you to create intricate joints and precise cuts that enhance the quality and aesthetic appeal of your projects. Whether you’re building furniture, crafting decorative pieces, or constructing functional items, a table saw is an essential tool for taking your woodworking skills to the next level.
Essential Tools And Accessories For Table Saw Mastery
When it comes to mastering the art of using a table saw, having the right tools and accessories is essential. Not only can they help you maintain and enhance the performance of your table saw, but they can also improve safety, accuracy, and efficiency. In this section, we will discuss the must-have tools for maintaining and enhancing your table saw’s performance, as well as the accessories that can take your woodworking skills to the next level.
Must-have Tools For Maintaining And Enhancing The Performance Of A Table Saw
Keeping your table saw in top-notch condition is crucial for achieving accurate cuts and extending the tool’s lifespan. To help you with this, here are some indispensable tools:
- Miter Gauge: A miter gauge is an essential tool for making precise crosscuts and angled cuts. It allows you to guide the workpiece through the blade at the desired angle, ensuring clean and accurate results.
- High-quality Blades: Investing in high-quality blades is a must for exceptional results. Different blades are designed for specific tasks like rip cuts, crosscuts, or cutting different materials. Having a variety of blades ensures you can tackle any woodworking project with ease.
- Table Saw Push Stick: Your safety should always be a top priority when using a table saw. A table saw push stick is a simple tool that allows you to guide the workpiece through the blade without putting your hands at risk of coming into contact with the blade.
- Table Saw Blade Cleaning Kit: Sawdust and resin buildup on the blade can affect your cut quality and performance. A blade cleaning kit, including a blade cleaning solution and a cleaning brush, helps you keep the blade clean and maintain optimal cutting efficiency.
- Table Saw Calibration Tools: To ensure your table saw remains accurate, calibration tools like a dial indicator and a square are necessary. They allow you to align the blade, fence, and miter gauge, making sure your cuts are precise and true.
Accessories That Can Improve Safety, Accuracy, And Efficiency When Using A Table Saw
Apart from the essential tools, several accessories can greatly enhance your table saw experience. These accessories can improve safety, accuracy, and efficiency, making your woodworking tasks more enjoyable:
- Table Saw Featherboard: A featherboard helps prevent kickbacks and ensures a consistent feed rate by applying pressure against the workpiece. It keeps the stock against the fence and table, resulting in a safer and smoother cutting process.
- Table Saw Outfeed Support: An outfeed support provides additional support to longer workpieces, preventing them from sagging or tipping off the table during the cut. This accessory promotes stability and accuracy, allowing you to tackle larger projects with ease.
- Table Saw Dust Collection System: Proper dust collection is crucial for keeping your workspace clean and reducing health risks associated with dust inhalation. A dust collection system for your table saw helps capture and contain sawdust, preventing it from accumulating on your work surface.
- Table Saw Digital Fence: A digital fence system adds precision and convenience to your table saw by providing accurate measurements on a digital display. This eliminates the need for manual tape measurements, reducing the chances of errors and speeding up your workflow.
- Table Saw Crosscut Sled: A crosscut sled is a versatile accessory that allows you to make accurate and repeatable crosscuts with ease. It provides a stable platform to hold the workpiece securely and ensures precise cuts every time.
By equipping yourself with these must-have tools and accessories, you can take your table saw mastery to new heights. Whether you are a seasoned woodworker or just starting, investing in the right tools is key to achieving optimal results and enjoying a safe and efficient woodworking experience.
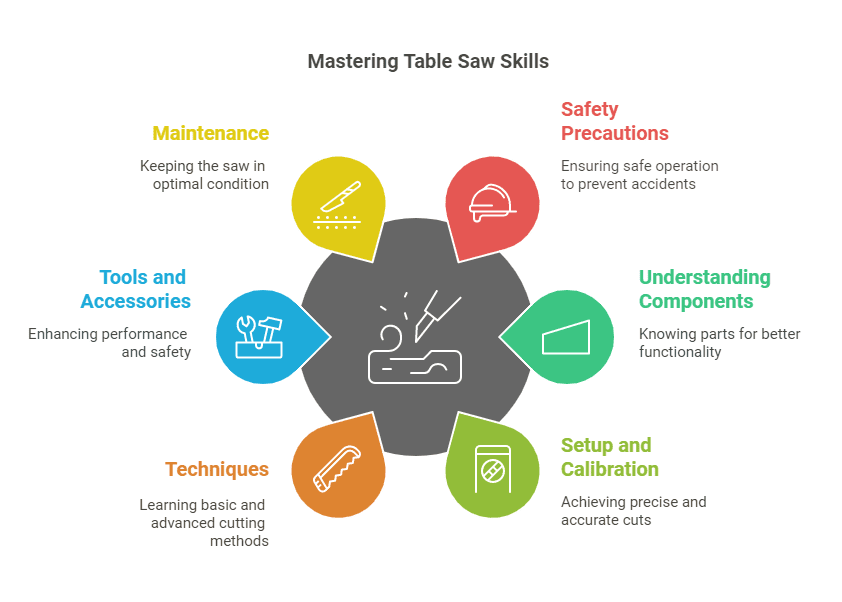
Table Saw Maintenance And Cleaning Tools
Proper maintenance and cleaning of your table saw are essential for its longevity and optimal performance. By regularly cleaning and maintaining your table saw, you can ensure that it operates smoothly, delivers precise cuts, and remains safe to use. To help you with this task, here is an overview of the tools you’ll need for regular maintenance and cleaning of your table saw.
Overview Of Tools For Regular Maintenance And Cleaning Of A Table Saw
To keep your table saw in top shape, you’ll need a few tools that facilitate its maintenance and cleaning. Here is a list of essential tools:
1. Cleaning Brush:
- A small, soft-bristled brush is perfect for removing sawdust, debris, and other particles that may accumulate on the table, miter slots, and other crucial components of the table saw.
2. Dust Collection System:
- A dust collection system, like a vacuum or dust collector, helps to keep your workspace clean by effectively capturing sawdust and chips. By preventing sawdust from piling up around your saw, you can maintain a cleaner and safer working environment.
3. Rip Fence Cleaning Tool:
- The rip fence is an integral part of your table saw, and it can accumulate dirt and debris over time. Using a rip fence cleaning tool, such as a wire brush or a soft cloth, you can easily remove any buildup and ensure smooth operation.
4. Blade Cleaning Solution:
- Blades can get caked with resin, pitch, and other substances that can affect their cutting performance. A blade cleaning solution, specifically designed for this purpose, helps to dissolve and remove these residues, keeping your blades sharp and efficient.
5. Lubricant:
- Proper lubrication of moving parts is essential to prevent friction and ensure smooth operation of your table saw. Use a high-quality lubricant that is appropriate for the various components, such as the blade tilt mechanism, elevation gears, and the arbor assembly.
Importance Of Keeping The Table Saw Clean And Well-maintained For Optimal Performance
Regular maintenance and cleaning of your table saw play a vital role in its performance and longevity. Here are some key reasons why it is important to keep your table saw clean and well-maintained:
1. Safety:
- A clean and well-maintained table saw reduces the risk of accidents and injuries. Removing debris and sawdust helps prevent them from interfering with the cutting process, allowing you to have better control over your cuts and reducing the chances of kickback.
2. Precision:
- By keeping your table saw clean, you ensure accurate and precise cuts. Sawdust buildup, resin on the blades, or a dirty rip fence can lead to inaccuracies and compromises in your workpiece’s dimensions and finish.
3. Efficiency:
- A well-maintained table saw operates at peak efficiency. When the moving parts are lubricated, the blade is sharp, and the components are clean, the table saw can deliver smooth and effortless cuts, reducing strain on the motor and improving overall performance.
4. Longevity:
- Regular maintenance helps extend the lifespan of your table saw. By cleaning and lubricating, you minimize wear and tear on the components, reducing the chances of breakdowns and increasing the overall durability of your machine.
Now that you know the essential tools and understand the importance of maintaining and cleaning your table saw, you can ensure that your woodworking projects run smoothly and your table saw remains in optimal condition for years to come.
Safety Accessories And Devices
In this section, we will explore the importance of safety accessories and devices for using a table saw. These accessories are designed to prevent accidents and improve precision, ensuring a smooth and secure woodworking experience.
Exploration Of Safety Accessories Such As Push Sticks, Featherboards, And Blade Guards
When using a table saw, it is crucial to have the right safety accessories and devices at your disposal. Let’s take a closer look at a few essential ones:
1. Push Sticks
Push sticks are a simple yet highly effective tool for keeping your hands at a safe distance from the blade. These sticks provide the necessary leverage and control to guide the workpiece through the cut, minimizing the risk of accidental contact with the sharp blade.
2. Featherboards
A featherboard is another valuable safety accessory that helps prevent kickback. It consists of thin, flexible fingers that apply pressure against the workpiece, keeping it firmly against the table and fence. This ensures a stable and controlled feed, reducing the chances of the workpiece being thrown back towards the operator.
3. Blade Guards
Blade guards are an essential safety device installed around the saw blade. They provide a barrier between your hand and the spinning blade, reducing the risk of accidental contact. Blade guards typically include a transparent shield that allows you to see the workpiece while keeping you protected from any flying debris.
How These Accessories Can Prevent Accidents And Improve Precision While Using A Table Saw
Now that we have explored these safety accessories, let’s understand how they contribute to accident prevention and improved precision:
Accident Prevention:
Using push sticks keeps your hands safely away from the blade, minimizing the possibility of severe injuries. Featherboards ensure that the workpiece stays firmly in place, significantly reducing the risk of kickback and sudden movement. Blade guards act as a physical barrier, preventing accidental contact with the blade and shielding you from any dangerous debris. By employing these accessories correctly, you can create a safer working environment for yourself.
Improved Precision:
Push sticks and featherboards provide a secure grip on the workpiece, helping you maintain a consistent feed rate and ensuring accurate cuts. With better control over the material, you can achieve smoother and more precise results. Blade guards, although primarily a safety measure, also enhance precision by preventing unwanted contact that could potentially ruin the accuracy of your cuts.
Remember, it is essential to understand how to properly use these safety accessories and devices. Always follow the manufacturer’s instructions and ensure they are in good working condition before beginning any woodworking project.
Upgrades And Modifications For Improved Performance
Upgrading and modifying your table saw can greatly improve its overall performance, accuracy, and capabilities. By investing in high-quality upgrades such as a reliable fence system or an upgraded blade, you can take your woodworking projects to the next level.
Recommendations For Upgrades
When it comes to upgrading your table saw, there are a few key areas to focus on. Consider these recommendations for enhanced performance:
- High-Quality Fence System: A high-quality fence system is an essential upgrade for any table saw. It provides stability, precision, and accuracy when making cuts. Look for a fence system that is sturdy, easy to adjust, and offers smooth gliding.
- Upgraded Blade: Investing in an upgraded blade is another worthwhile upgrade that can vastly improve the performance of your table saw. A high-quality blade with the right tooth count and configuration can provide cleaner cuts, reduce tear-out, and increase cutting efficiency.
Enhanced Accuracy And Capabilities
Upgrading your table saw with these recommended modifications can bring a wide range of benefits to your woodworking projects. Here’s how they can enhance accuracy and capabilities:
- Improved Precision: A high-quality fence system ensures that your cuts are straight and accurate, resulting in precise measurements and clean cuts.
- Reduced Material Waste: A superior fence system and upgraded blade combination allow you to optimize your material usage, reducing waste and maximizing your resources.
- Enhanced Safety: Upgrades can improve safety features such as anti-kickback mechanisms and blade guards, providing added protection during operation.
- Expanded Cutting Options: With an upgraded blade, you can tackle a wider variety of materials, from hardwoods to plywood, with ease. This versatility opens up new possibilities for your woodworking projects.
- Time and Effort Savings: Upgrades can result in smoother operation, faster setup, and easier adjustments. This saves you valuable time and effort, allowing you to focus more on your creative work.
By making these upgrades and modifications, you can unlock the full potential of your table saw, elevating your woodworking projects to a new level of precision and efficiency. Whether you’re a seasoned professional or a hobbyist, investing in these upgrades is a worthwhile endeavor that will enhance your overall woodworking experience for years to come. Take the time to research and choose the right upgrades for your specific needs, and reap the benefits of improved performance and capabilities.
Advanced Tips For Mastering The Art Of Table Saw Operation
Discover advanced tips and techniques to master the art of operating a table saw with this comprehensive guide. Enhance your woodworking skills and achieve precision cuts with these valuable insights.
For experienced woodworkers, using a table saw is second nature. However, there are always new techniques and strategies to explore that can elevate your woodworking projects to the next level. In this section, we will discuss advanced tips and tricks that will help you achieve professional-level results and maximize the potential of your table saw.
Next-level Techniques And Strategies For Experienced Woodworkers
Once you have mastered the basics of table saw operation, it’s time to take your skills to the next level. These advanced techniques will help you tackle more complex woodworking projects with precision and finesse.
Tips For Achieving Professional-level Results And Maximizing The Potential Of A Table Saw
- Invest in quality blades: Professional woodworkers know that a sharp and high-quality blade is crucial for achieving clean and accurate cuts. Consider investing in a variety of blades suited for different materials and cutting styles.
- Use a zero-clearance insert: To minimize chip-out and tear-out, a zero-clearance insert is a must-have accessory. This insert provides support right up to the blade, reducing the risk of splintering and ensuring cleaner cuts.
- Practice proper blade alignment: Ensuring that the table saw blade is aligned perfectly parallel to the fence is essential for precise cuts. Regularly check and adjust the alignment to maintain accuracy.
- Incorporate jigs and fixtures: Jigs and fixtures are extremely helpful for achieving consistent and repeatable cuts. By using specialized jigs, such as a crosscut sled or a miter gauge extension, you can tackle complex angles and shapes with ease.
- Master the art of joinery: With a table saw, you can create precise and strong joinery. Techniques like dado cuts, rabbets, and box joints can be accomplished using the table saw, allowing you to create intricate and professional-looking connections.
- Practice safety measures: Advanced woodworking requires extra attention to safety. Always wear safety goggles, use push sticks and feather boards to keep your hands away from the blade, and maintain a clean and organized workspace.
By incorporating these advanced tips into your table saw operation, you’ll be able to achieve professional-level results and push the boundaries of your woodworking projects. Remember to practice these techniques regularly and keep honing your skills to become a master of the table saw.
Fine-tuning Blade And Fence Alignment
Ensure precise blade and fence alignment to effectively utilize a table saw. Properly following these steps will enhance accuracy and safety while operating the tool.
Advanced Methods For Achieving Precise Blade And Fence Alignment
When it comes to using a table saw, achieving precise blade and fence alignment is essential for accurate and high-quality cuts. Fine-tuning the alignment of both the blade and the fence ensures that each cut is straight, smooth, and reliable. In this section, we will explore advanced methods that can help you achieve optimal alignment for your table saw.
1. Making Small Adjustments That Make A Significant Difference
Even tiny adjustments to the blade and fence alignment can have a massive impact on the quality of your cuts. It’s crucial to understand that the alignment of the blade and fence may need occasional adjustment to maintain the desired accuracy.
- Begin by checking the current alignment of the blade and fence. Using a measuring tool, such as a precision square, ensure that the blade is parallel to the fence. If adjustments are necessary, proceed to the next step.
- Loosen the bolts holding the blade in place. This will allow you to make precise adjustments.
- Use a dial indicator or a digital alignment tool to measure the parallelism between the blade and the fence. Make small adjustments to the bolts, ensuring that the blade moves closer to perfect alignment with each iteration.
- Recheck the alignment after each adjustment using the measuring tool. Repeat the process of making small adjustments until the blade and fence are perfectly aligned.
- Once you achieve the desired alignment, securely tighten the bolts holding the blade in place.
By taking the time to make these small adjustments, you’ll be able to achieve precise alignment, resulting in superior cuts and reducing the chances of inaccurate and wasteful cuts.
2. Using Shims For Additional Precision
When fine-tuning the alignment of your table saw’s blade and fence, you may encounter situations where small adjustments just aren’t enough to achieve absolute accuracy. In such cases, using shims can provide the additional precision required.
- Identify the areas where the alignment is slightly off. This could be due to irregularities in the table or other factors.
- Measure the gap between the fence and the blade using a feeler gauge.
- Find thin shims, such as metal or plastic, that can fill the measured gap. Insert the shim between the fence and the table saw to eliminate the misalignment.
- Recheck the alignment after inserting the shim to ensure that it has successfully resolved the issue. If needed, repeat the process with additional shims until the alignment is perfect.
Using shims allows you to overcome small discrepancies in alignment, ensuring that your table saw operates at its highest level of accuracy.
Working With Challenging Materials And Angles
Using a table saw efficiently not only requires knowledge of the basic operations but also the ability to tackle challenging materials and angle cuts. In this section, we will explore various techniques to cut difficult materials like plywood, hardwood, and laminate. We will also provide tips to ensure accurate angled cuts and miters using a table saw.
Techniques For Cutting Difficult Materials Like Plywood, Hardwood, And Laminate
When it comes to working with challenging materials like plywood, hardwood, and laminate, a few techniques can make the process smoother and more efficient. By following these tips, you can achieve clean, precise cuts:
- Ensure your blades are sharp: Using sharp blades is crucial when dealing with tough materials. Dull blades can result in rough and uneven cuts. It’s essential to regularly inspect and replace your blades.
- Adjust the cutting speed: Different materials may require different cutting speeds. For example, plywood might need a slower speed compared to hardwood. Experiment with different speeds to find the optimal setting for each material.
- Use the right blade type: Choosing the appropriate blade for the material you’re working with can significantly impact the quality of your cuts. For plywood, a crosscut blade with a high tooth count is recommended. Hardwood may benefit from a rip blade.
- Support your workpiece: Challenging materials can be heavy and prone to tear-out during cutting. Using support, such as a table extension or additional wooden blocks, can prevent damage and provide stability.
- Utilize a zero-clearance insert: Installing a zero-clearance insert on your table saw significantly reduces tear-out and splintering. This insert reduces the gap between the blade and the surface, resulting in cleaner cuts.
Tips For Making Accurate Angled Cuts And Miters Using A Table Saw
Accurate angled cuts and miters can add beauty and precision to your woodworking projects. Here are a few tips to help you achieve the desired results:
- Calibrate your table saw: Before making angled cuts, ensure that your table saw is properly calibrated. This includes adjusting the miter gauge and bevel angle to ensure accurate and consistent cuts.
- Use a high-quality miter gauge: Investing in a reliable and precise miter gauge is essential for making accurate angled cuts. A solid miter gauge enables you to set the desired angle and maintain it throughout the entire cut.
- Create a jig for repeatable angles: If you frequently work with specific angles, consider creating a jig that can be easily attached to the miter gauge. This allows for consistent and repeatable cuts, saving you time and effort.
- Take the time to set up your cuts accurately: Double-check the angle settings and ensure that the workpiece is properly aligned before making the cut. Even a slight deviation can result in an inaccurate angle.
- Consider making test cuts: When working with complex angles or critical cuts, it’s advisable to make test cuts on scrap material. This allows you to fine-tune your setup and ensure the final cut is precise.
By implementing these techniques and tips, you’ll be well-equipped to handle challenging materials and angles on your table saw. Remember, practice and patience are key to mastering the art of woodworking.
Troubleshooting And Problem-solving
Learn how to troubleshoot and solve issues that arise while using a table saw. Discover helpful tips and techniques to ensure smooth and efficient operation of this powerful tool.
Even with proper preparation and caution, using a table saw can sometimes lead to challenges and issues. It’s essential to be familiar with common problems that may arise and have effective strategies in place to troubleshoot and resolve them. This will ensure smooth operation and minimize any disruptions to your woodworking projects. In this section, we will discuss some of the common issues, challenges, and potential problems when using a table saw, as well as strategies to troubleshoot and resolve them.
Common Issues, Challenges, And Potential Problems When Using A Table Saw
Table saws are powerful tools, and like any machinery, they can encounter issues. Here are some common problems that you may come across when using a table saw:
- Blade misalignment or wobbling
- Wood binding or kickback
- Poor quality cuts
- Difficulty adjusting the rip fence or miter gauge
- Motor overheating or tripping the circuit breaker
- Dust collection problems
Strategies For Troubleshooting And Resolving Issues To Ensure Smooth Operation
To ensure smooth operation and overcome the challenges mentioned earlier, here are some strategies for troubleshooting and resolving these issues:
1. Blade misalignment or wobbling
If you notice that the blade is not aligned properly or wobbling, check if it is securely tightened. If the problem persists, you may need to replace the blade or consult a professional for further assistance.
2. Wood binding or kickback
Wood can bind against the blade, leading to kickback and potentially causing injury. To prevent this, use push sticks or featherboards to maintain control over the wood and ensure it moves smoothly through the blade.
3. Poor quality cuts
If you’re experiencing poor quality cuts, consider sharpening or replacing the blade. Dull blades can result in tear-out or uneven cuts. Additionally, ensure that the wood is properly supported and that the blade height and angle are correctly adjusted.
4. Difficulty adjusting the rip fence or miter gauge
If you’re having trouble adjusting the rip fence or miter gauge, check for any debris or obstructions that may be interfering. Clean the tracks and mechanisms, and make sure everything is properly aligned and tightened.
5. Motor overheating or tripping the circuit breaker
If the motor of your table saw is overheating or constantly tripping the circuit breaker, it may be a sign of an electrical issue or a motor problem. Turn off the saw, let it cool down, and then investigate the cause. It’s advisable to have a certified electrician inspect the wiring and connections.
6. Dust collection problems
Dust collection is essential for maintaining a clean and safe working environment. If you’re experiencing issues with dust collection, check if the dust port or collection bag is clogged and clear it if necessary. Consider upgrading to a more efficient dust collection system or using additional accessories like dust hoods or shop vacuums.
By being aware of these common issues and having strategies in place to troubleshoot and resolve them, you can ensure smooth table saw operation and enhance your woodworking experience.
Safety Tips And Best Practices For Table Saw Users
Discover essential safety tips and best practices for table saw users with our comprehensive guide. Learn how to properly use a table saw to maintain a safe and efficient woodworking environment.
Safety Tips and Best Practices for Table Saw Users
Using a table saw can be a rewarding experience as it allows you to make precise cuts on various materials. However, it is crucial to prioritize safety when operating this powerful tool. By following a few essential safety tips and best practices, you can minimize the risk of accidents and create a safe working environment. Whether you are a beginner or an experienced table saw user, it is important to refresh your knowledge on safety guidelines. In this section, we will cover crucial safety tips to remember and best practices to maintain a safe working environment.
Crucial Safety Tips To Remember When Using A Table Saw
When it comes to using a table saw, safety should always be your top priority. By adhering to these essential safety tips, you can ensure your well-being and prevent accidents. Here are some key points to keep in mind:
1. Always wear appropriate personal protective equipment (PPE), including safety glasses or goggles, ear protection, and a dust mask. This will safeguard you from potential hazards such as flying debris and loud noise.
2. Familiarize yourself with the operation manual provided by the manufacturer. Understanding the specific features and functions of your table saw will help you make the most of it while operating it safely.
3. Before starting any work, inspect the saw blade, fence, and other components for any damage or wear. Dull or damaged blades can cause kickbacks or inaccurate cuts. Keep the blade sharp and replace it if necessary.
4. Ensure that the table saw is properly set up and secured. It should be placed on a stable surface with ample space for maneuvering the material. The blade should be parallel to the fence, and the fence should be securely locked in place.
5. Before making any adjustments or changing the blade, disconnect the table saw from the power source. This will prevent any accidental starts and potential injuries.
6. When feeding material into the table saw, always use a push stick or push block to keep your hands a safe distance from the blade. Never feed material with your hands close to the blade.
7. Avoid wearing loose clothing, jewelry, or loose-hanging accessories that could get caught in the blade or other moving parts. This will prevent accidents and ensure your safety.
Best Practices To Maintain A Safe Working Environment
Creating a safe working environment is crucial for the long-term well-being of table saw users. By implementing these best practices, you can minimize the risk of accidents and promote safety at all times:
- Keep your workspace clean and free from clutter. Remove any debris, offcuts, or other materials that could obstruct your movements or cause accidents.
- Maintain proper lighting in your work area. Sufficient lighting will ensure better visibility and help you work with precision while minimizing the chances of accidents.
- Regularly check and maintain your table saw. Clean the table and blade, and lubricate any moving parts as recommended by the manufacturer. This will prolong the lifespan of your saw and ensure its optimal performance.
- Store your table saw properly when not in use. Keep it covered to protect it from dust and other contaminants that can affect its performance. Ensure that the power cord is safely stored and away from any potential hazards.
- Stay focused and avoid distractions while using a table saw. Concentrate on the task at hand and avoid conversations, phone use, or other distractions that can divert your attention and compromise your safety.
Remember, the key to using a table saw safely lies in a combination of knowledge, attention to detail, and good practices. By following these crucial safety tips and implementing best practices, you can minimize the risk of accidents and create a safe working environment for yourself and those around you.

Proper Personal Protective Equipment (PPE)
Before you even think about using a table saw, it’s crucial to prioritize your safety. That’s where proper personal protective equipment (PPE) comes into play. Investing in and wearing the right gear can make all the difference in protecting yourself against potential hazards. In this section, we will provide you with a detailed overview of the essential PPE for using a table saw, as well as explain the importance of wearing PPE to safeguard against those potential dangers.
Detailed Overview Of The Essential Personal Protective Equipment For Using A Table Saw
When operating a table saw, the following safety gear is essential to protect yourself:
1. Eye Protection
Wearing safety glasses or goggles is a must when working with a table saw. The saw’s spinning blade releases fine particles of wood and other debris that can easily fly into your eyes, causing severe injuries or even blindness. Ensure your eye protection is impact-resistant and fits snugly to provide maximum coverage.
2. Hearing Protection
The constant loud noise generated by a table saw can lead to long-term hearing damage if proper precautions are not taken. Invest in a pair of earplugs or earmuffs designed to provide adequate noise reduction. By wearing hearing protection, you can comfortably focus on your woodworking projects without worrying about potential hearing loss.
3. Respiratory Protection
Woodworking results in the production of fine sawdust and wood particles that can be harmful if inhaled. A high-quality respirator or dust mask will offer the necessary filtration to prevent respiratory issues, such as allergies, asthma, or even more serious conditions. Make sure you choose respiratory protection that effectively filters out sawdust and other airborne particles to maintain a clean and safe breathing environment.
4. Hand Protection
Your hands are at direct risk of injury when handling a table saw. Wearing heavy-duty work gloves can provide a crucial layer of protection against accidental cuts or abrasions. Opt for gloves with good grip and dexterity, allowing you to maintain control of the materials being worked on while avoiding potential accidents.
Importance Of Wearing PPE To Protect Against Potential Hazards
Wearing proper personal protective equipment during table saw use is paramount for your safety and well-being. Let’s take a closer look at why:
- Prevent Eye Injuries: Safety glasses or goggles shield your eyes from flying debris, sawdust, or wood particles that could cause severe eye damage.
- Protect Your Hearing: Earplugs or earmuffs reduce the risk of long-term hearing loss due to prolonged exposure to the loud noise generated by a table saw.
- Ensure Respiratory Health: By using a respirator or dust mask, you can avoid inhaling harmful wood particles, preventing potential respiratory issues.
- Avoid Hand Injuries: Heavy-duty work gloves give an additional layer of protection to your hands, reducing the risk of cuts and abrasions.
By wearing the appropriate PPE, you create a secure working environment, minimizing the likelihood of accidents and ensuring you can focus on your woodworking projects with peace of mind.
Safe Workstation Setup And Organization
Setting up a safe and efficient workspace is crucial when using a table saw. Taking the time to organize your workstation not only helps improve your workflow but also minimizes the risk of accidents and potential hazards. In this section, we will explore some tips and strategies to create a clutter-free area that maximizes safety and productivity.
Tips For Setting Up A Safe And Efficient Workspace For Using A Table Saw
1. Clear the area: Before you start setting up your workspace, ensure that the area around the table saw is clear of any obstacles or debris. Remove any unnecessary tools, materials, or clutter that may hinder your movement or interfere with the operation of the saw.
2. Adequate lighting: Proper lighting is essential for maintaining a safe workspace. Ensure that the area around your table saw is well-lit so that you can clearly see the workpiece, the cutting blade, and any potential hazards. Consider adding additional task lighting if needed.
3. Ergonomics: Pay attention to ergonomics when arranging your table saw station. Position the saw at a comfortable height that allows for easy operation and reduces strain on your back and arms. Additionally, ensure that the workpiece is aligned with your line of sight to maintain optimal control and visibility.
4. Safety equipment: Always have the necessary safety equipment readily available near your table saw. This includes protective goggles, ear defenders, dust masks, and push sticks. Having these items within arm’s reach ensures that you can quickly access them when needed, promoting a safe working environment.
Organizational Strategies To Maintain A Clutter-free Area And Avoid Potential Hazards
1. Storage solutions: Invest in storage options such as shelves, cabinets, or toolboxes to keep your tools and accessories organized. Assign designated spots for each item to prevent them from cluttering your workspace and becoming potential trip hazards.
| Tool | Designated Spot |
|---|---|
| Circular Saw | On the shelf |
| Measuring Tape | In the toolbox |
| Saw Blades | In the cabinet |
2. Cable management: Keep power cords and cables organized and out of the way by using cable ties, hooks, or cable management systems. This not only prevents tripping hazards but also ensures that cords do not get tangled or interfere with the operation of the table saw.
3. Marking and labeling: Label storage containers, drawers, and shelves for easy identification of tools and accessories. Use visible, bold labels to quickly locate items, reducing the time spent searching and minimizing potential distractions during work.
4. Regular maintenance: Establish a maintenance schedule to keep your table saw and its surrounding area clean and in good working condition. Regularly inspect the saw for loose parts, clean the work surface, and remove any sawdust or debris that may accumulate. This not only improves safety but also prolongs the lifespan of your table saw.
By following these tips and implementing organizational strategies, you can create a safe, clutter-free, and efficient workspace for using your table saw. Remember, maintaining a well-organized workstation is crucial for both safety and productivity.
Safety Procedures During Operation
Learn how to safely operate a table saw by following the proper safety procedures during operation.
Using a table saw requires utmost caution to prevent accidents and ensure a smooth woodworking experience. Follow these step-by-step guidelines for safe operation, along with important safety precautions to keep in mind while using a table saw:
Step-by-step Guidelines For Safe Operation Of A Table Saw
- Inspect the table saw and ensure it is in proper working condition before starting. Check the blade alignment, fence, and other components for any defects or damages.
- Wear appropriate personal protective equipment (PPE) before operating the table saw. This includes safety goggles, ear protection, and a dust mask to safeguard against flying debris and noise.
- Position the table saw in a well-lit and spacious area, allowing sufficient room for maneuvering your workpiece.
- Ensure the table saw is placed on a stable and level surface, firmly securing it to prevent any accidental movement or wobbling during operation.
- Make sure the blade guard and anti-kickback pawls are properly installed and adjusted. These safety features help prevent accidents caused by kickback or contact with the rotating blade.
- Adjust the height and angle of the blade according to your specific woodworking needs, ensuring the blade is not set too high or too low to minimize the risk of kickback.
- Prioritize a proper cutting stance by positioning yourself to the side of the blade and maintaining a sturdy stance with your feet shoulder-width apart.
- Keep your hands and fingers at a safe distance from the blade at all times. Never place them in the path of the blade or near the blade guard while it is in motion.
- Make use of push sticks, push blocks, or featherboards to guide your workpiece smoothly and maintain control, reducing the risk of accidental contact with the blade.
- Do not rush the process; take your time to properly align and position the workpiece against the fence and ahead of the blade to ensure accurate and smooth cuts.
- Maintain a clear work area by removing any debris, offcuts, or obstructions that can interfere with the table saw or potentially cause accidents.
Important Safety Precautions To Follow While Using A Table Saw
- Always disconnect the table saw from the power source before making any adjustments, changing the blade, or performing maintenance tasks.
- Avoid wearing loose-fitting clothing or jewelry that might get caught in the rotating blade. Opt for well-fitted attire.
- Never operate the table saw while under the influence of alcohol, medications, or substances that may impair your judgment or coordination.
- Be mindful of the type of materials you are cutting and adjust the cutting speed and feed rate accordingly to prevent kickback or blade damage.
- Regularly clean the table saw, removing sawdust and debris to maintain optimal functionality and prevent possible fire hazards.
- Keep children and pets away from the work area and ensure that only trained individuals operate the table saw.
- Consider utilizing additional safety accessories such as push shoes or magnetic featherboards for improved control and precision.
- Stay focused and avoid distractions while operating the table saw. Concentrate on the task at hand to minimize the risk of accidents.
Implementing these safety procedures and precautions will significantly reduce the likelihood of accidents and ensure a safer and more enjoyable table saw experience. Remember, prioritizing safety should always be the top priority when using any power tool. Stay vigilant, follow the guidelines, and enjoy your woodworking projects with peace of mind.
Frequently Asked Questions Of How To Use A Table Saw
What Safety Precautions Should I Take When Using A Table Saw?
To ensure your safety while using a table saw, always wear safety goggles, use a push stick to keep your fingers away from the blade, and make sure the blade guard is properly in place. Additionally, keep the work area clean and free from distractions.
How Do I Choose The Right Table Saw For My Needs?
When choosing a table saw, consider factors such as the size of the blade, the power of the motor, the rip capacity, and the safety features. Think about the type of projects you’ll be working on and the space you have available.
Reading reviews and consulting with professionals can also help guide your decision.
How Do I Make Precise Cuts With A Table Saw?
Achieving precise cuts with a table saw requires proper setup and technique. Start by ensuring that the blade is aligned parallel to the fence. Use a high-quality miter gauge or sled to guide your workpiece during crosscuts. Make sure to keep the wood firmly pressed against the fence and the table throughout the cut for accuracy.
Conclusion
Mastering the use of a table saw is crucial for any woodworker or DIY enthusiast. By following the proper safety precautions and learning the essential techniques, you can confidently take on a wide range of woodworking projects. Remember to maintain focus, be mindful of the blade, and always use the appropriate safety gear.
With practice and patience, you can harness the power of this versatile tool and create beautiful and functional pieces with ease.