
How to Use Wormwood: A Genius & Safe Guide
Using wormwood safely and effectively involves first ensuring it’s free of active pests by kiln-drying, freezing, or applying a borate treatment. Once treated, stabilize the holes with epoxy resin or wood filler for strength and a smooth finish. This transforms the wood’s unique character into a beautiful feature for any woodworking project.
Have you ever found a piece of wood riddled with tiny holes and tunnels? Many beginners think this wood is ruined. They might call it “wormwood” and toss it on the scrap pile. This is a common and frustrating mistake. That beautiful, character-filled wood is perfectly usable!
Don’t worry, I’m here to show you how to turn that “ruined” wood into a stunning project. It’s easier than you think. You can safely and confidently use wood with wormholes. This guide will walk you through every simple step. Let’s learn how to embrace those beautiful imperfections together.
What Is Wormwood in Woodworking?
When we woodworkers talk about “wormwood” or “wormy wood,” we are not talking about the plant. We mean wood that has been tunneled through by larvae of wood-boring beetles. These insects are often called woodworms. The tiny holes and winding tracks they leave behind create a unique pattern that can be truly beautiful.
Common types of wood you might find with this character include:
- Ambrosia Maple
- Wormy Chestnut
- Pecky Cypress
- Oak and Ash
The key is knowing how to handle this wood. Is it safe? Is it strong? The answer to both is yes—if you follow a few simple steps. We will turn those concerns into confidence so you can use this amazing material in your projects.
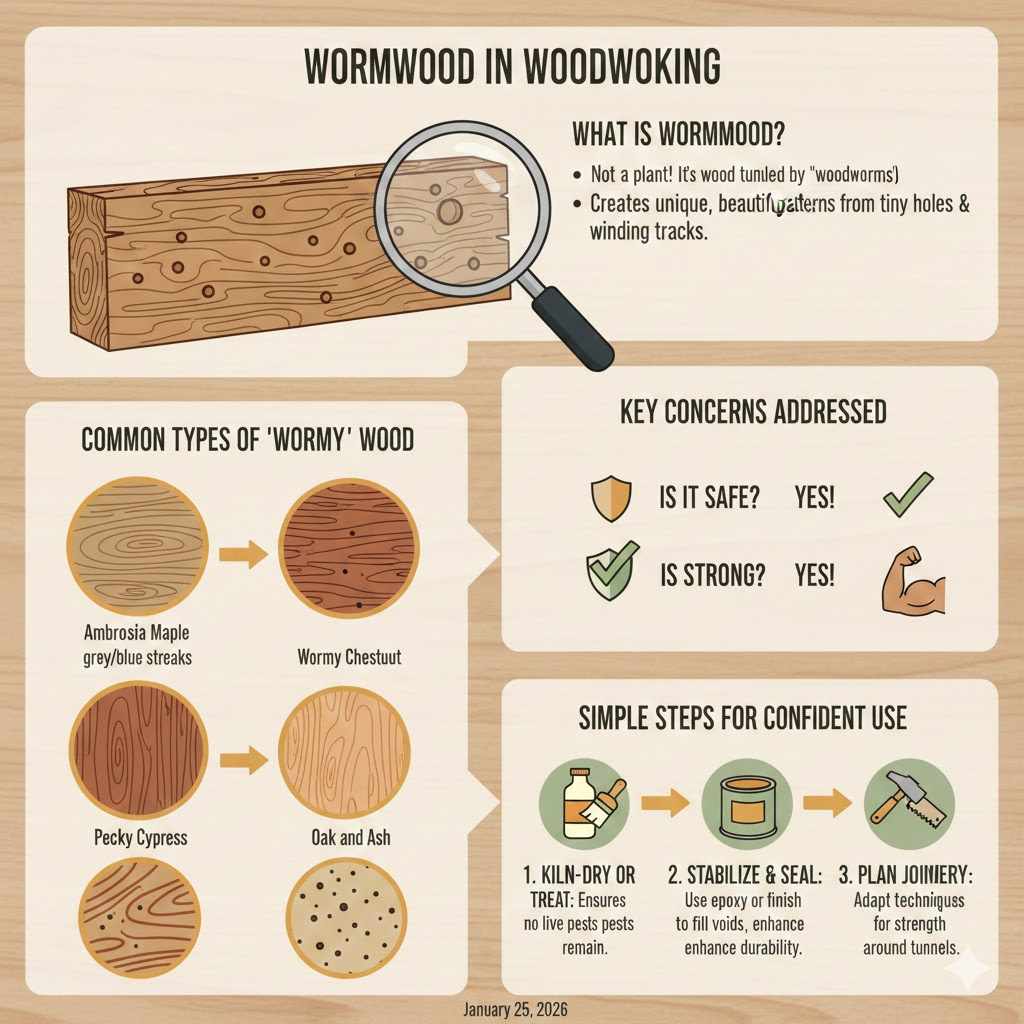
Is It Safe to Bring Wormy Wood into Your Home?
This is the number one question I get. Nobody wants to bring active pests into their house! The good news is that most wormy wood you buy from a reputable supplier is perfectly safe. It has been kiln-dried. This process heats the wood to a high temperature, which kills any insects and their eggs.
However, if you find a piece of wood yourself, you must treat it first. You need to be 100% sure there is nothing still living inside. We will cover exactly how to do that in our step-by-step guide below. Safety always comes first in the workshop.
Signs of an Active Woodworm Infestation
Before you begin, inspect your wood carefully. Look for these two simple signs of an active infestation:
- Frass: This is a fine, powdery dust near the holes. It looks like fresh sawdust. It is the waste left by the larvae.
- Live Insects: You may see small adult beetles on or near the wood, especially between May and September.
If you see either of these signs, you must treat the wood before using it. If there is no frass and the holes look clean and old, the wood is likely safe. But when in doubt, always treat it.
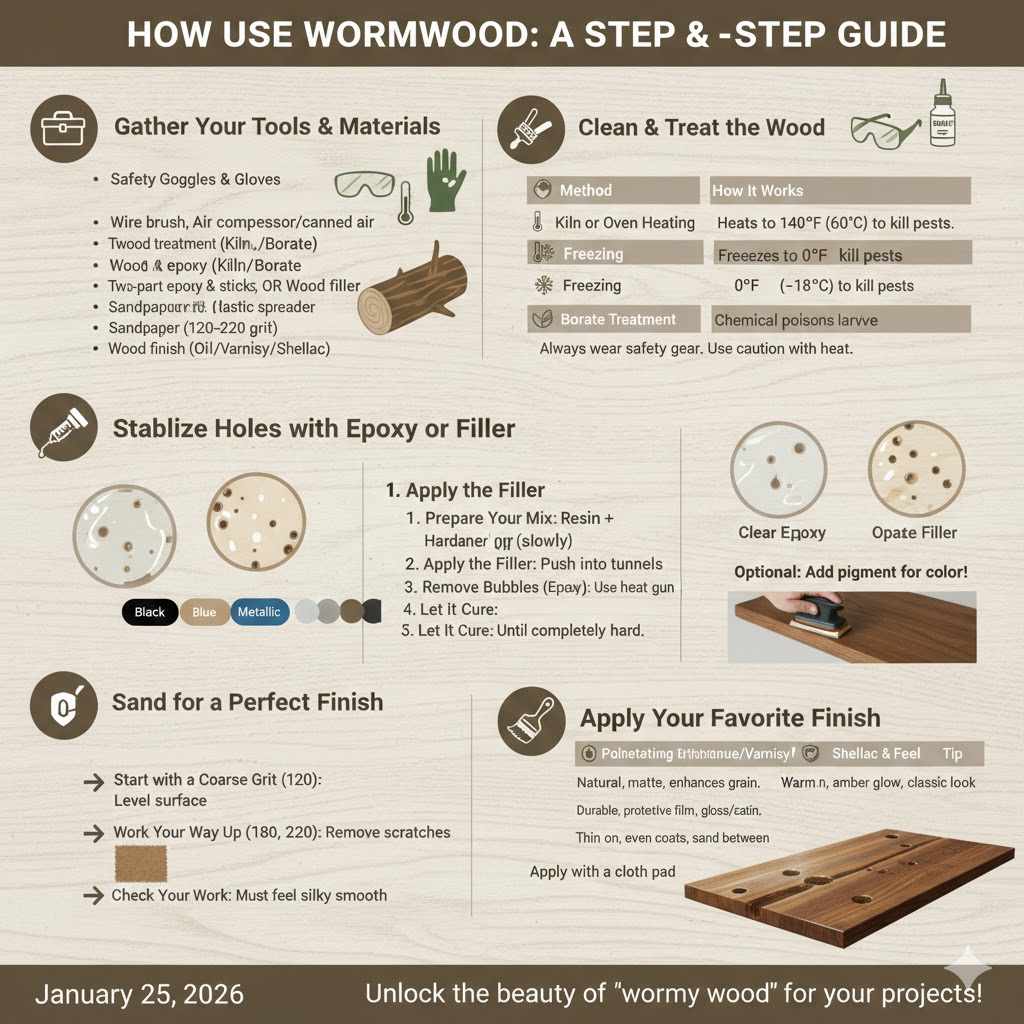
How to Use Wormwood: A Step-by-Step Guide
Ready to unlock the beauty of wormy wood? Let’s walk through the process together. It’s a straightforward method that guarantees a safe and gorgeous result for your next project, whether it’s a tabletop, a picture frame, or a feature shelf.
Step 1: Gather Your Tools and Materials
Having everything ready makes the job go smoothly. You won’t need many special tools, just a few key supplies. Here’s a simple checklist to get you started.
- Safety Goggles and Gloves
- A wire brush
- Air compressor or canned air (optional, but helpful)
- Your chosen wood treatment (we’ll discuss options next)
- Two-part epoxy resin or wood filler
- Mixing cups and sticks
- Plastic spreader or putty knife
- Sandpaper (various grits from 120 to 220)
- Your choice of wood finish (like oil, varnish, or polyurethane)
Step 2: Clean and Treat the Wood
This is the most important step for safety and peace of mind. First, use a wire brush to gently scrub the surface of the wood. This removes any loose dirt or debris. Then, use compressed air to blow out any dust from inside the wormholes. Now, you’re ready to treat it.
You have a few great options for treatment. Each one works well; just pick the one that is best for you and the size of your wood piece.
| Treatment Method | How It Works | Best For | Safety Notes |
|---|---|---|---|
| Kiln or Oven Heating | Heats the wood to at least 140°F (60°C) for several hours to kill all life stages of insects. | Small to medium pieces that fit in a DIY kiln or home oven (with caution). | High fire risk. Never leave the oven unattended. Not for finished or painted wood. |
| Freezing | Kills insects by freezing the wood at 0°F (-18°C) or lower for at least 72 hours. | Small pieces that can fit in a chest freezer. Excellent for delicate items. | Wrap the wood in plastic to prevent moisture damage from condensation. |
| Borate Treatment | A low-toxicity chemical (disodium octaborate tetrahydrate) is applied to the wood. It soaks in and poisons any feeding larvae. | Larger pieces or wood you cannot heat or freeze. It also prevents future infestations. | Always wear gloves and goggles. Apply in a well-ventilated area. Follow product instructions carefully. For more info on safety, check the EPA’s guide on borate salts. |
Step 3: Stabilize the Holes with Epoxy or Filler
Once your wood is clean and pest-free, it’s time to make it strong. The wormholes can create weak spots. Filling them adds strength and creates a smooth, durable surface. Your two main choices are epoxy resin or wood filler.
For a clear, glassy look that highlights the tunnels, epoxy is the best choice. For an opaque look that blends in, wood filler works great.
- Prepare Your Mix: If using two-part epoxy, mix the resin and hardener according to the manufacturer’s directions. Mix slowly to avoid creating too many air bubbles. If using wood filler, it’s usually ready right out of the container.
- Apply the Filler: Use a plastic spreader to work the epoxy or filler over the holes. Push it firmly into the tunnels to ensure they are completely filled. Don’t be afraid to overfill slightly; we will sand it down later.
- Remove Bubbles (Epoxy Only): If you used epoxy, you can gently wave a heat gun or torch a few inches above the surface. This will pop any air bubbles that rise to the top, giving you a crystal-clear finish. Be very careful not to burn the wood.
- Let It Cure: Patience is key here. Let the epoxy or filler cure completely. This can take anywhere from a few hours to a full day. Check the product label for specific curing times. The wood should not feel tacky at all before you move on.
You can even add colored pigment to your epoxy to create a stunning design feature. Black, blue, or metallic pigments look fantastic against the natural wood grain.
Step 4: Sand for a Perfect Finish
Now that the filler is hard, your surface will be bumpy and uneven. It’s time to make it perfectly smooth. This is where your sandpaper comes in. This part of the process is very rewarding.
- Start with a Coarse Grit: Begin sanding with a lower-grit sandpaper, like 120-grit. This will quickly remove the excess epoxy or filler and level the surface. You can use a random orbit sander for large, flat areas or sand by hand for smaller pieces.
- Work Your Way Up: After the surface is level, switch to a finer grit, like 180 or 220. This will remove the scratches left by the coarser paper and give your wood a silky-smooth feel.
- Check Your Work: Wipe the surface with a clean cloth to remove all the dust. Run your hand over the wood. It should feel completely smooth. If you feel any bumps or rough spots, keep sanding until it’s perfect.
Step 5: Apply Your Favorite Finish
This is the final step where the magic happens! Applying a finish will protect your project and make the grain and wormhole patterns pop. The type of finish you choose is up to you, but some work especially well with the character of wormy wood.
Here’s a table to help you decide:
| Finish Type | Look & Feel | Best For | Application Tip |
|---|---|---|---|
| Penetrating Oil (Tung, Danish) | Natural, matte, or satin look. Enhances the wood’s color and grain deeply. | Cutting boards (with food-safe oil), decorative boxes, picture frames. | Wipe on, let it soak in for 15-20 minutes, then wipe off all the excess. |
| Polyurethane or Varnish | Durable, protective film. Comes in satin, semi-gloss, or gloss sheens. | Tabletops, shelves, and any high-wear surfaces that need extra protection. | Apply thin, even coats with a quality brush, and sand lightly between coats. |
| Shellac | Warm, amber glow. Dries very quickly and gives a classic look. | Small decorative items and furniture that won’t see heavy use or liquids. | Often applied with a cloth pad in a technique called French polishing. |
After applying your finish and letting it cure, your project is complete! You have successfully taken a piece of wood that others might have overlooked and turned it into something truly special and beautiful.
FAQ: Using Wormwood in Your Projects
Can I use wood that has active woodworms?
No, you should never use wood with an active infestation in your home or shop. The pests can spread to other wood, including furniture or even the structure of your house. Always treat the wood first using one of the methods mentioned above to ensure all pests are gone.
What’s the difference between wood filler and epoxy for wormholes?
Epoxy resin cures to be very hard, durable, and often clear, which is great for highlighting the wormholes as a design feature. Wood filler is a paste that dries opaque and is best when you want the holes filled and blended with the wood. For structural strength and visual appeal, epoxy is usually the better choice for wormy wood. You can find more details about wood fillers at this helpful Forest Products Laboratory guide.
Will putting a finish on the wood kill any remaining bugs?
No, a surface finish like oil or polyurethane will not kill larvae deep inside the wood. The finish only seals the surface. This is why treating the wood before stabilizing and finishing is a critical step you should never skip.
Is wormy wood structurally weak?
It can be, depending on how many holes there are. For wood with just a few scattered holes, the structural loss is minimal. If the wood is heavily damaged, it is not suitable for load-bearing projects. Properly filling the holes with a strong material like epoxy will restore a great deal of its strength and make it suitable for things like tables and shelves.
Where is the best place to find wormy wood?
You can often find it at local lumberyards or specialty wood suppliers. Ask for “ambrosia maple” or “wormy chestnut.” You can also find it in reclaimed wood from old barns or buildings. Always be sure to ask if the wood has been kiln-dried or treated before you buy.
Conclusion: Embrace the Character
Working with wormy wood is one of the most rewarding experiences in woodworking. You get to take a piece of lumber with a rich story and give it a new life. What was once seen as a flaw becomes the wood’s most beautiful feature.
By following these simple, safe steps, you can feel totally confident using wormwood in your projects. From proper inspection and treatment to stabilizing and finishing, you now have the skills to handle it like a pro. Don’t be afraid of a few holes. Embrace them, highlight them, and build something that is not only beautiful but also completely unique. Now get out to the workshop and create something amazing!