Table Saw Extensions Do It Yourself: Easy DIY Tips
Table saw extensions can be easily built by yourself to increase the cutting capacity and versatility of your table saw. We will explore some DIY table saw extension options that you can consider to enhance your woodworking projects.
Whether you need more workspace, improved cross-cutting ability, or support for large materials, these DIY extensions can help you tailor your table saw to meet your specific needs. From simple plywood extensions to advanced folding designs, we will discuss various techniques and materials that you can use to create your own table saw extensions.
Discover how you can save money and customize your woodworking setup by adding these do-it-yourself table saw extensions.
Types Of Table Saw Extensions
Looking to amp up your table saw with DIY extensions? There are various types of table saw extensions, including outfeed tables, router tables, and home-built alternatives. These extensions can enhance your workspace, increase cutting capacity, and improve precision for all your woodworking projects.
Table saw extensions are a great way to increase the functionality and versatility of your table saw. Whether you’re a DIY enthusiast or a professional woodworker, table saw extensions can enhance your woodworking experience. In this article, we will explore two types of table saw extensions: Fence Extensions and Outfeed Extensions.
Fence Extensions
Fence extensions are a valuable addition to your table saw setup. They extend the length of the fence, allowing you to handle larger materials with ease and precision. With fence extensions, you can comfortably work on larger projects without the worry of material support or alignment issues.
Table 1: Popular Fence Extension Brands
| Brand | Features |
|---|---|
| Biesemeyer | Heavy-duty construction, accurate alignment, and smooth operation. |
| Delta | Easy installation, adjustable length, and reliable performance. |
| Vega | Highly durable, great value for money, and compatible with various table saw models. |
Whether you choose Biesemeyer, Delta, or Vega, a fence extension will provide you with added convenience and precision during your woodworking projects.
Outfeed Extensions
Outfeed extensions are another type of table saw extension that serves a crucial role in supporting longer workpieces. These extensions provide additional space behind the saw, enabling you to safely and securely handle large and heavy materials. By preventing the workpiece from falling off the table, outfeed extensions ensure accurate cuts and enhance safety.
Unordered List: Benefits of Outfeed Extensions
- Stability and support for longer workpieces.
- Improved safety during cutting operations.
- Prevention of material waste due to accidental falls.
- Consistent and precise cuts.
If you frequently work with long boards or sheet materials, an outfeed extension is a must-have accessory for your table saw. It will make your woodworking projects more efficient and enjoyable.
In conclusion, fence extensions and outfeed extensions are two common types of table saw extensions that can significantly enhance your woodworking experience. Whether you need extra support for handling larger materials or require additional space to work with long boards, these extensions are essential tools for any woodworker. Choose the right extensions that suit your needs and enjoy the added convenience and precision they bring to your table saw setup.
Materials And Tools Needed
When it comes to building a table saw extension, having the right materials and tools is crucial for a successful project. By choosing the right materials and essential tools, you can ensure that your table saw extension is sturdy, durable, and provides the functionality you need. Here’s a look at what you’ll need to get started.
Choosing The Right Materials
When choosing materials for your table saw extension, it’s important to consider both the strength and weight of the material. Plywood is a popular choice due to its affordability, ease of handling, and stability. However, for a more heavy-duty extension, MDF (medium-density fiberboard) or melamine can be used. These materials offer excellent durability and a smooth surface for smooth cuts.
Essential Tools For The Project
Before you start building your table saw extension, make sure you have the essential tools on hand. Circular saw or table saw, tape measure, drill, screws, level, and clamps are some of the basic tools you’ll need for cutting, measuring, and assembling the extension. Additionally, safety goggles and ear protection are vital for ensuring a safe working environment.
Step-by-step Guide
Are you looking to enhance your table saw’s capabilities with DIY extensions? In this step-by-step guide, we will walk you through the process of creating and attaching your own table saw extension.
Measuring And Cutting The Extension
Measure the dimensions of the desired extension for your table saw.
Use a table saw to carefully cut the extension to the correct size.
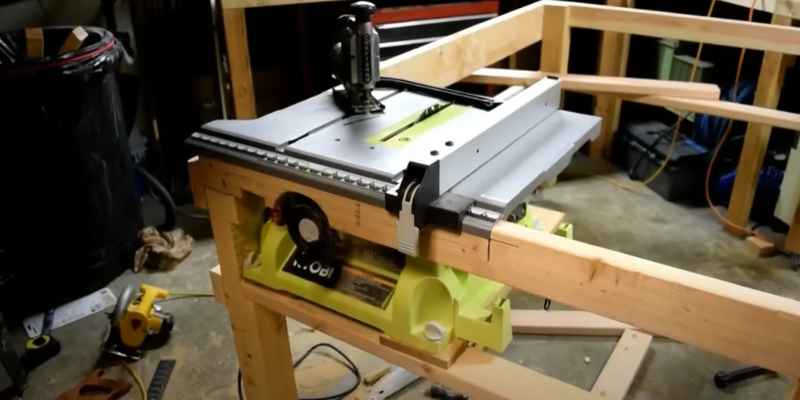
Attaching The Extension To The Table Saw
Securely fasten the extension to the table saw using screws.
Ensure the extension is level and aligned with the table saw surface.
Safety Precautions
When working with table saw extensions, it is crucial to prioritize safety precautions to ensure a secure and accident-free working environment. By adhering to safety best practices, you can significantly reduce the risk of injuries and mishaps. Let’s delve into the essential safety measures that need to be implemented when working with table saw extensions.
Wearing Safety Gear
Before beginning any woodworking task with a table saw extension, always wear appropriate safety gear. This includes protective eyewear, ear protection, and a dust mask to shield yourself from potential hazards such as flying debris, loud noise, and sawdust inhalation. Additionally, ensure that all clothing and accessories are secure and devoid of loose ends to prevent entanglement with the saw.
Maintaining A Clean And Organized Workspace
A clean and organized workspace is fundamental for safe operation with a table saw extension. Remove any potential tripping hazards, clear away clutter, and keep the area around the saw clear of debris. Also, ensure that the saw blade is unobstructed, and the feed path is free from obstacles or debris that could cause kickback during operation. Implement a regular cleaning routine to prevent sawdust buildup and maintain a clear line of sight for safe and precise cutting.
Tips For Customization
When it comes to table saw extensions, customization is key. By personalizing your table saw extension, you can create a setup that perfectly suits your woodworking needs. In this article, we will provide you with some valuable tips for customizing your table saw extension. From adding T-tracks for accessories to incorporating dust collection features, these tips will help you maximize the functionality and convenience of your extension.
Adding T-tracks For Accessories
Adding T-tracks to your table saw extension gives you the flexibility to easily attach and adjust various accessories. With T-tracks installed, you can effortlessly mount featherboards, fence stops, hold-down clamps, and other accessories to enhance your woodworking capabilities.
To add T-tracks, follow these simple steps:
- Measure and mark the desired location for the T-tracks on your table saw extension.
- Drill pilot holes at the marked locations to ensure accurate placement.
- Using screws or bolts, secure the T-tracks onto the extension.
- Ensure that the T-tracks are level and flush with the surface of the extension for smooth operation.
Incorporating Dust Collection Features
Dust collection is an essential aspect of any woodworking setup, and incorporating dust collection features into your table saw extension helps maintain a clean and safe working environment. By effectively capturing sawdust and debris, you can reduce the amount of airborne particles and keep your workspace organized.
Consider the following options for incorporating dust collection into your table saw extension:
- Attach a dust collection port to the back or side of the extension, allowing the sawdust to be conveniently collected and directed into a separate dust collection system.
- Create a dust chute beneath the extension, connecting it to a dust collection system. This setup efficiently captures sawdust as it falls, minimizing cleanup and maximizing safety.
- Install a dust hood above the blade, designed to capture dust directly from the source. This feature can significantly reduce the amount of sawdust that escapes into the surrounding area.
By incorporating dust collection features into your table saw extension, you can work more efficiently and maintain a cleaner workspace.
Enhancing Accuracy And Precision
When it comes to woodworking, accuracy and precision are crucial. Even the smallest measurement error can lead to disastrous results in a project. That’s where table saw extensions do it yourself come into play. These extensions not only increase the working area of your table saw but also enhance the accuracy and precision of your cuts.
Calibrating The Extension With The Saw Blade
Calibrating the extension with the saw blade is the first step to ensure accurate and precise cuts. Start by adjusting the height of the saw blade to match the height of the extension. This will ensure that the saw blade and the extension form a seamless surface, reducing any chances of misalignment.
Once you have adjusted the height, make sure that the extension is parallel to the saw blade. You can use a measuring tape or a square to check for alignment. If the extension is not parallel, you can tighten or loosen the bolts to make the necessary adjustments.
Checking For Squareness
Squareness is essential for precise cuts, especially when working with angled cuts or joinery. To check for squareness, use a carpenter’s square and place it against the saw blade and the extension. If the square fits perfectly against both surfaces, then your extension is square with the blade.
If the square doesn’t fit snugly against either surface, you’ll need to make adjustments. Loosen the bolts holding the extension in place and use shims or other leveling tools to bring it into square. Tighten the bolts once you achieve the desired squareness.
By ensuring the extension is calibrated with the saw blade and checking for squareness, you will greatly enhance the accuracy and precision of your table saw. These simple yet crucial steps will prevent measurement errors, reduce wastage of materials, and ultimately result in flawless woodworking projects.
Final Touches And Testing
Applying A Protective Finish
Before proceeding to test the extension, it is crucial to apply a protective finish to ensure longevity.
Testing The Extension For Functionality
Test the table saw extension to guarantee it functions as intended for accurate cuts.
Frequently Asked Questions Of Table Saw Extensions Do It Yourself
What Are The Benefits Of Building Diy Table Saw Extensions?
DIY table saw extensions offer increased cutting capacity, improved stability, and cost savings compared to purchasing pre-made extensions. By customizing the extensions, woodworkers can tailor them to their specific needs and create a more personalized work area.
How Do Table Saw Extensions Enhance Woodworking Projects?
Table saw extensions provide additional support for large workpieces, enabling more precise cuts and greater flexibility in handling various materials. They also contribute to improved safety by reducing the risk of kickback and enhancing overall stability during cutting tasks.
What Materials Are Suitable For Constructing Table Saw Extensions?
When building table saw extensions, sturdy materials such as plywood, MDF, or metal are commonly used for durability and stability. Choosing a material that complements the existing saw table and aligns with the specific woodworking requirements is crucial for optimal results and performance.
Conclusion
Creating your own table saw extensions can significantly enhance the functionality and versatility of your woodworking projects. By following the step-by-step instructions provided in this blog post, you can easily create custom extensions that suit your specific needs. Not only will this DIY approach save you money, but it will also allow you to customize the extensions to fit your workshop and projects perfectly.
Give it a try and enjoy the benefits of having extended table saw capabilities for your future woodworking endeavors.