Upgrade Your Home: Mastering the Art of Transitioning Wood Flooring between Rooms
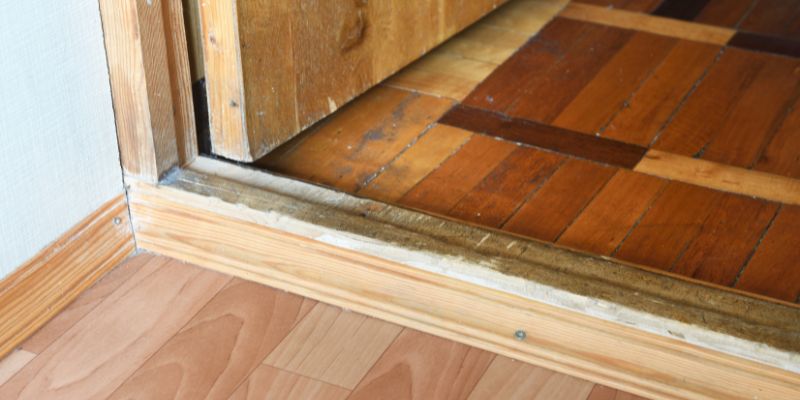
Transitioning wood flooring between rooms can be achieved by using transition strips or thresholds to create a smooth and visually appealing flow. These transition pieces are available in various materials and styles to complement the wood flooring and facilitate a seamless transition from one room to another.
When transitioning wood flooring between rooms, it is essential to consider factors such as the difference in floor heights, the expansion and contraction of the wood, and the overall aesthetic of the space. The transition strips or thresholds can be installed during the initial flooring installation or added later to provide a cohesive and functional transition between different flooring types or rooms.
We will explore different methods and options for transitioning wood flooring between rooms, providing practical tips for achieving a seamless and professional finish.
Understanding Wood Flooring Transitions
One of the key aspects of a well-designed interior space is the seamless flow between rooms. When it comes to transitioning wood flooring between rooms, there are various options to consider. In this article, we will delve into the different types of wood flooring transitions and provide guidance on choosing the right transition method for your space.
Different Types Of Wood Flooring Transitions
When transitioning wood flooring between rooms, there are several methods that can be used. Each method offers its own unique advantages and aesthetic appeal. Below, we explore some of the most commonly used types of wood flooring transitions:
Choosing The Right Transition Method
While it may seem like a simple task, choosing the right transition method for your wood flooring can make a significant difference in the overall look and feel of your space. Here are some factors to consider when selecting a transition method:
- Thickness and Height: Before deciding on a transition method, it is crucial to consider the thickness and height difference between the two rooms. This will determine the type of transition that can be installed without causing any tripping hazards or visual inconsistencies.
- Room Functionality: Consider the functionality of the rooms involved. For example, if you are transitioning from a bathroom to a hallway, you may opt for a water-resistant transition method to prevent water damage.
- Design Cohesion: Ensure that the transition method you choose complements the overall design and aesthetic of your space. Whether it be a seamless transition or a contrasting transition, it should enhance the visual appeal of your flooring.
- Budget and Maintenance: Take into account your budget and the maintenance requirements of different transition methods. Some transitions may require more regular cleaning and care.
In conclusion, understanding wood flooring transitions is crucial to achieve a seamless and aesthetically pleasing interior. By considering factors such as thickness, functionality, design cohesion, budget, and maintenance, you can choose the right transition method for your wood flooring, ensuring a smooth and visually appealing transition between rooms.
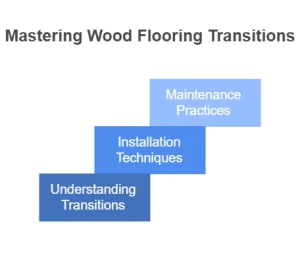
Installation And Techniques
When transitioning wood flooring between rooms, the installation and techniques employed can make a significant difference in the overall aesthetics and functionality of the space. It is crucial to pay careful attention to detail in order to achieve seamless transitions, both visually and structurally. In this section, we will explore three essential aspects of installing wood flooring transitions: preparing the subfloor, installing transition pieces, and blending and matching the wood flooring.
1. Preparing The Subfloor
Before installing any wood flooring transitions, it is essential to ensure that the subfloor is properly prepared. This preparation process involves several crucial steps:
- Inspect the subfloor: Begin by thoroughly examining the subfloor for any signs of damage, such as cracks, unevenness, or moisture issues. Address any problems before proceeding with the installation.
- Clean and level the subfloor: Remove any dirt, debris, or old flooring material from the subfloor. Use a leveling compound to correct any unevenness in the surface, as this will help prevent future issues with the transition pieces.
- Check the height difference: Measure the height difference between the two floors where the transition will be placed. This measurement will help determine the type and size of transition pieces required for a smooth and level transition.
2. Installing Transition Pieces
Transition pieces play a crucial role in seamlessly linking different wood flooring areas. Directly installing the pieces between the rooms requires careful consideration and precise execution. Here are some key steps to follow:
- Measure and cut the transition pieces: Take accurate measurements of the width required for each transition piece, ensuring a snug fit. Use a miter saw or a hand saw to make precise cuts.
- Apply adhesive: Apply an appropriate flooring adhesive to the underside of the transition piece. Ensure the adhesive covers the entire surface that will come into contact with the subfloor.
- Position and secure the transition piece: Carefully position the transition piece in place, aligning it with the edge of each wood floor. Apply gentle pressure and use a rubber mallet or a tapping block to secure it firmly into place.
- Allow time for the adhesive to set: After installing the transition pieces, allow sufficient time for the adhesive to cure and set, as per the manufacturer’s instructions. This will ensure a secure and stable installation.
3. Blending And Matching Wood Flooring
To create a harmonious transition between different wood flooring areas, it is essential to blend and match the materials effectively. Here are a few strategies to achieve a seamless integration:
- Select the right wood species: Choose wood species that complement each other in color, grain, and overall appearance. Consider the existing flooring in both rooms and aim for a coordinated look.
- Ensure consistent plank size: Keep the plank size consistent across the transition area to maintain visual continuity. This consistency minimizes abrupt changes in pattern and gives a cohesive flow to the space.
- Use similar finishing techniques: Apply the same finishing techniques, such as staining or sanding, to both wood flooring sections. This will help achieve a cohesive look, even if there are subtle differences in the wood species.
Maintaining And Caring For Wood Flooring Transitions
Wood flooring transitions can add both beauty and functionality to your home. These transitions not only connect your different rooms seamlessly but also protect the edges of your wood flooring from wear and tear. To ensure your transitions stay in top shape for years to come, it is essential to maintain and care for them properly. In this blog post, we will discuss three essential aspects of maintaining and caring for wood flooring transitions: regular cleaning and maintenance, dealing with scratches and damage, and refinishing wood flooring transitions.
Regular Cleaning And Maintenance
Regular cleaning and maintenance play a crucial role in preserving and enhancing the appearance of your wood flooring transitions. By following these simple yet effective strategies, you can keep your transitions in optimal condition:
- Use a soft-bristle broom or vacuum with a wood floor attachment to remove dust, dirt, and debris from the transitions. It is important to clean the transitions regularly to prevent scratches and damage caused by abrasive particles.
- Damp mop the transitions using a well-wrung mop or microfiber cloth. Avoid excessive water, as it can cause warping and swelling of the wood. Instead, use a specialized wood floor cleaner or a mixture of water and mild detergent.
- Immediately wipe up any spills or liquids that come into contact with the transitions. Liquids can penetrate the wood and cause staining or damage if left unattended.
- Place mats or rugs at entryways and high-traffic areas to minimize dirt and moisture from reaching the transitions. Make sure these mats are non-slip and have a breathable backing to prevent moisture entrapment.
Dealing With Scratches And Damage
Over time, it is natural for wood flooring transitions to develop scratches and minor damage. However, you can effectively deal with these issues to maintain the overall appearance of your transitions:
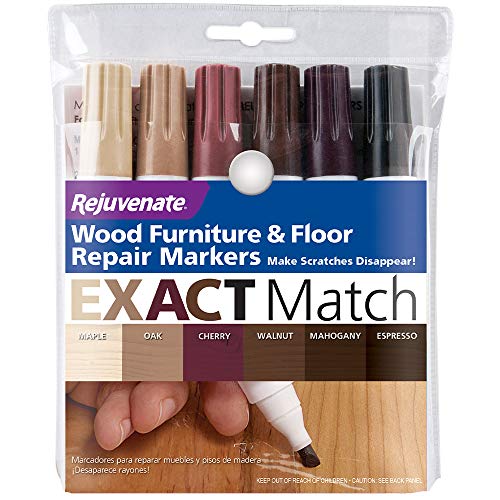
- Fill in small scratches using a specialized wood touch-up marker or filler. Choose a shade that matches your wood flooring transitions for a seamless repair.
- Avoid using harsh cleaning chemicals or abrasive cleaners, as they can strip away the protective finish of the transitions and exacerbate scratches or damage.
- If the damage is more severe, consider consulting a professional wood flooring contractor who can repair or replace the affected transitions with precision.

Refinishing Wood Flooring Transitions
Regular refinishing of wood flooring transitions is an important step in their long-term care. Refinishing not only restores the beauty of the transitions but also provides additional protection against wear and tear. Here are some essential steps to follow when refinishing your wood flooring transitions:
- Clean the transitions thoroughly by removing any dirt, dust, or residue using a wood floor cleaner.
- Lightly sand the transitions to remove the existing finish and create a smooth surface. Be careful not to sand too deeply, as it can damage the wood.
- Apply a suitable wood floor finish using a brush or applicator pad. Follow the manufacturer’s instructions for the recommended drying and curing time.
- After the finish has fully cured, ensure proper ventilation of the room and avoid placing heavy furniture or rugs on the transitions for a few days.
By adhering to these maintenance and care guidelines, you can ensure that your wood flooring transitions remain beautiful, functional, and long-lasting. Whether it’s regular cleaning, addressing scratches, or refinishing, proper care will enhance the appearance of your transitions, keeping them a standout feature in your home.
Frequently Asked Questions Of Transitioning Wood Flooring Between Rooms
How Do You Transition Hardwood Floors From One Room To Another?
To transition hardwood floors from one room to another, use a transition strip or molding that matches the flooring. Install it between the two rooms, ensuring a smooth and seamless transition.
Should You Change Direction Of Hardwood Flooring Between Rooms?
Yes, it is recommended to change the direction of hardwood flooring between rooms. Doing so can create visual separation and enhance the overall aesthetic appeal of your space.
Do You Need Transition Strips Between Rooms With Same Flooring?
Transition strips are not necessary between rooms with the same flooring. The consistent flooring creates a seamless flow and eliminates the need for transition strips.
How Do You Transition Flooring Between Rooms With Different Heights?
To transition flooring between rooms with different heights, you can use transition strips or molding. These materials create a smooth and seamless transition, ensuring a safe and visually appealing result. Choose the appropriate type of strip based on your flooring materials for a precise fit.
Conclusion
To seamlessly transition wood flooring between rooms, it is crucial to consider various factors such as the design aesthetic, functionality, and overall flow of the space. By choosing the right transition methods, whether it’s through thresholds, molding, or even color coordination, you can create a harmonious and visually appealing transition.
Remember to also consider practical aspects like the type of wood and maintenance requirements. With the right approach, you can achieve a flawless and cohesive look throughout your home.